![]()
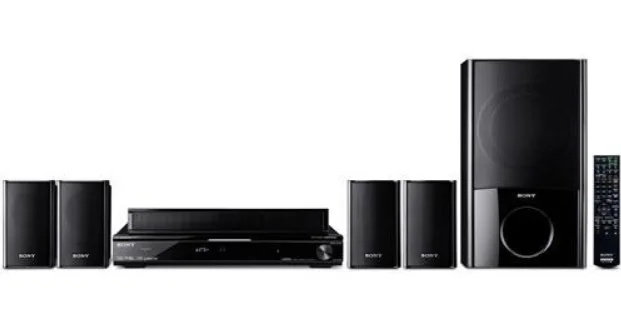
Sony HT-SF360 Home Theater System
Important Safety Instructions
- Follow all instructions.
- Do not use this apparatus near water.
- Clean only with a dry cloth. Do not block any ventilation openings. Install in accordance with the manufacturer’s instructions.
- Do not install near any heat sources such as radiators, heat registers, stoves, or other apparatus (including amplifiers) that produce heat.
- Do not defeat the safety purpose of the polarized or grounding-type plug. A polarized plug has two blades with one wider than the other. A grounding type plug has two blades and a third grounding prong. The wide blade or the third prong is provided for your safety. If the provided plug does not fit into your outlet, consult an electrician for replacement of the obsolete outlet.
- Protect the power cord from being walked on or pinched, particularly at plugs, convenience receptacles, and the point where they exit from the apparatus.
- Only use attachments/accessories specified by the manufacturer.
- Use only with the cart, stand, tripod, bracket, or table specified by the manufacturer, or sold with the apparatus. When a cart is used, use caution when moving the cart/apparatus combination to avoid injury from tip-over.
- Unplug this apparatus during lightning storms or when unused for long periods of time.
- Refer all servicing to qualified service personnel. Servicing is required when the apparatus has been damaged in any way, such as power-supply cord or plug is damaged, liquid has been spilled or objects have fallen into the apparatus, the apparatus has been exposed to rain or moisture, does not operate normally, or has been dropped.
CAUTION
You are cautioned that any changes or modifications not expressly approved in this manual could void your authority to operate this equipment.
To reduce the risk of electric shock, the speaker cord should be connected to the apparatus and the speakers in accordance with the following instructions.
- Disconnect the AC power cord from the MAINS.
- Strip 10 to 15 mm of the wire insulation from the speaker cord.
- Connect the speaker cord to the apparatus and the speakers carefully so as not to touch the core of the speaker cord by hand. Also, disconnect the AC power cord from the MAINS before disconnecting the speaker cord from the apparatus and the speakers.
Description and location of parts
Front panel
- On/standby: Press to turn the receiver on or off.
- ACTIVE STANDBY lamp: Lights up in amber when the Control for HDMI and/or S-AIR standby mode is set to on and the receiver is in standby mode.
- Display: The current status of the selected component or a list of selectable items appears here.
- White lamp: Lights up when the receiver is on and DSPL is set to on in the DISPLAY function. Lights off when the receiver is in standby mode or DSPL is set to off in the DISPLAY function.
- Remote sensor: Receives signals from the remote commander.
- MASTER VOLUME: Turn to adjust the volume level of all speakers at the same time.
- INPUT SELECTOR: Press to select the input source to playback.
Indicators on the display
- LFE: Lights up when the disc being played back contains an LFE (Low Frequency Effect) channel and the LFE channel signal is actually being reproduced.
- SLEEP: Lights up when the sleep timer is activated.
- Playback channel indicators: The letters (L, C, R, etc.) indicate the channels being played back. The boxes around the letters vary to show how the receiver downmixes the source sound. L, Front Left, R, Front Right, C, Center (monaural), SL, Surround Left, SR, Surround Right, S, Surround (monaural or the surround components obtained by Pro Logic processing). Example: Recording format (Front/Surround): 3/2.1 Sound Field: A.F.D. AUTO
- D: Lights up when the receiver is decoding Dolby Digital signals. Note: When playing a Dolby Digital format disc, be sure that you have made digital connections.
- S-AIR (KS360S only): Lights up when the S-AIR transmitter (not supplied) is connected.
- HDMI: Lights up when a playback component is connected to this receiver using an HDMI jack.
- Preset station indicators: Light up when using the receiver to tune in to radio stations you have preset.
- Tuner indicators: Light up when using the receiver to tune in to radio stations, etc.
- COAX: Lights up when the source signal is a digital signal being input through the COAX IN jack.
- OPT: Lights up when the source signal is a digital signal being input through the OPT IN jack.
- PL/PLII: PL lights up when the receiver applies Pro Logic processing to 2-channel signals in order to output the center and surround channel signals. PLII lights up when the Pro Logic II Movie/Music decoder is activated.
- DTS: Lights up when the receiver is decoding DTS signals. Note: When playing a DTS format disc, be sure that you have made digital connections.
- SW: Lights up when the audio signal is output from the SUBWOOFER jack.
Rear panel
SPEAKERS section
Connects to the supplied speakers and subwoofer.
S-AIR (EZW-T100)
CAUTION: Please do not remove the slot cover until you want to install the wireless transmitter.
Connects to a wireless transmitter (not supplied).
DMPORT
DMPORT jack: Connects to a DIGITAL MEDIA PORT adapter.
AUTO CALIBRATION section
AUTO CAL MIC jack: Connects to the supplied optimizer microphone for the Auto Calibration function.
AUDIO INPUT section
AUDIO IN jacks: Connects to a Super Audio CD player, CD player, etc.
DIGITAL INPUT/OUTPUT section
- OPT IN jacks: Connects to a DVD player, etc.
- COAX IN jack: The COAX IN jack provides a better sound quality.
- HDMI IN/OUT jacks: Connects to a DVD player, satellite tuner, or Blu-ray disc player. The image is output to a TV or a projector, while the sound can be output from a TV or speakers connected to this receiver.
ANTENNA section
FM ANTENNA jack: Connects to the supplied FM wire antenna.
AM ANTENNA terminals: Connects to the supplied AM loop antenna.
Remote commander
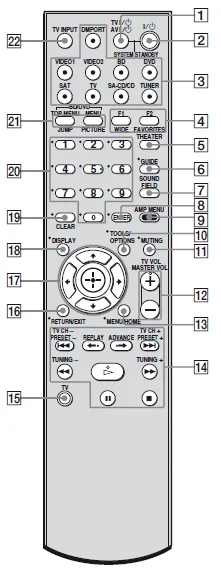
You can use the supplied remote RM-AAU057 to operate the receiver and to control the Sony audio/video components that the remote is assigned to operate (page 60).
RM-AAU057
- TV, AV (on/standby): Press to turn on or off the Sony audio/video components that the remote is assigned to operate. Press (on/standby) and TV/AV (on/standby) at the same time to turn off the receiver and all other components that the remote is assigned to operate (SYSTEM STANDBY).
- On/standby: Press to turn the receiver on or off. To turn off all Sony components, press (on/standby) and AV (on/standby) (1) at the same time (SYSTEM STANDBY). Saving the power in standby mode: When “CONTROL FOR HDMI” is set to “CTRL ON” and “P.SAVE” is set to “SAVE ON”. When S-AIR standby “STBY” is set to “STBY OFF”.
- Input buttons: Press one of the buttons to select the component you want to use. The buttons are factory-assigned to control Sony components.
- FAVORITES: To display the stored favorites. WIDE: To select the wide picture mode.
- THEATER: Press to set the optimal picture settings automatically for watching movies when you connect a Sony TV that is compatible with the THEATER button. Also, the audio is automatically switched to the audio output of this receiver when you connect the TV and the receiver with an HDMI connection, and the Control for HDMI function is set to on.
- GUIDE: Press to display the guide when you are watching analog and digital channels.
- SOUND FIELD: Press to select a sound field.
- ENTER: Press to enter the selection.
- AMP MENU: Press to display the menu of the receiver.
- TOOLS/OPTIONS: Press to enable you to access various viewing options and change/make adjustments according to the source and screen format.
- MUTING: Press to turn off the sound temporarily. Press MUTING again to restore the sound.
- MASTER VOL: Press to adjust the volume.
- MENU/HOME: Press to display the menu.
- PRESET +/–: Press to select a preset station. TUNING +/–: Press to scan the station. (For Tuner Operation).
 : Press to skip the track. Fast forward/reverse: Press to fast reverse or fast forward (For DM Port).
 - Press and hold (15) the TV (yellow) button while pressing the buttons with a yellow dot or yellow printing to control the TV.
- RETURN/EXIT: Press to return to the previous screen of any displayed menu.
 :Sony STR-KS360 Home Theater AV Receiver-6
- DISPLAY: Press to display the information during the Tuner function.
- CLEAR: Press to clear a mistake when you input a wrong character.
- Numeric buttons (number 5*): Press to select channels and tracks directly.
- BD/DVD TOP MENU, MENU: Press to display the top menu or disc menu. JUMP: To select the previous and the current channels of the TV, Satellite tuner, Blu-ray disc recorder, and DVD player. PICTURE: To cycle through the available picture modes of the TV.
- TV INPUT: Press to select input.
Note:
- Some functions explained in this section may not work depending on the model.
- The above explanation is intended to serve as an example only. Therefore, depending on the component, the above operation may not be possible or may operate differently than described.
Getting Started
Installing the speakers
This receiver allows you to use a 5.1 channel speaker system. To fully enjoy theater-like multi-channel surround sound, be sure to connect all the speakers (two front speakers, a center speaker, and two surround speakers) and a subwoofer (5.1 channel).
You can place your speakers as shown below.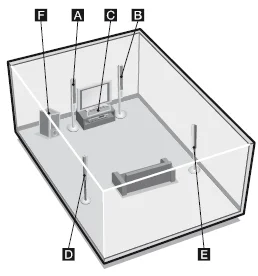
- Front speaker (left)
- Front speaker (right)
- Center speaker
- Surround speaker (left)
- Surround speaker (right)
- Subwoofer
Tip
Since the subwoofer does not emit highly directional signals, you can place it wherever you want.
Installing the speakers on a flat surface
Before you install the speaker and subwoofer, be sure to attach the supplied foot pads to the center speaker and subwoofer to prevent vibration or movement.
Installing the speakers on the speaker stand
For greater flexibility in positioning the speakers, use the supplied speaker stand. For details, refer to the supplied speaker stand installation guide.
Installing the speakers on the wall
You can install your speakers on the wall.
- Prepare screws (not supplied) that are suitable for the hook on the back of each speaker.
- Fasten the screws to the wall. The screws should protrude 7/32 to 9/32 inch.
For the center speaker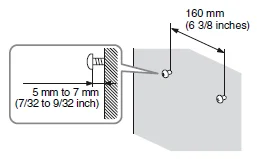
For the front speakers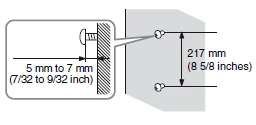
- Hang the speakers on the screws.
Notes
- Use screws that are suitable for the wall material and strength. As a plasterboard wall is especially fragile, attach the screws securely to a beam and fasten them to the wall. Install the speakers on a vertical and flat wall where reinforcement is applied.
- Contact a screw shop or installer regarding the wall material or screws to be used.
- Sony is not responsible for accidents or damage caused by improper installation, insufficient wall strength or improper screw installation, natural calamities, etc.
- If you install the speakers on the wall, you do not need to attach the supplied speaker stand.
Connecting the speakers
Before connecting the cords, be sure to disconnect the AC power cord (mains lead).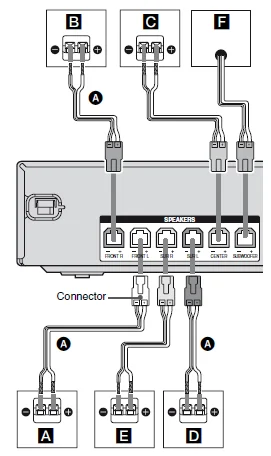
- (A) Speaker cord (supplied
- Front speaker (left)
- Front speaker (right)
- Center speaker
- Surround speaker (left)
- Surround speaker (right)
- Subwoofer
Note on speaker cords
The connectors of the speaker cords are the same color as the speaker jack to be connected. When connecting a speaker cord, be sure to match the colored connector to the speaker jack on the receiver: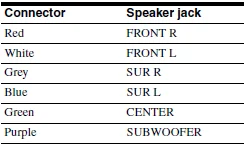
To connect the speakers correctly
Check the speaker type by referring to the speaker label* at the rear panel of the speakers.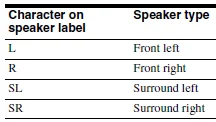
The center speaker and subwoofer do not have the character on the speaker label. For details on the speaker type, see page 4.
Connecting the TV
You can watch the selected input image when you connect the HDMI OUT jack to a TV. It is not necessary to connect all the cords. Connect audio and video cords according to the jacks of your components.
Before connecting the cords, be sure to disconnect the AC power cord.
Notes
- Be sure to turn on the receiver when the video and audio signals of a playback component are being output to a TV via the receiver. Unless the power is turned on, neither video nor audio signals will be transmitted.
- When connecting optical digital cords, insert the plugs straight in until they click into place.
- Do not bend or tie optical digital cords.
Tips
- To output the sound of the TV from the speakers connected to the receiver, be sure to connect the audio output jacks of the TV to the TV IN jacks of the receiver. Turn off the TV’s volume or activate the TV’s muting function.
- All the digital audio jacks are compatible with 32 kHz, 44.1 kHz, 48 kHz, and 96 kHz sampling frequencies.
Connecting the antennas
Connect the supplied AM loop antenna and FM wire antenna.
Before connecting the antennas, be sure to disconnect the AC power cord (mains lead).
Notes
- To prevent noise pickup, keep the AM loop antenna away from the receiver and other components.
- Be sure to fully extend the FM wire antenna.
- After connecting the FM wire antenna, keep it as horizontal as possible.
Preparing the receiver and the remote
Connecting the AC power cord (mains lead)
Connect the AC power cord (mains lead) to a wall outlet.
Performing initial setup operations
Before using the receiver for the first time, initialize the receiver by performing the following procedure. This procedure can also be used to return settings you have made to their factory defaults.
Be sure to use the buttons on the receiver for this operation.
- Press on/standby to turn on the receiver.
- Hold down on/standby for 5 seconds. “CLEARED” appears. All the settings you have changed or adjusted are reset to the initial settings.
Inserting batteries into the remote
Insert two R6 (size-AA) batteries in the RM-AAU057 Remote Commander. Observe the correct polarity when installing batteries.
Notes
- Do not leave the remote in an extremely hot or humid place.
- Do not use a new battery with old ones.
- Do not mix manganese batteries and other kinds of batteries.
- Do not expose the remote sensor to direct sunlight or lighting apparatuses. Doing so may cause a malfunction.
- If you do not intend to use the remote for an extended period of time, remove the batteries to avoid possible damage from battery leakage and corrosion.
- When you replace the batteries, the remote buttons may be reset to their factory settings. If this happens, reassign the buttons again (page 60).
- When the remote no longer operates the receiver, replace all the batteries with new ones.
Calibrating the appropriate settings automatically (AUTO CALIBRATION)
This receiver is equipped with DCAC (Digital Cinema Auto Calibration) Technology, which allows you to perform automatic calibration as follows:
- Check the connection between each speaker and the receiver.
- Adjust the speaker level.
- Measure the distance of each speaker from your listening position.
- Measure the frequency characteristics.
The measurement result is not utilized for signals with a sampling frequency of more than 96 kHz.
The DCAC is designed to obtain proper sound balance in your room. However, you can adjust the speaker levels manually according to your preference. For details, see “8: Adjusting the speaker levels (TEST TONE)” (page 27).
Before you perform Auto Calibration
Before you perform the Auto Calibration, set up and connect the speakers (pages 13, 15).
- The AUTO CAL MIC jack is used for the supplied optimizer microphone only. Do not connect other microphones to this jack. Doing so may damage the receiver and the microphone.
- During the calibration, the sound that comes out of the speakers is very loud. The volume of the sound cannot be adjusted. Pay attention to the presence of children or to the effect on your neighborhood.
- Perform the Auto Calibration in a quiet environment to avoid the effect of noise and to get a more accurate measurement.
- If there are any obstacles in the path between the optimizer microphone and the speakers, the calibration cannot be performed correctly. Remove any obstacles from the measurement area to avoid measurement error.
Notes
- If the muting function has been activated before you perform Auto Calibration, the muting function will be set to off automatically.
- When you use the S-AIR product, disconnect the headphones.
For more Manuals by Sony, visit ManualsLibraryy
Sony HT-SF360 Home Theater System-FAQs
How do I set up my Sony HT-SF360 Home Theater System?
Connect your TV and the Sony HT-SF360 using an HDMI cable via the HDMI ARC/eARC port. On your TV, go to Settings → Display & Sound → Audio Output → eARC Mode → Auto, then select Speakers → Audio System. Turn on the eARC feature for best sound.
How do I connect the Sony home theater system to my TV?
Use the HDMI ARC port on both your TV and the system. Once connected, set the TV’s audio output to “Audio System.” You can also use an optical cable if HDMI is unavailable.
How do I pair the Sony soundbar and subwoofer?
Plug in both the soundbar and subwoofer. They usually connect automatically when powered on. If not, press and hold the PAIRING button on the subwoofer until the indicator flashes, then press the PAIRING button on the soundbar.
How should I place my Sony home theater speakers?
Position the front left and right speakers equally apart from your TV, the center speaker below or above the screen, and the rear speakers slightly behind your seating area for immersive surround sound. Place the subwoofer near a wall or corner for deeper bass.
How do I set up 5.1 surround sound?
Place your five speakers (front left, center, front right, rear left, rear right) around the room, and the subwoofer near the front. Connect each speaker to the correct terminal, then run the auto calibration or sound test from the system menu to balance sound.
How can I access sound settings on my Sony system?
Press the Quick Settings or Home button on your remote, go to Settings → Display & Sound → Audio Settings, and adjust sound modes, bass, treble, or speaker levels as needed.
Does it matter which HDMI port I use?
Yes. Use the HDMI ARC or eARC port on your TV for the best audio quality. Regular HDMI ports will not support full surround sound or return audio from the TV.
How do I improve sound quality on my Sony home theater?
Keep the soundbar or speakers at least 4 inches away from walls or the TV to prevent echo. Use HDMI ARC, enable Dolby Atmos or Surround Mode, and adjust the bass and treble in the settings menu.
How do I reset my Sony HT-SF360 system to factory settings?
Press the MENU button on the remote, scroll to RESET, and select it. When “ALL RESET” appears on the display, press ENTER. Your system will return to its original factory settings.
How can I enhance dialogue clarity?
Enable Voice or Dialogue Mode using the soundbar’s remote or system menu. This boosts mid-range frequencies to make speech in movies and shows easier to hear.


