![]()
Medion MD19161 Car-Motorcycle Battery Charger
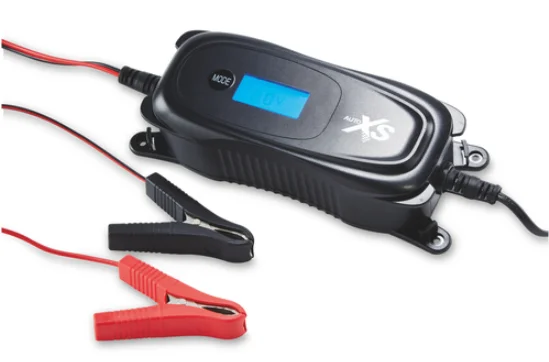
Overview
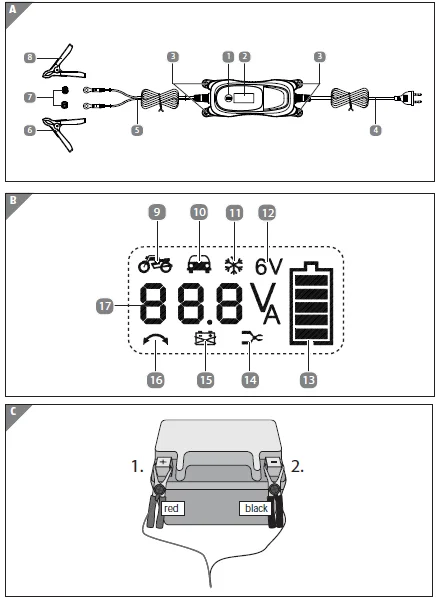
Device parts
- MODE button
- Display
- Fixing holes
- Power cord with plug
- Connection lead with ring terminals
- Negative terminal clamp (black) with connection lead
- Fastening screws
- Positive terminal clamp (red) with connection lead
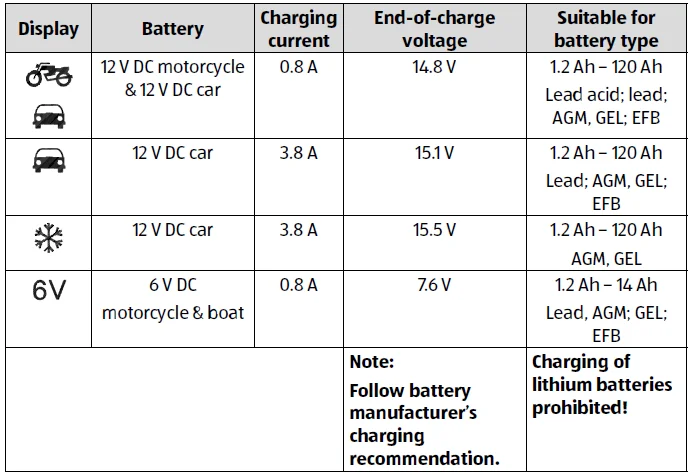
- 12 V / 0.8 A charging mode active – standard charging
- 12 V / 3.8 A charging mode active – fast charging
- 12 V / 3.8 A COLD charging mode active – fast charging at low temperatures
- 6 V / 0.8 A charging mode active – standard charging
- Charging display
- Error display (No battery connected, short circuit)
- Battery faulty
- Error display (clamps connected incorrectly)
- Charging current display/current battery voltage display
Proper use
This device is a charger connected to the input side. It has a trickle charging function. It is suitable for charging and trickle-charging the following rechargeable 6 V or 12 V lead-acid batteries with electrolyte solution or gel, as well as AGM batteries that are used in motor vehicles:
- 6 V: capacity from 1.2 Ah to 14 Ah;
- 12 V: capacity from 1.2 Ah to 120 Ah;
In addition, you can regenerate completely discharged 12 V batteries (regeneration mode).
The device is not suitable for charging lithium batteries for vehicles, motorcycles, or boats.
Use the charger only for charging the types of batteries named in this guide. Under no circumstances may other batteries be charged with this charger.
There is a risk of injury when using other types of batteries, and the charger could be damaged.
Please follow the battery manufacturer’s charging recommendation.
The charger charges batteries automatically in a number of stages and can therefore recharge them to up to around 100% of their capacity.
You can also leave a battery connected to the charger if you are not using it for some time in order to keep it in a charged state.
The device is only intended for private use and not for industrial/ commercial use.
Please note that no liability will be accepted if the device is used for an improper purpose:
- Do not modify the device without our express agreement, and do not use any accessories that have not been supplied or approved by us.
- Only use replacement parts or accessories that we have supplied or approved.
- Observe all the information in these operating instructions, especially the safety information. Any other use is deemed improper and might cause personal injury or damage to property.
- Do not use the device in areas where there is a risk of explosion. This includes, for example, fuel pumps, fuel storage areas, or areas in which corrosive agents are processed. This device should also not be used in areas where the air is contaminated with particles (e.g., flour or sawdust).
- Do not expose the device to extreme conditions. Avoid:
- high humidity or wet conditions,
- extremely high or low temperatures,
- direct sunlight,
- naked flame.
Safety information
DANGER!
Risk of injury!
Risk of injury for people with reduced physical, sensory, or mental capacity (for example, partially disabled people or older persons with impaired physical and mental capacity) or with a lack of experience and/or knowledge (for example, older children).
- Keep the device and its accessories out of the reach of children.
- This device can be used by children 8 years and older and by people with reduced physical, sensory, or mental capacity or with a lack of experience and/or knowledge, but only under proper supervision or if they have been instructed on how to use the device safely and have understood the risks involved.
- Children must not be allowed to play with the device.
- Do not allow children to clean the device or carry out user maintenance tasks on it unless they are over 8 years of age and properly supervised.
- Children under 8 years of age should not be allowed near the device and its connection lead.
- Do not store any of the packaging material used (bags, polystyrene, etc.) within the reach of children.
- Do not allow children to play with the packaging.
- Never leave the charger unattended while it is in use.
Risk of electric shock/short circuit
There is a risk of electric shock/short circuit due to live parts.
- Only connect the device to a properly installed and easily accessible power point close to the place where you have set up the device. The local mains voltage must correspond to the technical specifications for the device.
- The power outlet must be easily accessible so that you can unplug the device from the power quickly if necessary.
- Switch off the power point and unplug the device after each use, before cleaning, and if it is not being supervised.
- Always pull on the plug, not the power cord.
- Make sure that the power cord does not come into contact with hot objects or surfaces (e.g, hotplate).
- Do not operate the device if the device or the power cord shows signs of damage or if the device has been dropped.
- In the event of a storm, devices connected to the power grid can be damaged. For this reason, you should always switch off the power point and pull out the plug if there is a storm.
- Before using it for the first time and after each use, check the device and the power cord for damage.
- Unwind the power cord completely.
- Do not kink or pinch the power cord.
- Contact the Service Centre without delay if the device has been damaged during transport.
- Do not, under any circumstances, make any unauthorised modifications to the device or try to open a component and/or repair it yourself.
- Only have the power cord repaired by a suitably qualified workshop, or contact Customer Service in order to avoid hazards.
- Always switch off the power point and unplug the device before cleaning or servicing it.
Charging
WARNING!
Explosion hazard!
Improper handling of the charger can lead to sparking and can trigger an explosion.
Gaseous hydrogen can escape from the battery during the charging and discharging process. Contact with open flame will cause a highly explosive oxyhydrogen reaction.
- Please follow the manufacturer’s charging recommendations.
- Take note of the charging specifications of the battery.
- Only use types of batteries suited to the charger.
- Always ensure adequate ventilation.
- Carry out charging and discharging in a weatherproof space with good ventilation.
- In addition, ensure that there is no naked flame present during charging and discharging (flame, embers, or sparks).
- Do not smoke in the immediate vicinity of the charger.
- Do not store any explosive or flammable substances, e.g., petrol or solvents, nearby that could ignite while using the charger.
- Make sure when using cords and electrical devices that no sparking or electrostatic discharge occurs.
Handling rechargeable batteries
WARNING!
Chemical burns hazard!
Battery acid is highly corrosive.
- Use acid-proof safety gloves, clothing, and eye protection.
- Do not turn batteries over because acid can leak out of the degassing vents.
- If a cell is leaking, the fluid must not come into contact with skin or eyes. If you nevertheless come into contact with the fluid, the area affected must be rinsed with plenty of water. Immediately seek medical attention.
Wall mounting
The device has fixing holes so that you can mount it on the wall.
WARNING!
Electric shock hazard!
There is a risk of electric shock due to live parts in the device.
- Always switch off the power point and pull out the plug 4 before carrying out assembly and maintenance work or cleaning the device.
There is a risk of electric shock from live wires.
- Do not drill into concealed areas in which electrical wires or gas, or water pipes may be located. Use the appropriate locating devices to detect wires and pipes.
- Choose a suitable place on the wall. Ensure adequate ventilation.
- Select four wall plugs and screws suitable for the size of the fastening holes 3.
- Mark the location of the holes on the wall.
- Drill four holes and insert the wall plugs.
- Screw the device in place firmly.
Operation
Take the product out of the packaging and dispose of all the packaging material as well as the protective display film.
Connect the charger to the battery
The charger detects the type of 6 V or 12 V battery automatically.
WARNING!
Electric shock hazard!
There is a risk of electric shock due to live parts in the device.
- Always switch off the power point and pull out the plug 4 before you attach or remove the connection clamps on the battery.
Before you disconnect a motor vehicle or motorcycle battery, first consult the vehicle operating instructions to inform yourself about the possible consequences of disconnecting the battery.
- If the battery that you wish to charge is connected to the vehicle, first disconnect the vehicle’s negative terminal connection lead (black) from the negative terminal of the battery before charging or discharging. The negative terminal of the battery is generally attached to the vehicle’s body.
- Then disconnect the vehicle’s positive terminal connection lead (red) from the positive terminal of the battery.
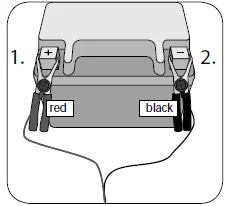
- Then connect the positive terminal clamp (red) 8 of the charger to the positive terminal of the battery, and after that, the negative terminal clamp (black) 6 to the battery’s negative terminal, away from the battery and the fuel line.
- Connect the power cord 4 of the battery charger to a mains power point.

You can unscrew the clamps from the battery charger in order to connect it securely to the battery using the ring cable lugs, for example, for trickle charging in winter.
Select charging mode
Select a charging mode depending on the type of battery and ambient temperature. You can also recharge a completely discharged (deeply discharged) battery (Page 25).
After connecting the battery, the electronics in the charger start the charging process in 6 V or 12 V standard charging mode, depending on the type of battery.
- To select a charging mode, press the MODE 1 button several times. The symbol for the particular mode and the charging current are shown on display 2.
- The charger identifies the 6 V or 12 V standard charging mode suited to the type of battery. For this reason, not every mode can be selected for every battery.
- After a mode has been selected, the charger runs it. The display will show the current battery voltage. If a battery remains connected to the charger after complete charging, the charger automatically switches to trickle charging. The battery is still charged by trickle charging even if another mode is selected.
Status display
- When the device is switched on, the background lights up blue.
- During the charging process, the selected charging mode, the current battery voltage, and the charging level of the battery are displayed.
- If there is a malfunction (e.g., due to a short circuit), error symbols are displayed and the device switches to standby mode (see also “Reverse polarity protection” on page 27).

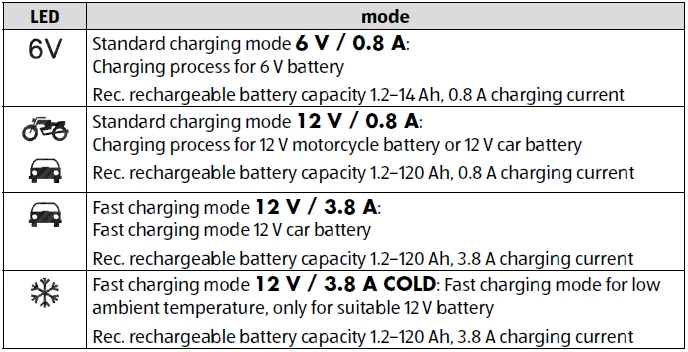
Charging mode 6 V / 0.8 A (batteries 6 V to max. 14 Ah)
The rating plate on your battery will tell you what type it is. Follow the battery manufacturer’s charging recommendation.
Normally, the charger identifies the 6 V standard charging mode suited to the type of battery. If the battery is not recognised, proceed as follows:
- Set this mode to charge 6 V batteries with a capacity of less than 14 Ah.
- Press the MODE button 1 several times to select 6 V / 0.8 A.
The 12 symbol appears on display 2.
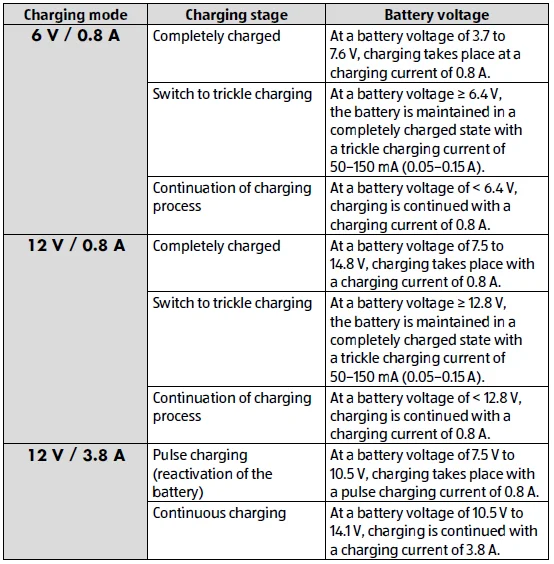
If you do not subsequently set a different mode, the electronics will automatically start the charging process at a charging current of approximately. 0.8 A.
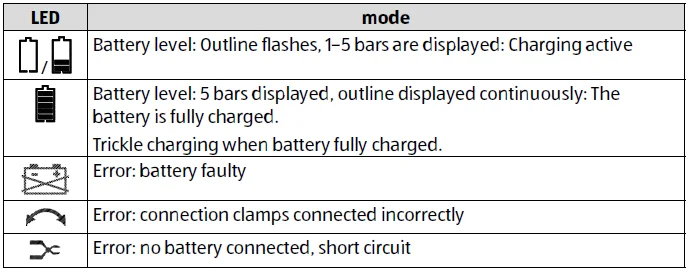
When the battery is completely charged, the outline around the battery symbol 13 stops flashing, and the entire battery lights up continuously. Trickle charging takes place in this state.
Charging mode 12 V / 0.8 A (batteries 12 V to max. 120 Ah)
The rating plate on your battery will tell you what type it is. Follow the battery manufacturer’s charging recommendation.
Normally, the charger identifies the 12 V standard charging mode suited to the type of battery. If the battery is not recognised, proceed as follows:
- Set this mode to charge batteries with a capacity of less than 120 Ah.
- Press the MODE button 1 several times to select 12 V / 0.8 A.
The 9 and 10 symbols appear on display 2.
If you do not subsequently set a different mode, the electronics will automatically start the charging process at a charging current of approximately. 0.8 A.
When the battery is completely charged, the outline around the battery symbol 13 stops flashing, and the entire battery lights up continuously. Trickle charging takes place in this state.
12 V / 3.8 A charging mode (fast charging for 12 V batteries from 1.2 Ah to 120 Ah)
The rating plate on your battery will tell you what type it is. Follow the battery manufacturer’s charging recommendation.
Proceed as follows:
- Set this mode to charge batteries with a capacity of 1.2 Ah and above and normal ambient temperatures.
- Press the MODE button 1 several times to select 12 V / 3.8 A.
The 10 symbol appears on the display 2.
If you do not subsequently set a different mode, the electronics will automatically start the charging process at a charging current of approximately. 3.8 A.
When the battery is completely charged, the outline around the battery symbol 13 stops flashing, and the entire battery lights up continuously. Trickle charging takes place in this state.
12 V / 3.8 A Cold (fast charging for 12 V batteries, from 1.2 Ah to 120 Ah, at cold temperatures)
The rating plate on your battery will tell you what type it is. Follow the battery manufacturer’s charging recommendation.
Proceed as follows:
- Set this mode to charge batteries with a capacity of 1.2 Ah and low ambient temperatures. Also set this mode to charge suitable gel and AGM batteries (Absorbent Glass Mat: batteries with electrolyte contained in fiberglass) with a capacity of 1.2 Ah and above.
- Press the MODE button 1 several times to select the 12 V / 3.8 A COLD mode.
The 11 symbol appears on the display.
If you do not subsequently set a different mode, the electronics will automatically start the charging process at a charging current of approximately. 3.8 A.
When the battery is completely charged, the outline around the battery symbol 13 stops flashing, and the entire battery lights up continuously. Trickle charging takes place in this state.
Regenerate/charge deeply discharged 12 V batteries (regeneration mode)
- Connect the deeply discharged (completely flat) battery to the charger and start the charging process.
In this regeneration mode, the battery is charged until the charger measures a terminal voltage that is high enough for a regular charging process. The device then switches automatically to a suitable charging mode and continues charging normally.
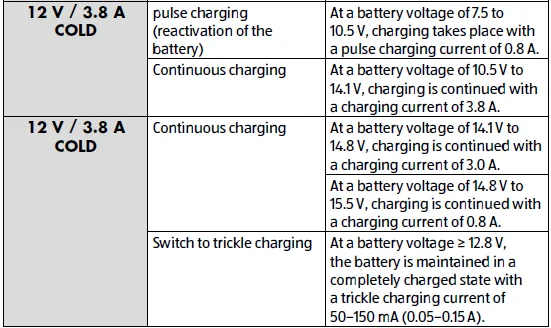
Description of the charging cycle


Reverse polarity protection
The device is protected against being set up incorrectly. If it is connected incorrectly or the battery voltage falls below 7.5 V for 12 V batteries and below 3.7 V for 6 V batteries, the device remains in standby mode.
- If the clamps are connected with the poles reversed (connected incorrectly), 16 appears on the display.
- If the clamps are not connected correctly and the circuit is not closed, 14 appears on the display.
- If the battery itself is faulty, 15 lights up on the display.
You cannot operate the device.
Overheating protection
If the device temperature reaches more than 115°C, the overheating protection is triggered and charging is paused until the device has cooled down. The display will continue to show the battery level.
Disconnecting the battery
WARNING!
Explosion hazard!
Improper handling of the charger can lead to sparking and can trigger an explosion.
Gaseous hydrogen can escape from the battery during the charging and discharging process. Contact with open flame will cause a highly explosive oxyhydrogen reaction.
- Disconnect the device from mains power before you disconnect the connection clamps from the battery.
- Ensure that you disconnect the battery clamps in the correct order.
Disconnect the battery from the charger in the following order:
- After charging, disconnect the device from mains power.
- Remove the negative terminal connection lead (black) from the negative terminal of the battery.
- Remove the positive terminal connection lead (red) from the positive terminal of the battery
- Reconnect the positive terminal connection lead of the vehicle to the positive terminal of the battery.
- Reconnect the negative terminal connection lead of the vehicle to the negative terminal of the battery.
Cleaning and care
WARNING!
Electric shock hazard!
There is a risk of electric shock due to live parts in the device.
- Always switch off the power point and pull out the plug before carrying out assembly and maintenance work or cleaning the device.
- Before cleaning, switch off the power point 4 and pull out the mains plug. Use a soft, dry cloth for cleaning. Avoid using any chemical solvents and cleaning products because they can damage the surface and/or the labels on the device.
- After use for an extended period, also clean the connection clamps 6 / 8 with a dry cloth in order to maintain optimum contact with the terminals.
Storage/transport
- If you are not using the device, switch off the power point and unplug 4 the device. Store it in a dry, dust-free location at temperatures between –20°C and 60°C out of direct sunlight.
- Make sure that the device is kept out of the reach of children.
- To avoid damage during transport, we recommend using the original packaging.
Service information
Please contact our Customer Service team if your device ever stops working the way you want or expect it to. There are several ways for you to contact us:
- In our Service Community, you can meet other users, as well as our staff, and you can exchange your experiences and pass on your knowledge there. You will find our Service Community at http://community.medion.com.
- Alternatively, use our contact form at www.medion.com/contact.
- You can also contact our Service team via our hotline or by post.
Opening times
Mon – Fri: 08:30AM to 06:00PM EST
Hotline number
1300 884 987
For more Manuals by Medion, visit ManualsLibraryy
Medion MD19161 Car-Motorcycle Battery Charger-FAQs
What voltage should a fully charged 12V battery show?
A fully charged 12V battery typically reads 12.6V to 12.8V with the engine off. If it drops below 12.0V, the battery needs recharging.
Should I unplug the charger when the battery is fully charged?
Yes. Although the Medion MD19161 has a maintenance mode, it’s best to unplug the charger after full charge to conserve energy and prevent unnecessary cycling.
Can the Medion MD19161 charge a completely dead battery?
If the battery voltage is too low (below 7V), the charger might not detect it. In that case, you may need to “wake up” the battery using a manual boost charger or connect it in parallel with a charged battery for a short time.
What is the 80/20 rule for battery charging?
Keep your battery between 20% and 80% charge for best longevity. Avoid deep discharges below 20% and continuous charging to 100%, as this can shorten battery life over time.
Is it safe to leave the battery plugged in overnight?
Yes, the Medion MD19161 features automatic shut-off when the battery is full. However, for safety and energy efficiency, disconnect it once the LED indicates full charge.
Why does my charger show a blinking red light?
A blinking red light means there’s a connection issue or charging error. Check the clamps for secure attachment and make sure polarity (positive/negative) is correct.
What happens if I keep the battery connected after 100% charge?
The charger switches to float mode to maintain the voltage, but leaving it connected for too long can increase wear over time. It’s best to remove it once charged.
What are the common signs of a faulty battery charger?
If the charger light doesn’t turn on, the battery voltage doesn’t rise, or it overheats quickly, the charger may be faulty and should be inspected or replaced.

