![]()
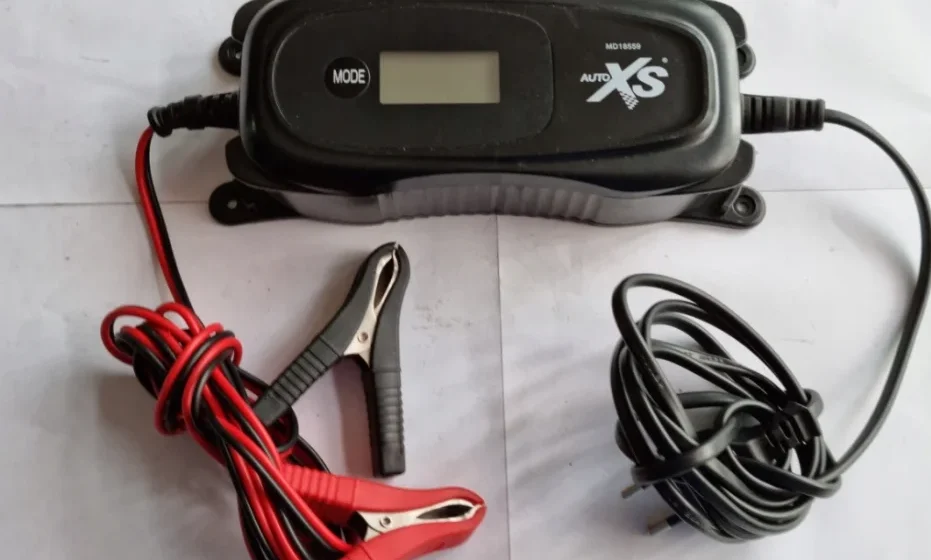
Medion MD18559 Car Battery Charger

Overview
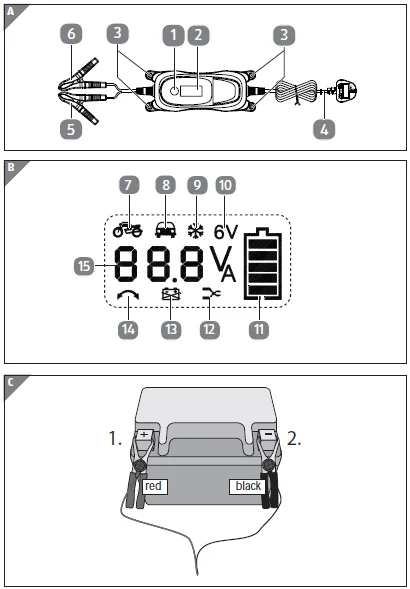
- MODE button
- Display
- Fixing holes
- Mains cord with mains plug
- Positive terminal clamp (red), with connection cord
- Negative terminal clamp (black), with connection cord
- 12 V / 0.8 A charging mode active – standard charging
- 12 V / 3.8 A charging mode active – fast charging
- 12 V / 3.8 A COLD charging mode active – fast charging at low ambient temperature
- 6 V / 0.8 A charging mode active – standard charging
- Charge display (see page 18 ff.)
- Fault display (no battery connected, short circuit)
- Battery defective
- Fault display (incorrectly connected terminals)
- Charging current display/current battery voltage display
Proper use
This appliance is a primary-side switched charging appliance with pulse trickle charging. It is suitable for charging and trickle-charging the following rechargeable 6 V or 12 V lead batteries containing an electrolyte solution or gel, as well as AGM batteries, which are used in motor vehicles:
- 6 V: Capacity from 1.2 Ah to 14 Ah;
- 12 V: Capacity from 1.2 Ah to 120 Ah;
It can also regenerate fully discharged 12 V batteries (regeneration mode).
The appliance is not suitable for recharging lithium batteries for vehicles, motorbikes, or boats. Use the charger only to charge the battery types specified in these instructions. No other batteries may be charged with the charger.
When using other types of batteries, there is a risk of injury, and the charger could be damaged.
The charger charges batteries automatically in several stages and can thus recharge them up to approximately 100% of their capacity. You can also connect a battery that has not been used for a long time to the charger in order to keep it charged.
The appliance is only intended for private use and not for industrial/commercial use.
Note that no liability will be accepted if the appliance is not used for its intended purpose:
- Do not modify the appliance without our express agreement, and do not use any accessories that have not been supplied or approved by us.
- Do not use any replacement parts or accessories that we have not supplied or approved.
- Comply with all the information in these operating instructions, especially the safety information. Any other use is considered improper and can cause personal injury or property damage.
Safety information
Read the safety instructions carefully before using the appliance for the first time. Note the warnings on the appliance and in the operating instructions. Always keep the operating instructions close to hand. If you sell the appliance or give it away, please ensure that you also pass on these instructions.
- These appliances can be used by persons with reduced physical, sensory, or mental capabilities or a lack of experience and knowledge if they have been given supervision or instruction concerning the use of the appliance in a safe way and understand the hazards involved.
- Children must not be allowed to play with the appliance.
- Cleaning and user maintenance must not be carried out by children.
- Keep the appliance and its accessories out of the reach of children.
- Children should be kept away from the appliance and the mains cord.
- Never leave the charger unattended when the appliance is in use.
Risk of injury!
- Risk of choking and suffocation through swallowing or inhaling small parts or plastic wrap.
- Do not store any of the packaging material used (bags, polystyrene, etc.) within the reach of children.
- Do not let children play with the packaging material.
Setting up the appliance
- The appliance should only be placed on stable, level, and well-ventilated surfaces.
- Never place the appliance on the edge of a table – it could tip over and fall.
- Ensure that the power cord does not become a tripping hazard, and do not use an extension cord.
- Use the appliance only at an ambient temperature of 0 °C–40 °C.
- The appliance must not be exposed to prolonged direct sunlight.
- Do not expose the charger to long-lasting temperature effects above 40 °C. The charger’s output power falls automatically at higher temperatures.
- Do not cover the charger; otherwise, it may overheat and become damaged.
Charging process
WARNING!
Risk of explosion!
Improper handling of the charger can result in sparks and trigger an explosion.
Gaseous hydrogen may flow out of the battery during charging and trickle charging. Contact with an open flame can trigger a highly explosive gas detonation.
- Ensure that ventilation is adequate.
- Carry out the charge and trickle charge process in a well-ventilated space sheltered from the weather.
- In addition, ensure that there is no open flame (fire, embers, or sparks) when charging or trickle charging.
- Do not smoke in the immediate vicinity of the charger.
- Do not store any explosive or combustible materials, e.g,. petrol or solvents in the vicinity, as they could ignite while the charger is in use.
- When using cords and electrical appliances, make sure that there are no sparks or electrostatic discharge.
- Avoid the creation of sparks when connecting and disconnecting the charger:
- Avoid an electrical short circuit when connecting the charger to the battery. Always connect the negative terminal connection cord (black) to the battery’s negative terminal. Always connect the positive terminal connection cord (red) to the battery’s positive terminal.
- Connect the mains cord at a distance from the battery and fuel pipe.
- After charging, disconnect the appliance first from the mains power. Only after that, remove the terminal clamps from the battery.
Handling rechargeable batteries
WARNING!
Risk of chemical burns!
Battery acid can cause strong chemical burns.
- Use acid-resistant protective gloves, clothes, and eye protection.
- Do not turn batteries over as acid can leak from the gas release openings.
- If a cell has developed a leak, the liquid must not touch the skin or eyes. If you do come into contact with the liquid, rinse the affected area with plenty of water. Consult a doctor immediately.
- Remove the leaking battery liquid with a dry, absorbent cloth and avoid contact with skin, for example, by using acid-proof protective gloves.
Package contents
DANGER!
Risk of choking and suffocation!
Risk of choking and suffocation through swallowing or inhaling small parts or plastic wrap.
- Keep the plastic wrap out of the reach of children.
- Do not let children play with the packaging material.
- Check your purchase to ensure that all items are included. If anything is missing, please contact us within 14 days of purchase.
The following items are supplied with your product:
- Car battery charger
- Operating instructions and warranty documents
Mounting on the wall
The appliance has fixing holes so that you can attach it to the wall.
WARNING!
Risk of electric shock!
There is a risk of electric shock from live parts of the appliance.
- Before assembly and maintenance work and before cleaning the appliance, always unplug the mains plug 4 from the mains power supply. There is a risk of electric shock from live electric lines.
- Do not drill holes into areas that may contain embedded power, gas, or water lines. Use a suitable search tool to locate these lines.
- Select a suitable location on the wall. There must be adequate ventilation.
- Select four rawl plugs and screws that are suitable for the wall and the size of the fixing holes 3.
- Mark the drill holes on the wall.
- Drill the four holes and insert the rawl plugs.
- Screw the appliance tightly.
Operation
Remove the product from the packaging and remove all the packaging material and the protective film on the display.
Connecting the charger to the battery
The charger will automatically recognise the battery type connected (6 V or 12 V battery).
WARNING!
Risk of electric shock!
There is a risk of electric shock from live parts of the appliance.
Always unplug the mains plug 4 from the mains socket before attaching the connection clamps to the terminals on the battery or removing them.
Note: Before disconnecting a car or motorcycle battery, first consult the vehicle’s instruction manual on the potential consequences of disconnecting the battery.
- If the battery that you wish to charge is connected in the vehicle, first disconnect the vehicle’s negative terminal connection cord (black) 6 from the battery’s negative terminal before the charging or trickle charging process (see Fig. C). The battery’s negative terminal is usually connected to the vehicle’s bodywork.
- Then disconnect the vehicle’s positive terminal connection cord (red) 5 from the battery’s positive terminal.
- Then attach the charger’s positive terminal clamp (red) to the battery’s positive terminal and then the negative terminal clamp (black) to the battery’s negative terminal, at a distance from the battery and the fuel pipe.
- Connect the battery charger’s mains cord 4 to a mains socket.
Select charging mode
Select a charging mode depending on the battery type and ambient temperature.
You can also recharge a completely discharged battery (Page 21).
The charger’s electronics start the charging process after connecting the battery in the 6 V or 12 V standard charging mode, depending on the battery type.
- To select a charging mode, press the MODE 1 button several times. The symbol of the respective mode will be shown on display 2.
- The charger recognises the standard 6 V or 12 V charging mode suitable for the battery type. Therefore, not every mode can be selected for every battery.
- After selecting a mode, the charger implements it. Now the display indicates the current voltage. If a battery remains attached to the charger once charging is complete, the charger automatically switches to trickle charging. The battery is also trickle-charged if another mode is selected.
Status displays
- While the appliance is switched on, the background lighting is blue.
- During charging, the selected charging mode, the current battery voltage, and the charge level of the battery are displayed.
- During faulty appliance use (e.g., by short circuit), fault symbols are displayed, and the appliance will switch to standby mode if applicable (see also “Protection against wrong polarity” on page 23).


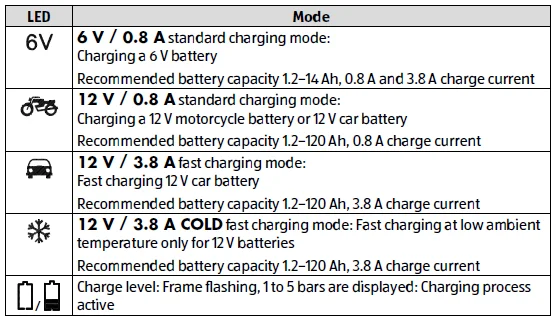
6 V / 0.8 A charging mode (6 V batteries up to max. 14 Ah)
You can identify the battery type from the type plate on your battery.
The charger will normally recognise the 6 V standard charging mode suitable for the battery type. If the battery is not recognised, proceed as follows:
- Set this mode to charge 6 V lead acid batteries with a capacity under 14 Ah.
- Press the MODE 1 button several times to select mode 6 V / 0.8.
The 10 symbol is shown on display 2.
If you do not, then set another mode; the electronics automatically start the charging process with a charging current of around 0.8 A.
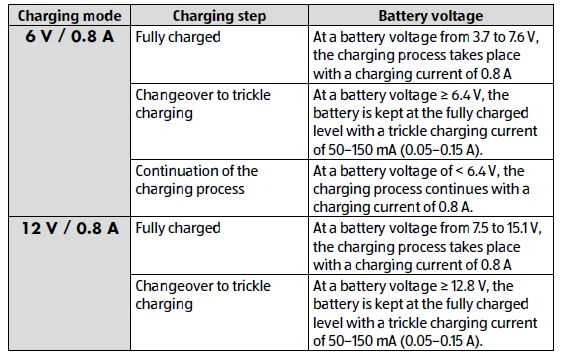
Once the battery is fully charged, the frame around the battery icon 11 stops flashing, and the entire battery icon lights up continuously. Trickle charging takes place in this state.
12 V / 0.8 A charging mode (12 V batteries up to max. 120 Ah)
You can identify the battery type from the type plate on your battery.
The charger will normally recognise the 12 V standard charging mode suitable for the battery type. If the battery is not recognised, proceed as follows:
- Set this mode to charge batteries with a capacity under 120 Ah.
- Press the MODE 1 button several times to select the 12 V / 0.8 A mode.
The 7 symbol is shown on display 2.
If you do not, then set another mode; the electronics automatically start the charging process with a charging current of around 0.8 A.
Once the battery is fully charged, the frame around the battery icon 11 stops flashing, and the entire battery icon lights up continuously. Trickle charging takes place in this state.
12 V / 3.8 A charging mode (fast charging for 12 V batteries from 1.2 Ah to 120 Ah)
You can identify the battery type from the type plate on your battery.
Proceed as follows:
- Set this mode to charge batteries with a capacity of 1.2 Ah or over, and normal ambient temperatures.
- Press the MODE 1 button several times to select the 12 V / 3.8 A mode.
The 8 symbol is shown on display 2.
If you do not, then set another mode; the electronics automatically start the charging process with a charging current of around 3.8 A.
Once the battery is fully charged, the frame around the battery icon 11 stops flashing,a nd the entire battery icon lights up continuously. Trickle charging takes place in this state.
12 V / 3.8 A Cold (fast charging for 12 V batteries from 1.2 Ah to 120 Ah at low ambient temperature)
You can identify the battery type from the type plate on your battery.
Proceed as follows:
- Set this mode to charge batteries with a capacity of 1.2 Ah or over and low ambient temperatures. Set this mode also to charge AGM batteries (absorbent glass mat: batteries in which the electrolyte is held in glass fibre mats) with a capacity of 1.2 Ah and over.
- Press the MODE 1 button several times to select the 12 V / 3.8 A COLD mode.
The 9 symbol is displayed.
If you do not, then set another mode; the electronics automatically start the charging process with a charging current of around 3.8 A.
Once the battery is fully charged, the frame around the battery icon 11 stops flashing, and the entire battery icon lights up continuously. Trickle charging takes place in this state.
Regenerating/recharging fully discharged 12 V batteries (regeneration mode)
- Connect the fully discharged battery to the charger and start the charging process.
In this regeneration mode, the battery is charged until the charger measures a terminal voltage that is high enough for a regular charging mode. The appliance then switches automatically to an appropriate charging mode and continues charging.
Description of the charging cycle
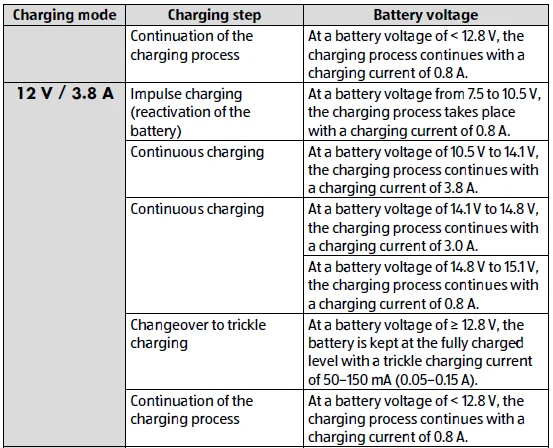
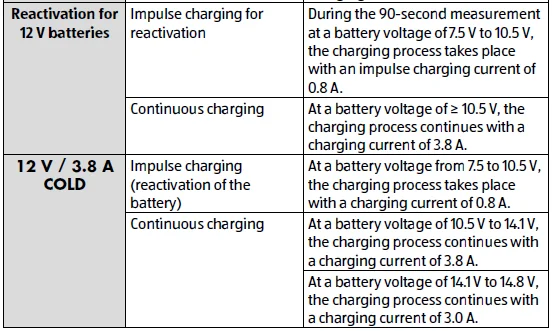
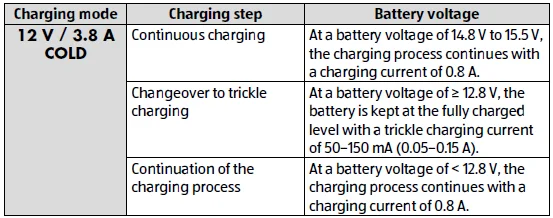
Protection against wrong polarity
The appliance is protected against improper start-up. In case of a faulty connection or if the battery voltage falls below 7.5 V for 12 V batteries and below 3.7 V for 6 V batteries, the appliance remains in standby mode.
- In the event that the terminals have the wrong polarity (are connected incorrectly), 14 is displayed.
- If the terminal clamps are incorrectly connected and the electric circuit is not closed, the display shows 2 12.
- If the battery itself is faulty, 13 lights up on the display.
You cannot operate the appliance.
Overheating cut-out
If the appliance temperature exceeds 115 °C, the overheating cut-out is triggered, and the charging process is interrupted until the appliance has cooled off. The display continues to show the charge level.
Disconnecting the battery
WARNING!
Risk of explosion!
Improper handling of the charger can result in sparks and trigger an explosion.
Gaseous hydrogen may flow out of the battery during charging and trickle charging. Contact with an open flame can trigger a highly explosive gas detonation.
- Disconnect the appliance from the mains before disconnecting the terminal clamps on the battery.
- Observe the correct sequence when disconnecting the battery terminal clamps.
When disconnecting the battery from the charger, proceed in the following order:
- After charging, disconnect the appliance from the mains power.
- Detach the negative terminal clamp (black) 6 from the battery’s negative terminal.
- Detach the positive terminal clamp (red) 5 from the battery’s positive terminal.
- Reconnect the vehicle’s positive terminal connection cord to the battery’s positive terminal.
- Reconnect the vehicle’s negative terminal connection cord to the battery’s negative terminal.
Switching off
Switch the charger off by pulling out the mains plug 4.
Cleaning and care
WARNING!
Risk of electric shock!
There is a risk of electric shock from live parts of the appliance.
- Before assembly and maintenance work and before cleaning the appliance, always unplug the mains plug from the mains power supply.
- Before cleaning, pull the mains plug out of the 4 socket. Use a soft, dry cloth to clean the appliance. Avoid the use of chemical solutions and cleaning products because these may damage the appliance surface and/or markings.
- After longer periods of use, also clean the terminal clamps 5 / 6 with a dry cloth to maintain excellent contact with the terminals.
Storing/transporting
- When you are not using the appliance, unplug the mains plug 4 and store the appliance between –20 °C and 60 °C in a dry, dust-free environment that is not exposed to direct sunlight.
- Do not store the appliance within the reach of children.
- To avoid damage during transport, we recommend that you use the original packaging.
Service information
Please contact our Customer Service team if your device ever stops working the way you want or expect it to. There are several ways for you to contact us:
In our Service Community, you can meet other users, as well as our staff, and you can exchange your experiences and pass on your knowledge there.
You will find our Service Community at http://community.medion.com.
- Alternatively, use our contact form at www.medion.com/contact.
- You can also contact our Service team via our hotline or by post.
Opening times
- Mon – Fri: 08.00 – 20.00
- Sat – Sun: 10.00 – 16.00
Hotline number UK
0333 3213106
Hotline number Ireland
1 800 992508
For more Manuals by Medion, ManualsLibrary
Medion MD18559 Car Battery Charger-FAQs
How do I use the Medion MD18559 battery charger step by step?
Connect the red clamp to the positive (+) terminal and the black clamp to the negative (–) terminal of your battery. Plug in the charger, select the correct mode (12V or 6V), and let it charge. When charging is complete, unplug the charger before removing the clamps.
How can I tell when my car battery is fully charged?
The green LED light on the Medion MD18559 charger will turn on, indicating the battery is fully charged. The red light shows that charging is still in progress.
How long does it take to fully charge a car battery?
Charging time depends on the battery’s capacity and charger output. For example, a 48Ah battery takes around 8 hours at a 6A rate. Larger batteries may take longer.
Can I leave the battery charger on overnight?
Yes — the Medion MD18559 features automatic shut-off when the battery reaches full charge. However, avoid leaving it connected for days to prevent unnecessary trickle charging.
What voltage should a fully charged 12V battery show?
A healthy, fully charged 12V battery should read 12.8V. If the voltage drops below 12.4V, it may need recharging soon.
How can I check if my Medion battery charger is working properly?
Use a multimeter to measure the output voltage. Connect the probes to the charger’s clamps (red to positive, black to negative). A working charger should show an output close to its rated voltage (around 12V).
Will the Medion MD18559 charge a completely dead battery?
If the battery’s voltage is above 10.5V, the charger should detect and charge it. For deeply discharged batteries below this level, manual charging or a jump start may be required first.
What happens if I overcharge my battery?
The Medion MD18559 includes overcharge protection, but continuous overcharging on manual settings can cause overheating, bulging, or reduced battery lifespan.
What color indicates my charger is working?
A red LED means charging is in progress, while a green LED means charging is complete. If no light appears, check the power source and cable connections.

