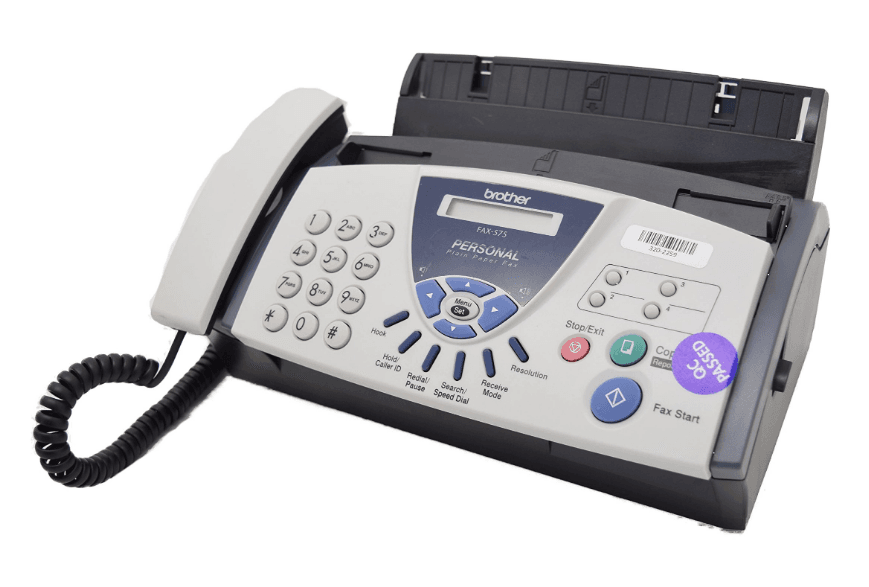
Brother 575 Plain Paper Fax
Safety precautions
To use the fax machine safely. Please refer to these instructions for later reference and before attempting any maintenance.
WARNING
- There are high-voltage electrodes inside the fax machine. Before you clean the fax machine, make sure you have unplugged the telephone line cord first and then the power cord from the AC power outlet.
- Do not handle the plug with wet hands. Doing this might cause an electrical shock.
- After you have just used the fax machine, some internal parts are extremely HOT! Please be careful.
- Use caution when installing or modifying telephone lines. Never touch telephone wires or terminals that are not insulated unless the telephone line has been disconnected at the wall jack. Never install telephone wiring during a lightning storm. Never install a telephone jack in a wet location.
- This product must be installed near an AC power outlet that is easily accessible. In case of emergencies, you must disconnect the power cord from the AC power outlet to shut off power completely.
- To reduce the risk of shock or fire, use only a No.26 AWG or larger telecommunication line cord.
IMPORTANT SAFETY INSTRUCTIONS
When using your telephone equipment, basic safety precautions should always be followed to reduce the risk of fire, electric shock, and injury to persons, including the following:
- Do not use this product near water, for example, near a bathtub, wash bowl, kitchen sink, or washing machine, in a wet basement, or near a swimming pool.
- Avoid using this product (other than a cordless type) during an electrical storm. There may be a remote risk of electric shock from lightning.
- Do not use this product to report a gas leak in the vicinity of the leak.
SAVE THESE INSTRUCTIONS
Part names
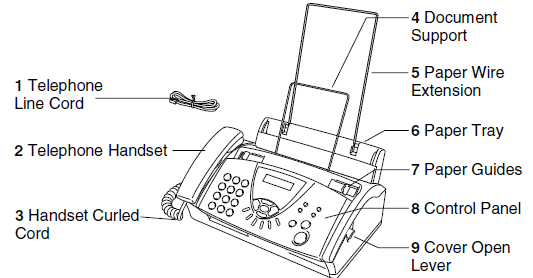
Front view
| No. | Name | Description |
| 1 | Telephone Line Cord | Connect the fax machine to a telephone wall jack. |
| 2 | Telephone Handset | Use when receiving or making voice calls. |
| 3 | Handset Curled Cord | Use to connect the handset to the fax machine. |
| 4 | Document Support | Supports the document in the ADF. |
| 5 | Paper Wire Extension | Supports the paper in the paper tray. |
| 6 | Paper Tray | Load paper here. |
| 7 | Paper Guides | Press and slide to fit the document width. |
| 8 | Control Panel | Use the keys and display to control the fax machine. |
| 9 | Cover Open Lever | To open the top cover, lift this lever. |
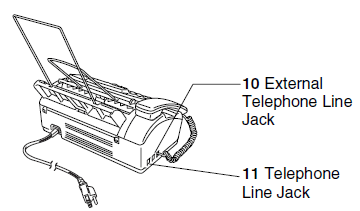
Back view
| No. | Name | Description |
| 10 | External Telephone Line Jack (EXT.) | Plug in the telephone line of an external telephone or TAD here. |
| 11 | Telephone Line Jack (LINE) | Plug in the telephone line here. |
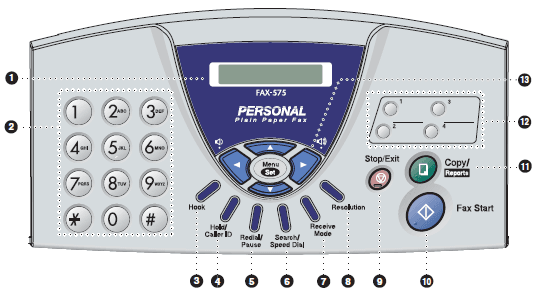
Control panel overview
- LCD (Liquid Crystal Display): Displays messages on the screen to help you set up and use your fax machine.
- Dial Pad: Use these keys to dial telephone and fax numbers and as a keyboard for entering information into the fax machine. The # key lets you temporarily switch the dialing type during a telephone call from “PULSE” to “TONE”. (Canada Only)
- Hook: Lets you dial telephone and fax numbers without lifting the handset.
- Hold/Caller ID: Lets you place calls on hold. Also, lets you view or print the Caller ID list.
- Redial/Pause: Redials the last number you called. It also inserts a pause in Quick-Dial numbers.
- Search/Speed Dial: Lets you look up numbers stored in the dialing memory and lets you dial stored numbers by pressing # and a two-digit number.
- Receive Mode: Use to select how your fax machine will handle incoming calls.
- Resolution: Adjusts the resolution when you send a fax or make a copy.
- Stop/Exit: Stops a fax, cancels an operation, or exits from the menu.
- Fax Start: Starts an operation, such as sending a fax.
- A Copy/Reports: With document in the ADF: Makes a copy. Without a document in the ADF, it lets you access the Reports menu.
- One-Touch Keys: These keys give you instant access to previously stored Quick-Dial numbers.
- Navigation Keys:
Menu/Set: The same key is used for menu and set operations. Let’s you access the menu to program and store your settings in the fax machine.
About fax machines
Custom features
Do you have voicemail on the phone line?
If you have Voice Mail on the phone line where you will install your new fax machine, there is a strong possibility that Voice Mail and the fax machine may conflict with each other while receiving incoming calls.
Why should there be problems?
Since both the fax machine and Voice Mail will pick up the call after the number of rings you have set, each of them has the ability to keep the other from receiving calls.
For example, if your voicemail is set to answer after two rings and the fax machine is set to answer after four, your voicemail will stop the fax machine from receiving faxes. If you set Voice Mail and the fax machine to answer after the same number of rings, there is no way of knowing which one will answer first. It is important to remember that neither Voice Mail nor the fax machine can pass the call back to the other after the call has been answered.
How can you avoid possible problems?
A very good way to avoid problems like the one mentioned is to get a second phone number on your present phone line. Many people with Voice Mail choose this service, which is called ‘Distinctive Ring’, and they are very satisfied with it.
Another way to avoid possible problems is to replace your voicemail with an answering machine. Your fax machine is designed to work with an answering machine or TAD (telephone answering device).
Connections
Connecting an external telephone
You can connect a separate telephone (or telephone answering device) directly to your fax machine as shown in the diagram below.
Connect the telephone’s line cord to the jack labeled EXT. on the side of the fax machine.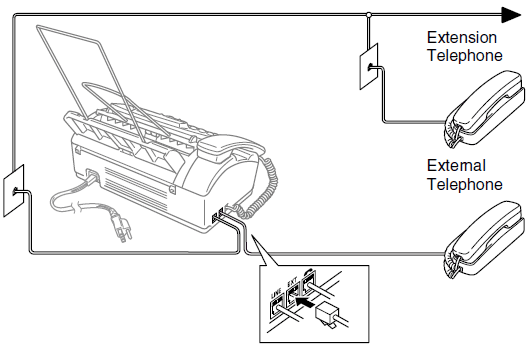
Whenever this phone (or TAD) is in use, the LCD shows EXT. TEL IN USE, and if the fax handset is lifted, an alarm sounds.
To disconnect the call on the external phone and switch to the fax, lift the handset and press Hook.
Connecting an external telephone answering device (TAD)
Sequence
You may choose to connect an answering device. However, when you have an external TAD on the same telephone line as the fax machine, the TAD answers all calls, and the fax machine “listens” for fax calling (CNG) tones. If it hears them, the fax machine takes over the call and receives the fax. If it doesn’t hear CNG tones, the fax machine lets the TAD continue playing your outgoing message so your caller can leave you a voice message.
The TAD must answer within four rings (the recommended setting is two rings). The fax machine cannot hear CNG tones until the TAD has answered the call, and with four rings, there are only 8 to 10 seconds of CNG tones left for the fax “handshake”. Make sure you carefully follow the instructions in this manual for recording your outgoing message. We do not recommend using the toll saver feature on your external answering machine if it exceeds four rings.
If you do not receive all your faxes, you must reset the setting on your external TAD to four rings or less.
If you subscribe to your telephone company’s Distinctive Ring service:
You may connect an external TAD to a separate wall jack only if you subscribe to your telephone company’s Distinctive Ring service, have registered the distinctive ring pattern on the fax machine, use that number as a fax number, and set your fax machine’s Receive mode to MANUAL. The recommended setting is four rings on the external TAD when you have the telephone company’s Distinctive Ring Service.
If you do not subscribe to the Distinctive Ring service:
You must plug your TAD into the EXT. Jack of the fax machine. If your TAD is plugged into a wall jack, both your fax machine and the TAD will try to control the phone line.
Unless you are using Distinctive Ring, do not connect a TAD elsewhere on the same phone line.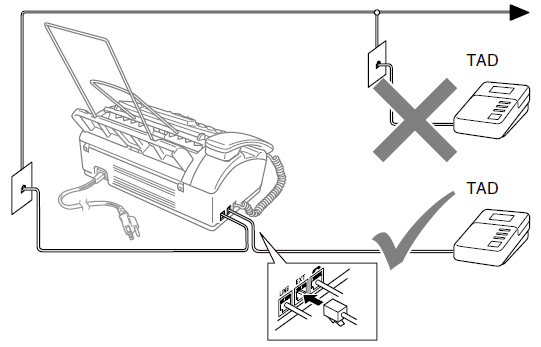
Making copies
Using the fax machine as a copier
You can use this fax machine as a copier. Always make sure you have paper in the paper tray before making copies.
Incoming faxes cannot be received on paper or into the memory while the fax machine is copying.
Copy operations
To make a single copy that is not reduced, enlarged, or sorted, you only have to press one key. Remember, your fax machine cannot scan anything closer than 1/6 in. (4 mm) from the edge of the paper.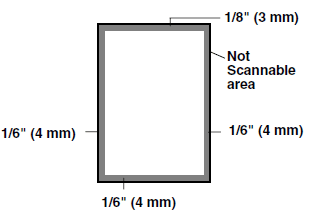
Making a single copy
- Insert the document face down in the ADF.
- Press Copy/Reports twice. To cancel, press Stop/Exit. Do NOT pull on the paper while copying is in progress. The default resolution for a single copy is S.FINE. Set the resolution to PHOTO for photographs by using the Resolution key.
Troubleshooting and routine maintenance
Troubleshooting
IMPORTANT
For technical help, you must call the country where you bought the fax machine. Calls must be made from within that country.
Error messages
As with any sophisticated office product, errors may occur. If this happens, your fax machine identifies the problem and displays an error message. The most common error messages are shown below.
You can correct most problems by yourself. If you need more help, call the Brother fax back system (USA only).
ERROR MESSAGES | ||
| ERROR MESSAGE | CAUSE | ACTION |
| CHECK PAPER RELOAD PAPER PRESS STOP KEY | The fax machine is out of paper, or paper is not properly loaded in the paper tray. | Refill the paper or remove the paper and load it again. If this error appears while receiving a fax, load paper to restart printing. If you were copying or printing reports, load paper and try again. (See How to load paper on page 2-2) |
| The paper is jammed in the fax machine. | See Paper Jam on page 12-5. | |
| COVER IS OPEN CLOSE COVER | The cover is not closed completely. | Close the cover. |
| DOCUMENT JAM REMOVE JAM PRESS STOP KEY | The documents were not inserted or fed properly, or were too long. (See Document Jam on page 12-4.) | Insert the document again. |
| The document is jammed in the fax machine. | See Document Jam on page 12-4. | |
| DR MODE IN USE | The fax machine is set to Distinctive Ring mode. You can not change the Receive Mode from Manual to another mode. | Set Distinctive Ring to off. |
| LINE DISCONNECT | The other person or other person’s fax machine stopped the call. | Try to send again. |
| MEMORY NEAR FULL CLEAR MEMORY | The fax machine is almost out of memory. | Clear the faxes and scheduled jobs from memory. —OR— Print the faxes that are in the memory. (See Printing a fax from the memory on page 5-6.) |
| ERROR MESSAGE | CAUSE | ACTION |
| NOT REGISTERED | You tried to access a One-Touch or Speed-Dial number that is not programmed. | Set up the One-Touch or Speed-Dial number. (See Storing One-Touch Dial numbers on page 7-1 and Storing Speed-Dial numbers on page 7-2.) |
| OUT OF MEMORY CLEAR MEMORY | The data is too large for the fax machine’s memory. | (Fax sending or copy operation in process) Press Stop/Exit and wait until the other operations in progress finish, and then try again. —OR— Clear the faxes and schedule jobs in the memory. To gain extra memory, you can turn off Fax Storage. (Setting Fax Storage on page 8-3.) —OR— Print the faxes that are in the memory. (Printing a fax from the memory on pages 5-6) |
| PAPER JAM PLS OPEN COVER, REMOVE JAM | The paper is jammed in the fax machine. | (See Paper Jam on page 12-5.) |
| PHONE LINE BUSY | The number you dialed does not answer or is busy. | Verify the number and try again. |
| POLLING FAILED | You tried to poll a fax machine that is not in Polling Waiting mode. | Check the other fax machine’s polling setup. |
| PRINTHEAD OVERHEATED WAIT TO COOL | The print head has overheated. | Wait 30 minutes for it to cool or wait until the message disappears automatically. |
| RECEIVE FAILED | Poor phone line quality caused a communication error. | If the problem continues, call the telephone company and ask them to check your phone line. |
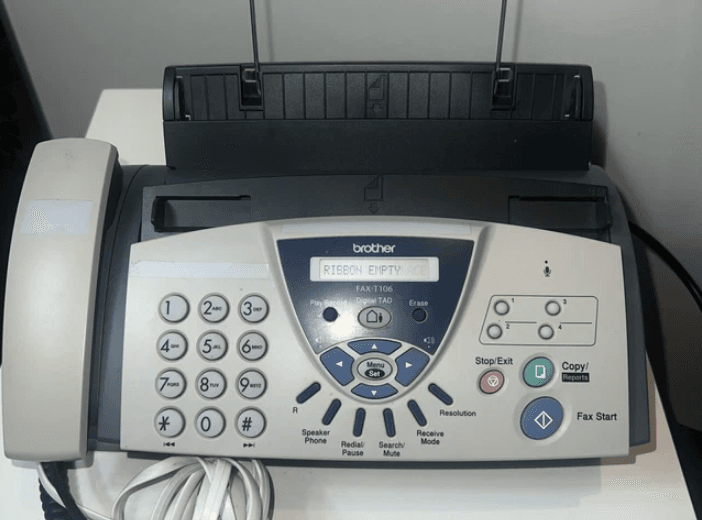
| RIBBON EMPTY RESET OR REPLACE | Your fax machine is out of ribbon, or the print cartridge is not properly installed. | Install the print cartridge or change the ribbon again. (See Changing the ribbon on page 12-9.) |
| ERROR MESSAGE | CAUSE | ACTION |
| MEMORY DISABLED UNABLE TO INIT UNABLE TO PRINT UNABLE TO SCAN | The fax machine has a mechanical problem. —OR— A foreign obstacle, such as a clip or ripped paper, is in the fax machine. | Open the top cover and remove any foreign obstacles from inside the fax machine. If the error message continues, disconnect the fax machine from the power source for several minutes, then reconnect it. You will lose all faxes from the memory. Please follow the steps below before disconnecting the fax machine so you will not lose any important messages. Check whether the fax machine has faxes in the memory 1. Press Menu/Set, 0, 0, 1. 2. If the fax machine does not have faxes in its memory, disconnect the fax machine from the power source for several minutes and then reconnect it. —OR— If faxes are present, you can transfer them to another fax machine. Go to Step 3. Transfer faxes to another fax machine 3. Enter the fax number to which faxes will be forwarded. 4. Press Fax Start. 5. After the faxes are transferred, disconnect the fax machine from the power source for several minutes and then reconnect it. Transfer the Journal report to another fax machine You can transfer the Fax Journal report to another fax machine. 1. Press Menu/Set, 0, 0, 2. 2. Enter the fax number to which faxes will be forwarded. 3. Press Fax Start. |
If you have not set up your Station ID, you cannot enter fax transfer mode. | ||
If the error message continues, call Brother Customer Service. In the USA: 1-800-284-4329 In Canada: 1-877-BROTHER |
Routine maintenance
Cleaning the print head
Clean the print head when you want to improve the print quality, and also as part of your routine maintenance.
After you have just used the fax machine, some internal parts of the fax machine are extremely HOT! So please be careful.
- Before you clean inside the fax machine, unplug the telephone line cord first, and then the power cord from the AC power outlet.
- Open the top cover by lifting the lever on the right side of the top cover.
- Take out the print cartridge.
- To clean your fax machine’s print head, wipe the print head with a lint-free cloth that is dry or lightly moistened with isopropyl alcohol.
- Wait until the alcohol on the print head is completely dry.
- Install the print cartridge.
- Close the top cover. Press down on both sides of the top cover until it clicks.
- Plug the telephone line cord back in first, and then plug the power cord back into the AC power outlet.
Cleaning the scanner
- Before you clean inside the fax machine, unplug the telephone line cord first, and then the power cord from the AC power outlet.
- Open the top cover by lifting the lever on the right side of the top cover.
- Clean the white film and the glass strip with isopropyl alcohol on a lint-free cloth. Be careful not to bend the white film or drop anything into the fax machine.
- Close the top cover. Press down on both sides of the top cover until you hear it click into place.
- Plug the telephone line cord back in first, and then plug the power cord back into the AC power outlet.
For more Manuals by Brother, visit ManualsLibraryy
Brother 575 Plain Paper Fax-FAQs
Can I use my Brother fax machine without a phone line?
Yes, you can send faxes without a traditional phone line by using an online fax service like eFax. These services allow you to fax from anywhere via the internet and even keep your existing fax number.
Should the paper go face up or face down when faxing?
Insert the document face down into the fax machine when sending a fax. This ensures the printed side is transmitted correctly.
How can I find out my fax number?
Check your fax machine’s settings, user manual, or previous sent/received fax pages. Some devices automatically print the fax number on each transmission.
How do I send a fax using a printer or fax machine?
1. Load the document into the fax tray (face down).
2. Dial the recipient’s fax number on the control panel.
3. Press the Send button.
If the recipient shares their phone line with a fax machine, it’s good practice to notify them before sending.
How can I tell if my fax was sent successfully?
Check the Transmission Verification Report. This report confirms the date, time, number of pages, recipient’s fax number, and whether the fax was successful.
What does “Fax Memory Full” mean?
This message means the fax machine’s memory is nearly full. To continue sending faxes, delete old or pending files stored in memory.
What is the default password for Brother fax machines?
If not labeled otherwise, the default password is usually “initpass”. Check for a label on the machine or consult the manual.
How does a fax machine work?
Fax machines convert documents into digital signals and send them over phone lines. The receiving machine decodes the signal and prints the document on paper.

