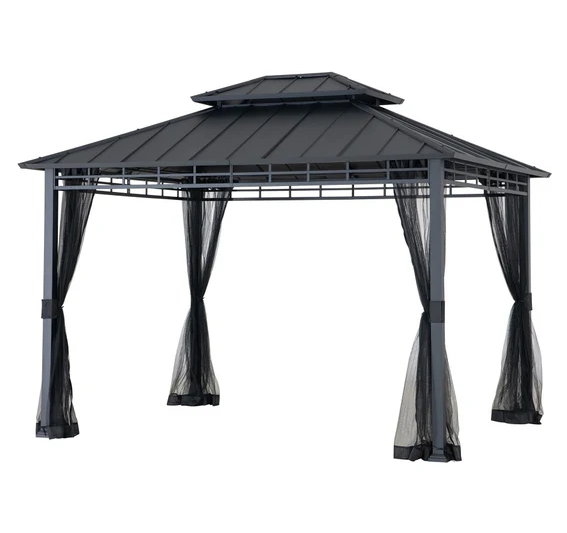
Broyhill A102010903 Hardtop Gazebo
MAINTENANCE:
- Steel components for this gazebo are treated with rust-inhibiting paint that protects it from rusting. However, due to the nature of steel, surface oxidation (rusting) will occur if these protective coatings are scratched. This is not a defect and thus not covered by the warranty.
- To minimize this condition, it is recommended to use care when assembling and handling the product to prevent scratching the paint. Should any scratching or damage occur, it is recommended to cover the scratch immediately with rust-inhibiting paint (not included).
- Surface rust can also be easily removed with a very light application of regular cooking oil or WD-40. If surface oxidation (rusting) occurs and if no measure is taken to prevent this, the oxidation may start dripping onto the deck or patio and cause damaging stains, which may be difficult to remove. This can be prevented if the above-mentioned measures are taken to keep the product from oxidizing.
- Do not use bleach, acid, or other abrasive cleaners on the roof or frame parts.
- Keep the instruction manual for future reference.
- Keep the original packaging to store the gazebo.
- Periodically check and ensure that all bolts are well-tightened during use
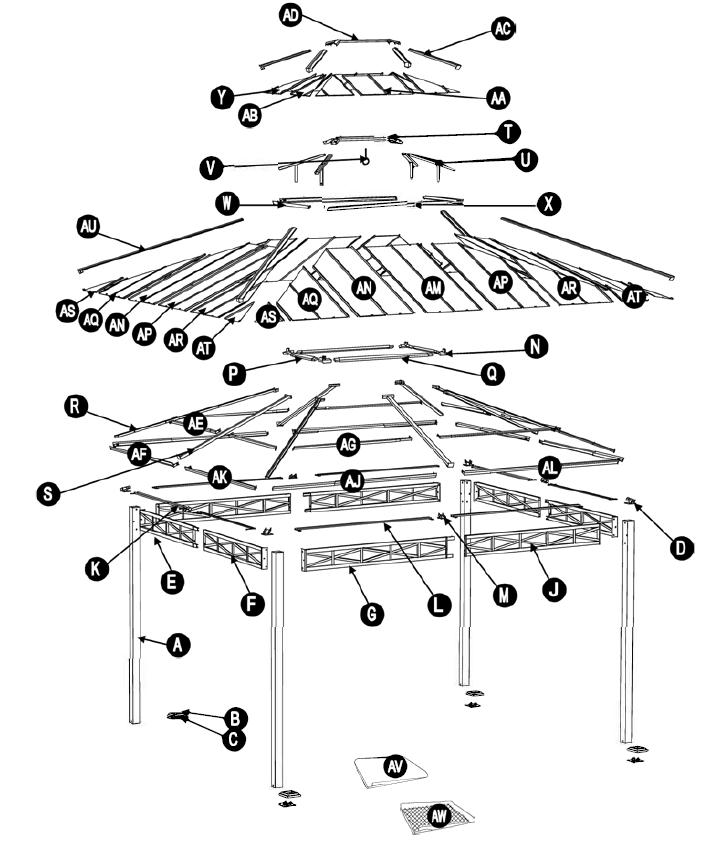
EXPLODED DRAWING
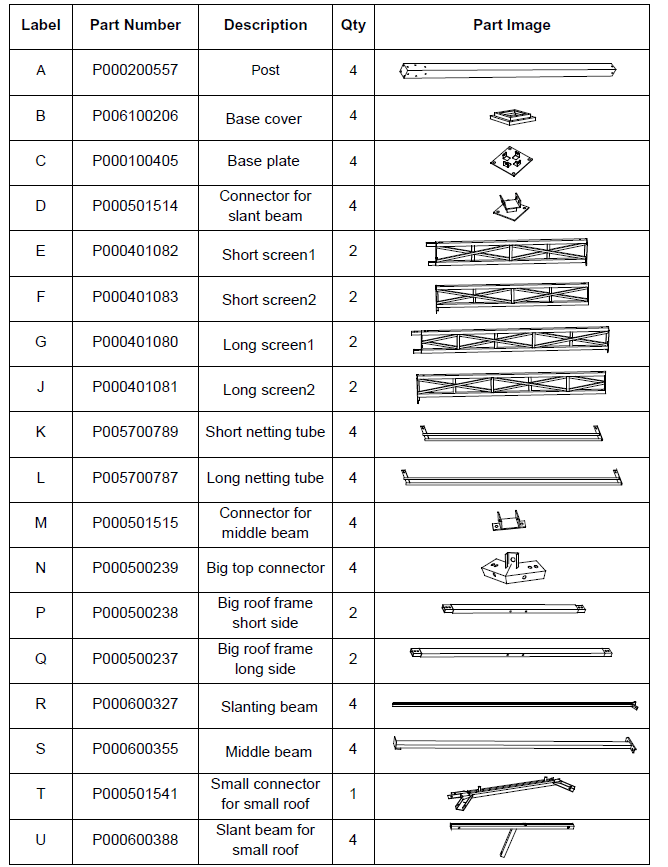
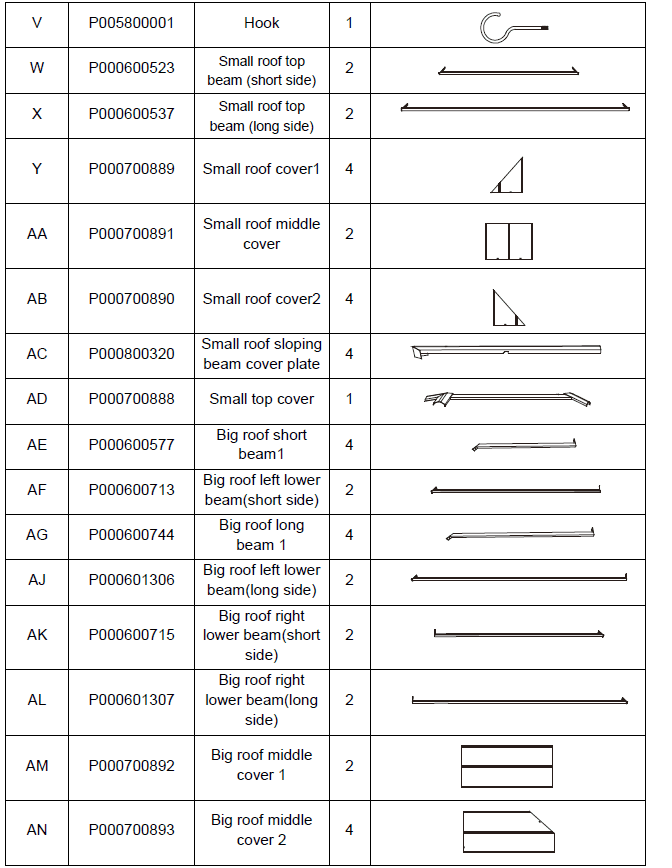
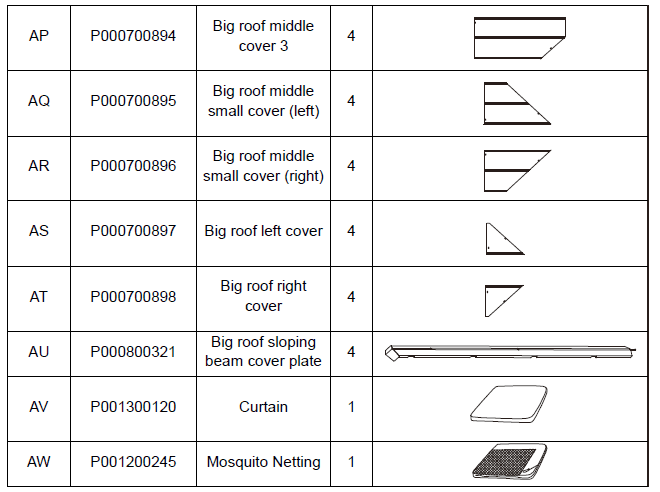
PART LIST
STEP 1
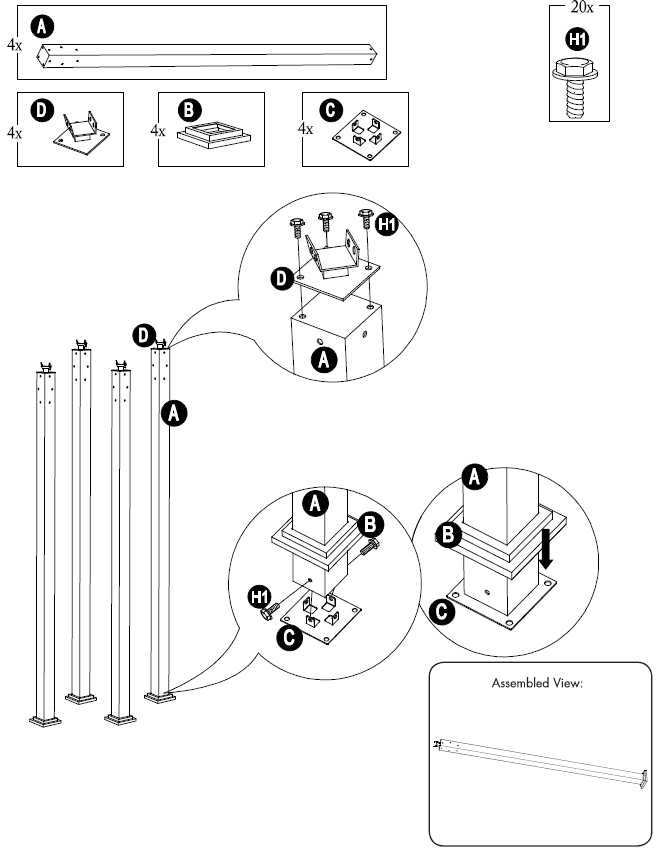
- Attach the Base plate(C) and Base cover (B) to the Post(A) by by Bolt(H1), then attach Connector for cant beam(D) to the upper Post(A), tight them by Wrench(HW1)

STEP 2
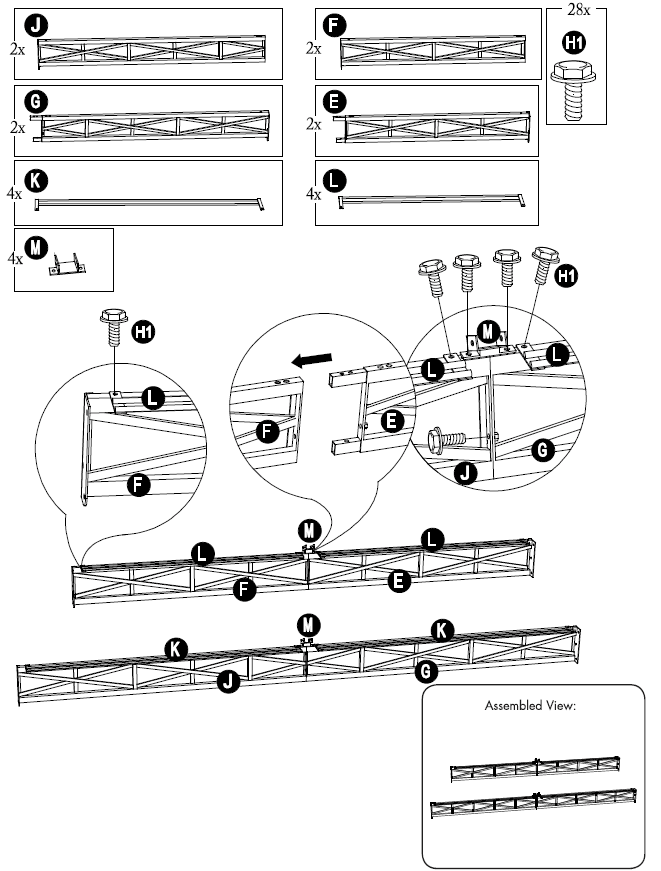
- Insert the screen(G/E) to screen(J/F),fixed with bolt(H1). Then, attach the netting tube(L/ K) and the Connector for middle beam(M) with bolt(H1) to the screen(E/F/G/J), tighten with wrench(HW1)

STEP 3
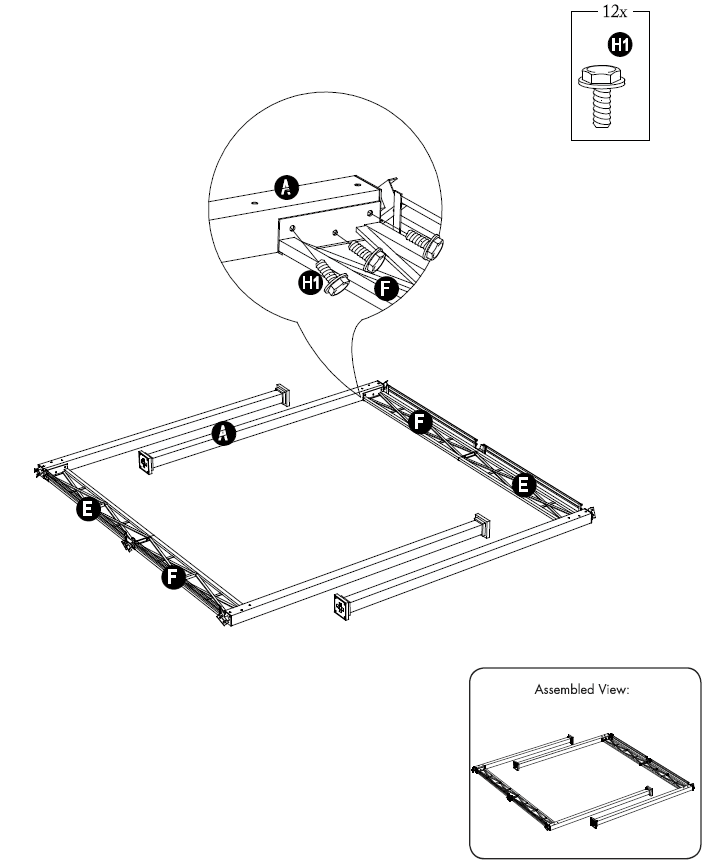
- Attached is the assembled short screen(E/F) to the post (A) with bolt(H1), tighten with wrench(HW1)

STEP 4
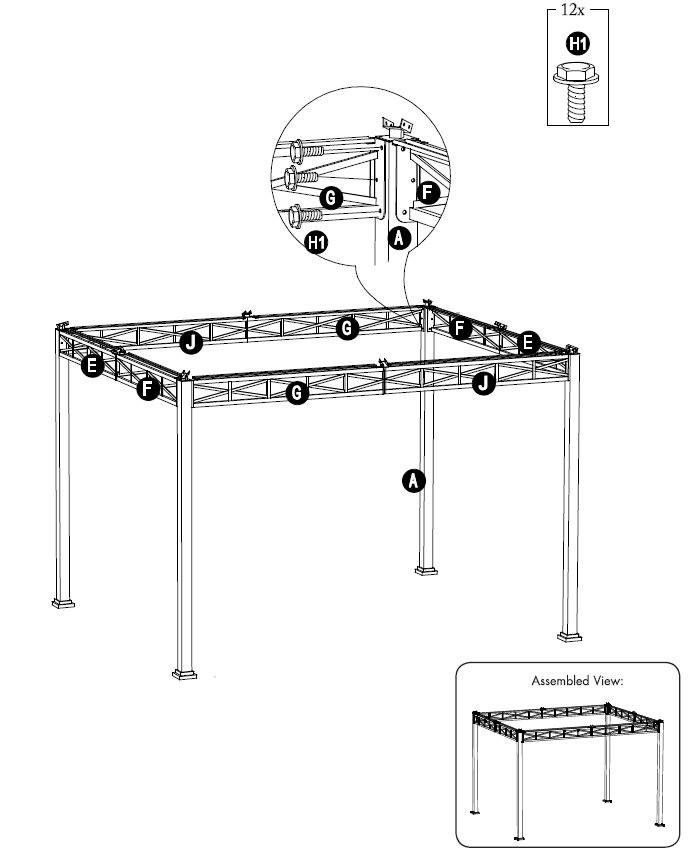
- Attach the assembled long screen(G/ J) to the post (A) with bolt(H1), tighten with wrench(HW1).

STEP 5
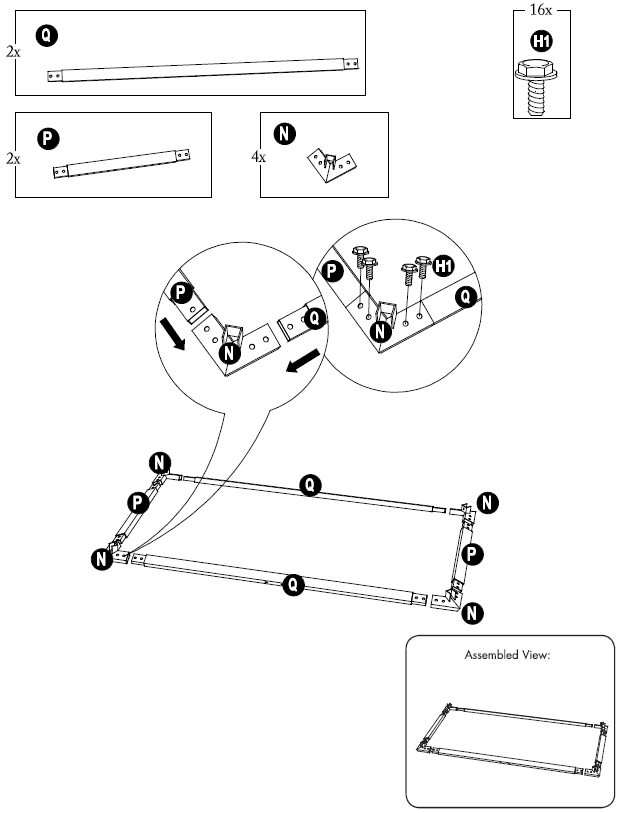
- Assemble the Big roof frame long side(Q), Big roof frame short side(P) and Big top connector(N) by Bolt(H1), tighten with wrench(HW1).
STEP 6
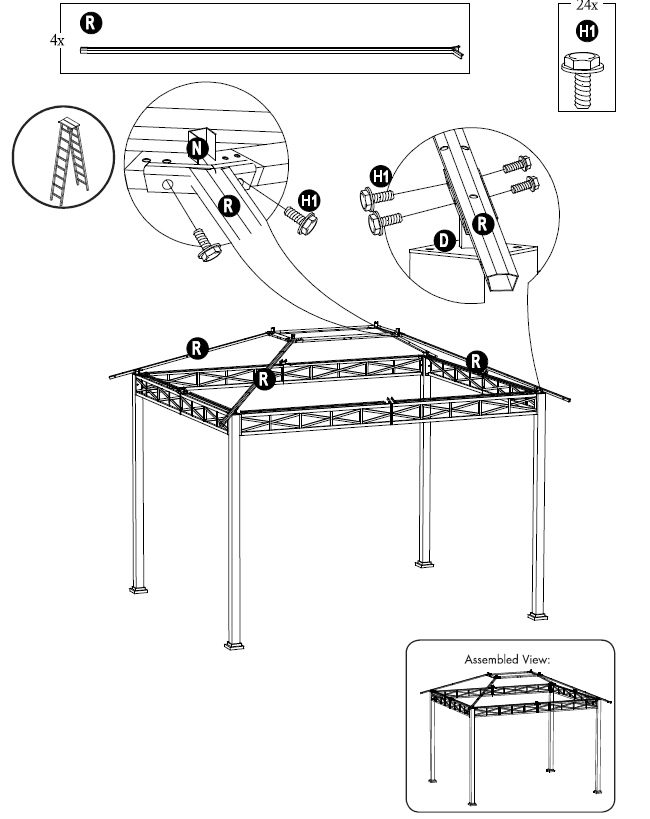
- Assemble the Slanting beam(R), Connector for slant beam(D) and Big top connector(N) by Bolt(H1), tighten with wrench(HW1).

STEP 7
- Attach the Middle beam(S) to the Connector for middle beam(M) on Big roof frame (P/Q) with bolt(H1), tighten with wrench(HW1)

STEP 8
- Attach Small roof connection tube(T) to Slant beam for small roof (U) by Bolt(H1) and Wrench(HW1), then tight up the Hook(V) to Small roof connection tube(T).

STEP 9
- Assemble the small rooftop beam(W/X) to the Slant beam for small roof (U) by Bolt(H1) and Wrench(HW1), then lock them to the Big top connector (N) by Bolt(H1) and Wrench(HW1).

STEP 10
- Refer to the upper image to place the Cover(Y/AA/AB) to the correct location, then locked them with a Bolt(H1) and Wrench(HW1)

STEP 11
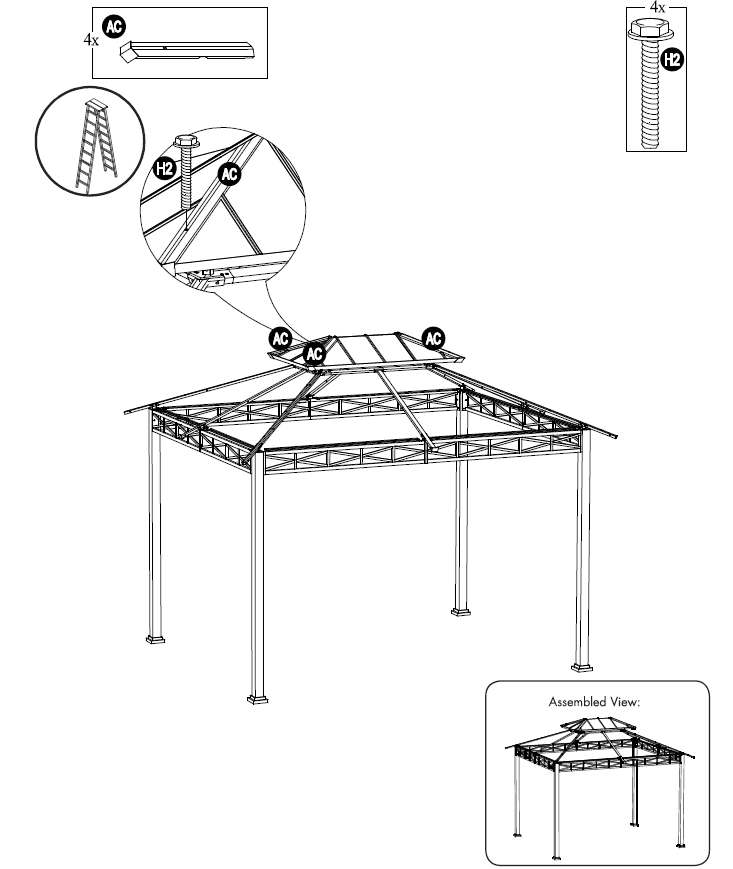
- Attached the Small roof sloping beam cover plate (AC)to the small roof with bolt(H2), tighten with wrench(HW1).

STEP 12
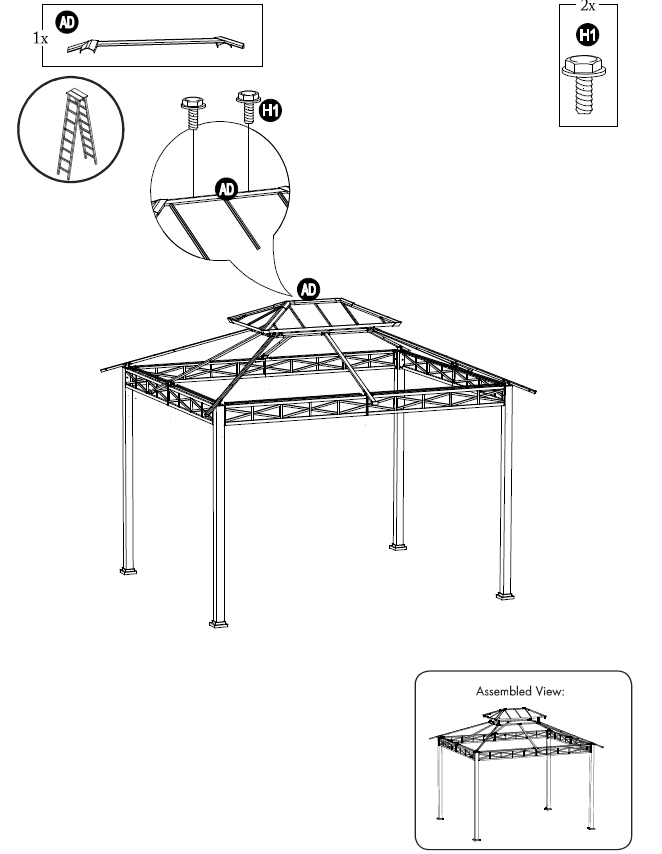
- Attached the Small top cover (AD)to the small roof with bolt(H1), tighten with wrench(HW1).

STEP 13
- Attach Big roof short beam 1 (AE), Big roof long beam 1(AG) to Slanting beam(R) and Middle Beam(S) with Bolt(H1), tighten with wrench(HW1).

STEP 14
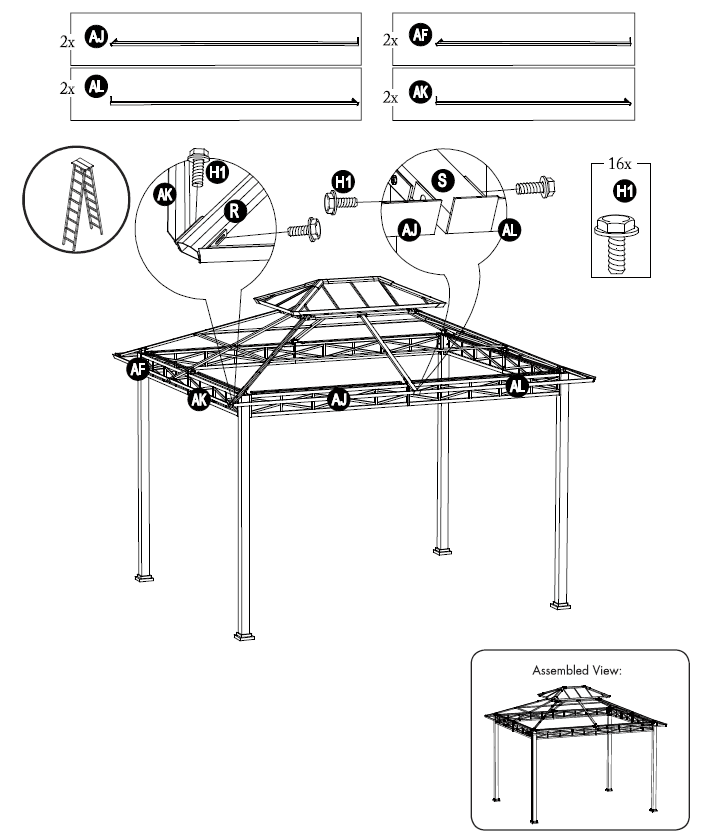
- Attach the Big roof left lower beam(AF/AJ) and Big roof, right lower beam(AK/AL) to Slanting beam(R) and Middle Beam(S) with Bolt(H1), tighten with wrench(HW1).

STEP 15
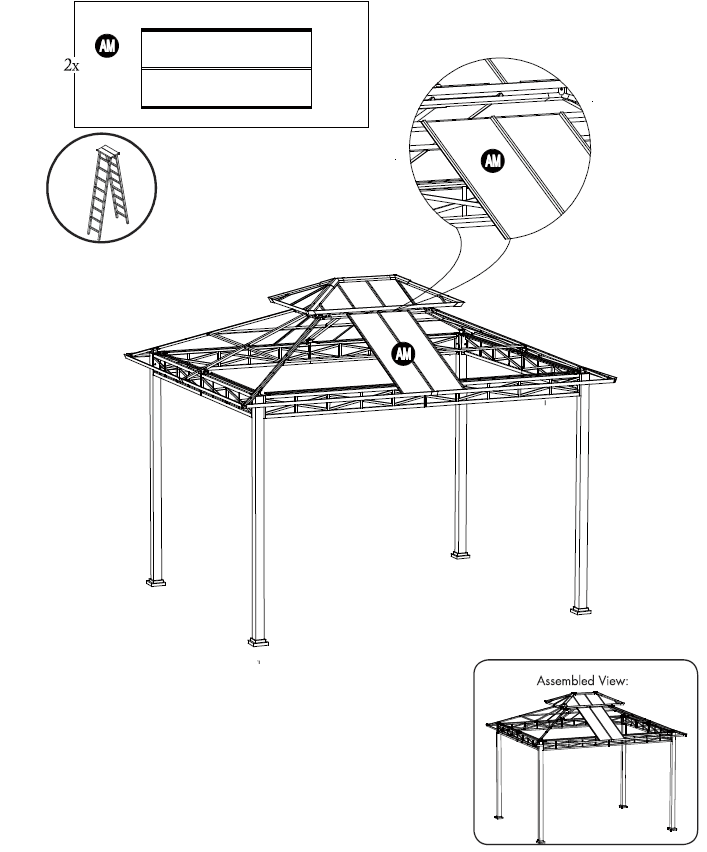
- Put Big roof middle cover 1 (M) to the middle location of the long side like rthe ight image

STEP 16
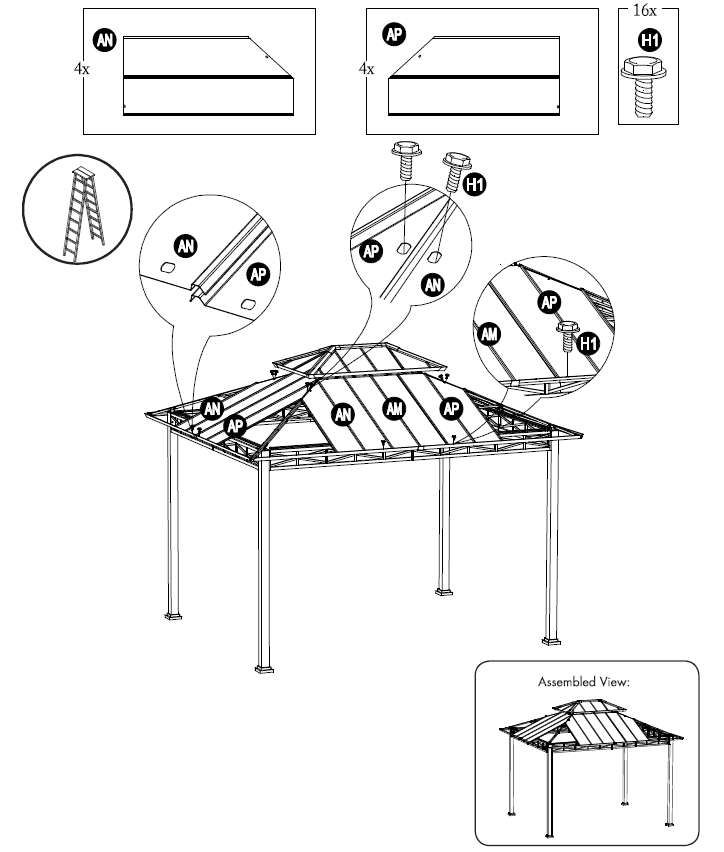
- Put the Big roof middle cover 2 (AN) and Big roof middle cover 3 (AP) beside the Big roof middle cover 1(AM) at the long side, then put the Big roof middle cover 2 (AN) and Big roof middle cover 3 (AP) at the short side, locked them by Bolt(H1) and Wrench(HW1)

STEP 17
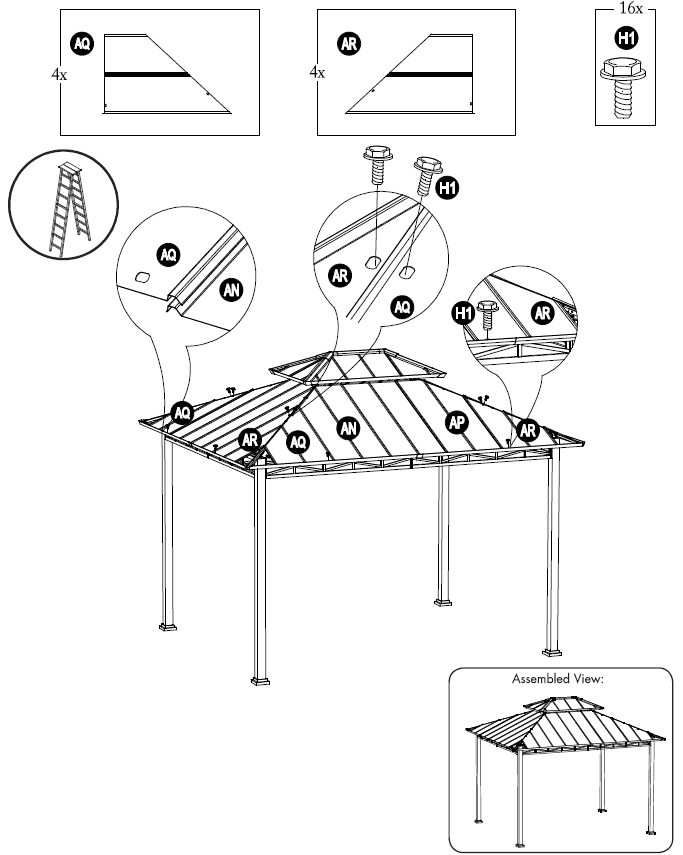
- Put the Big roof middle, small cover (AQ, AR) beside the Big roof middle cover 2(AN) and Big roof middle cover 3(AP), lock them with the Bolt(H1) and Wrench(HW1)

STEP 18
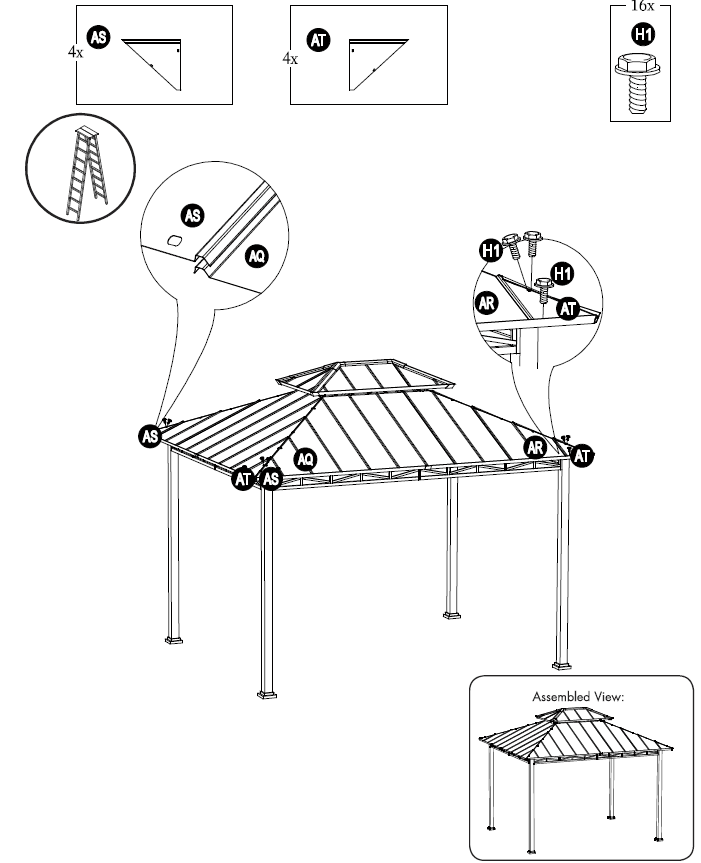
- Put the Big roof left cover(AS) and Big roof right cover(AT) beside the Big roof middle small cover (AQ/AR), lock them with the Bolt(H1) and Wrench(HW1)

STEP 19
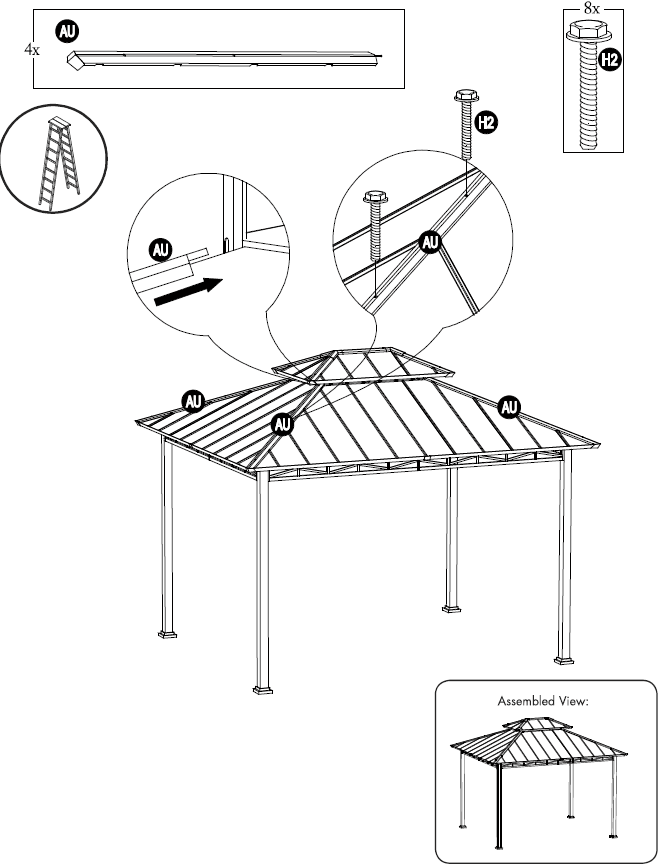
- Attach Big roof sloping beam cover plate(AU) to the Big top by Bolt(H2) and Wrench(HW1)

STEP 20
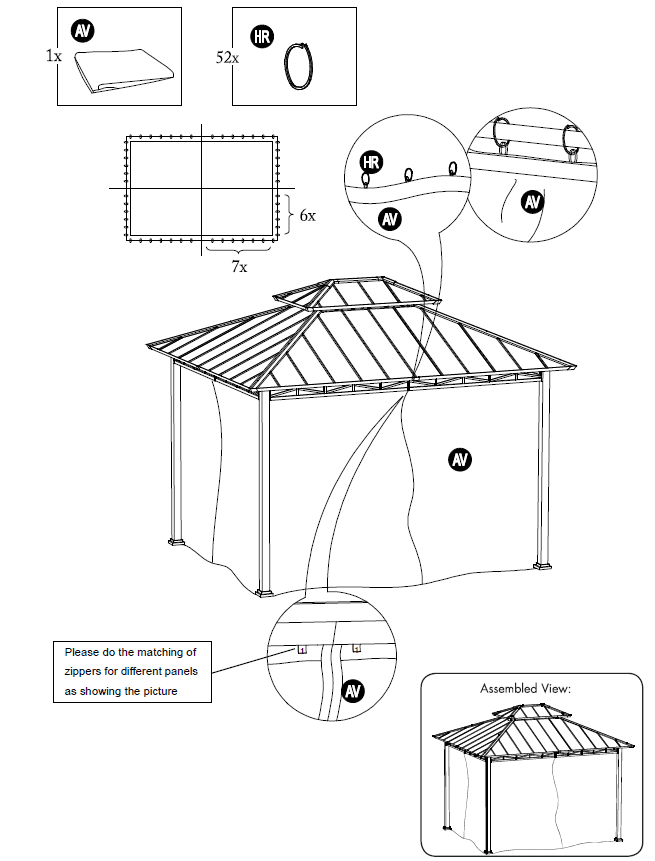
- Hang the Curtain(AV)on the netting tube (K/L) with Ring(HR)

STEP 21
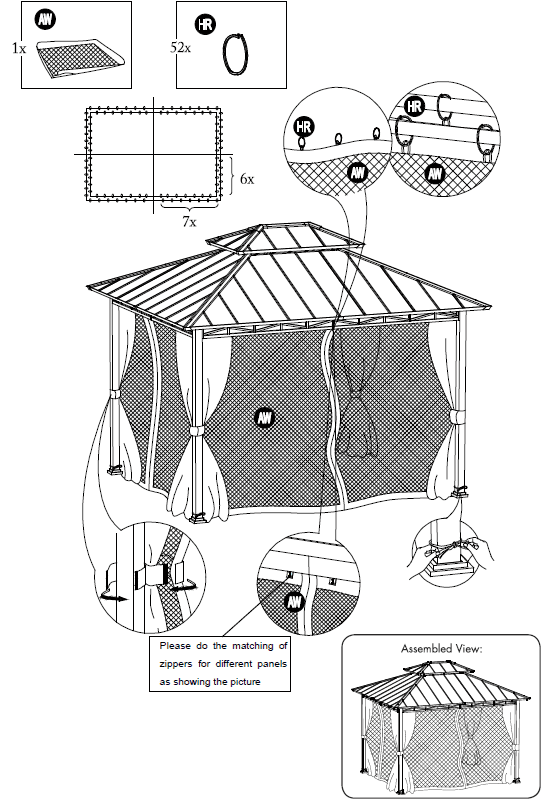
- Hang the Mosquito Netting(AW)on the netting tube (K/L) with Ring(HR)

STEP 22
- Pulling UP the Base Cover(B), they fixed the Gazebo to the ground by Stake(HS) and Base Plate(C)

For more manuals by Broyhill, visit ManualsLibraryy
Broyhill A102010903 Hardtop Gazebo-FAQs
How do I choose the right hardtop gazebo?
Look for polycarbonate roofs for UV protection and impact resistance—great for sunny climates. Aluminum frames are lightweight, strong, and ideal for wind and rain resistance.
How do I measure a gazebo top correctly?
1. Corner to Corner: Measure along the edge or seam between two adjacent corners.
2. Corner to Peak: Measure from the top of a leg to the highest point of the roof.
3. Valance Depth: Measure the vertical height of the valance (if present).
What materials are hardtop gazebos made from?
Hardtop gazebos are usually made of reinforced aluminum, galvanized steel, or polycarbonate panels, offering durability against rain, wind, and sun.
Can my hardtop gazebo blow away in the wind?
Yes, in high winds above 35 mph, unsecured gazebos may shift or tip. Always anchor it with stakes, sandbags, or water weights to keep it stable.
How do I weatherproof my gazebo?
Apply waterproof stains, paints, or sealants to wood parts. For metal, ensure coatings are rust-resistant and clean debris regularly to prevent damage.
What makes a good-quality gazebo?
A durable gazebo should be made from powder-coated aluminum or galvanized steel, which resists fading, rust, and weather damage.
How do I calculate the area of my gazebo?
If your gazebo is an octagon, use the formula:
Area = ½ × apothem × perimeter
How do I repair a damaged gazebo top?
Use adhesive patches or tape for small tears. For bigger rips, sew with matching fabric. Regular upkeep helps extend canopy life.
Are hardtop gazebos waterproof?
Yes, they are waterproof if the canopy is made of PE, PVC, or coated fabric and has sealed seams to prevent leaks.

