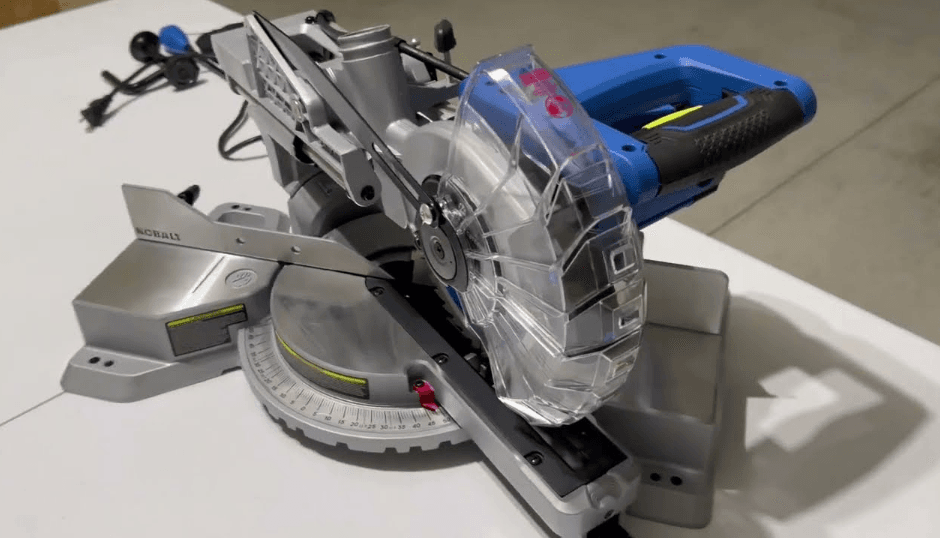
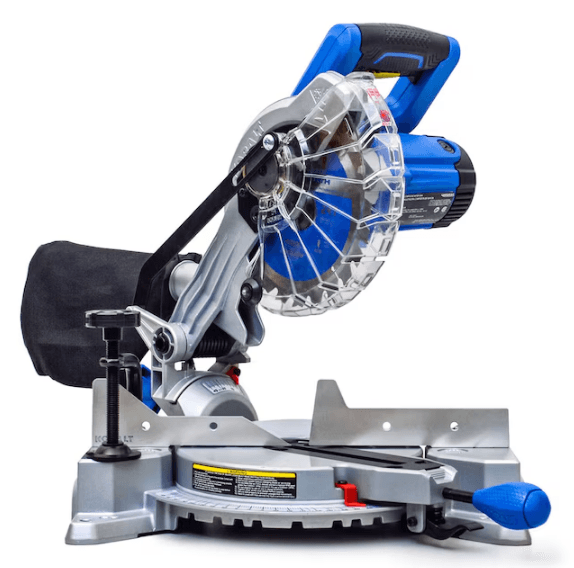
Kobalt SM1850LW Sliding Compound Miter Saw
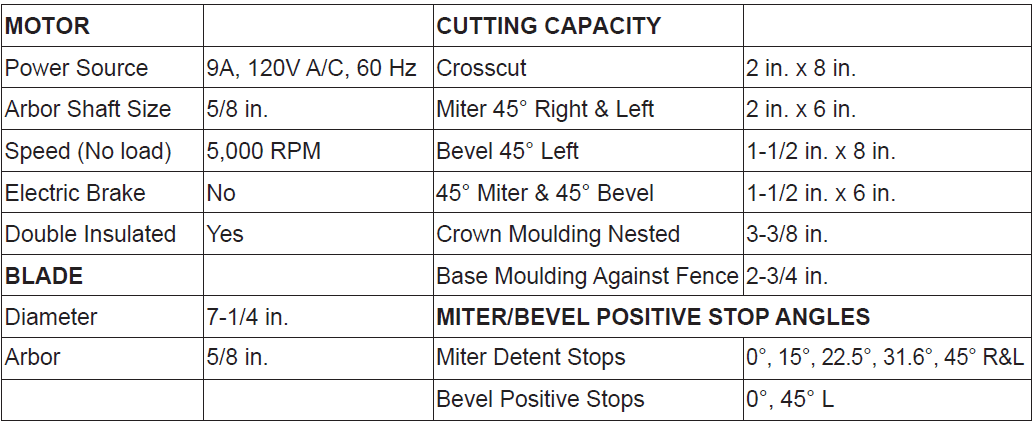
PRODUCT SPECIFICATIONS
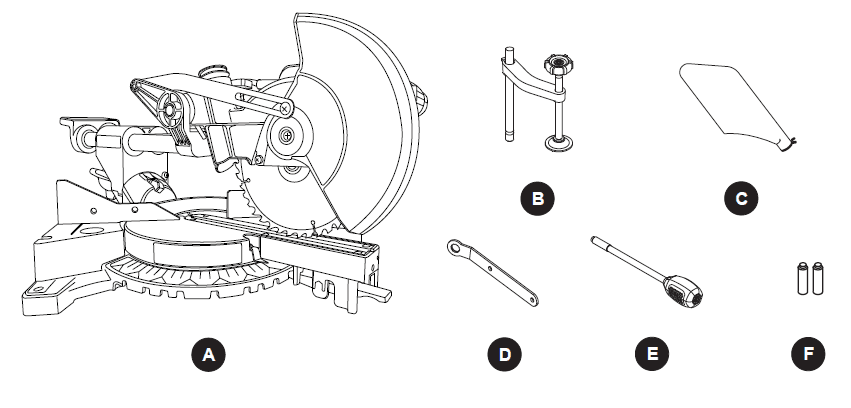
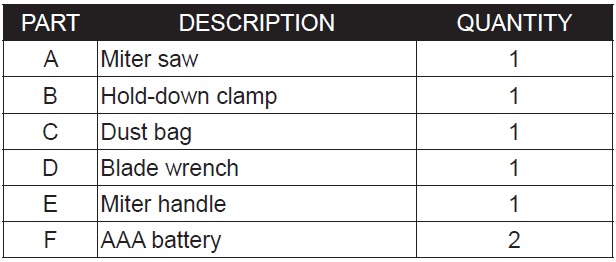
PACKAGE CONTENTS
UNPACKING YOUR MITER SAW
WARNING: To avoid injury from unexpected starting or electrical shock, do not plug the power cord into a source of power during unpacking and assembly. The cord must remain unplugged whenever you are adjusting/assembling the saw.
- Remove the miter saw from the carton.
IMPORTANT: Do not lift miter saw by the trigger switch handle. It may cause misalignment. Lift the saw by the hand holds for transportation. - Place the saw on a secure, stationary work surface.
- Separate all parts from the packing material. Check each one with the illustration below to make certain all items are accounted for before discarding any packing material.
WARNING: If any part is missing or damaged, do not attempt to assemble the miter saw or plug in the power cord until the missing or damaged part is correctly replaced. To avoid electric shock, use only identical replacement parts when servicing double-insulated tools.
SAFETY INFORMATION
GENERAL SAFETY INFORMATION
PROPOSITION 65 WARNING
Some dust created by power sanding, sawing, grinding, drilling, and other construction activities contains chemicals known to the State of California to cause cancer, birth defects, or other reproductive harm.
Some examples of these chemicals are:
- Lead from lead-based paints,
- Crystalline silica from bricks and ceme,nt and other masonry products, and
- Arsenic and chromium from chemically-treated lumber.
Your risk from these exposures varies depending on how often you do this type of work. To reduce your exposure to these chemicals: work in a well-ventilated area and work with approved safety equipment, such as dust masks that are specially designed to filter out microscopic particles.
Handling the power cord on this product may expose you to chemicals known to the State of California to cause cancer and birth defects or other reproductive harm. Wayour sh hands after handling.
CAUTION
- Use only the accessories recommended for this miter saw. Follow instructions that accompany the accessories. Use of improper accessories may cause injury.
- The use of any cutting tool except 7-1/4 in. saw blades is prohibited. Do not use accessories such as shaper cutters or dado sets. Ferrous metal cutting, the use of abrasive wheels, and the cutting of masonry products are prohibited.
- Do not attempt to modify this tool or create accessories not recommended for use with this tool. Any such alteration or modification is misuse and could result in a hazardous condition, leading to possible serious injury.
WARNING:
To avoid the risk of personal injury, do not modify this power tool or use accessories not recommended to fit your tool.
WARNING:
Read warnings and conditions on your CARBIDE TIPPED SAW BLADE.
- Do not operate the saw without the proper saw blade guard in place.
- Carbide is a very hard but brittle material. Care should be taken while mounting, using, and storing carbide-tipped blades to prevent accidental damage.
- Slight shocks, such as striking the tip, can seriously damage the blade. Foreign objects in the workpiece, such as wire or nails, can also cause tips to crack or break off.
- Before using, always visually examine the blade and tips for bent teeth, cracks, breakage, missing or loose tips, or other damage.
- Do not use if damage is suspected. Failure to heed safety instructions and warnings can result in serious bodily injury or loss of eyesight.
GUIDELINES FOR EXTENSION CORDS
When using an extension cord, be sure to use one heavy enough to carry the current your product will draw. An undersized cord will cause a drop in line voltage, resulting in loss of power and overheating. The table below shows the correct size to use depending on cord length and nameplate ampere rating. If in doubt, use the next heavier gauge. The smaller the gauge number, the heavier the cord.
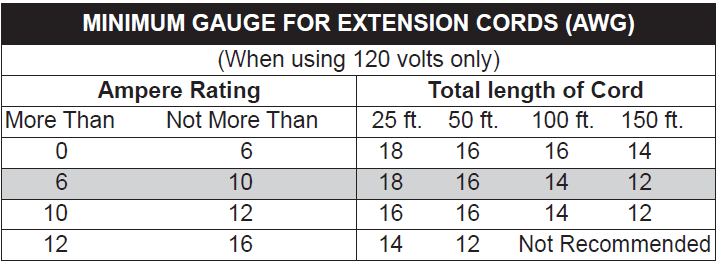
Be sure your extension cord is properly wired and in good condition. Always replace a damaged extension cord or have it repaired by a qualified person before using it. Protect your extension cords from sharp objects, excessive heat, and damp areas.
Use a separate electrical circuit for your tools. This circuit must not be less than #12 wire and should be protected with a 15A time-delay fuse. Before connecting the tool to the extension cord, make sure the saw switch is in the OFF position. The electric circuit should be rated at the same voltage as is stamped on the motor nameplate. Running at a lower voltage will damage the motor.
CAUTION: In all cases make certain the receptacle in question is properly grounded. If you are not sure, have a certified electrician check the receptacle.
PREPARATION
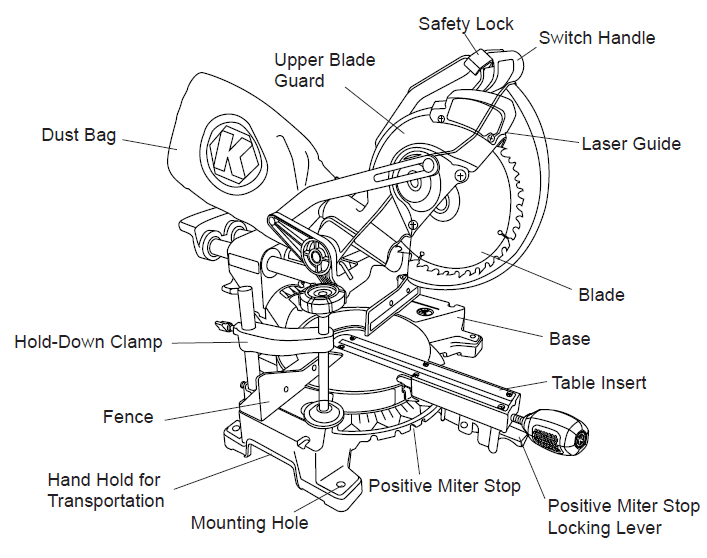
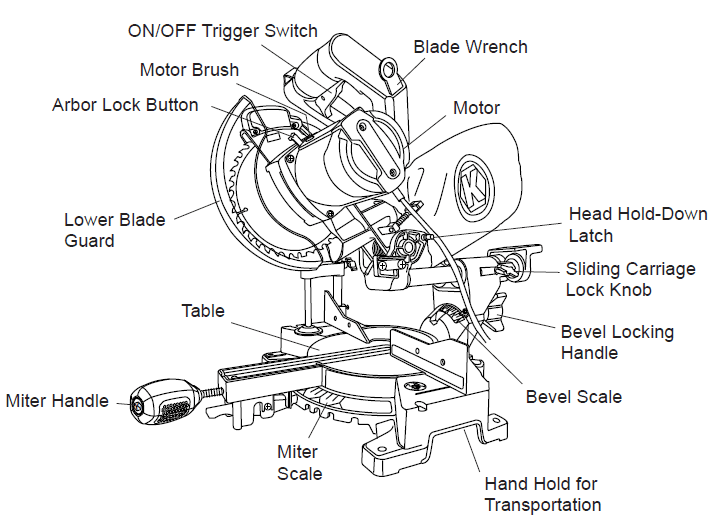
Before beginning assembly or operation of the product, make sure all parts are present. Compare parts with the package contents list and diagram on page 3. If any part is missing or damaged, do not attempt to assemble, install, or operate the product.
Estimated Assembly Time: 10 minutes
Tools Required for Assembly (included): Blade Wrench
Tools Required for Assembly (not included): Adjustable Wrench, 2 mm Hex Wrench, 8 mm Hex Wrench, 10 mm Hex Wrench, Combination Square, Phillips Screwdriver, Flathead Screwdriver.
KNOW YOUR MITER SAW
ASSEMBLY INSTRUCTIONS
WARNING: To avoid injury, do not connect this miter saw to a power source until it is completely assembled and adjusted and you have read and understood the operator’s manual.
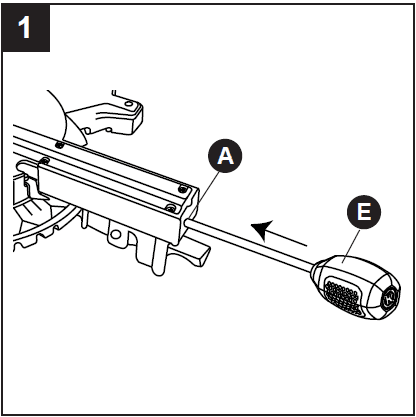
INSTALLING THE MITER HANDLE (FIG. 1)
- Thread the miter handle (E) into the hole located at the front of the miter saw (A).
INSTALLING THE DUST BAG (FIG. 2)
- Squeeze the metal collar wings on the dust bag (C).
- Place the dust bag neck opening around the exhaust port on the miter saw (A) and release the metal collar wings.
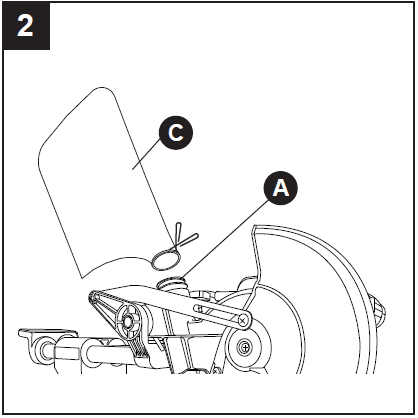
NOTE: To empty the dust bag, squeeze the metal collar wings and remove from the exhaust port. Open the zipper on the underside of the bag and empty into a waste container.
IMPORTANT: Check frequently and empty the bag before it gets full.
WARNING: Do not use this saw to cut and/or sand metals. The hot chips or sparks may ignite sawdust from the bag material.
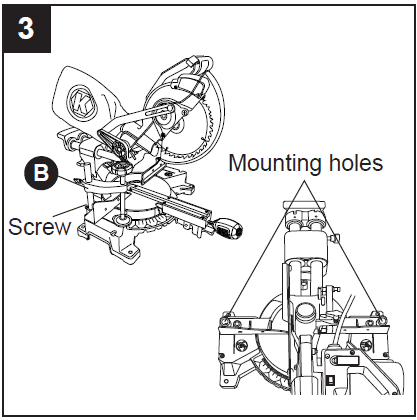
INSTALLING THE HOLD-DOWN CLAMP (FIG. 3)
NOTE: There are two mounting holes for the hold-down clamp. These are located just behind the fence on the left and right side of the base.
- Loosen the screw with a Phillips screwdriver.
- Place the hold-down clamp (B) in the desired mounting hole.
- Tighten the screw to hold the hold-down clamp.
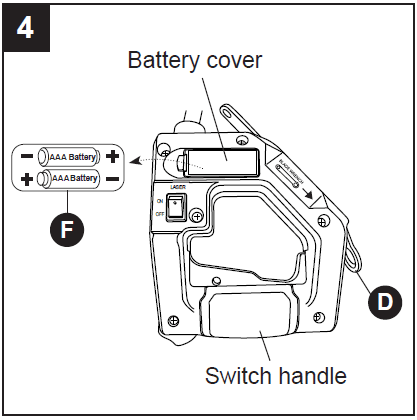
SAW BLADE WRENCH (FIG. 4)
For convenient storage and prevention of loss, there is a slot in the side of the switch handle for storing the blade wrench (D) when not in use.
INSERTING AND REPLACING BATTERIES FOR THE LASER (FIG. 4)
- Unplug your miter saw.
WARNING: Failure to unplug your tool could result in accidental starting, causing possible serious personal injury. - Open the battery cover located on the switch handle.
- Insert the two supplied AAA batteries (F) as per the diagram. If replacing the batteries, take out the old batteries and replace with new AAA batteries. Dispose of old batteries properly.
- Close the battery cover.
NOTE: Replace with batteries that have a rating of 1.5 volts (Number 4 series and AAA size or equivalent).
HELPFUL HINT: Remove the two batteries during long periods of non-use of the saw. This will reduce damage to the laser guide from the batteries corroding during storage.
ADJUSTMENT INSTRUCTIONS
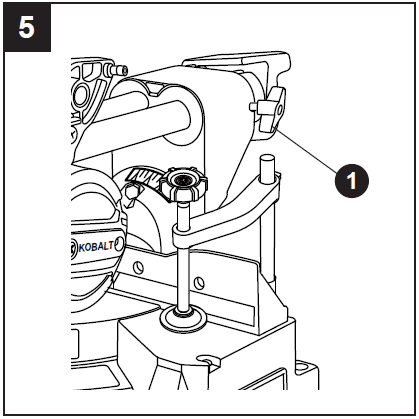
UNLOCKING THE SLIDE CARRIAGE (FIG. 5)
- After removing the saw from the carton, loosen the slide carriage lock knob (1). When transporting or storing the miter saw, the slide carriage should always be locked in position. The slide carriage lock knob (1) is located on the right side of the slide carriage.
UNLOCKING AND LOCKING THE CUTTER HEAD (FIG. 6)
Unlocking the cutter head:
- To raise the cutter head from its storage/transport position, push down slightly on the switch handle (1).
- Pull out the stop latch knob (2).
- Allow the cutting head to rise to the up position.
Locking the cutting head:
When transporting or storing the miter saw, the cutting head should always be locked in the down position.
- Push the cutting head down to its lowest position.
- Push the stop latch knob (2) into the locking hole.
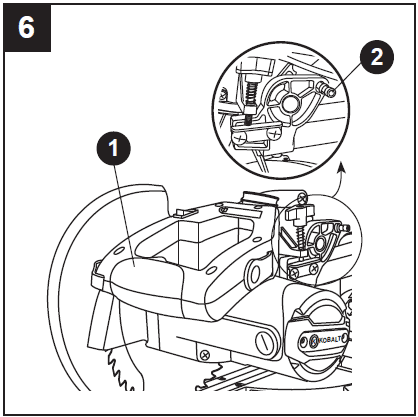
CAUTION: To avoid injury and damage to the saw, transport and store the miter saw with the cutting head locked in the down position. Never use the stop latch to hold the cutting head in a down position for cutting operations.
IMPORTANT: To avoid damage, never carry the miter saw by the switch handle, the cutting arm, or the miter table handle. ALWAYS use the handholds for transportation.
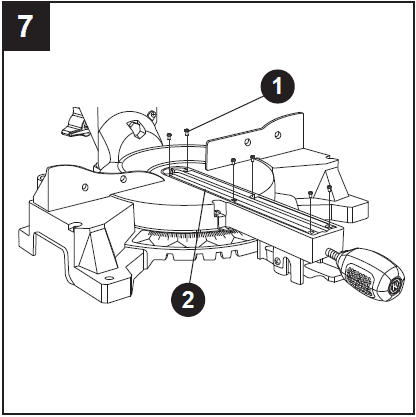
REMOVING AND INSTALLING THE TABLE INSERT 7 (FIG. 7)
NOTE: The miter saw comes with the table inserts already installed. These instructions are for replacing or adjusting either insert side.
WARNING
To avoid injury:
- Always unplug the saw to avoid accidental starting. Remove all small pieces of material from the table cavity before performing any cuts. The table insert may be removed for this purpose, but always reattach the table insert before performing a cutting operation.
- Do not start the sliding compound miter saw without checking for interference between the blade and table insert. Damage could result to the blade, table insert or turntable if blade strike occurs during the cutting operation.
- To remove, loosen and remove the six screws (1) on the table insert (2) with a Phillips screwdriver and remove the insert.
- To install, reposition the table insert, install the six screws and tighten.
- Check for blade clearance by moving the slide carriage through the full motion of the blade in the table slot. If neither side of the insert hits the saw blade, loosen the three screws for that side and adjust. Tighten the screws and check again for blade clearance.
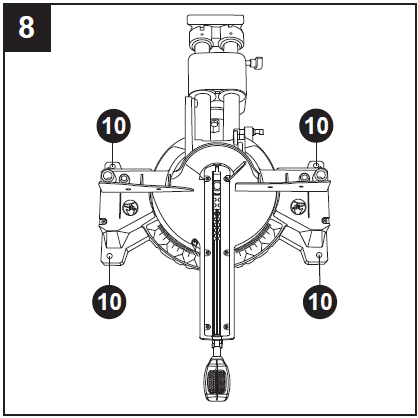
MOUNTING THE MITER SAW (FIG. 8, 9, 10)
WARNING
To avoid injury from unexpected saw movement:
- Disconnect the power cord from the outlet and lock the cutting head in the lower position using the stop latch. • Lock the slide carriage in place by tightening the slide carriage lock knob.
- To avoid back injury, lift the saw by using the hand holds for transportation. Bend with your knees, not your back.
- Never carry the miter saw by the power cord or by the switch handle. Carrying the tool by the power cord could cause damage to the insulation or the wire connections resulting in electric shock or fire.
- To avoid injury from flying debris, do not allow visitors to stand near the saw during any cutting operations.
Mounting instructions:
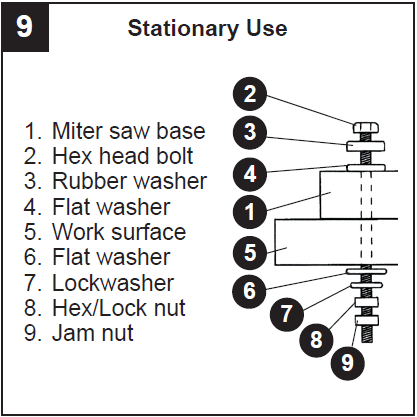
- For stationary use, place the saw in the desired location, directly on a workbench where there is room for handling and proper support of the workpiece. The base of the saw has four mounting holes (10) (Fig. 8). Bolt the base of the miter saw (1) to the work surface (5), using the recommended fastening method as shown in Fig. 9. NOTE: Mounting hardware is not included with this tool. Bolts, nuts, washers and screws must be purchased separately.
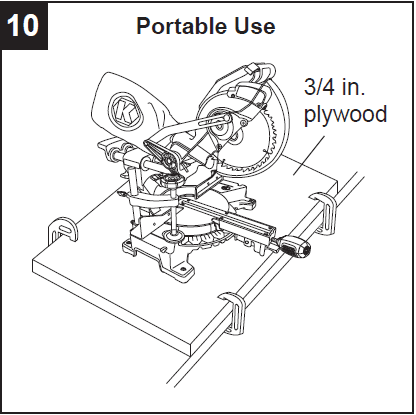
- For portable use, place the saw on a 3/4 in. thick piece of plywood. Bolt the base of the miter saw securely to the plywood using the mounting holes (10) (Fig. 8) on the base. Use C-clamps to clamp this mounting board to a stable work surface at the worksite (Fig. 10).
NOTE: If a miter saw stand is used, please follow all instructions shown in that product’s instructions for proper mounting.
REMOVING AND INSTALLING THE BLADE
WARNING: Only use a 7-1/4 in. diameter blade. To avoid injury from an accidental start, make sure the switch is in the OFF position and the plug is not connected to the power source outlet.
REMOVING (FIG. 11, 12, 13)
- Unplug the saw from the outlet.
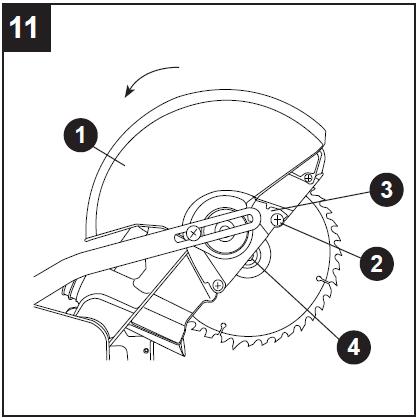
- Allow the miter saw cutting head to rise to the upright position. Raise the lower blade guard (1) to the up position.
- Loosen the cover plate screw (2) with a Phillips screwdriver.
NOTE: Do not remove this screw. - Rotate the cover plate (3) upward to expose the arbor bolt (4).
- Place the blade wrench over the arbor bolt.
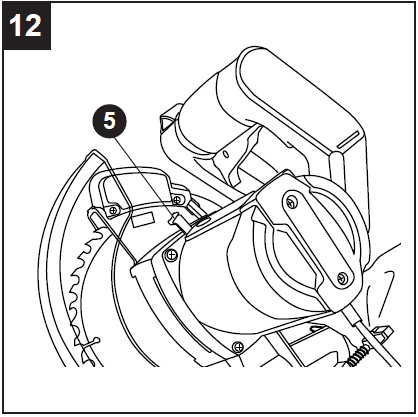
- Locate the arbor lock button (5) on the front of the motor, below the miter saw switch handle (Fig. 12).
- Press the arbor lock button, holding it in firmly while turning the blade wrench clockwise. The arbor lock will engage after turning the wrench. Continue to hold the arbor lock button to keep it engaged, while turning the wrench clockwise to loosen the arbor bolt.
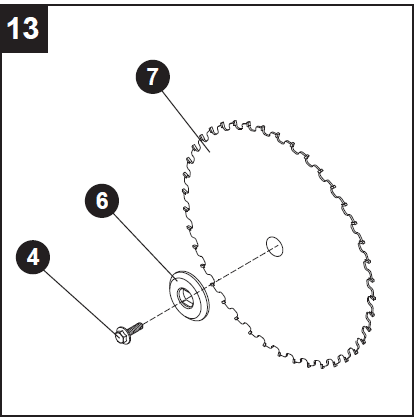
- Remove the arbor bolt (4), the blade collar (6), and the blade (7). Do not remove the inner blade collar (Fig. 13).
NOTE: Pay attention to the pieces removed, noting their position and the direction they face. Wipe the blade collar clean of any sawdust before installing a new blade.
INSTALLING BLADE (FIG. 11, 12, 13)
Unplug the miter saw before changing/installing the blade.
- Install a 7-1/4 in. blade with a 5/8 in. arbor, making sure the rotation arrow on the blade matches the clockwise rotation arrow on the upper guard.
- Place the blade collar (6) against the blade and on the arbor. Thread the arbor bolt (4) onto the arbor (Fig. 13) in a counterclockwise direction. IMPORTANT: Make sure the flats of the blade collars are engaged with the flats on the arbor shaft. Also, the flat side of the blade collar must be placed against the blade.
- Place the blade wrench on the arbor bolt.
- Press the arbor lock button (5), holding it in firmly while turning the blade counterclockwise. When the arbor lock engages, continue to press it in while tightening the arbor bolt securely (Fig. 12).
- Rotate the cover plate (3) back to its original position until the slot in the cover plate engages with the cover plate screw (2). While holding the lower blade guard, tighten the screw with a Phillips screwdriver (Fig. 11).
NOTE: The lower blade guard must be raised to the upright position to access the cover plate screw. - Lower the blade guard (1) and verify that the operation of the guard does not bind or stick (Fig. 11).
- Be sure the arbor lock is released so the blade turns freely before operating the saw.
WARNING
- To avoid injury, never use the saw without the cover plate securely in place. It keeps the arbor bolt from falling out if it accidentally loosens and helps prevent the spinning blade from coming off the saw.
- Make sure the collars are clean and properly arranged. Lower the blade into the lower table and check for any contact with the metal base or the miter table.
- To avoid injury from an accidental start, make sure the switch is in the OFF position and the plug is not connected to the power source outlet.
- Never cut metals or masonry products with this tool. This miter saw is designed for use on wood and wood-like products only.
BEVEL STOP ADJUSTMENT (FIG. 14, 15, 16)
WARNING: To avoid injury from an accidental start, make sure the switch is in the OFF position and the plug is not connected to the power source outlet.
90° (0º) Bevel Adjustment (FIG. 14)
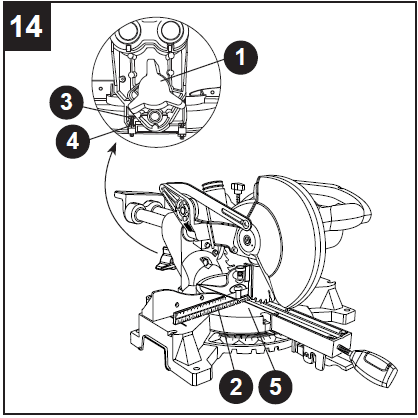
- Loosen the bevel lock handle (1) and tilt the cutting arm completely to the right. Tighten the bevel lock handle.
- Place a combination square (2) on the miter table with the ruler against the table and the heel of the square against the saw blade.
- If the blade is not 90° square with the miter table (5), loosen the bevel lock handle (1), tilt the cutting head to the left, loosen the locknut (4) and turn the bevel angle adjustment bolt (3) in or out with a 10 mm wrench until the blade is square with the table.
- Tilt the cutting arm back to the right at 90° (0°) bevel and recheck for alignment.
- Repeat steps 1 through 4 if further adjustment is needed.
- Tighten the bevel lock handle and locknut (4) when alignment is achieved.
90° Bevel Pointer Adjustment (FIG. 15)
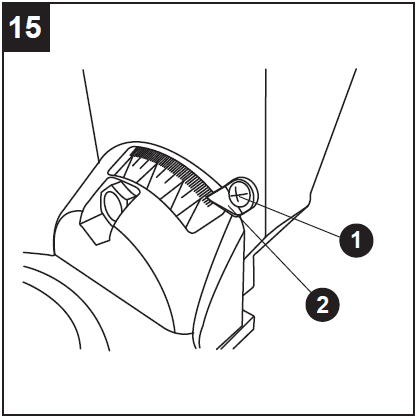
- When the blade is exactly 90° to the table, loosen the bevel indicator screw (1) using a Phillips screwdriver.
- Adjust bevel indicator (2) to the “0” mark on the bevel scale and retighten the screw.
WARNING: To avoid injury from an accidental start, make sure the switch is in the OFF position and the plug is not connected to the power source outlet.
45° Bevel Adjustment (FIG. 16)
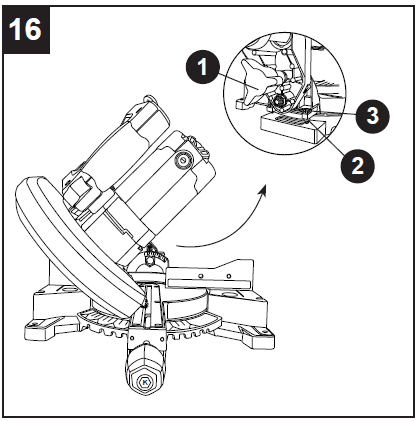
- Loosen the bevel lock handle (1) and tilt the cutting head completely to the left.
- Using a combination square, check to see if the blade angle is 45° to the table.
- If the blade is not at 45° to the miter table, tilt the cutting arm to the right, loosen the locknut (2) on the bevel angle adjustment bolt (3) and use a 10 mm wrench to the adjustment bolt (3) depth in or out to increase or decrease the bevel angle.
- Tilt the cutting arm to the left to a 45° bevel and recheck for alignment.
- Repeat steps 1 through 4 until the blade is at 45° to the miter table.
- Tighten the bevel lock handle (1) and locknut (2) when alignment is achieved.
MITER SCALE (FIG. 17)
The sliding compound miter saw scale can be easily read, showing miter angles from 0° to 45° to the left, and 0° to 45° to the right. The miter saw table has nine of the most common angle settings with positive stops at 0°, 15°, 22.5°, 31.6°, and 45°. These positive stops position the blade at the desired angle quickly and accurately. Follow the process below for the quickest and most accurate adjustments.
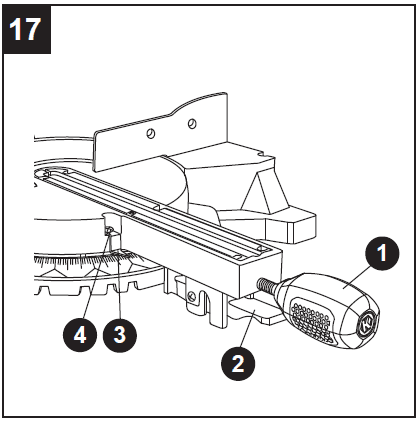
To Adjust Miter Angles
- Unlock the miter table by turning the miter handle (1) counterclockwise.
- Move the turntable while lifting ohe positive stop locking lever (2) to align the indicator (3) to the desired degree measurement.
- If the desired angle is one of the nine positive stops, release the positive stop locking lever, making sure the lever snaps into position, and then secure it by tightening the miter handle.
- If the miter angle desired is not one of the nine positive stops, simply lock the miter table into the desired angle position by turning the miter handle in the clockwise direction.
Miter Angle Pointer Adjustment (FIG. 17)
- Move the table to the 0° positive stop.
- Loosen the screw (4) that holds the indicator with a Phillips screwdriver.
- Adjust the indicator (3) to the 0° mark and retighten the screw.
ADJUSTING FENCE SQUARENESS (FIG. 18)
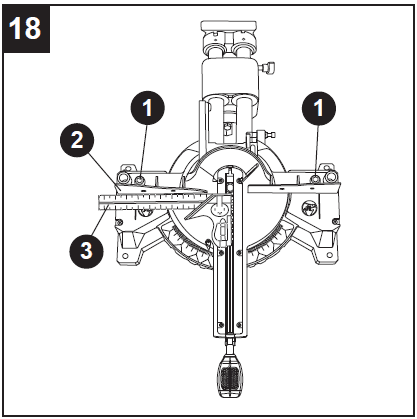
- Lower the cutting arm and lock it in position.
- Using a square (3), lay the heel of the square against the blade and the ruler against the fence (2) as shown.
- Loosen the two fence locking bolts (1) with an 8 mm hex wrench.
- Adjust the fence 90° to the blade and tighten the four fence locking bolts. NOTE: If the saw has not been used recently, recheck blade squareness to the fence and readjust if needed.
- After the fence has been aligned, cut 90° using a scrap piece of wood and check squareness on the piece. Readjust if necessary.
For more manuals by Kobalt, visit ManualsLibraryy
Kobalt SM1850LW Sliding Compound Miter Saw- FAQs
How do I adjust the bevel angle?
Step 1: Loosen the bevel lock knob at the rear.
Step 2: Tilt the saw left or right to the desired angle (0°–45°).
Step 3: Tighten the knob to lock the bevel.
How do I lock the blade for storage?
Engage the blade lock button and lower the saw head until it clicks into place.
What cuts can this saw make?
Crosscuts (90° straight cuts)
Miter cuts (angled cuts horizontally)
Bevel cuts (angled cuts vertically)
Compound cuts (both miter + bevel angles at once)
What’s the max cutting width & depth?
Width (sliding): Up to 7-1/4″ at 90°
Depth (vertical): Up to 2-1/2″ at 90°
Can it cut metal or rip lumber?
No—designed only for wood, PVC, and trim.
Use a table saw for rip cuts (lengthwise cuts).
How do I use the laser guide?
Step 1: Install 2 AAA batteries (compartment near the handle).
Step 2: Press the laser button to align cuts precisely.
What safety gear should I wear?
✔ Safety glasses
✔ Hearing protection
✔ Dust mask (for extended use)
How do I clean and maintain the saw?
Blade: Use a blade cleaner or mild detergent.
Sliding rails: Lubricate with silicone spray.
Dust: Blow out debris with compressed air.

