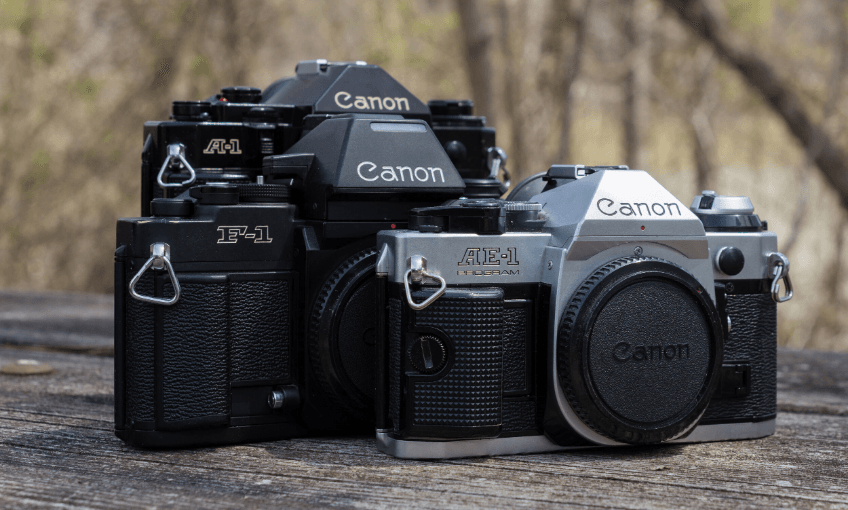
Canon F1N 35mm Film Camera
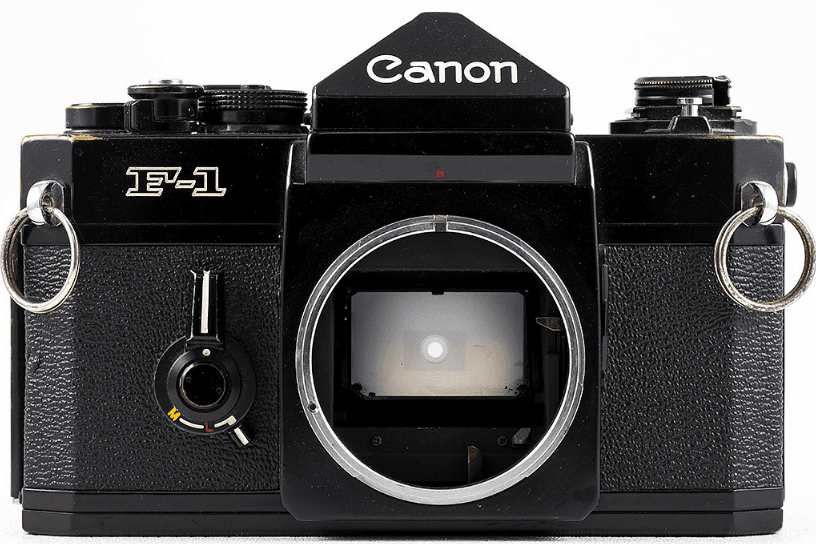
Attaching the Lens
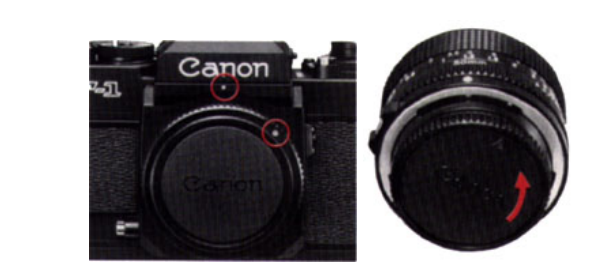
To remove the body cap, turn it counterclockwise until it stops and pull it off. To reattach, align the red dot on the cap with the camera’s red dot. Then lightly push the cap in and turn it fully clockwise. Turn the rear lens cap in the direction of the arrow until it stops and pull it off. To reattach, align the arrow on the cap with the lens’ red dot. Then lightly push the cap in and turn it fully clockwise.
To mount the lens, align its red positioning point with the camera’s red dot and turn the lens in the direction of the arrow until it stops and the lens release button pops out. To remove the lens, turn it counterclockwise while pressing the lens release button.
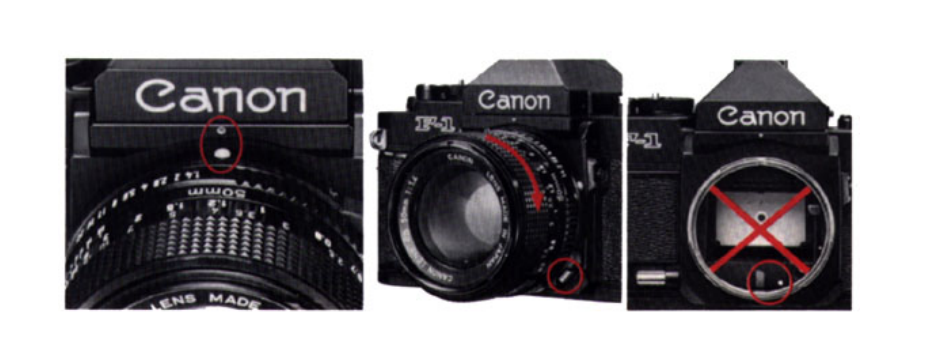
CAUTION: Do not mount the lens if the red dot inside the camera mount and the red line on the stop-down slide are showing. In this case, push in the stopdown slide so that it locks in the normal (retracted) position and these warning marks can no longer be seen
The following lenses cannot be mounted on the New Canon F-1:
- FL 19mm f/3.5
- FL 58mm f/1.2
- R 50mm f/1.8
- R 58mm f/1.2
- R 100mm f/3.5
- R 100mm f/2
- FLP 38mm f/2.8
Notes
- Do not push the stop-down slide while advancing the film. Otherwise, it may be impossible to mount the lens.
- Do not press the lens release button while mounting the lens or it may not pop out, thus causing the lens to work incorrectly
Battery
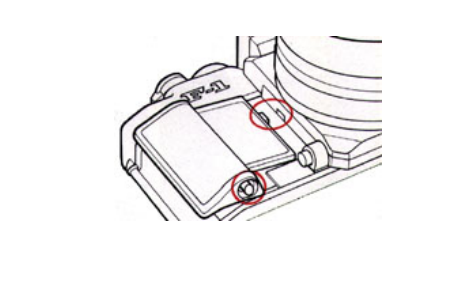
Loading the Battery
The action grip of the camera also serves as a battery chamber cover and therefore must be removed to load a battery. To do this, press the release button and lift up the grip. Use one of the batteries listed below or an equivalent of another brand:
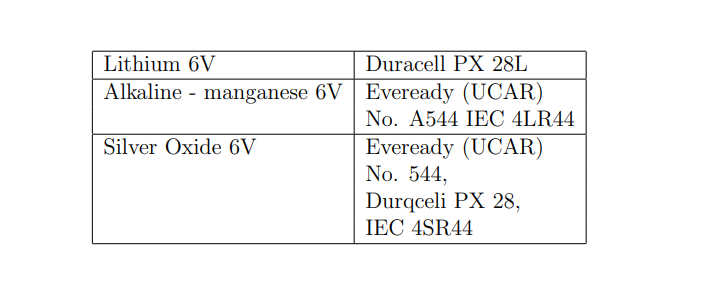
To ensure proper contact, wipe the battery terminals with a clean, dry cloth before loading. Load a new battery so that its terminals are in the directions indicated by the diagram inside the battery chamber. Insert the negative end first, then push down and insert the positive end. The camera will not function if the battery is loaded incorrectly. Then slide the action grip’s tab into the guide hole as shown, and lower the grip until it locks in place.
Checking the Battery
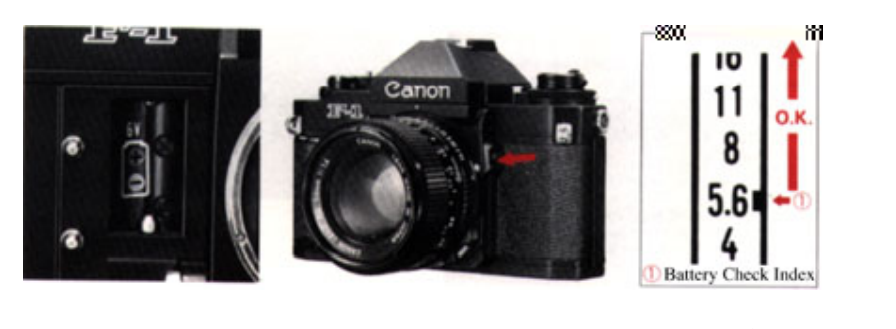
The battery can be checked with the shutter dial at any setting other than ”A”, and at any ASA/ISO film speed setting. With the shutter dial on ”B,” battery check is possible only after the film has been advanced. To check the battery, press the check button for about three seconds while looking in the viewfinder. Battery power is sufficient when the meter needle is above the battery check index. The weaker the battery, the lower the needle. However, even if the battery is weak, exposure will still be correct as long as the shutter is released when you press the shutter button. If the meter needle rests at or below the index, the battery is almost exhausted. In this case, have a new battery ready. With normal use the battery should last about one year.
Battery po’wer may decrease, however, at temperatures below 0◦ C (32◦ F). In this case, load a new battery and keep the camera warm until you are ready to shoot. Do not throw the original battery away; keep it as a spare. Alternate the two batteries, keeping the one that is not in use warm. Although a battery may not perfomm well in the cold, it may work normally again at higher temperatures. Lithium batteries are recommended for use at low temperature
IMPORTANT
The New Canon F-1 can be used even if the battery fails simply by removing the exhausted battery from the camera. The mechanically controlled shutter speeds are 1/2000 to 1/125 sec., ”S” (1/90 sec.) and ”B” (bulb).
Notes:
- Remove the battery if you do not expect to use the camera for about three weeks or longer.
- Do not try to take the battery apart and never dispose of it in fire
Try to make a habit of checking the battery at the followingtimes:
- After loading a new battery.
- If the shutter won’t function with the selftimer/lock lever on ”A.”
- Before and after making many long exposures at slow speeds other than ”B.”
- When you are using the camera at low temperatures.
- Before shooting important events.
- When the camera is used frequently.
- After storing the camera for a long time.
- Before going on a trip.
The battery check button also serves to cancel the self-timer, meter reading, illumination of viewfinder information (”LIGHT” setting of meter mode selector), and shutter operation during long exposures. The circuit is cancelled the moment you press the button, and the second curtain will close when you remove your finger. The shutter will not be released if you press the shutter button while pressing the battery check button.
Shutter Release and Self-timer/Lock Lever
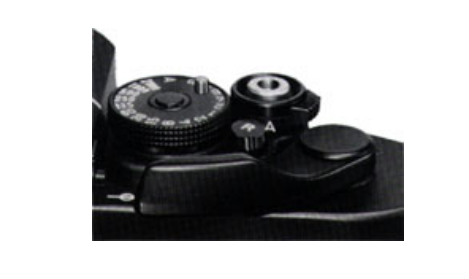
The self-timer/lock lever of the camera has three settings. With the lever at ”A,” press the shutter button halfway to activate the meter. To release the shutter, gently press the shutter button all the way down. When the level is at ”L,” the shutter button is locked. It is advisable to turn the lock lever to ”L” when the camera is not in use to prevent accidental shutter release and battery consumption. With the lever at ”S,” the camera’s 10-second self-timer can be activated simply by pressing the shutter button.
For further details on self-timer photography. Shutter release is electromagnetic as long as there is a battery in the camera. Once the battery is removed, the camera switches to mechanical release, and only those speeds which are mechanically controlled can be used. The shutter button has a threaded socket in the center to accept a standard cable release.
IMPORTANT: The New Canon F-1 has a built-in safety circuit which prevents shutter release if the lens aperture ring is on the ”A” mark and a power drive is not attached.
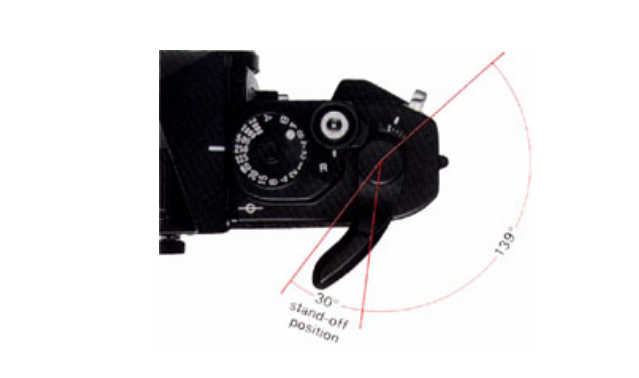
First push the advance lever out to its 30◦ stand-off position To advance the film, turn the advance lever all the way to the right in one continuous 139◦ stroke or several short ones. This also cocks the shutter and prepares the diaphragm and mirror for the next shutter release. The film must be advanced fully to the next frame or the shutter will not release.
Holding the Camera
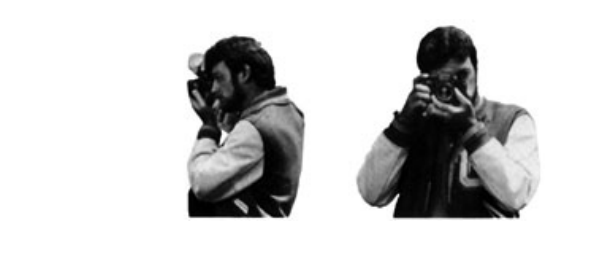
The best way to prevent image blur from camera movement is to hold the camera as steady as possible, with your left hand supporting the camera and lens. Lightly rest your right index finger on the shutter button, and the tip of your thumb on the film advance lever or on the body. Wrap your other right fingers around the action grip. Then press your left elbow to your body and lightly press the camera against your cheek or forehead. For a vertical shot, steady at least one elbow against your body. Spread your feet slightly apart. one foot ahead of the other, and relax.
Lean against a steady support if one is available. There is, of course, no one correct way to hold the camera. Experiment to find the most suitable way for you. Select a method that provides comfort in addition to stability. It may help to practice in front of a mirror. When shooting at a shutter speed of 1/30 sec. Or slower or with a telephoto lens, it is advisable to mount the camera on a tripod. If the tripod screw is especially long, be careful not to screw it in beyond the limit of the camera’s tripod socket.
Focusing
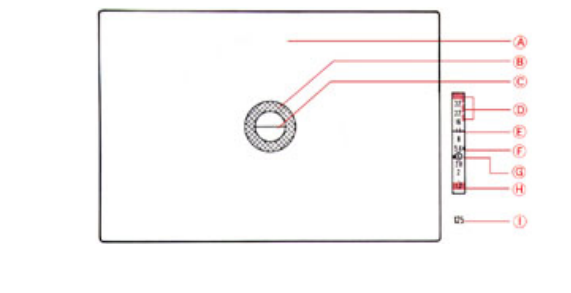
- Laser-matte screen
- Microprism rangefinder
- New split rangefinder
- Overexposure warning mark
- Meter Needle
- Stopped-down metering/battery check index
- Aperture needle
- Underexposure warning mark when using f/1.4 lens)
- Shutter speed display
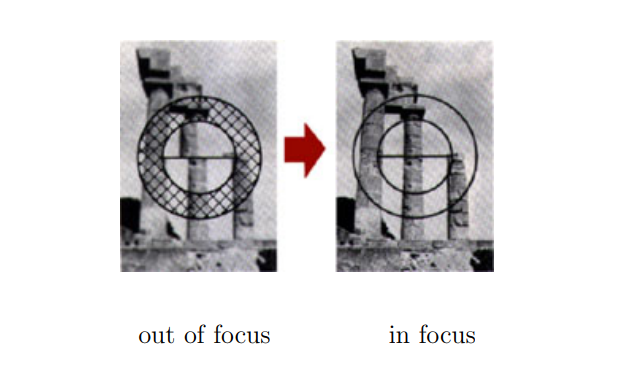
Turn the focusing ring of the lens as you look in the viewfinder until the main subject is sharp. The three focusing aids of the standard screen can be used alone or in combination according to the subject and your own preference.
Note: The New Canon F-1’s focusing screen, which makes precise focusing possible, also determines the metering sensitivity area. There are 13 types of focusing screens and three different metering areas optionally available to suit your particular focusing and metering requirements.
New Split Rangefinder
The new split-image rangefinder divides the subject in half horizontally and is especially useful for a subject which has vertical lines. The subject is in focus when the two halves merge to become one unbroken image. When using a lens with a maximum aperture of f/5.6 or smaller, one-half of the split-image rangefinder may take on,a slight color.
Microprism Rangefinder
When the subject is out of focus, the microprism ring breaks the subject into tiny fragments, causing a shimmering effect. It is clear and steady when your subject is in focus.
Laser-matte Screen
The laser-matte screen appears fuzzy until the subject is -in focus. It is particularly effective when you are using accessories for copying or close-ups.
Note: Ten eyesight correction lenses from +3 to -4 diopters are available. They may make viewing and focusing easier if you are near- or farsighted. Choose the one closest to your eyeglass prescription, then make a practical test if possible
Loading the Film
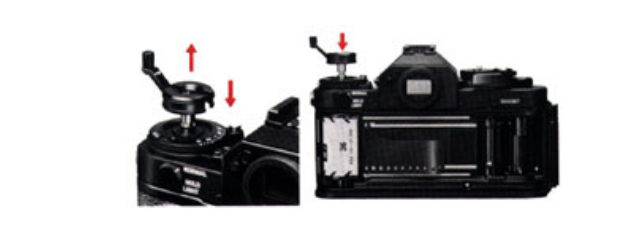
Pressing the safety stopper, pull up the rewind knob until the camera back pops open. Be sure to shield the film from direct sunlight while loading. Place the cartridge in the film chamber as shown. Then push down the rewind knob, turning it until it drops into its normal position.
Note: Remove the plastic insert from the pressure plate before loading the first film cartridge
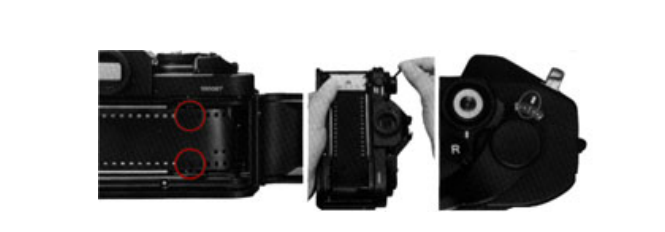
Pull the film leader across the camera and insert the tip into any slot of the take-up spool. Advance the film once. Make sure the sprocket teeth engage the film perforations. The film should be taut. If there is any slack, unfold the rewind crank and gently turn it in the direction of the arrow until it stops. Note that the rewind crank must be unfolded before you turn it; otherwise, the knob will turn freely. Then fold the rewind crank back in. Close the camera back.
Take several blank shots, releasing the shutter and advancing the film until the frame counter reaches ”1.” While doing this, keep an eye on the rewind knob. If it rotates in ,the direction of the arrow, the film is loaded correctly.
CAUTION: NEVER remove the camera’s rewind coupler cover from the baseplate when film is loaded in the camera. This will expose the film to light. It is not necessary to remove the coupler cover except for attaching the AE Motor Drive FN.
Setting the ASA/ISO Film Speed
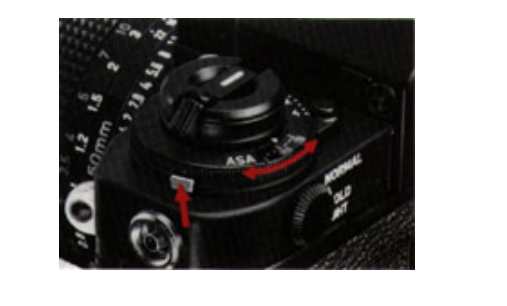
Turn the setting dial, while pressing the lock release button, until the desired film speed aligns with the index. The dial cannot be turned lower than ASA6 or higher than ASA6400. The table on the next page shows the ASA/ISO film speeds which can be set on the New Canon F-1. Figures in parentheses are intermediate speeds which are indicated by dots on the ASA/ISO dial. ASA/ISOis a numerical rating of the film’s sensitivity to light. The higher the number, the faster the film and the more sensitive it is to a given amount of light as compared to a film with a lower number. The film manufacturer’s ASA/ISO rating can be found on the film cartridge, the carton, and the data sheet.
Frame Counter
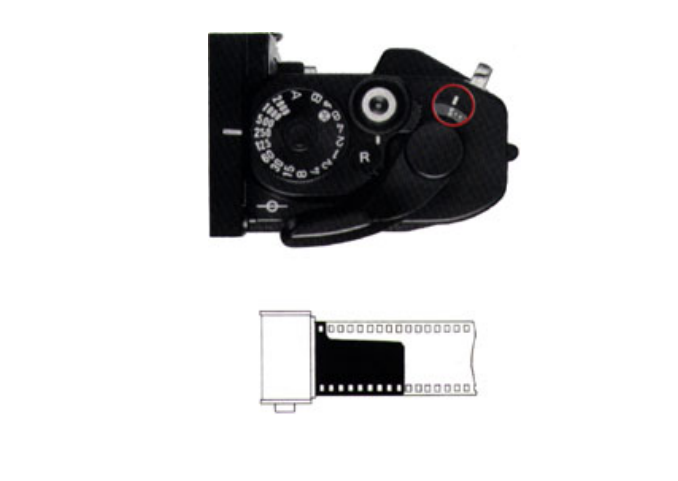
Each time you advance the film, the frame counter also advances to the next number. It can count up to 39 frames. The numbers 1, 12, 20, 24 and 36 are in orange, the latter four to call your attention to the fact that rolls with those numbers are or are almost finished. The frame counter automatically returns to ”S” when you open the camera back. During multiple exposures, the frame counter advances each time you wind the advance lever.
The New Canon F-1 will also accept bulk film loaded into standard cartridges. In this case. be sure to trim the leader as shown before loading it into the camera.
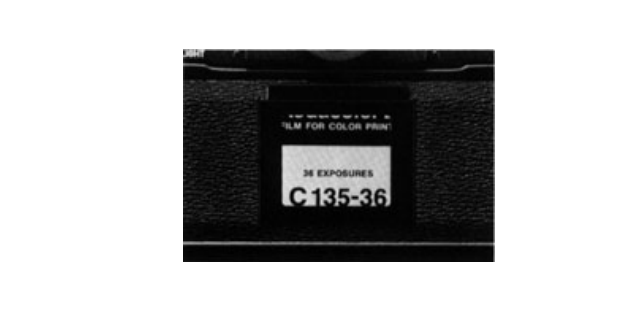
Memo Holder
The camera back has a memo holder. It conveniently holds the end of the film box as a reminder of the type of film in use and the rnumber of exposures.
Caring for your Camera
As with any precision instrument, proper care and maintenance involve a few simple rules in addition to common sense. Observing these few rules will keep your New Canon F-1 in top condition at all times.
- The best thing you can do for your camera is to use it regularly. In the event that you must store it for quite a while, first remove it from its case or camera bag. Remove the battery. Wrap the camera in a clean, soft cloth and place it in a cool, dry, dust-free place. If you store the body and lens separately, attach both the body and rear lens caps.
- Keep the camera and lens out of direct sunlight and away from ”hot spots,” such as the trunk, rear window shelf or glove compartment of a car. Do not store the camera in a laboratory or other such area where chemicals may cause corrosion.
- To keep the camera in top condition during prolonged storage, occasionally insert the battery and take several blank shots to ”exercise” the mechanisms. Check the operation of each part before you use the camera following storage.
- Reliable under normal use, your camera can be damaged by water, excessive spray or humidity, sand and shock. Clean it especially well after you use it in an area with excessive dust or saltwater spray. If you accidentally drop it in water, it may be irreparable but take it immediately to an authorized Canon service facility for inspection.
- To clean the exterior of the camera body, first blow off dust with a blower brush. Wipe off smudges with a silicone cloth or chamois leather. If smudges remain on the eyepiece after using a blower brush, wipe it lightly with lenscleaning tissue which has been moistened with a couple of drops of lens cleaner.
- If the lens surfaces are clean, yet the viewfinder appears dusty, the picture will not be affected by the dust in the viewfinder. If the mirror gets dirty, it will not affect pictures but it may make viewing difficult. Dust it very gently with a blower brush. If further cleaning is necessary, take the camera to the nearest authorized.Canon service facility.
- The film chamber needs cleaning from time to time to remove film dust which may scratch the film. Gently dust it out with a blower brush, being careful not to press on the film rails, shutter curtain and pressure plate.
- To clean the lens surfaces, use only a blower brush, cleaning fluid and tissue made specially for cleaning camera lenses. Carefully follow the lens’ instructions.
For more manuals by Canon, visit ManualsLibraryy
Canon F1N 35mm Film Camera-FAQs
How do I unload the film?
Press the rewind button (bottom of the camera).
Turn the rewind crank until resistance eases.
Open the back and remove the film canister.
How do I store 35mm film after shooting?
Keep film cool and dry (ideally in a fridge if storing long-term).
Avoid heat and humidity to prevent degradation.
Does the Canon F-1N have a self-timer?
Yes! The self-timer lever (near the lens mount) allows for delayed shutter release.
What lenses work with the Canon F-1N?
It uses Canon FD lenses (manual focus). Popular options:
FD 50mm f/1.4 (standard prime)
FD 35mm f/2 (wide-angle)
FD 85mm f/1.8 (portrait)
Is the Canon F-1N good for beginners?
Yes, if you want to learn full manual control. It’s rugged, reliable, and fully mechanical, making it a great choice for film photography beginners.
How do I clean the Canon F-1N?
Use a soft brush or air blower for dust.
Wipe the body with a microfiber cloth.
Avoid liquid cleaners near the shutter or lens mount.
Can I use flash with the Canon F-1N?
Yes! It has a hot shoe and supports manual flash units (no TTL metering).
What’s the best ISO setting for 35mm film?
ISO 100–200 for bright daylight.
ISO 400–800 for low light or action shots.
Why is my light meter not working?
Check the battery.
Ensure the ISO is set correctly.
Clean the battery contacts if corroded.
How do I advance the film manually?
Use the film advance lever (top right). After each shot, wind it fully to prepare for the next exposure.

