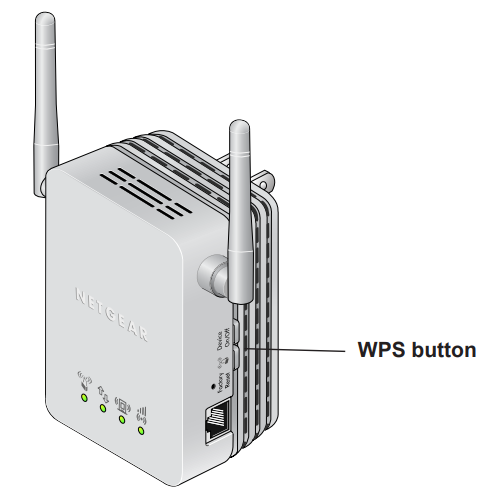
Netgear N300 WiFi Range Extender Model WN3000RP
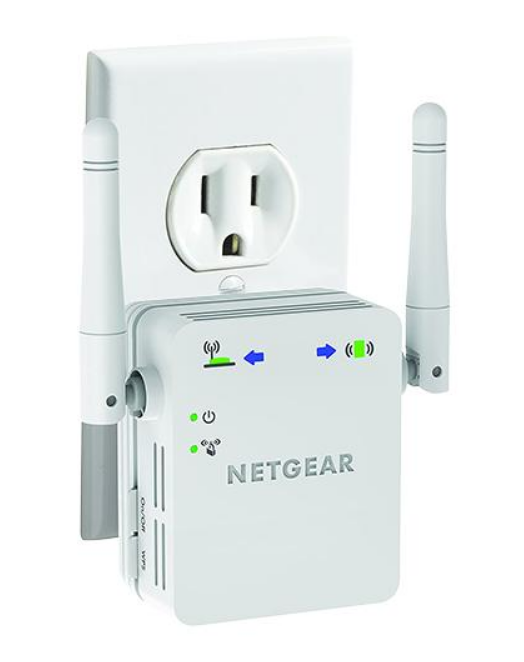
Hardware Features

The LEDs on the front show how the Extender is working:
 WPS. This LED indicates a WPS wireless connection.
- Solid green. There is wireless security (WPA or WPA2).
- Blinking green. A WPS connection is in progress.
 PC to Extender. The LED is lit when the Extender is connected to a PC.
 Status. This LED is lit when the Extender is powered on.
 Link Rate. This LED indicates a wireless connection between the Extender and the router.
- Green is best.
- Amber is good.
- Red is poor.
The side panel has the following features:
- Ethernet port. You can use this for a wired connection to a computer or other device as described in the User Manual.
- Factory Reset button. To use this button, stick a paper clip into the reset hole and hold it until the Status LED flashes.
 WPS button. Press the WPS button to wirelessly connect the Extender to your router or wireless adapter.
- Device On/Off button. Turns the device on and off.
How the Extender Works
The Extender works like a bridge between a wireless router and a computer or wireless device outside the wireless router’s range. To do this, the Extender has two main jobs:
- The Extender connects to a wireless network that is up and running.
When the Extender connects wirelessly to a network, it acts as a network client. This is similar to how a computer connects to a network. - The Extender acts as an access point for computers.
The Extender has its wireless network called NETGEAR_EXT that wireless computers can join. In its role as an access point, the Extender performs tasks that wireless routers do, such as broadcasting its network name (SSID).
The Extender must do each of these jobs so that both ends of the bridge are in place.

When to Use Your Extender
NETGEAR recommends that you connect to the Extender only when your home network connection is poor. Because data traffic routed through the Extender is inherently slower than traffic routed directly from the network, the computer should stay on the network if the connection is good enough. NETGEAR recommends that you connect through the Extender network only when the computer is in a “dead zone” where connection from the network is very poor or non-existent.
The Extender LEDs can help you tell if the extender is correctly set up and working as it should.
- The best performance is delivered when both the Link Rate LED and the PC to Extender Connection LED are green.
- A workable performance is delivered when the Link Rate LED is amber and the PC to Extender Connection LED is green.
Positioning Your Extender
The ideal location to place the Extender is halfway between your wireless router and your computer.

The best connection is established when there is a clear line of sight between the Extender and the wireless router, and also a clear line of sight between the Extender and the computer you are using. If this straight path is blocked by a thick wall or other materials, move the Extender to a different location halfway between the computer and the router.
If there is no power outlet nearby or if you prefer to place the Extender elsewhere, move the Extender closer to the computer. If the Link Rate LED is green or amber and the PC to Extender Connection LED is green, the Extender is working as expected.
To improve the Link Rate LED from red or amber to green:
- Once you successfully connect to the Extender from a computer that is outside the range of your router and log in to www.mywifiext.net, the Smart Wizard guides you through the process to connect the Extender to a router.
- If the Link Rate LED is red or the Smart Wizard cannot connect the Extender to a router, move the Extender closer to the router or to a different spot where it provides a better line of sight. As you move the Extender, continue to check the Link Rate and the PC to Extender Connection LEDs on the front panel until you find a location where the Link Rate LED is green or amber, and the PC to Extender Connection LED is green. Note that you might have to unplug the Extender as you move it to a different location. If you do, from the new location, power up the Extender and continue to check the LEDs.
Once the LEDs show that the Extender is in a good location, open a browser and go to http://www.mywifiext.net to continue the setup process.
Connect a PC to the Extender with an Ethernet Cable
Usually, you connect to the Extender wirelessly, but you can use its LAN port to connect a wired device such as an Ethernet-enabled gaming console, printer, or PC.
Note: Before you connect wired devices or computers, first install and set up your Extender as described in the Universal WiFi Extender WN3000RP Installation Guide that came in the package.
- Connect your computer to the Extender with an Ethernet cable.
- Plug the Extender into an electrical outlet.
CAUTION:
Do not use an Ethernet cable to connect the Extender to a router. If you do so, the Extender does not work because it is designed to use only a wireless connection to the router. - Log in as described in the following section.
If you have trouble connecting
- If you start your computer, connect the Ethernet cable to the Extender, and launch your browser quickly, the computer might still need a couple of minutes to recognize the Ethernet LAN connection before you can connect.
- Make sure that your Ethernet cable is securely connected to the Extender and the computer, and that the Extender LAN LED is on. If the LED is not lit, reconnect the Ethernet cable, and relaunch your Internet browser.
Log In to the Extender
You can log in to the Extender to use the Smart Wizard or to use the menu selections to view or change the extender’s settings.
- On your computer, launch an Internet browser such as Mozilla Firefox or Microsoft Internet Explorer.
- In the address field of your browser, enter http://www.mywifiext.net. You are prompted to enter a user name and password.
 If you do not see the login prompt, make sure to include http:// when you type http://www.mywifiext.net in your browser.
 - Type admin for the user name. The default password is password. NETGEAR recommends that you set a more secure password after you log in (see Set the Password on page 23).
- If your Extender has an Internet connection, the Firmware Upgrade screen displays (see Upgrade the Firmware on page 23), and the software automatically checks for new firmware at the NETGEAR website.
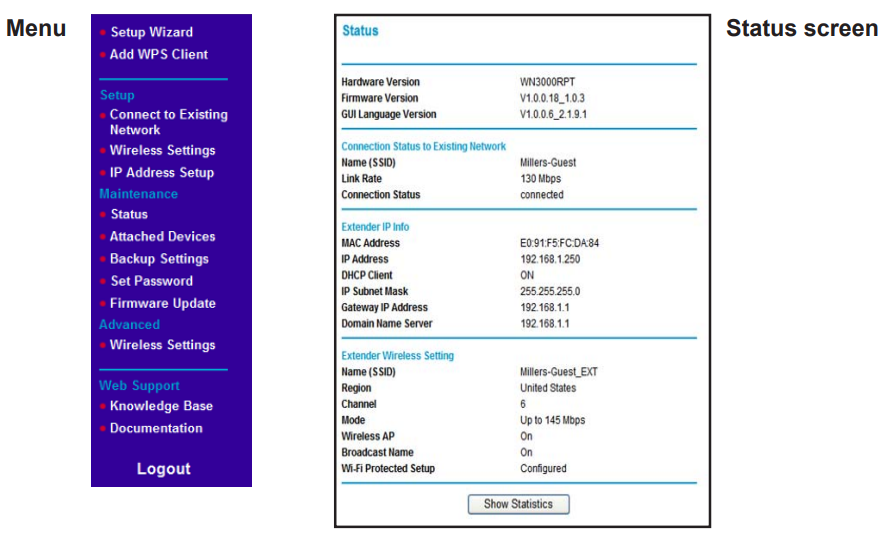
- The Status screen displays with the menu on the left. This screen shows what the current settings are for the Extender:

Use the Smart Wizard to Set Up the Extender
The Smart Wizard can help you set up your Extender to connect to a wireless network. For information about more configuration options, see Chapter 2, Extender Network Settings.
The Universal WiFi Extender WN3000RP Installation Guide (included in the package) explains how to install your Extender. During installation, when you launch your Internet browser, the Smart Wizard automatically displays.
After installation, to use the Smart Wizard again:
- Log in to the Extender as described previously.
Note: Once you begin using the Smart Wizard, you must complete all of its steps before you can exit. - From the menu, select Setup Wizard. The following screen displays:
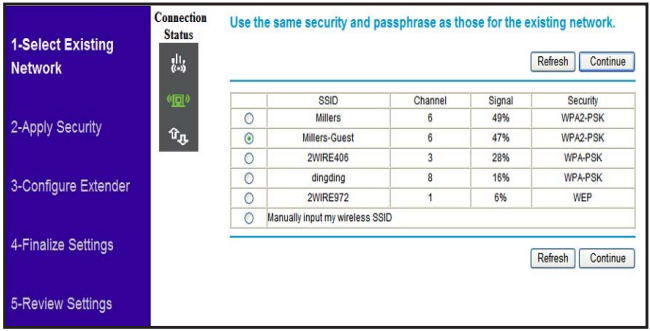
 This is the same Smart Wizard that displays during installation as described in the installation guide.
 - Either select a network from the list, or select the Manually input my wireless SSID radio button and type the SSID.

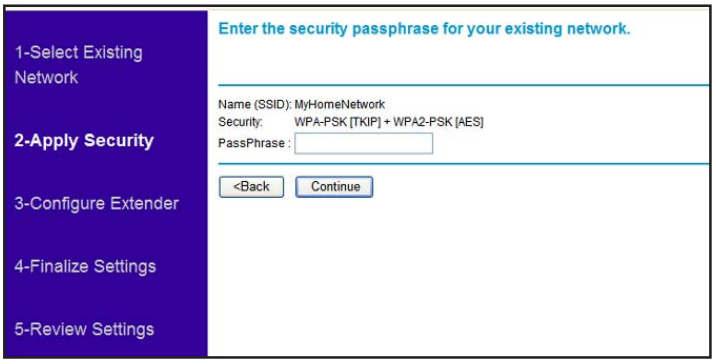
- Enter the passphrase for your wireless network and click Continue. The next screen displays:

- Make sure that the correct network name is shown, and then click Continue. The Extender connects to your existing wireless network.
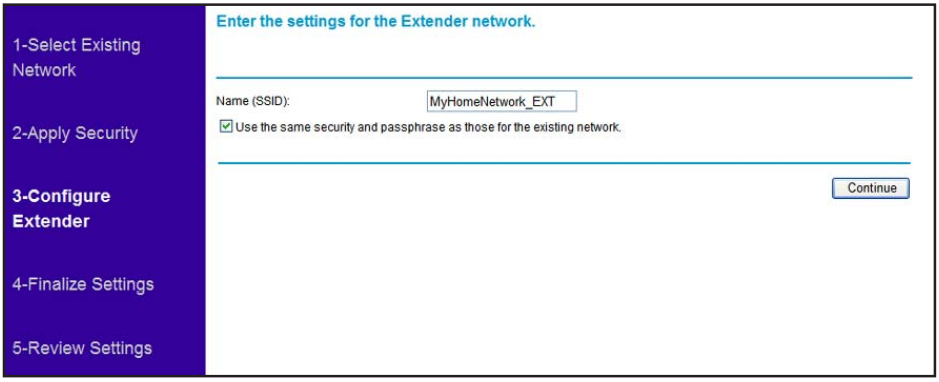
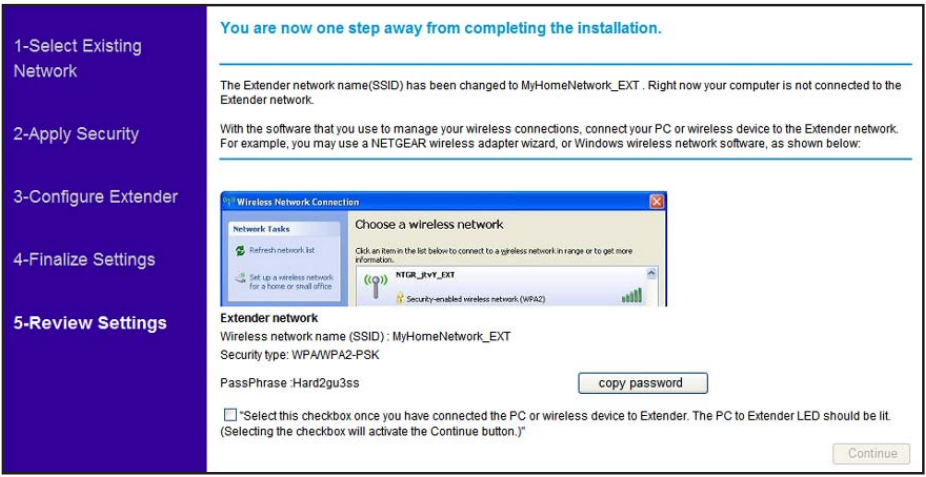
 The Extender’s wireless network name (SSID) changes to the name of your wireless network with _EXT added to the end. The following screen displays:
 When this happens, your computer is automatically disconnected from the Extender wireless network.
 - If you want to use the same password to access the Extender’s wireless network that you use for wireless access to your existing network, click the copy password button.
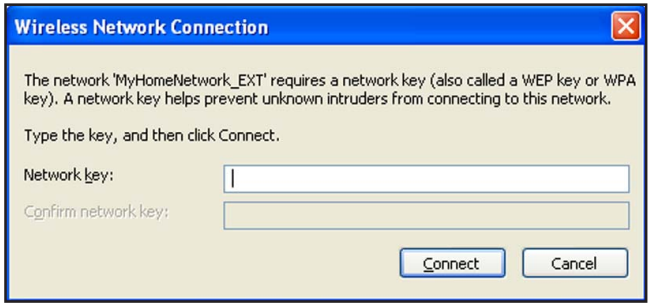
- With the software that you use to manage your wireless connections, join the Extender wireless network. For instance, if you use Windows, you might use a screen like this:

- Then go back to the Extender wizard screen and select the check box to confirm that you have connected to the Extender network:

- Click Continue.
Extender Network Settings
Connect the Extender to an Existing Network
You can use this menu selection to wirelessly connect the Extender to your home network.
- From the Extender menu at http://www.mywifiext.net, select Setup > Connect to an Existing Network. The Extender scans for wireless networks and displays a list.
 If your wireless network is not on the list, and it is up and running, see Positioning Your Extender on page 7 for suggestions.
 - Click the radio button to select your network from the list and click Continue. The next screen displays:
- Enter your network’s passphrase or key and click Continue.
 The Extender joins your wireless network.
Use WPS to Add a PC to the Extender’s Wireless Network
WPS (Wi-Fi Protected Setup) lets you connect a computer or wireless device to the Extender’s network without entering the wireless network passphrase or key. Instead, you use a WPS button or enter a PIN to connect. WPS supports WPA and WPA2 wireless security. If your Extender network is open (no wireless security is set), then connecting with WPS automatically sets WPA2 + WPA wireless security on the Extender network.
The Universal WiFi Extender WN3000RP Installation Guide explains how to use WPS during installation.
You can connect with WPS by using either the WPS button on the side of the Extender, or by logging in to the Extender and clicking an onscreen WPS button.
To use the Extender WPS button to connect
- Locate the WPS button on the side of the Extender.

- Press the Extender’s WPS button.
For 2 minutes, the Extender attempts to add a wireless client (a computer or other wireless device) to its wireless network. - Within 2 minutes, press the WPS button on your wireless device, or follow the WPS instructions that came with your wireless device.
Your wireless device is now connected to the Extender.
To log in to the Extender and use WPS to connect
- From the Extender menu at http://www.mywifiext.net, select Setup > Add WPS Client. The following screen displays:

- Select a radio button.
- Push Button (recommended). Either click the
 button or press the
  WPS button on the front of the Extender.
 - PIN Number. Select the PPIN radio button and enter the client PIN in the field that displays. The Extender tries to find the wireless client (the computer) that is attempting to join the network. If you are using a WPS button, it tries for 2 minutes. If you are using a PIN, it tries for 4 minutes.
- Push Button (recommended). Either click the
- Go to your wireless computer. Use its WPS software to try to connect to the Extender.
The first time you add a WPS client, WPS automatically sets the Extender’s wireless security to WPA2 + WPA with a random passphrase. You can view these settings in the Wireless Settings screen, described in the following section.
Extender Wireless Settings
You can use the Wireless Settings screen to change the network name (SSID) for the Extender’s network and to set up wireless security. If you do not change these settings, the network name is NETGEAR_EXT, and the network is open (no wireless security is set up).
Note: If you use a wireless computer to change the extender’s wireless settings, you will be disconnected when you click Apply. To reconnect, you must select the new network name that you create and enter the passphrase or wireless security key that you set up.
To change the wireless settings for the extender’s network:
- From the Extender menu at http://www.mywifiext.net, select Setup > Wireless Settings to display the following screen:

- In the Name (SSID) field, you can type in a new name to customize your extender network.
- In the Security Options section of the screen, select the type of wireless security that you want to use on your network.
- None. This is an open wireless network. Any wireless computer or device is allowed to join this network.
- WEP. WEP is an older standard and is less secure than WPA or WPA2. WEP uses encryption keys and data encryption for data security. You can select 64-bit or 128-bit encryption.
- WPA-PSK [TKIP]. WPA is more secure than WEP. When using wireless computers or devices that support WPA, you can enter a passphrase to join the extender’s wireless network.
- WPA2-PSK [AES]. WPA2 is even more secure, but some older computers do not support this standard. When using wireless computers or devices that support WPA2, you can enter the passphrase to join the extender’s wireless network.
- WPA-PSK [TKIP] + WPA2-PASK [AES]. When using wireless computers or devices that support either WPA or WPA2, you can enter the passphrase to join the extender’s wireless network.
- Click Apply to save your settings.
- Use your wireless computer to connect to the Extender’s network with its new settings. The Smart Wizard can guide you through this process.
Set Up WEP
- In the Wireless Settings screen, in the Security Options section, select the WEP radio button.
- Select the authentication type: Automatic, Open System, or Shared Key. The default is Open System.
Note: The authentication is separate from the data encryption. You can select authentication that requires a shared key, but still leaves data transmissions unencrypted. Security is stronger if you use both the Shared Key and WEP encryption settings. - Select the encryption strength setting:
- WEP 64-bit encryption. Enter 10 hexadecimal digits (any combination of 0–9, a–f,
or A–F). - WEP 128-bit encryption. Enter 26 hexadecimal digits (any combination of 0–9, a–f, or A–F).
- WEP 64-bit encryption. Enter 10 hexadecimal digits (any combination of 0–9, a–f,
- Enter the encryption keys. You can manually or automatically program the four data encryption keys. These values must be identical on all computers and access points in your network:
- Passphrase. To use a passphrase to generate the keys, enter a passphrase and click Generate. This automatically creates the keys. Wireless computers must use the passphrase or keys to access the Extender.
Note: Not all wireless computers support passphrase key generation. If your computer does not support the passphrase, then you will need to type the encryption key in order to join the wireless network. - Key 1–Key 4. These values are not case-sensitive. You can manually enter the four data encryption keys. These values must be identical on all computers and access points in your network. Enter 10 hexadecimal digits (any combination of 0–9, a–f, or A–F).
- Passphrase. To use a passphrase to generate the keys, enter a passphrase and click Generate. This automatically creates the keys. Wireless computers must use the passphrase or keys to access the Extender.
- Select which of the four keys will be the default.
Data transmissions are always encrypted using the default key. The other keys can be used only to decrypt received data. The four entries are disabled if WPA-PSK or WPA authentication is selected. - Click Apply to save your settings.
Set Up WPA, WPA2, or WPA + WPA2
Both WPA and WPA2 provide strong data security. WPA with TKIP can be used on Windows systems with Service Pack 2 or later. WPA2 with AES is a hardware implementation; see your device documentation before implementing it.
To set up WPA or WPA2 in the Extender:
- On the Wireless Setting screen, select the radio button for the WPA or WPA2 option of your choice.
- The settings displayed on the screen depend on which security option you select.
- For WPA-PSK or WPA2-PSK, enter the passphrase.
- Click Apply to save your settings.
Extender IP Address Setup
From the Extender menu at http://www.mywifiext.net, under the Maintenance heading, select IP Address.
The IP Address screen shows whether the Extender is set to get its IP address dynamically from the router (this is the most common setting) or is set as a static IP address.
- Get Dynamically From the outer. The wireless network router assigns an IP address when the Extender connects to its wireless network. Most networks are set up so that the router automatically does this.
- Use a Static IP Address. Specify a static IP address. This is not usually necessary. If you set this up, you should be technically experienced or have a technically experienced person help you.
- IP Address. The static IP address.
- IP Subnet Mask. The subnet mask associated with the IP address.
- Gateway IP Address. The IP address for the gateway.
- Primary DNS. The primary domain name server (DNS).
- Secondary DNS. The secondary domain name server (DNS).
Status Screen
When you connect to http://www.mywifiext.net, after the automatic firmware check, the Status screen displays. You can also select Status from the menu to display this screen: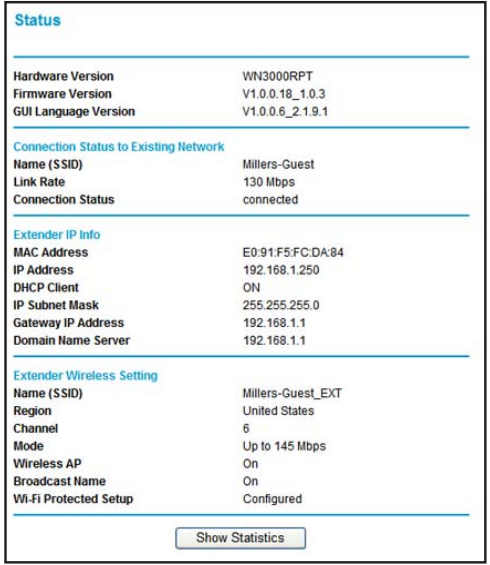 This screen shows the current settings and the status of your Extender.
You can click Show Statistics to see device performance statistics such as the number of packets sent and the number of packets received for each port. See Show Statistics on page 20.
Hardware and Firmware Version. The model of the hardware and the currently running firmware version.
GUI Language Version. The currently selected language.
Connection Status to Existing Network
- Name (SSID). Your Extender is set up to connect to this SSID, also called the wireless name.
- Connection Status. The status of your wireless connection (connected or disconnected).
- Link Rate. The actual transmission (Tx) and receive (Rx) link rate in the current wireless connection.
Extender IP Info
- MAC Address. The physical address of the Extender, as seen from the local area network (LAN).
- IP Address. The IP address of the Extender. The default is 192.168.1.250.
- DHCP Client. Identifies the network DHCP client on the wireless network.
- IP Subnet Mask. The IP subnet mask associated with the LAN IP address of the Extender. The default is 255.255.255.0.
- Gateway IP Address. The IP address of the wireless network gateway.
- Domain Name Server. The IP address of the Domain Name Server (DNS) of the wireless network.
Extender Wireless Settings
- Name (SSID). The name (SSID) of the wireless network.
- Region. The country where the Extender is set up for use.
- Channel. The current channel determines the operating frequency.
- Wireless AP. Indicates if the access point (AP) feature is enabled.
- Broadcast Name. Indicates if the Extender is configured to broadcast its SSID.
- Wi-Fi Protected Setup. This indicates whether Wi-Fi Protected Setup is configured.
Show Statistics
On the Device Status screen, click Show Statistics to display the following screen:

Table 1. Show Statistics Fields


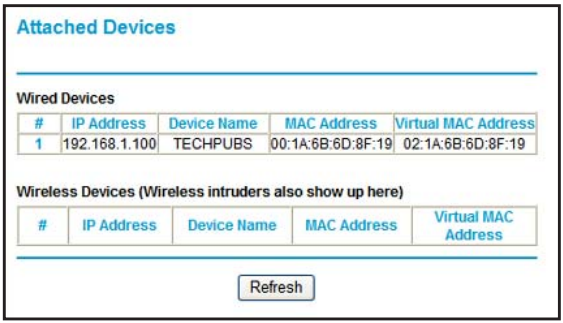
Attached Devices
From the Extender menu at http://www.mywifiext.net, under the Maintenance heading, select Network Devices to display the following screen:
Back Up and Manage Extender Settings
From the Extender menu at http://www.mywifiext.net, under the Maintenance heading, select Backup Settings to display this screen.

The Backup and Restore options in the Backup Settings screen let you save and retrieve a file containing your Extender’s configuration settings. Once you have your Extender working correctly, you should back up the information to have it available if something goes wrong. When you back up the settings, they are saved as a file on your computer. You can restore the device’s settings from this file.
Back Up Settings
- Click Backup. Your browser extracts the configuration file from the Extender.
- If you do not have your browser set up to save downloaded files automatically, locate where you want to save the file.
- You can give the file a meaningful name at this time, such as internet_adapter.cfg.
Restore Settings
- On the Backup Settings screen, click Browse.
- Locate and select the previously saved backup file.
- Click Restore.
A screen displays, letting you know that the device has been successfully restored to the previous settings. The Extender restarts. This takes about 1 minute.
CAUTION:
Do not try to go online, turn off the Extender, shut down the computer, or do anything else to the Extender until it finishes restarting! - Close the message window.
To restore your settings from a saved configuration file, enter the full path to the file on your computer, or click Browse to browse to the file. When you have located it, click Restore to send the file to the Extender. The Extender then reboots automatically.
Erase the Settings
Under some circumstances (for example, if you have lost track of the changes that you made to the Extender settings), you might want to erase the configuration. After an erase, the Extender returns to its factory settings (see Factory Settings on page 27).
To erase the configuration, click the Erase button in the Backup Settings screen.
CAUTION:
Do not try to go online, turn off the Extender, shut down the computer, or do anything else to the Extender until it finishes restarting!
Set the Password
The user name to access the Extender is admin, and its default password is password. NETGEAR strongly recommends that you set a more secure password.
From the Extender menu at http://www.mywifiext.net, select Maintenance > Set Password. The following screen displays:

Type the old password, type the new password twice, and then click Apply.
Upgrade the Firmware
Unless you changed the settings in the Firmware Upgrade screen previously, the Extender is set up to check for new firmware automatically at login.
If you do not want to use the automatic firmware check, clear the Check for New Version Upon Login check box.
To check for firmware and upgrade if it is available:
- From the Extender menu at http://www.mywifiext.net, under the Maintenance heading, select Firmware Upgrade. The following screen displays:

- Click Check to see if new firmware is available. If it is, follow the onscreen prompts to download it onto your computer.
- Use the Browse field to locate and select the new firmware.
- Click Upload to install the new firmware on your Extender.
CAUTION:
Once you start the firmware upgrade, do not try to go online, turn off the Extender, shut down the computer, or do anything else to the Extender until it finishes restarting.
Advanced Wireless Settings
The Extender is already set up with the optimum settings. Do not alter these settings unless directed by NETGEAR support. Incorrect settings might disable the Extender unexpectedly.
To view or change the advanced wireless settings:
From the Extender menu at http://www.mywifiext.net, under the Advanced heading, select Wireless Settings. The following screen displays:
You can view or configure the following settings:
- Enable Wireless Access Point. Enable the extender to work as a wireless access point. If this check box is cleared, then computers or wireless devices cannot connect wirelessly to the extender.
- Enable SSID Broadcast. Enable the extender to broadcast its wireless network name (SSID). If this check box is cleared, then the wireless network is hidden. To join a hidden wireless network, you have to type the wireless name.
- Disable the Device’s PIN. Selecting this check box disables the extender’s PIN. The PIN can be used for a WPS wireless connection.
- Keep Existing Wireless Settings. When this check box is selected, the settings in the Wireless Settings screen stay the same when WPS is used for a wireless connection.
- Set up Access List. Specify a list of computers or wireless devices that are allowed to connect to the network. If you use an access list, then computers that are not on the list are not allowed to join the wireless network.
Troubleshooting
Smart Wizard FAQs
- When I connect to the network, Smart Wizard keeps asking me for my passphrase, and I am sure I’ve entered the correct passphrase. What can I do?
The Extender is likely placed at the borderline of the range covered by the router. See Positioning Your Extender on page 7. - I got an error message in the Review Settings screen in the Smart Wizard. What should I do?
Make sure that your computer is connected to the Extender by using the SSID and the passphrase that you have just set up, and clicking the Refresh button in your browser. This will return you to the Smart Wizard. - I connected to NETGEAR_EXT and launched a browser, but why can’t I see the Smart Wizard?
- Make sure that your computer is set up to use DHCP. If you set up your computer to use a static IP address, you have to change the settings back so that it uses Dynamic Host Configuration Protocol (DHCP).
- Make sure the PC to Extender Connection LED is green.
- Relaunch the browser and enter www.mywifiext.net.
- Check to make sure that your computer has an IP address in the IP Address screen (see Extender IP Address Setup on page 18).
Connecting to http://www.mywifiext.net
If you have trouble connecting, try to locate the source of the problem:
- For help with passwords, see Log In to the Extender on page 8.
- If your browser displays an error page, make sure that you include http:// when you type this URL in the address field of your Internet browser. If you leave it out, you might not be able to connect.
- The Extender LEDs can help you tell if the extender is correctly set up and working as it should.
- The best performance is delivered when both the Link Rate LED
 and the PC to Extender Connection LED
  are green.
 - A workable performance is delivered when the Link Rate LED is amber
 and the PC to Extender Connection LED
 is green.
- The best performance is delivered when both the Link Rate LED
If you cannot get a wireless connection working, you can use an Ethernet cable to connect your computer to the Extender. See Connect a PC to the Extender with an Ethernet Cable on page 8.
Joining Wireless Networks
To join a wireless network, you must know its network name (also called the SSID) so that you can select it. If the network is secure, you must know the passphrase or wireless key. If the Extender does not connect to the network that you chose, the following message displays:
Connection was not established to the selected network.
If this happens, it could be due to one of these reasons:
- The network name, passphrase, or key might have been typed incorrectly. Click Cancel, use the Smart Wizard to select the network from the list, and retype the passphrase or key. This is case-sensitive. PASSWORD25 is not the same as Password25 or password25. See Use the Smart Wizard to Set Up the Extender on page 9.
- If the Smart Wizard does not find your wireless network (it is not displayed in the Select Existing Network screen), check to see if your wireless network is still up and running. Make sure that the router is turned on. If possible, move the Extender closer to the router and click Try Again.
- If the Extender WLAN LED is red, this indicates a poor wireless connection. The best connection is established when there is a clear line of sight between the Extender and the router you are connecting to. Make sure that there are no physical obstacles between the Extender and the router, and try to move the Extender closer to the router.
If you use the Smart Wizard, and the Extender cannot connect to the router or cannot get an IP address from the router, it displays the following message:
You are not able to connect to the Internet. Click Continue to run through the setup again to connect to your network.
If you click Continue, the Smart Wizard starts again (see Use the Smart Wizard to Set Up the Extender on page 9). If you click Exit, the Status screen displays with menu selections on the left (see Log In to the Extender on page 8).
Supplemental Information
Factory Settings
You can press and hold the Factory Settings button on the side panel for 7 seconds. The Extender resets and returns to its factory settings.
Table 2.
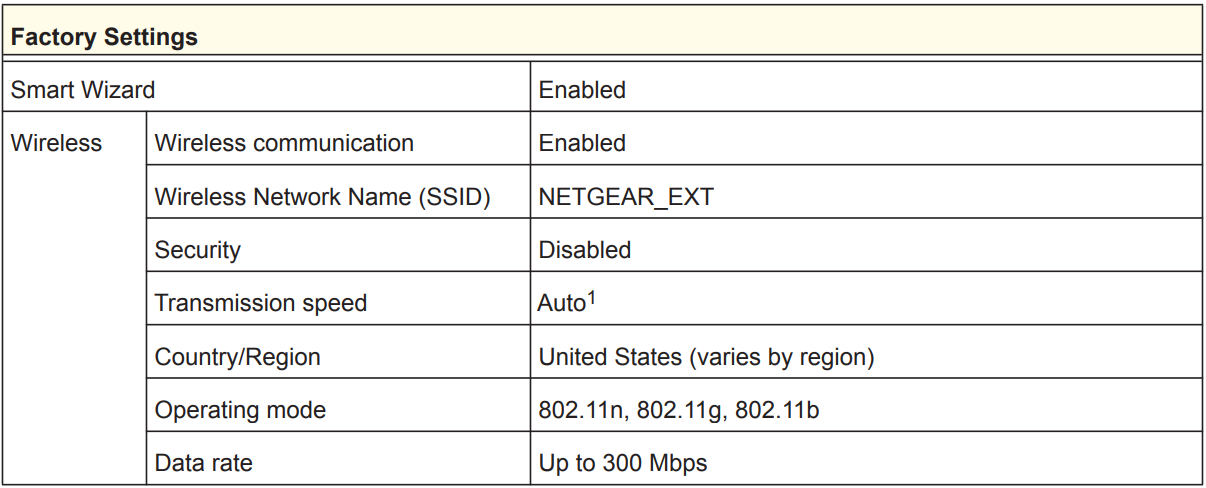
1. Maximum wireless signal rate (IEEE Standard 802.11). Actual throughput will vary. Network conditions and environmental factors, including volume of network traffic, building materials and construction, and network overhead, lower the actual data throughput rate.
Technical Specifications
Table 3.

For more manuals by Netgear, visit ManualsLibraryy
Netgear N300 WiFi Range Extender Model WN3000RP- FAQs
Q1. How do I set up my NETGEAR WN3000RP WiFi Extender?
Plug in the extender near your router and switch it to “Extender” mode. When the power light turns solid green or blue, press the WPS button on the extender, then press the WPS button on your router. Once the connection is established, move the extender to a location where you need better coverage.
Q2. How does the NETGEAR WiFi extender work?
The extender connects to your existing WiFi network and rebroadcasts the signal, helping eliminate dead zones and improve coverage in areas where your router signal is weak.
Q3. What is the default admin username and password?
The default username is admin, and the default password is password. For security, it’s recommended to change the password after first login.
Q4. Where is the best place to put my WiFi extender?
Place it midway between your router and the weak-signal area. Ensure it is within the router’s WiFi range for the best results.
Q5. How do I know if my NETGEAR extender is working properly?
Check the Link Rate LED—it should remain lit. You can also log in to your router and confirm that the extender appears in the connected devices list.
Q6. How far can the WN3000RP extend WiFi?
The extender can typically cover up to 1,000 sq. ft., but the range depends on your home layout, walls, and interference from other devices.
Q7. What do the blinking lights on my extender mean?
Flashing green/red: The extender is too far from the router—move it closer.
Solid green or blue: Good connection.
Flashing red: Lost connection or failed WPS setup.
Q8. How often should I reboot my extender?
Rebooting once a month is recommended to refresh memory and connections. Do not confuse rebooting with a factory reset—resetting erases all settings.


 If you do not see the login prompt, make sure to include http:// when you type
 This is the same Smart Wizard that displays during installation as described in the installation guide.
 The Extender’s wireless network name (SSID) changes to the name of your wireless network with _EXT added to the end. The following screen displays:
 When this happens, your computer is automatically disconnected from the Extender wireless network.

 If your wireless network is not on the list, and it is up and running, see Positioning Your Extender on page 7 for suggestions.
 The Extender joins your wireless network.