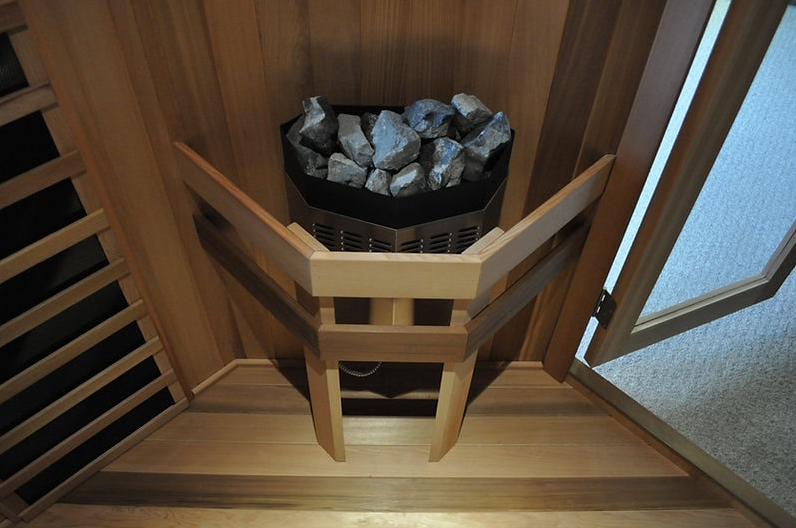
Homecraft C-Series 240V 1-PHASE Sauna Heater
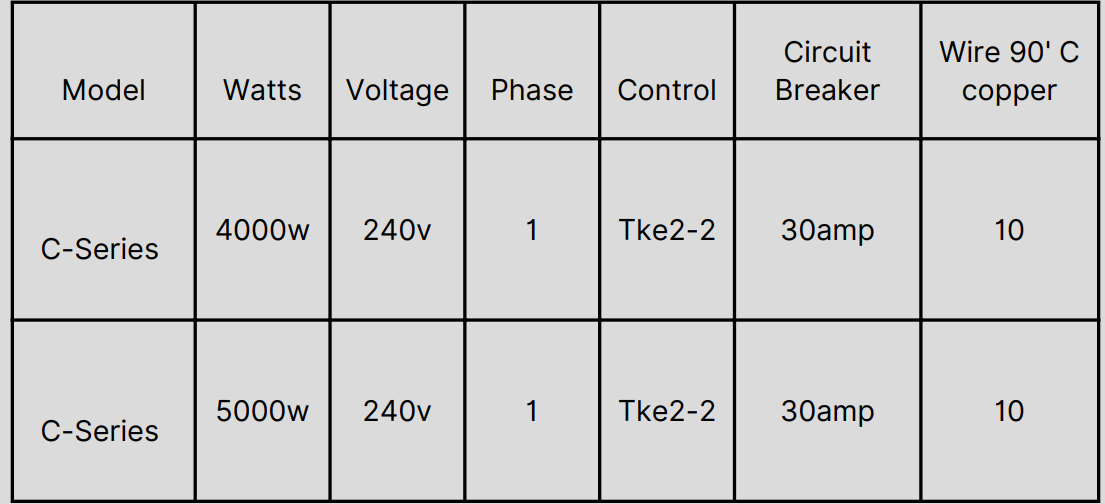
Electrical Specifications
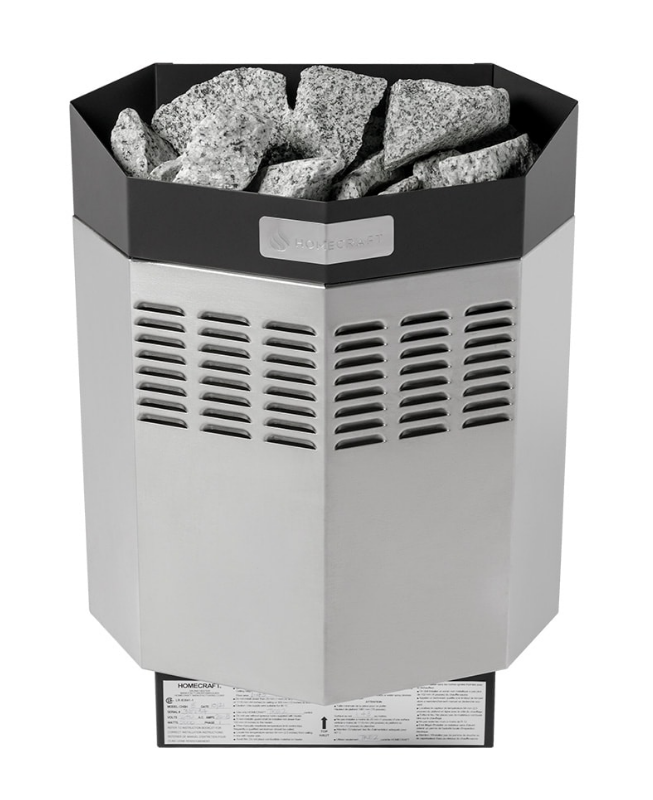
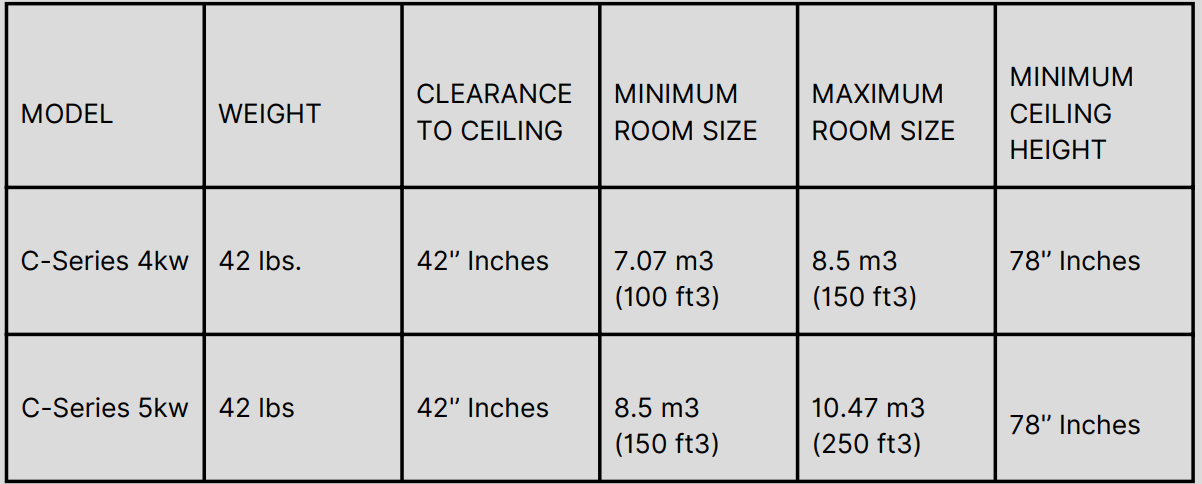
Heater Specifications
GENERAL WARNINGS & CAUTIONS
ELECTRICAL WIRING ROUTING
ALL WIRING TO THE SAUNA HEATER AND ACCESSORIES MUST BE ROUTED AWAY FROM ANY DIRECT RADIATION FROM THE SAUNA HEATER
WATER SPRAY
NEVER SUBJECT THE SAUNA HEATER OR CONTROL COMPONENTS TO DIRECT WATER SPRAY
SHOWER HEAD
NEVER INSTALL A SHOWER HEAD ABOVE THE SAUNA HEATER
FREQUENT HIGH LIMIT SWITCH FAULTS
IF THE MANUALLY RESETTABLE TEMPERATURE-LIMITING CONTROL TRIPS FREQUENTLY, A QUALIFIED SERVICEMAN SHOULD BE CONTACTED
FIRE PREVENTION
CAUTION: AVOID A FIRE, DO NOT PLACE COMBUSTIBLE MATERIAL ON THE SAUNA HEATER
APPROVED CONTACTORS
CAUTION: USE ONLY A CONTACTOR APPROVED FOR 250,000 ENDURANCE CYCLES
MAINTENANCE PROGRAM
THE OWNER MUST IMPLEMENT A MAINTENANCE PROGRAM FOR THE SAUNA HEATER AND INSPECT THE SAUNA HEATER AT THE END OF EACH DAY TO ENSURE THE SAUNA HEATER IS TURNED OFF
GENERAL SPECIFICATIONS
ELECTRICAL WIRING AND HOOK-UP SHOULD BE DONE BY A CERTIFIED ELECTRICIAN. ELECTRICAL CONNECTION BY A NON-CERTIFIED PERSON VOIDS THE WARRANTY. NEVER INSTALL ELECTRICAL WIRING SUCH THAT IT COULD BE EXPOSED TO HEAT RADIATING FROM THE SAUNA HEATER. THE CONTROL BOX MUST BE INSTALLED ON THE OUTSIDE OF THE SAUNA ROOM. DO NOT INSTALL ANY ELECTRICAL RECEPTACLES INSIDE THE SAUNA ROOM. NOTE: NO COMBUSTIBLE MATERIALS ARE PERMITTED UNDER THE HEATER. EXAMPLES OF THIS ARE DUCKBOARDS, TOWELS, PAPER TOWELS, ETC.
C-Series Sauna Heater Installation
Homecraft sauna heaters come fully assembled. Mounting hardware is supplied with the heater. Please remove the plastic protective coating on the outside of the heater after the sauna heater is completely installed and always before the initial start-up.
Mounting the Sauna heater:
- The C-series sauna heaters are to be installed 12” from the floor and need to have 42” of space above the heater to the ceiling to meet safety requirements for combustible materials.
- The C-Series heaters are small and compact and can be mounted normally on the wall as well as corner-mounted.
- Place the heater on the wall and, with a marker, safely mark where the brackets should go. Ensure the heater is level and meets the safety requirements for combustibles before securing the brackets to the wall.
- Lay the heater on the floor and remove the bottom plate. Open the appropriate knock-outs in the electrical box and install a seal-tight connector. Connect the wiring as shown in the wiring diagram and secure the bottom plate.
- Ensure the heater meets the distance to combustible safety distances.
- The thermostat temperature sensor should be mounted inside the sauna room, in line with the heater, 2.5” from the ceiling. If the sensor bulb is not positioned correctly, tripping of the high limit switch will occur.
- Ensure that a heater guard is placed around the heater for safety and that the heater guard maintains the safe distances to the sauna heater.
- Fill the heater rock basket with igneous rocks. NOTE: This sauna heater should never be operated without rocks.
Rock Placement:
Too many rocks will suffocate the heat inside the sauna heater, causing the high-limit safety switch to turn the heater off. Ensure proper airflow around the rocks. Ensure that the sauna rocks are not packed together too tightly in the rock basket. Cool air is entering the heater at the bottom, being heated by the elements, and rising through the top of the heater.
If airflow is impeded due to rock placement, superheated air will build up inside the heater, resulting in the Temperature High Limit Switch tripping. When installing rocks, place the first layer of rocks scattered over the screen, leaving approximately 50% of the screen exposed. Place each additional layer of rocks across the gaps so there will be good airflow. Stack the rocks loose and high, NOT tight and low. Use all the rocks provided.

Electrical Wiring Diagram
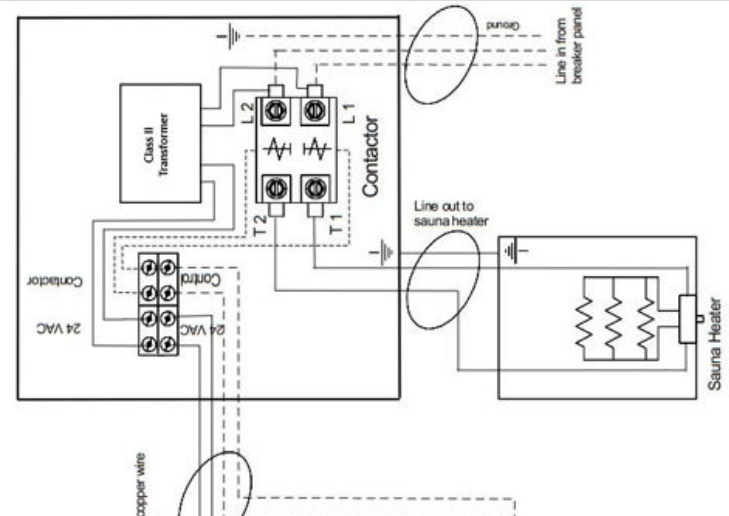
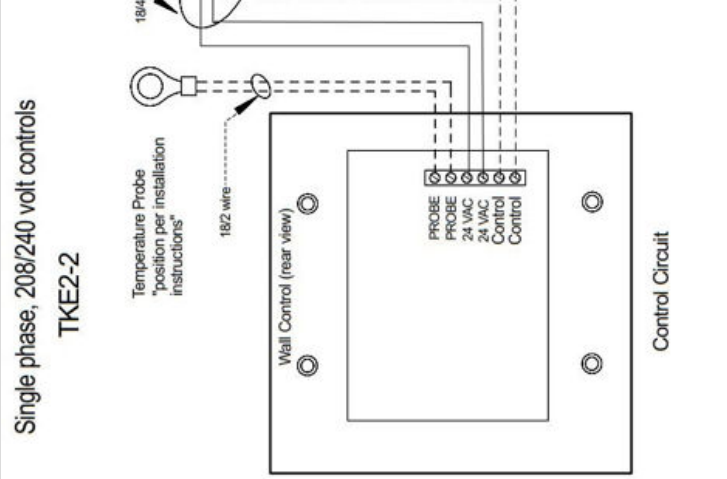
Sauna Heater Installation
Relay Control Box Installation
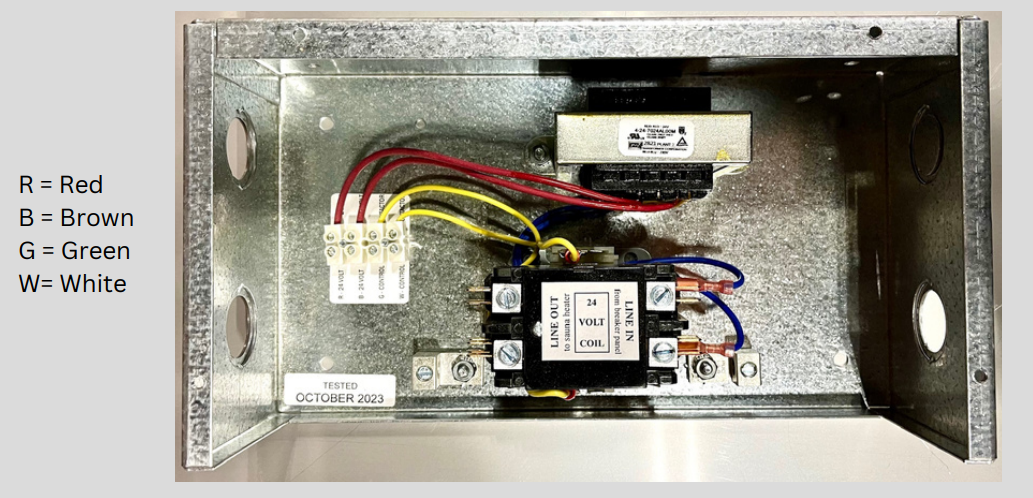
The “Relay Control Box” contains the 24-volt Class II transformer and a magnetic contactor. The Relay Control Box can be surface-mounted or flush-wall-mounted. This box needs to be mounted in a location that you can access should servicing be required. Note that 3658 mm (12 feet) of 18/4 wire is supplied with this control for connecting the Relay Control Box to the Wall Control Panel, so be sure to keep within this distance.
Caution: Use only a contactor approved for 250,000 cycles. Connect the 18/4 wire to the appropriate connections in the Relay Control Box. If more than the supplied 18/4 wire is needed for your installation, you can order additional wire from HOMECRAFT or purchase 18/4 wire locally. Do not splice into the supplied wires if you are short. Be sure to connect colored wires consistently between the Relay Control Box and the Wall Control Panel as per the wiring diagram (See page 8).
Temperature Sensor Installation
- Attach the Temperature Sensor, with the supplied connectors, to the 3658mm (12 Ft) length of 18/2 wire. If you require a longer distance between the sensor and the Digital Sauna Control, buy a new continuous length of 18/2 wire and attach the sensor to it. Do not splice into the wire supplied.
- Be sure to run the 18/2 wire inside the insulated stud space in the sauna wall.
- Be sure to leave a little slack in the 18/2 wire in the stud wall. Strip about 152mm (6”) from the outer casing of the 18/2 pair, leaving the protective casing on the individual leads. This will make it easier to attach the 18/2 wires to the sensor leads and give more flexibility when pushing any excess wire back into the wall.
- The sensor wire should come out of the wall into the sauna room through a 5/8” diameter hole so the sensor is positioned over the heater according to the heater instructions (see figure 1).
- Do not hide or bury the sensor behind a cover other than the one supplied by Homecraft. Incorrect installation of the sensor will negatively impact the heater operation, cause nuisance high limit tripping (safety device in the heater), and compromise personal and fire safety.
Digital Control for a Homecraft Sauna Heater:
A Digital wall-mount Sauna Control panel is precise and offers features for the safe operation of your sauna heater. A normal sauna control is a Class-2 24-volt circuit and does not require a GFI breaker. (Usually, a GFI breaker will not work with our sauna heaters.) Be sure to check with your local inspection authority. The Homecraft Tke2-2 control will fit a standard 2-gang electrical box to house the digital wall-mount control panel. This box should be mounted on the outside wall of the sauna.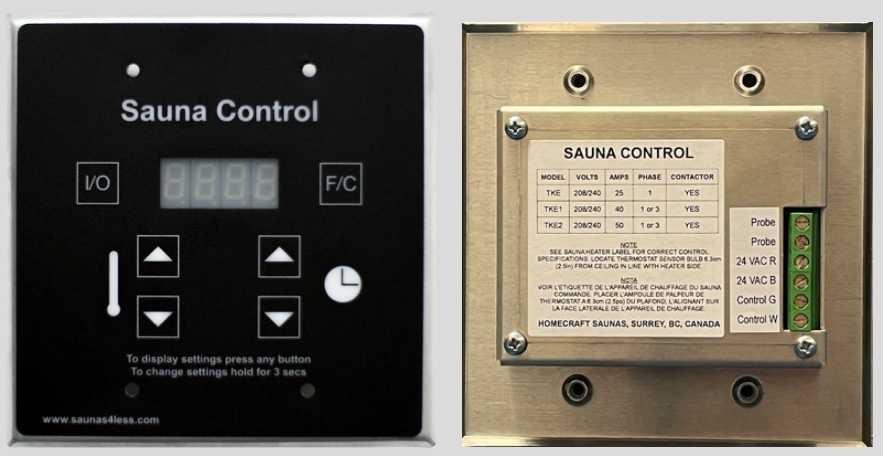
Connect the Thermistor inside the sauna room above or in-line with the heater 2.5” from the ceiling. Connect the thermistor to the 18/2 wire and connect it to the back of the touchpad.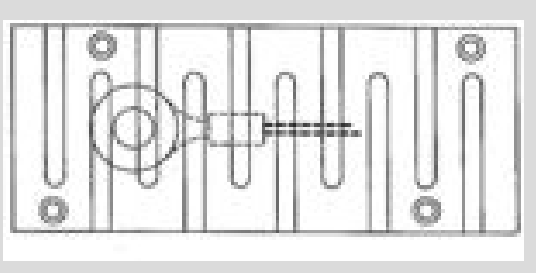
Connect the appropriate 18/4 wire from the touchpad to the contactor box.
Homecraft Warranty
Warranty Terms:
The buyer is obligated to read the user manual and follow the instructions and requirements presented. Damage to the product caused by not following the instructions from improper sauna use, or tampering with the heater will void the warranty. If there are any defects in the sauna heater, which the manufacturer can be blamed for, the buyer has the right to demand a replacement or repair of the product. All complaints must happen within the time period of the life of the warranty. The H-Series has a lifetime warranty on Manufactured components.
Warranty Terms:
- Warranty applies only to electric heaters that have been used according to the instruction manual.
- Warranty does not cover heating elements as they are considered a consumable part.
- Warranty does not cover general wear that occurs from normal sauna use.
Warranty does not apply when:
- The product has been damaged by carelessness
- The product has not been installed correctly
- The product has been modified or tampered with
- When the product is used with non-Homecraft certified components (ie, controls, rocks)
Our Guide to a good sauna
A great sauna is experienced when you can find the perfect balance of Heat, Steam, and Ventilation. The Heat & Steam portion is where our Sauna heaters come into play, and we have designed our heaters with just that in mind. Heating up to the maximal allowable temperatures in North America, and designed to take water onto the rocks to produce the desired amount of steam & humidity to create an amazing sauna experience.
IT’S TIME TO SAUNA
- Take a Shower before sauna use and dry off. Dry skin sweats faster than moist skin
- First Session: Stay in the sauna for around 15 minutes to get your first sweat.
- Listen to your body and pay attention to how you are feeling.
- Use a towel to protect your skin from the high heat of the wood
- You can sit or lie down, but before leaving, sit up for a few minutes
- The higher you sit, the hotter the temperature in the room
- Cooling off: A cold bucket of water, a cold shower, or an ice bath is a great way to rejuvenate after the session. Hot to cold therapy has proven benefits.
- Resting Period: Move to some fresh air to relax your body. Use a bathrobe or towel to not cool down too much. Usually, a break from the sauna can be between 15-25 minutes. Oftentimes, this is a social time to relax with friends and enjoy time together.
- Begin the sauna cycle once again and continue this for 2-3 full sessions to get the best benefits. The purpose of the sauna is not to suffer but to create a formula of good heat, cold, community, and relaxation.

QUESTIONS? CONTACT US.
1-800-604-888-3403
[email protected]
For More Manuals By Homecraft Saunas, Visit ManualsLibraryy.
Homecraft C-Series 240V 1-PHASE Sauna Heater-FAQs
Q1. How does a sauna heater work?
A sauna heater warms the air inside the sauna room, creating a hot and dry environment. Water can be poured over the heater’s stones to generate steam and increase humidity.
Q2. What are the electrical requirements for this sauna heater?
Most sauna heaters, including this model, require a dedicated 240-volt circuit. Depending on the heater size, it may need a 30–60 amp breaker with appropriate wiring.
Q3. How do I use the sauna heater safely?
Maintain proper clearance (usually 2–4 inches) from walls and follow the manufacturer’s installation guide. Never block airflow, and always supervise when in use.
Q4. How much electricity does a sauna heater use?
A 6 kW sauna heater typically consumes about 7–9 kWh over a two-hour heating and bathing session. Usage depends on heater size and sauna duration.
Q5. How hot should a sauna be for health benefits?
The ideal temperature is between 140°F and 200°F (60–93°C). Most users prefer 150–175°F for comfort and effectiveness.
Q6. How long does it take for the sauna to heat up?
Generally, the sauna reaches the desired temperature in 30 to 45 minutes.
Q7. How long will a sauna heater last?
With proper care, a sauna heater typically lasts 5 to 20 years, depending on usage frequency and water quality.
Q8. Can I pour water on the sauna heater?
Yes. Most UL-listed electric sauna heaters are designed for water to be safely poured on the stones to create steam.
Q9. Where is the best place to install a sauna heater?
It is usually placed on a front or side wall to maximize bench space and heating efficiency.

