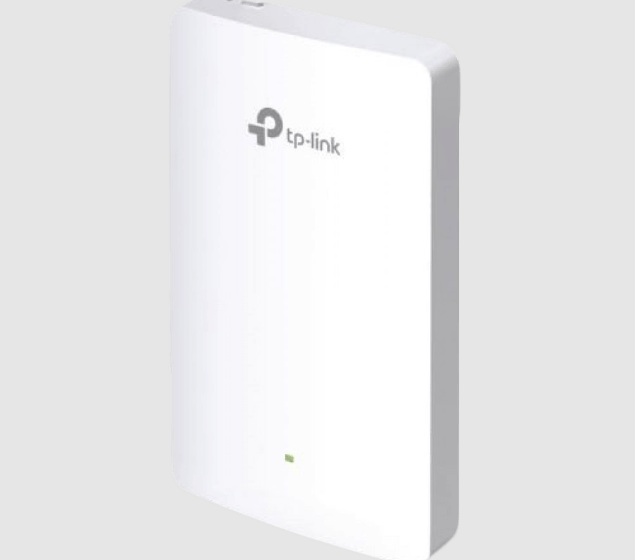
TP-Link EAP225-Wall Omada Wireless Wall-Plate Access Point
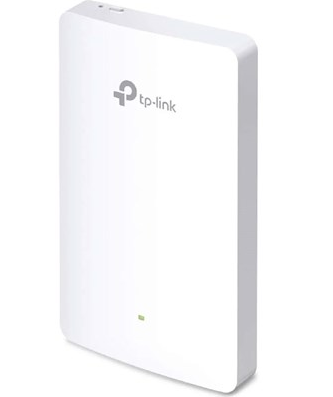
Overview
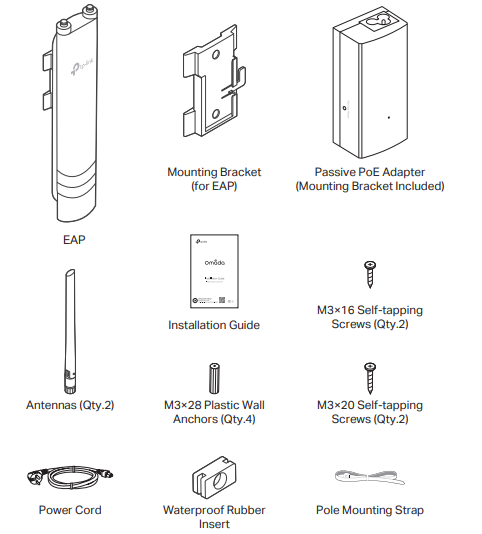
Package Contents
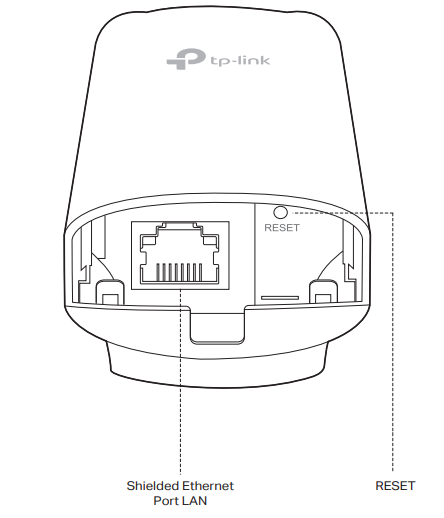
Panel Layout
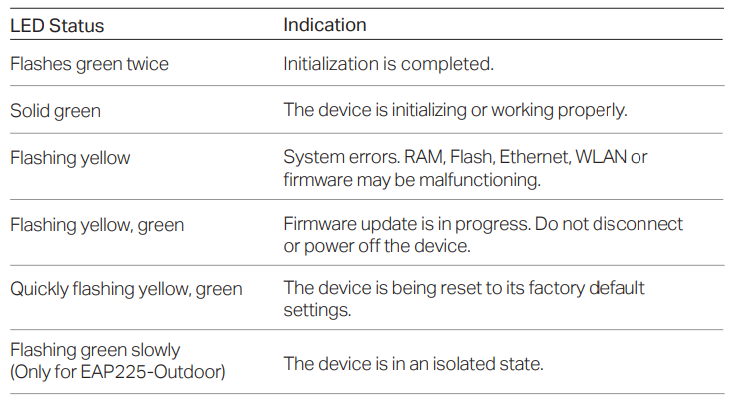
SYS LED Explanation
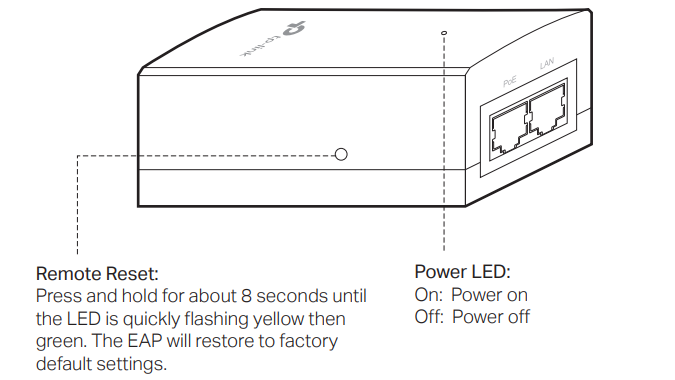
Passive PoE Adapter
Lightning and ESD Protection
Before mounting the EAP, you should consider Lightning and ESD Protection to ensure safety. Proper grounding is extremely important for outdoor devices. By using a shielded CAT5e (or above) cable for connection, you can reduce the damage from ESD attacks.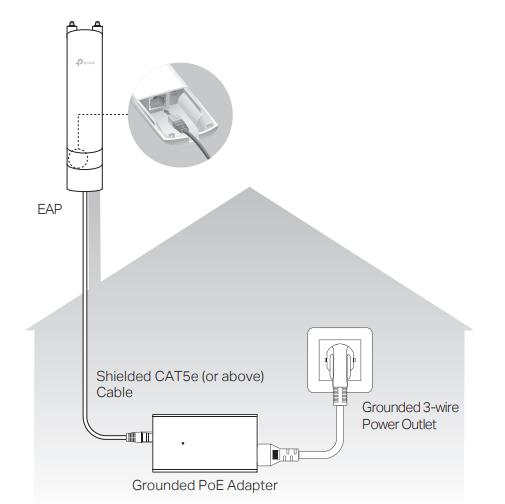
Hardware Installation
Mount the EAP
The EAP can be pole-mounted or wall-mounted. Follow the steps below for the appropriate installation.
Option 1: Pole Mounting
Step 1:
Lead the end of the pole mounting strap through the back of the EAP.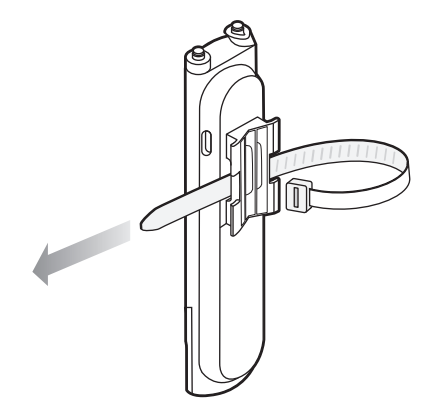
Step 2:
Position the EAP and wrap the pole mounting strap around the pole. Feed the end through the screw-block and tighten the strap until the EAP is secure.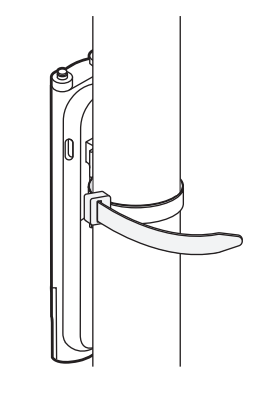
Step 3:
Connect the antennas to the EAP. For optimal Wi-Fi performance, adjust the direction of the antennas. It is recommended to position the antennas at 45-degree angles.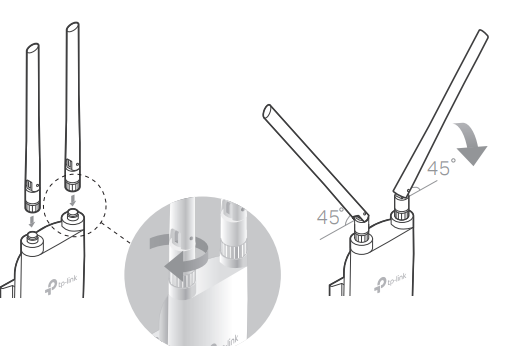
Option 2: Wall Mounting
Step 1:
Place the mounting bracket (for EAP) in the right position. Mark two positions for the screw holes. Drill two 6 mm holes for the screws at the marked positions.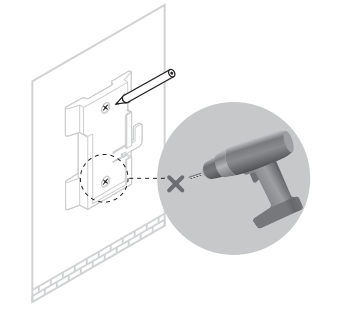
Step 2:
Insert the plastic wall anchors into the 6 mm holes. Align the bracket (for EAP) to the plastic wall anchors and drive the self-tapping screws into the anchors through the bracket (for EAP).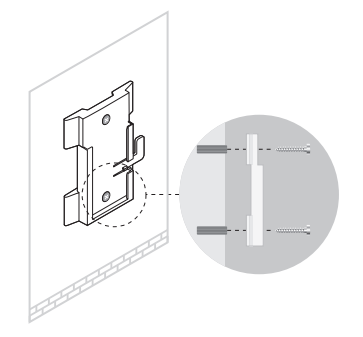
Step 3:
Align the mounting tabs on the back of the EAP with the slot for the mounting bracket (for EAP). Push and slide the EAP downward until it locks into place.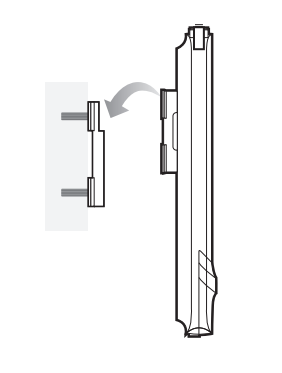
Step 4:
Connect the antennas to the EAP. For optimal Wi-Fi performance, adjust the direction of the antennas. It is recommended to position the antennas at 45-degree angles.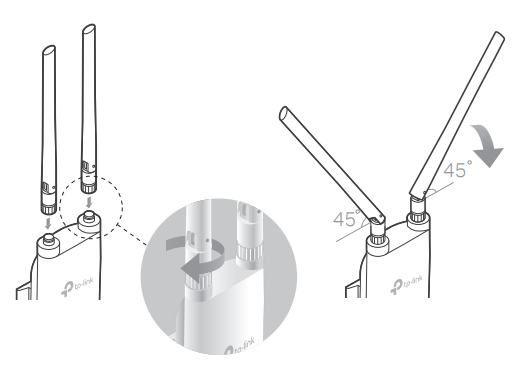
Connect Cables
Step 1:
Firmly grasp the rear of the interface cover and pull it downward.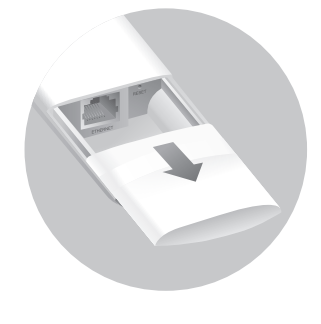
Step 2:
Use an adequate Ethernet cable to connect the LAN port. The length of the cable is up to 100 m for a steady power supply. Shielded CAT5e (or above) cable is recommended.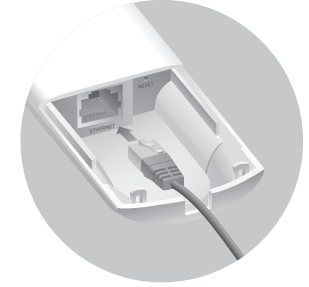
Step 3:
Attach the waterproof rubber insert to the groove at the underside of the device for waterproofing. Move the Ethernet cable to the hole of the waterproof rubber insert.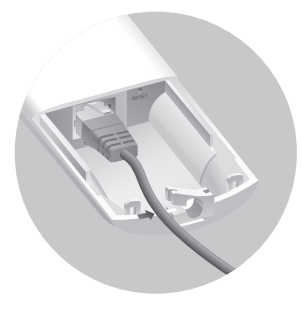
Step 4:
Flatten the waterproof rubber insert until it is parallel to the device. Replace the cover until it firmly locks into place.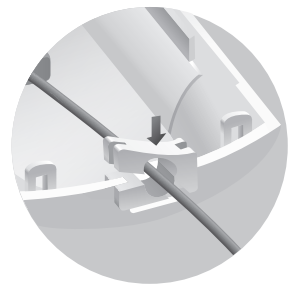
Power On
The EAP can be powered via the provided passive PoE adapter or a PSE device (such as a PoE switch).
Option 1: Via Passive PoE Adapter
Connecting the PoE Adapter
Connect the EAP to a Power over Ethernet (PoE) adapter as follows: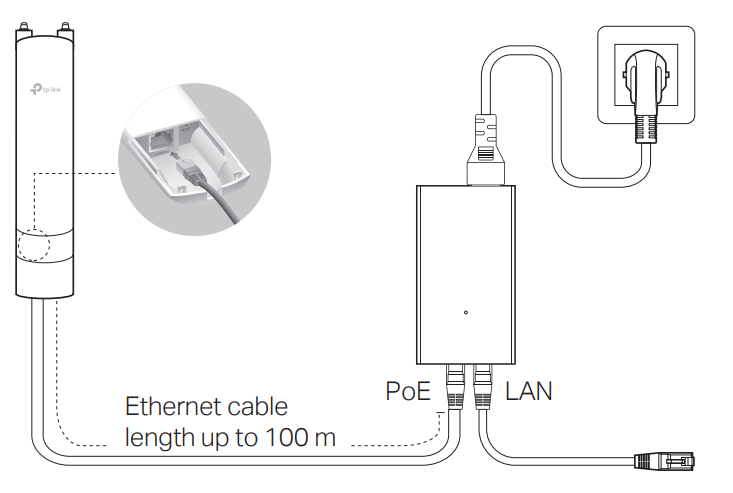
Mounting the PoE Adapter (Optional)
Note: To ensure the passive PoE adapter is attached most securely, it is recommended to install the adapter with the Ethernet port facing upward.
Step 1:
Remove the mounting bracket from the passive PoE Adapter. Drill two holes in the wall and insert the plastic wall anchors into the holes. Secure the mounting bracket to the wall. Make sure the shoulders at the corners of the mounting bracket are on the outside and pointing upward.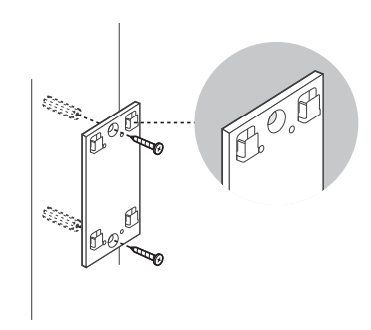
Step 2:
Attach the passive PoE adapter to the mounting bracket (for PoE Adapter) by sliding the adapter in the direction of the arrows until it locks into place.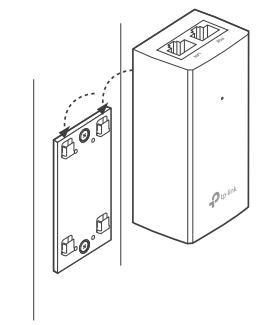
Option 2: Via PoE Switch (Only for EAP225-Outdoor)
Connect an Ethernet cable from the PoE switch to the Ethernet port.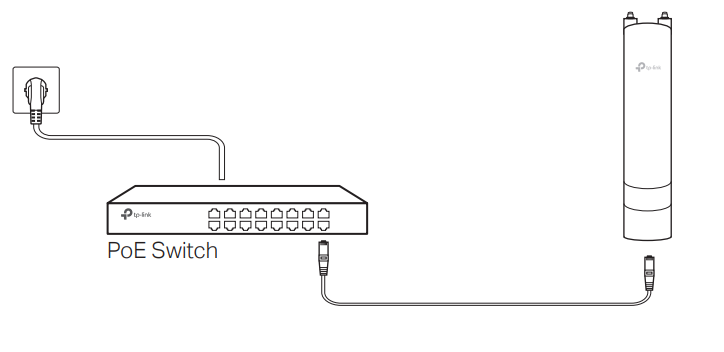
Software Configuration
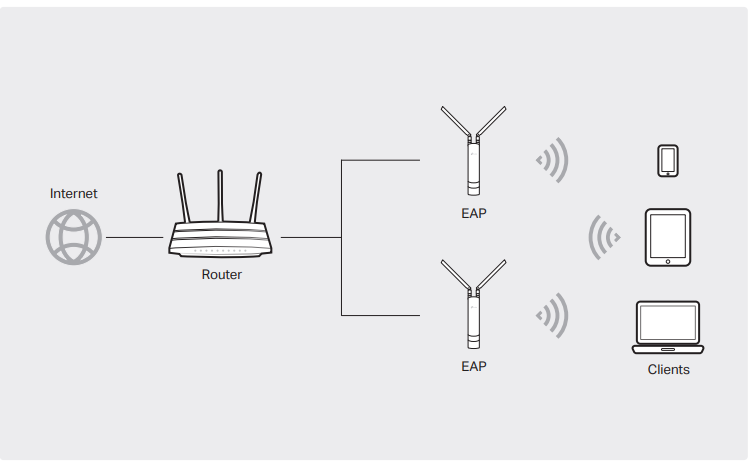
A DHCP server (typically a router with a DHCP function enabled) is required to assign IP addresses to the EAPs and clients in your local network. The EAP supports two configuration options:
- To configure and manage EAPs singly (usually suitable for a small network with a few EAPs), Standalone Mode is recommended. Please refer to Option 1.
- To configure and manage EAPs in batch, Controller Mode is recommended. Please refer to Option 2.
Option 1: Standalone Mode
Via Omada App
- Download the TP-Link Omada App on your mobile device. It can be downloaded from the App Store or Google Play.
- Connect your mobile device to the EAP by using the default SSID (format: TP-Link\_2.4GHz/5GHz\_XXXXXX) printed on the label at the bottom of the product.
- Open the Omada App, and wait for the EAP to appear on the Standalone APs page. Tap on the EAP you want to configure. The Omada App is designed to help you quickly configure the common settings. If you want to configure advanced settings, log in to the web page of your EAP or the controller.
Via a Web Browser
- Connect wirelessly by using the default SSID (format: TP-Link\_2.4GHz/5GHz\_XXXXXX) printed on the label at the bottom of the product.
- Launch a web browser and enter http://tplinkeap.net in the address bar. Use admin for both Username and Password to log in.
- Set up a new Username and Password for secure management purposes. Modify the wireless parameters and reconnect your wireless devices to the new wireless network. To configure other EAPs, connect your device to the EAP by the corresponding default SSID and repeat the steps listed above. You can configure some basic functions in Standalone Mode. If you want to configure advanced functions, use Controller Mode.
Option 2: Controller Mode
Controller Mode is applicable to the configuration for mass EAPs. All EAPs can be centrally configured and monitored via Omada Software Controller, Omada Hardware Controller (OC200/OC300), or Omada Cloud-Based Controller.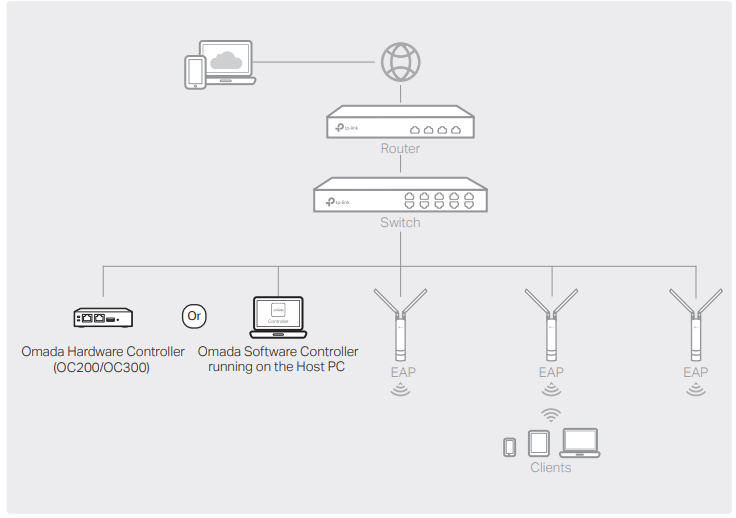
Via Omada Software Controller
- On the PC with Windows OS or Linux OS, download the Omada Software Controller installation file from https://www.tp-link.com/support/download/omada-software-controller/.
- Run the file and follow the wizard to install the Omada Software Controller.
- Launch the Omada Software Controller and follow the step-by-step instructions to complete the Quick Setup.
- After the wizard is finished, a login screen will appear. Enter the username and password you created and click Log in. Then you can further configure the controller.
Omada Cloud Service
After installing the Omada Software Controller, you can remotely access and configure the controller through Omada Cloud Service. Follow the steps below:
- Enable Cloud Access on the settings page on the controller and bind a TP-Link ID to your controller. If you have configured this in the setup wizard, skip the step.
- Launch a web browser and enter https://omada.tplinkcloud.com in the address bar.
- Enter your TP-Link ID and password to log in. A list of controllers that have been bound with your TP-Link ID will appear. Then you can click Launch to further configure the controller.
Omada App
With the Omada App, you can also manage your Omada Software Controller at a local site and a remote site. Note that the Omada Software Controller needs to be kept running when using the Omada App.
- Download the TP-Link Omada App on your mobile device. It can be downloaded from the App Store or Google Play.

- Launch your Omada App and configure the controller at a local site or a remote site.
Local Management
- Connect your mobile device to the EAP by using the default SSID (format: TP-Link\_2.4GHz/5GHz\_XXXXXX) printed on the label at the bottom of the product.
- Launch the Omada App and go to Local Access, tap the + button on the upper-right corner to add the controller. Then you can further configure the controller.
Remote Management
- Make sure Cloud Access is enabled on your controller, and your controller has been bound with your TP-Link ID.
- Launch the Omada App and log in with your TP-Link ID. Then go to Cloud Access. A list of controllers that have been bound with your TP-Link ID will appear. Then you can further configure the controller.
Via Omada Hardware Controller (OC200/OC300)
Omada Hardware Controller (OC200/OC300), which is pre-installed with Omada Software Controller, is a good alternative if you have no spare PC to keep running Omada Software Controller in the network. It needs to be purchased additionally. For more details, refer to the Installation Guide of OC200/OC300.
Via Omada Cloud-Based Controller
- Launch a web browser and enter https://omada.tplinkcloud.com in the address bar. Then enter your TP-Link ID and password to log in.
- Click Add Controller and subscribe to Omada Cloud-Based Controller. Follow the instructions to choose a plan and complete the payment. Then wait until your controller is deployed.
- The controller will appear in the list once bound with your TP-Link ID. Click Launch and follow the step-by-step instructions to complete the Quick Setup. After the wizard is finished, log in via the created username and password.
- Click Devices on the sidebar and then click Add Devices. Then you can add devices to the controller manually through the serial numbers at the bottom of the product.
Omada App
With the Omada App, you can also manage your Omada Cloud-Based Controller.
- Download the TP-Link Omada App on your mobile device. It can be downloaded from the App Store or Google Play.

- Launch the Omada App and log in with your TP-Link ID. Then go to Cloud Access. A list of controllers that have been bound with your TP-Link ID will appear. Then you can further configure the controller.
Attention:
For EAP225-Outdoor, in EU member states and EFTA countries, the operation in the frequency range 5150MHz-5350MHz is only permitted indoors. For EAP Controller, go to the Access Point page and select the desired EAP to specify the channel. For a web browser, go to Wireless > Wireless Settings to specify the channel.
For detailed configurations, please visit https://www.tp-link.com/support to download the User Guide of EAP in the download center.
![]() To ask questions, find answers, and communicate with TP-Link users or engineers, please visit https://community.tp-link.com to join TP-Link Community.
To ask questions, find answers, and communicate with TP-Link users or engineers, please visit https://community.tp-link.com to join TP-Link Community.
![]() For technical support, the user guide, and other information, please visit https://www.tp-link.com/support, or simply scan the QR code.
For technical support, the user guide, and other information, please visit https://www.tp-link.com/support, or simply scan the QR code.
![]() If you have any suggestions or needs on the product guides, please email [email protected].
If you have any suggestions or needs on the product guides, please email [email protected].
For More Manuals By TP-Link, Visit ManualsLibraryy.
TP-Link EAP225-Wall Omada Wireless Wall-Plate Access Point-FAQs
Q1. What is the purpose of Omada in TP-Link devices?
Omada allows you to configure, monitor, and manage your TP-Link devices through the Omada app. It supports both local and cloud access, making it easy to control your network from anywhere.
Q2. Is the TP-Link EAP225 a router or an access point?
The EAP225 is a wireless access point, not a router. It provides Wi-Fi connectivity by extending your existing wired or wireless network.
Q3. What is the coverage range of the EAP225-Wall?
Indoors, the recommended coverage radius is around 15 meters (50 feet) per access point, depending on placement and environment.
Q4. How many devices can connect to the EAP225 at once?
The EAP225 can typically handle 40–60 users in total, with about 20–30 users per frequency band (2.4GHz and 5GHz).
Q5. Does the TP-Link EAP225 support PoE?
Yes. The EAP225-Wall supports Power over Ethernet (PoE), allowing it to be powered via a PoE switch or injector without needing a separate power adapter.
Q6. Can I manage the EAP225 with a mobile app?
Yes. The Omada app is available on both iOS and Android. It lets you manage settings, clients, and monitor network status directly from your smartphone.
Q7. Can the EAP225 be used without an Omada Controller?
Yes, it can work in Standalone Mode without a controller. However, advanced features like fast roaming, captive portal vouchers, and centralized management require the Omada Controller.
Q8. Does adding access points improve Wi-Fi speed and coverage?
Yes. Placing multiple access points strategically increases coverage, improves speed, and ensures a stronger signal in larger spaces.
Q9. Is the TP-Link EAP225 worth buying?
Yes. It is a cost-effective, stable, and scalable Wi-Fi solution, making it ideal for homes, hotels, offices, and other business environments.

