HT Instruments QUICKLAN 6055 LAN-Cable Tester
SAFETY PRECAUTIONS AND PROCEDURES
![]() CAUTION: For your own safety as well as that of the apparatus, you are recommended to follow the procedures described in this instruction manual and carefully read all the notes preceded by the symbol. Non-compliance with the CAUTIONS and/or instructions may damage the apparatus and/or its components or injure the operator.
CAUTION: For your own safety as well as that of the apparatus, you are recommended to follow the procedures described in this instruction manual and carefully read all the notes preceded by the symbol. Non-compliance with the CAUTIONS and/or instructions may damage the apparatus and/or its components or injure the operator.
PRELIMINARY INSTRUCTION
- Read this instruction manual and the instrument’s one before starting use.
- Any instruction preceded by the caution symbol must be observed in order to avoid accidents or damage.
- Check that the battery has been correctly placed.
- Only qualified personnel practicing applicable safety precautions must use this product.
- Do not perform any measurement under conditions beyond the limits specified in this manual.
DURING USE
Read carefully the following recommendations and instructions:
- Do not use the instrument if damaged.
- Do not use the instrument outdoors.
- Do not perform measurements under environmental conditions beyond the limits specified in § 7.3.1.
- Do not expose the instrument to water splashes.
AFTER USE
- After using the instrument, switch it off.
- Remove batteries if you expect not to use the instrument again for a long period.
GENERAL DESCRIPTION
The instrument allows the following functions:
- Wire mapping test on LAN cables with RJ45 connectors
- Test on UTP and STP cables
- Up to 6 error conditions identified
- Recognition of up to 8 remote units
- Pass/Fail indications
- Backlight
- Auto Power OFF
PREPARATION FOR USE
INITIAL CHECKS
This instrument was checked both mechanically and electrically prior to shipment. All possible care and precautions were taken to ensure you receive the instrument in perfect condition. Notwithstanding, we suggest you check it rapidly (eventual damages may have occurred during transport). Make sure that all standard accessories mentioned in § 7.4.1 are included. Should you have to return the instrument for any reason, please follow the instructions mentioned in § 8.
POWER SUPPLY
The instrument is battery supplied with 1x9V alkaline battery type IEC 6F22 included in the package. When the![]() low battery indication symbol is displayed, replace it immediately following the instructions given in § 6.2. Don’t replace the battery while the instrument is connected to the plant.
low battery indication symbol is displayed, replace it immediately following the instructions given in § 6.2. Don’t replace the battery while the instrument is connected to the plant.
STORAGE
After a period of storage in extreme environmental conditions exceeding the limits mentioned in § 7.3, let the instrument return to normal measuring conditions before using it.
NOMENCLATURE
INSTRUMENT DESCRIPTION
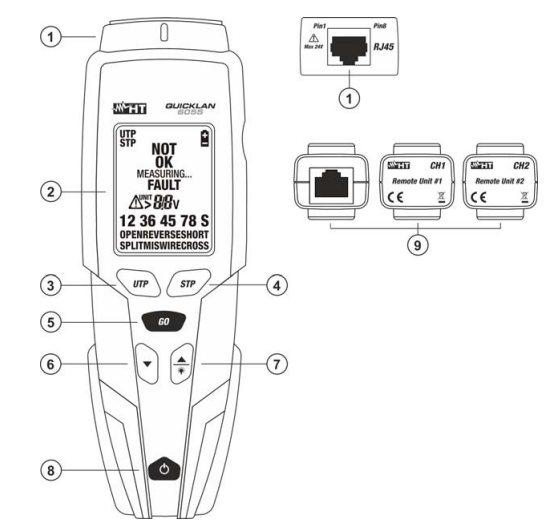
CAPTION:
- RJ45 input terminal
- LCD display
- UTP key
- STP key
- GO key
 key
key key
key- ON/OFF key
- Remote units #1 \~ #2
DISPLAY DESCRIPTION
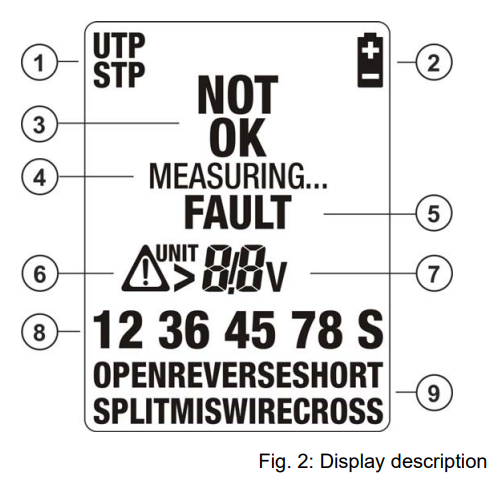
CAPTION:
- Type of selected cable
- Low battery indication
- Final test outcome
- Running test indication
- Fault test indication
- Caution and remote unit number indications
- Error numbers and input voltage indications
- RJ45 cable couples and S shield indications
- Error type indications
FUNCTION KEY DESCRIPTION
ON/OFF key
Pushing the ON/OFF key permits turning on the instrument. For an instant, all display segments light up, then the firmware release appears on the top right side. When “on” is displayed, the instrument is ready to start (see Fig. 3).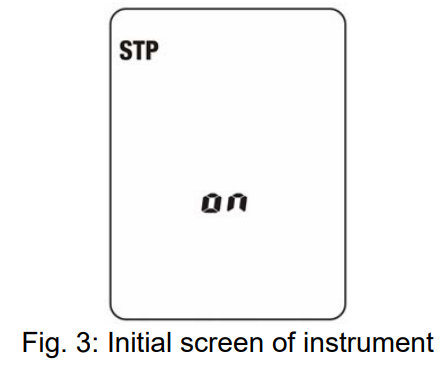
By pushing the long (>1s) ON/OFF key switches off the instrument.
UTP and STP keys
By pressing the UTP or STP keys, it’s possible to select the type of cable to be tested, with the following difference: STP also performs tests on the shield (continuity and proper connections) while UTP doesn’t. Consequently, STP must be pressed for all shielded cables such as FTP (Foiled Twisted Pair cable), STP (Shielded Twisted Pair cable), SSTP (Shielded/Shielded Twisted Pair cable), and SFTP (Shielded/Foiled Twisted Pair cable).
GO key
By pushing the GO key, activate the wire mapping test of the LAN cable connected between the instrument’s input and the remote unit used (see § 5.1).
![]() keys
keys
- By pushing
 keys for the selection of the errors detected by the instrument at the end of the wire mapping test on the cable (see § 5.2).
 - Pushing long (>2s) of the
 key permits activating/disabling the backlight.
Auto Power OFF feature
The instrument is provided with an Auto Power OFF (APO) feature which automatically permits it to switch off after approximately. 4 minutes of idleness in order to preserve the internal battery.
OPERATING INSTRUCTIONS
CABLING TEST VERIFY
The wire mapping of RJ45 LAN cables is tested in accordance with its defined cabling layout. To test a cable, perform the following steps:
- Switch on the instrument by pushing the ON/OFF key.
- Select the type of cable, UTP or STP, under test (see § 4.3.2).
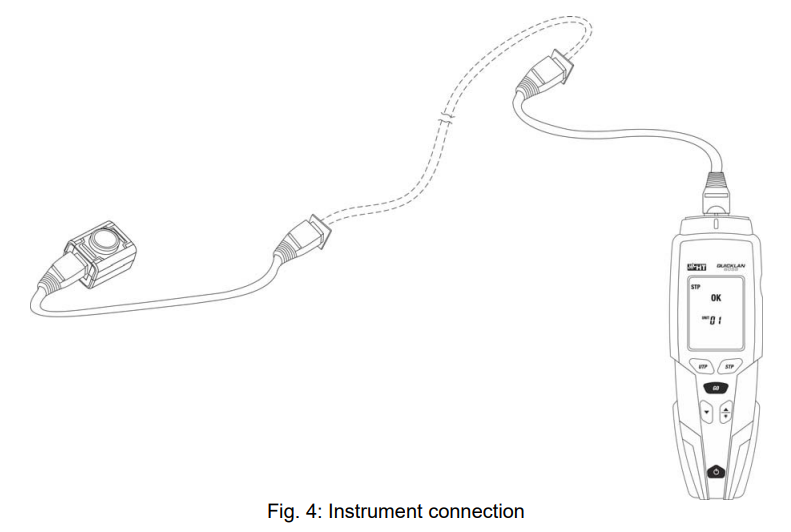
- Connect the cable under test to the meter and to the remote unit by using, if necessary, the supplied patch cables (see Fig. 4).

- Press the GO key. The message “MEASURING…” is shown, and the instrument performs all tests related to the selected type of cable. CAUTION: The remote unit must be connected; otherwise, no measurement is performed.
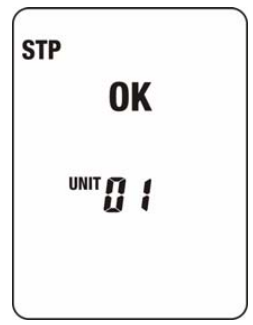
- If cabling is correct, a screen like this is displayed (OK). The identification number refers to the remote identifier connected to the other end of the cable being tested.

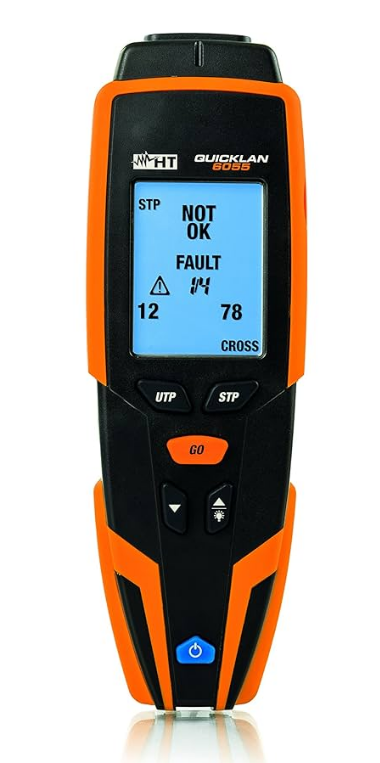
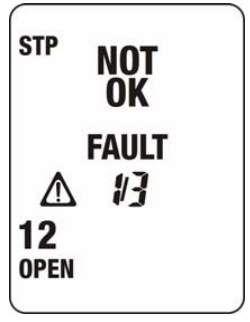
- If cabling is not correct, a screen like this is displayed. Referring to this example:
- “NOT OK” indication and caution symbol mean that the test has given some errors.
- “FAULT 1/3” means that the detected errors are 3, of which the first one is currently displayed. By pressing
 keys, it’s possible to run over the remaining screens and display other cabling errors.
 - Details on the detected error are given on the left side: e.g., the couple 1-2 is OPEN.

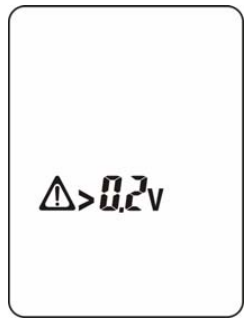
- If the instrument detects the presence of a voltage >0.2V on the RJ45 input, it shows the message in the screen on the right and does not perform the test. Eliminate the cause of the presence of voltage (e.g., coupling due to the presence of electrical cables close to LAN network cables). The maximum allowed voltage between inputs is 24V.

CABLING ERRORS
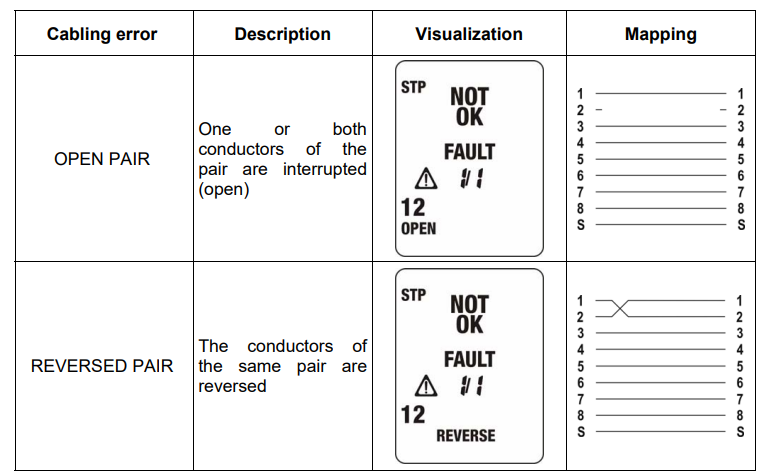
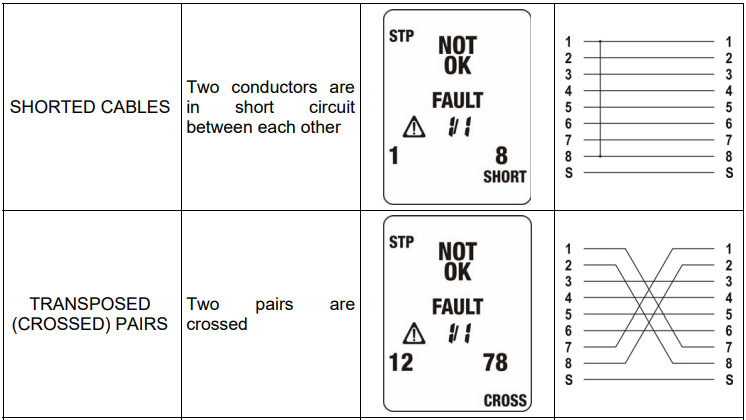
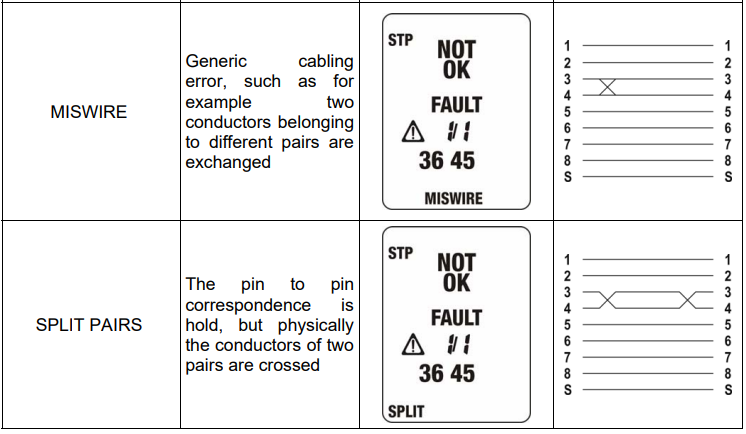
SPLIT PAIRS EXPLANATION NOTE
A LAN cable contains 8 conductors, twisted two by two, thus forming 4 pairs: 1-2, 3-6, 4-5, 7-8. The error “SPLIT PAIRS” consists of the exchange of two conductors belonging to different pairs. The pin-to-pin correspondence seems intact, but physically, the conductors of two couples are split. Such interaction hardly affects (or even makes impossible) the exchange of data at high frequency/speed.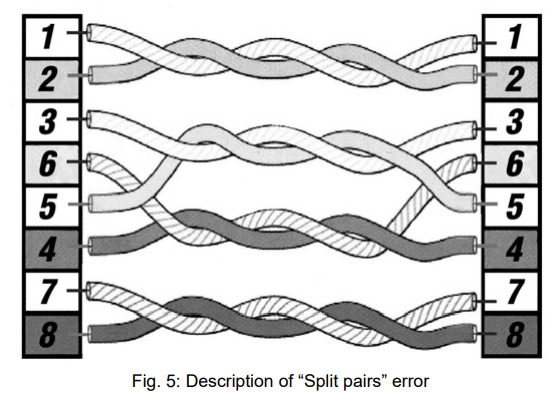
MAINTENANCE
GENERAL INFORMATION
- Whether in use or in storage, please do not exceed the specification requirements to avoid possible damage or dangers.
- Do not place this meter in high temperatures or high humidity, or expose it to direct sunlight.
- Be sure to turn off the meter after use. If you expect not to use the tester for a long time, remove the battery in order to avoid leakage of battery liquid that would damage the internal parts.
BATTERY REPLACEMENT
When![]() appears on the display, replace the battery.
appears on the display, replace the battery.
- Switch off the instrument.
- Remove the temperature probe.
- Remove the battery cover.
- Remove the battery from the battery fastener.
- Set the new battery into the battery fastener, and return it to the battery case.
- Replace the battery cover.
- Use the appropriate battery disposal methods for your area.
CLEANING
To clean the instrument, use a soft dry cloth. Never use a wet cloth, solvents, or water.
END OF LIFE
![]() CAUTION: this symbol indicates that equipment and its accessories shall be subject to a separate collection and correct disposal.
CAUTION: this symbol indicates that equipment and its accessories shall be subject to a separate collection and correct disposal.
TECHNICAL SPECIFICATIONS
TECHNICAL SPECIFICATIONS
Connectors:
- LAN input connectors
- RJ45
Cables which can be tested:
- Cable type UTP, STP
- Category CAT3, 5, 5E, 6, 6A, 7
- Reference guideline: TIA/EIA 568B
- Max height of use: 2000m (6562ft)
- Length: up to 200m (656ft)(1)
(1) To perform the test “SPLIT PAIR,” the cable must be at least 1m (3.3ft) long.
GENERAL SPECIFICATIONS
Mechanical features:
- Dimensions (L x W x H): 190 x 65 x 45mm (7 x 3 x 2in)
- Weight (with battery): 235g (8 ounces)
- Dimensions remote units (L x W x H): 30 x 25 x 27mm (1 x 1 x 1in)
- Weight remote units: 13g (0.5 ounces)
- Mechanical protection: IP40
Power supply:
- Battery type 1x9V type IEC 6F22
- Battery life ca 600h (backlight OFF), ca 16h (backlight ON)
- Auto Power OFF after 4 minutes of idleness (not disabled)
ENVIRONMENT
Environmental conditions
- Working temperature 0°C ÷ 40°C (32°F ÷ 104°F)
- Relative humidity <80%RH
- Storage temperature 0°C ÷ 40°C (32°F ÷ 104°F)
- Storage humidity <80%RH
ACCESSORIES
Standard accessories
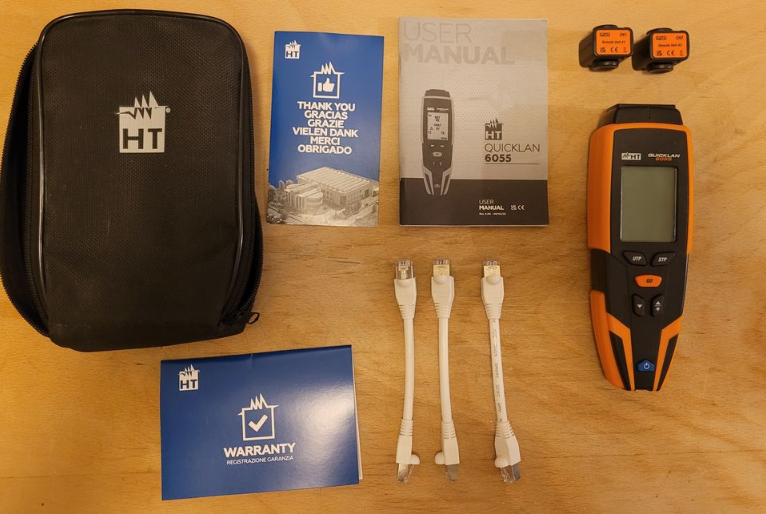
- Remote unit #1 CH1
- Remote unit #2 CH2
- Patch cables RJ45/RJ45, STP, 20cm, 3 pcs YAAMS0000000
- Battery
- Carrying bag
- User manual
Optional accessories
- Remote unit #3 and cable RJ45/RJ45 STP REM3
- Remote unit #4 and cable RJ45/RJ45 STP REM4
- Remote unit #5 and cable RJ45/RJ45 STP REM5
- Remote unit #6 and cable RJ45/RJ45 STP REM6
- Remote unit #7 and cable RJ45/RJ45 STP REM7
- Remote unit #8 and cable RJ45/RJ45 STP REM8
- Remote units #3 – #8 + 6 cables RJ45/RJ45 STP REM38
SERVICE
WARRANTY CONDITIONS
This instrument is guaranteed for one year against material or production defects, in accordance with our general sales conditions. During the warranty period, the manufacturer reserves the right to decide either to repair or replace the product.
Should you need to return the instrument for repair or replacement, obtain prior agreement with the local distributor from whom you bought it. Use only original packaging. Any damage that occurs in transit due to non-original packaging will be charged to the customer.
The warranty doesn’t apply to:
- Accessories and batteries (not covered by warranty).
- Repairs made necessary by improper use (including adaptation to particular applications not foreseen in the instructions manual) or improper combination with incompatible accessories or equipment.
- Repairs were made necessary by improper shipping material, causing damage in transit.
- Repairs made necessary by previous attempts for repair carried out by unskilled or unauthorized personnel.
- Instruments, for whatever reason, are modified by the customer themselves without the explicit authorization of our Technical Department.
The contents of this manual may not be reproduced in any form whatsoever without the manufacturer’s authorization. Our products are patented and our logotypes registered. We reserve the right to modify specifications and prices in view of technological improvements or developments that might be necessary.
SERVICE
Shouldn’t the instrument work properly? Before contacting your distributor, make sure that batteries are correctly installed and working, check the test leads, and replace them if necessary. Should the instrument still operate improperly, check that the operation procedure is correct and conforms to the instructions given in this manual. If the instrument is to be returned to the after-sales service or to a dealer, transportation costs are on the customer’s behalf. Shipment shall be agreed upon.
A report must always be enclosed with a rejected product stating the reasons for its return. To ship the instrument, use only the original packaging material; any damage that may be due to non-original packing shall be charged to the customer.
For More Manuals By HT Instruments, Visit ManualsLibraryy.
HT Instruments QUICKLAN 6055 LAN-Cable Tester-FAQs
Q1. What is the main function of the HT QUICKLAN 6055 LAN-Cable Tester?
It is used to test LAN cables by identifying faults, checking wiring accuracy, and measuring cable length in UTP, FTP, and coaxial cables.
Q2. How do I check a LAN cable with this tester?
Connect one end of the cable to the TX port and the other to the RX port, then switch on the tester. The light indicators will show the cable’s status.
Q3. What do the lights on the LAN tester indicate?
The lights represent the wiring sequence. Missing lights indicate breaks, multiple lights on the remote side may signal a short, and a fast sequence can be slowed with the “S” setting.
Q4. Can the QUICKLAN 6055 measure cable length?
Yes, it can measure cable length and also detect open circuits, shorts, or reversed wiring.
Q5. How do I know if my LAN cable is working?
If all lights show correctly during the test, the cable is functioning. Alternatively, try the cable in a device or swap it with a known good one.
Q6. What is the difference between straight-through and crossover LAN cables?
Straight-through cables connect different devices (e.g., PC to router), while crossover cables connect similar devices (e.g., PC to PC).
Q7. Can this tester detect a short or break in the cable?
Yes, it can detect shorts, breaks, reversed pairs, and other wiring faults that affect signal quality.
Q8. Can the tester verify gigabit compatibility?
Yes. Since gigabit uses all four wire pairs, the tester checks if all 8 wires are connected properly. If not, the cable will not support gigabit speeds.
Q9. What is the first step in troubleshooting a cable issue?
Check that the cable is securely connected. If the issue remains, use the LAN tester to verify continuity and wiring integrity.

