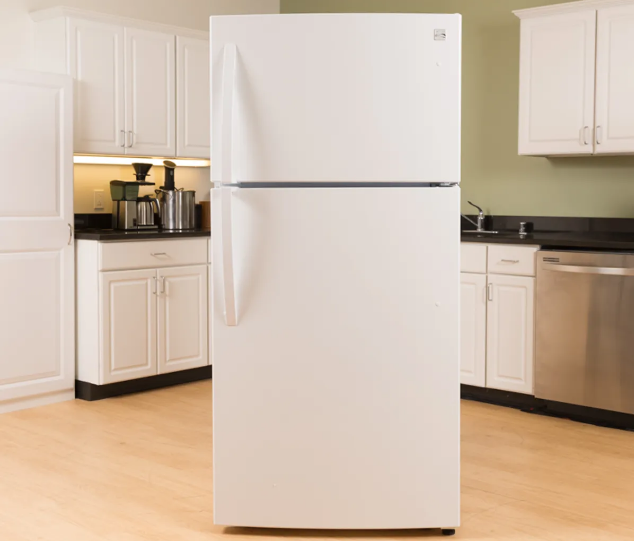
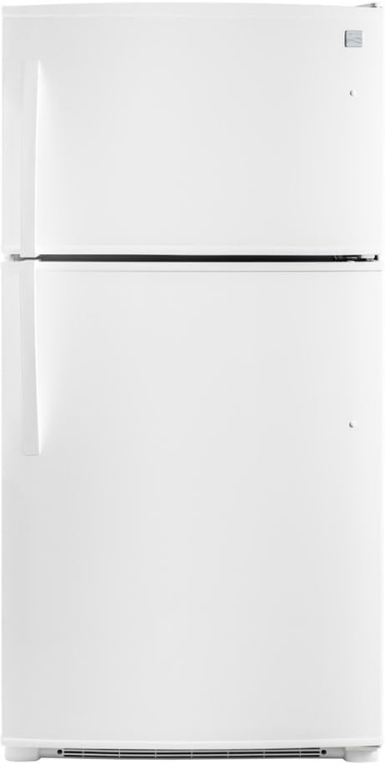
Kenmore 253 French Door Refrigerator
IMPORTANT SAFETY INSTRUCTIONS
- The refrigerator must be plugged into its own dedicated 115-Volt, 60 Hz, AC-only electric outlet.
- The power cord of the appliance is equipped with a three-prong grounding plug for your protection against electrical shock hazards. It must be plugged directly
into a properly grounded three-prong receptacle. - The receptacle must be installed in accordance with local codes and ordinances.
- Consult a qualified electrician,
- Do not use an extension cord or adapter plug. Immediately repair or replace any power cord that becomes frayed or damaged,
- Never unplug the refrigerator by pulling on the power cord. Always grip the plug firmly and pull straight out from the receptacle to prevent damaging the power cord.
- Unplug the refrigerator before cleaning and before replacing a light bulb to avoid electrical shock.
- Performance may be affected if the voltage varies by 10% or more. Operating the refrigerator with insufficient power can damage the compressor. Such damage is
not covered under your warranty. - Do not plug the unit into an outlet controlled by a wall switch or pull cord to prevent the refrigerator from being
- Avoid connecting the refrigerator to a Ground Fault Interrupter(GFI) circuit.
INSTALLATION
This Use & Cars Manual provides specific operating instructions for your model. Use the refrigerator only as instructed in this Use & Care Manual. Before starting the refrigerator, follow these important first steps.
LOCATION
- Choose a place that is near a grounded electrical outlet.
- Do not use an extension cord or an adapter pHug.
- HfpossiNe place the refrigerator out of direct sunlight and away from the range, dishwasher, or other heat sources,
- The refrigerator must be installed on a floor that is level and strong enough to support a fully loaded refrigerator.
- Consider the water supply availability for models supplied with an automatic ice maker.
LEVELING
All four corners of your refrigerator must rest firmly on a solid floor. Your refrigerator is equipped with adjustable front rollers to help level your unit.
To Level Your Refrigerator:
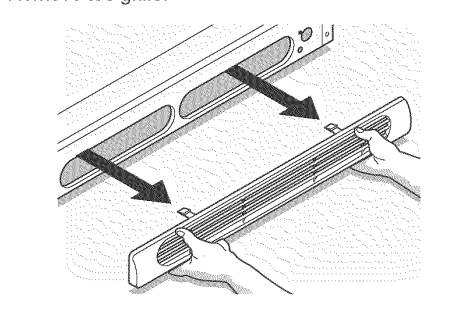
- Remove the toe grille

- Use a flat blade screwdriver or 3/8″ socket wrench to adjust tront rollers.
Connecting the Optional Ice Maker To the Water Supply
To Avoid Property Damage:
- Copper tubing is recommended for the water supply line. Water supply tubing made of 1/4″plastic is not recommended since it greatly increases the potential for water leaks.
- The manufacturer will not be responsible for any damage if plastic tubing is used for the supply line.
- DO NOT install water supply tubing in areas where temperatures fall below freezing.
- Chemicals from a malfunctioning softener can damage the ice maker. If the ice maker is connected to soft water, ensure that the softener is maintained and working properly.
Before installing The Water Supply Line, You Will Need
- Basic Tools: adjustable wrench, flat-blade screwdriver, and Phillips TM screwdriver
- Access to a household cold water line with water pressure between 20 and 120 psi,
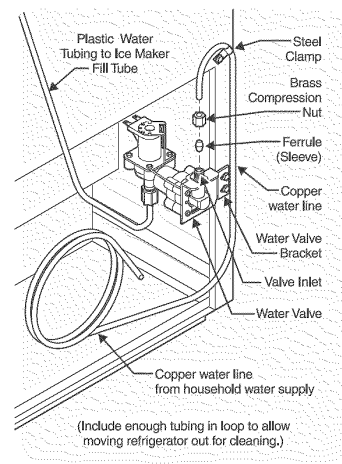
- A water supply line made of 1 inch (6,4 mm) OD, copper tubing, or braided water line. To determine the length of copper tubing needed, you will need to measure the distance from the ice maker inlet valve at the back of the refrigerator to your cold water pipe. Then, add approximately 7 feet (2,1 meters), so the refrigerator can be moved out for cleaning (as shown),
- A shutoff valve to connect the water supply line to your household water system.
- DO NOT use a self-piercing type shutoff valve,
- A compression nut and ferrule (sleeve) for connecting the water supply line to the ice maker inlet valve. NOTE: A water line kit is available through Sears retail ar Catalog Stores at an additional Cost.
To Connect Water Supply Line To Ice Maker Inlet Valve
- Disconnect the refrigerator from the electric power source.
- Place ethe nd of the water supply line into the sink or bucket. Turn ON the water supply and flush the supply line until the water is clear. Turn OFF the water supply at the shut-off valve.
- Unscrew the plastic cap from the water valve inlet and discard the cap.
- Slide the brass compression nut, then the ferrule (sleeve) onto the water supply line, as shown,
- Push the water supply line into the water valve inlet as far as it will go (1 inch). Slide the ferrule (sleeve) into the valve inlet and finger-tighten tighten compression nut onto the valve. Tighten another half turn with a wrench; DO NOT over-tighten.
- With a steel clamp and screw, secure the water supply line to the rear panel of the refrigerator as shown,
- Coil excess water supply line (about 2Y2turns) behind refrigerator as shown and arrange coils so they do not vibrate or wear against any other surface ……
- Turn ON the water supply at the shutoff valve and tighten any connections that leak.
- Reconnect the refrigerator to the electrical power source. (Include enough tubing in the loop to aHow
- To turnthe ice maker on, lower the wire signal arm (see ice maker front cover for ON/ rnovirtgrefrigerator outfo[cUeaoing. OFF position of arm).
Deer Removal and Reversal Instructions

The direction in which your refrigerator door can be reversed is by moving the door hinges from one side to the other. Reversing is performed by a qualified person.
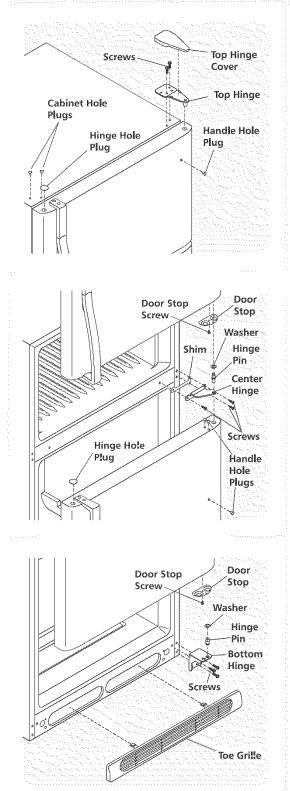
- Remove the toe grille and top hinge cover,
- Remove the top hinge with a 3/8″ hex driver and lift the freezer door off of center hinge pin. Set the door aside.
- Unscrew the center hinge pin using an adjustable wrench and save it for reassembly, ensuring the plastic washer stays on the hinge pin.
- Lift the refrigerator door off of bottom hinge and set it aside,
- Remove the center hinge and shim by removing aside screw and loosening the two outside screws enough to allow the hinge and shim to slide out, then tighten the screws.
- Loosen two outside screws on the opposite side of the refrigerator, and remove the
inside screw, and install the center hinge. - Remove two screws on the bottom hinge with a 3/8″ socket wrench
- Install the bottom hinge on the opposite side with the two screws removed from step 7.
- Unscrew the bottom hinge pin using an adjustable wrench. Move the hinge pin to the other hole in the hinge and tighten with an adjustable wrench,
- Reverse door handles. I see instructions on the next page.
- Move the freezer and refrigerator door stops to the opposite side before starting the screws. Use an awl to puncture the foam
- Position the refrigerator door onto the bottom hinge pin and screw the center Hinge pin through the center hinge into the top of the door. Close the refrigerator
door to help align the hinge hob. - Tighten the center hinge pin with an adjustable wrench,
- Remove the cabinet and hinge, and move to the opposite side.
- Lower the freezer door onto the center hinge pin
- Close the freezer door and have an assistant lift on the opposite side of the door while tightening screws to install the top hinge.
- Replace the toe grille and top hinge cover,
- Plug in the electrical power cord and turn the refrigerator temperature control to the center position. Adjust the setting as necessary.
TO REMOVE FREEZER HANDLE:
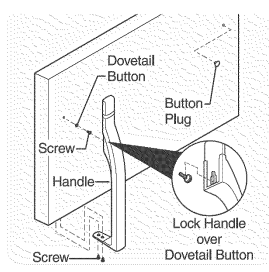
- Remove two screws attaching the handle to the bottom of the freezer door,
- Swing the bottom of the hand away from the door and slide the hand straight up and off of dovetail button.
- Remove the screw and dovetail button and install it on the other side. Moving the
hole plugs from the corresponding holes to the opposite side.
TO ATTACH FREEZER HANDLE:
- Start with the handle offset away from the door. Place the top of the handle over the dovetail button, swing the handle into an upright position, and push downward, locking it into place
- Secure the bottom of the handle with the two screws removed earlier.
TRIM REMOVAL (FULL-LENGTH TRIM MODELS ONLY}
Unsome modeUs, the refrigerator door has a full U-length trim piece which continues from the bottom of the handle to the bottom of the door. The top of the trim fits around the base of the handle. An adhesive “trim lock” is positioned about halfway down. The bottom of the trim is held in place by either an adhesive trim lock or a trim lock with two prongs inserted into a hole on the face of the door.
TO REMOVE Trim:
- Remove trim by gently pulling the trim lock areas out and away from the door.
- When the trim is free from the door, slide the trim straight down and away from the base of the handle.
TO REMOVE REFRIGERATOR HANDLE:
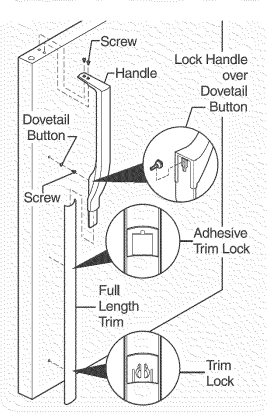
- Remove two screws attaching the handle to the top of the refrigerator door.
- Swing the top of the handle away from the door and slide the handle down and off of dovetail button.
- Remove the screw and dovetail button and install it on the other side, moving the hole plugs from the corresponding holes to the opposite side.
TO ATTACH REFRIGERATOR HANDLE:
- Start with the handle offset away from the door. Place the bottom of the handle over the dovetail button, swing the handle into an upright position, and pull upward, locking it into place.
- Secure the top of the handle with screws.
Features at a glance
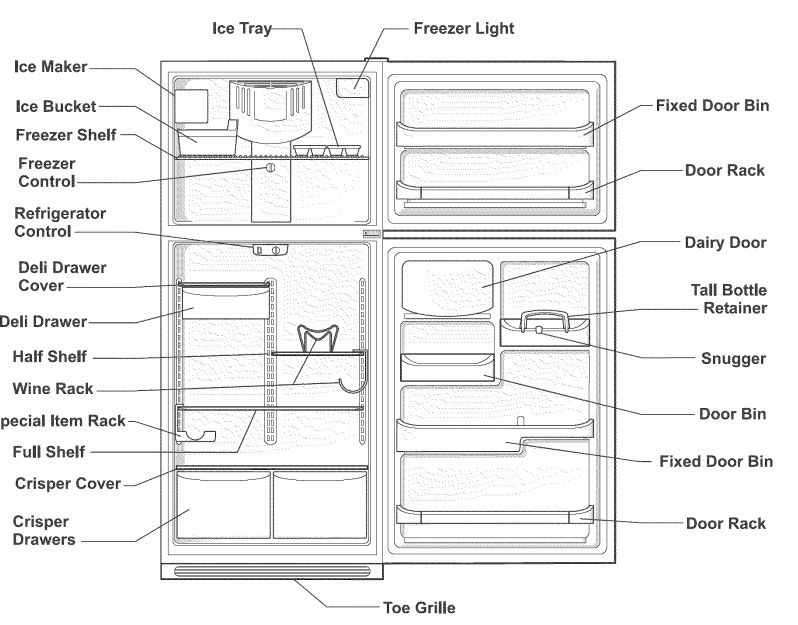
Temperature Controls
COOLDOWN PERIOD
To ensure safe food storage, allow the refrigerator to operate with the doors closed for at least 8 to 12 hours before loading it with food.
TEMPERATURE ADJUSTMENT
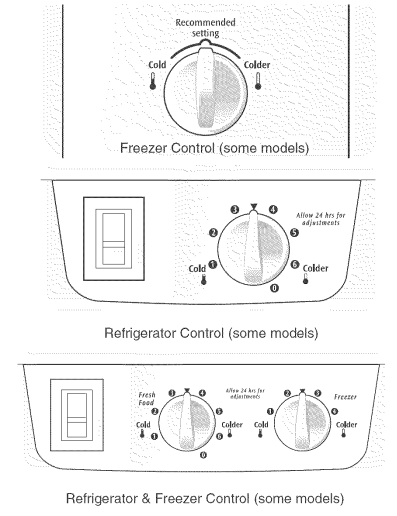
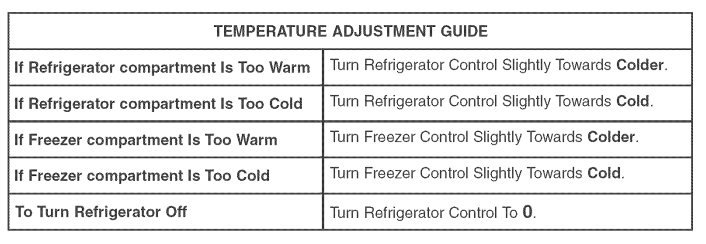
- Adjust temperature gradually: move the knob in small increments, allowing the temperature to stabilize.
- For coUdertemperatures turn the knob towards Colder.
- For warmer temperatures, turn the knob towards Cold.
Turning the refrigerator control will change temperatures m both compartments. For example, if the refrigerator control is turned to a colder setting, the freezer control may have to be adjusted to a warmer setting. Turning the freezer control will change only the freezer temperature. To maintain temperatures, a fan circulates air in the refrigerator
and freezer compartments. For good circulation, do not block cold air vents with food items.
SHELF ADJUSTMENT
Refrigerator shelves are easily adjusted to suit individual needs. Before adjusting the shelves, remove all food.
To adjust sliding shelves:
- Remove the shelf by pulling it forward to the step position. Lift the front edge and pull out,
- Replace the shelf on any pair of rails by reversing this procedure.
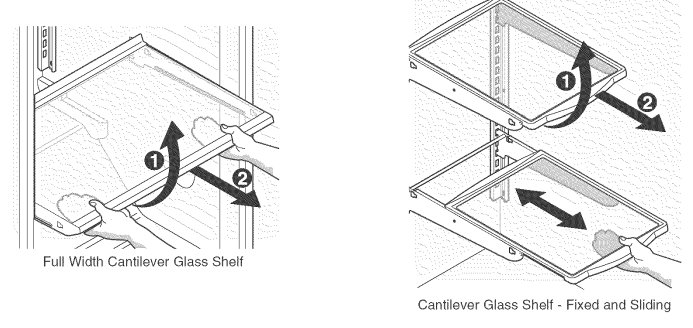
To adjust cantilever shelves:
- Lift the front edge,
- Pull the shelf out,
Replace the shelf by inserting the hooks at rear of the shelf into the wall bracket, Lower the shelf into the desired slots and lock into position, M SpiflProof T glass shelves (some models) catch and hold accidental spills, in some models, the Spi//ProoF shelves slide out for easy access to food and for fast cleaning, The shelves slide out independently of the cantilever brackets, Just pull the front of the shelf forward, The shelf can be extended
as far as the stopper will allow, but it is not removable from the cantilever bracket.
ICE SERVICE
If your refrigerator has an automatic ice maker, it will make a sufficient Supply of ice for normal use. During the initial startup of your refrigerator, however, no ice will be produced during the first 24 hours of operation. Automatic ice makers are also optional accessories that may be installed in Most models at any time. Call your local dealer for information. The ice maker produces 2 to 5 pounds of ice every 24 hours, depending on
usage conditions. Ice is produced at a rate of 8 cubes every 80 to 160 minutes.
TURNING YOUR ICE MAKER ON
After the plumbing connections have been completed, the water supply valve must be opened. Place the ice container under the ice maker, pushing it as Jar back as soon as possible. Lower the wire signal arm to its “down” or ON position. New plumbing connections may cause the first production of ice cubes to be discolored or have an odd flavor. These first cubes should be discarded until the cubes produced are free of discoloration and taste.
FOOD STORAGE IDEAS
Fresh Food Storage
- The fresh food compartment should be kept between 34° F and 40° F with an optimum temperature of 37 ° R
- Avoid overcrowding the refrigerator shelves. This reduces the circulation of air around the food and results in uneven cooling.
Fruits and Vegetables
- Storage in the crisper drawers traps moisture to help preserve the fruit and vegetable quality for long periods.
CARE AND CLEANING
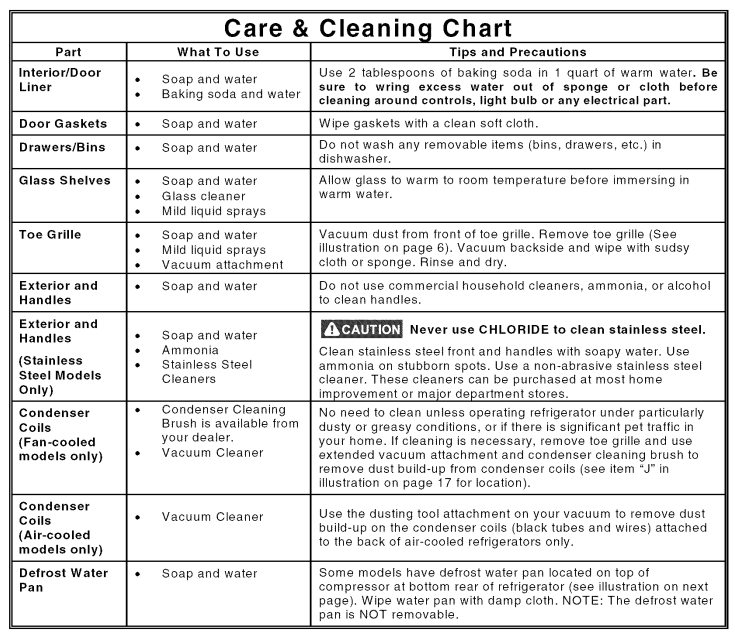
Keep your refrigerator and freezer clean to prevent odor buildup. Wipe up any spHU immediately, dry and clean, both sections at least twice a year. Never use any type of scouring pads, brushes, abrasive cleaners, or strong alkali on any surface. Do not wash any removable parts in the dishwasher. Always unplug the electrical power cord from the wall outlet before cleaning.
REPLACING THE FREEZER LIGHT BULB (SOME MODELS)
- Unplug the refrigerator,
- Wear gloves for protection against possible broken glass.
- Unsnap the light shield as shown.
- Unscrew and replace the old bulb with an appliance bulb of the same wattage.
- Remember to put the refrigerator back in.
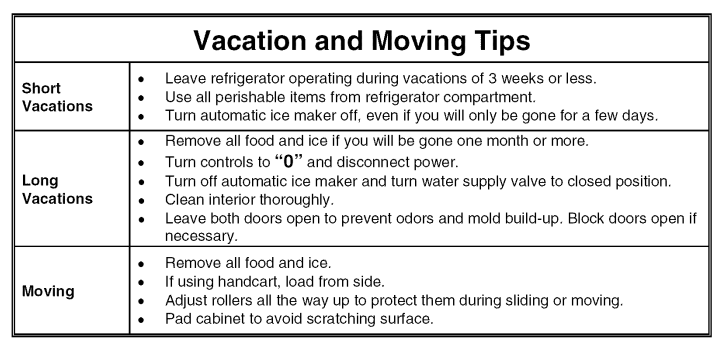
TROUBLESHOOTING
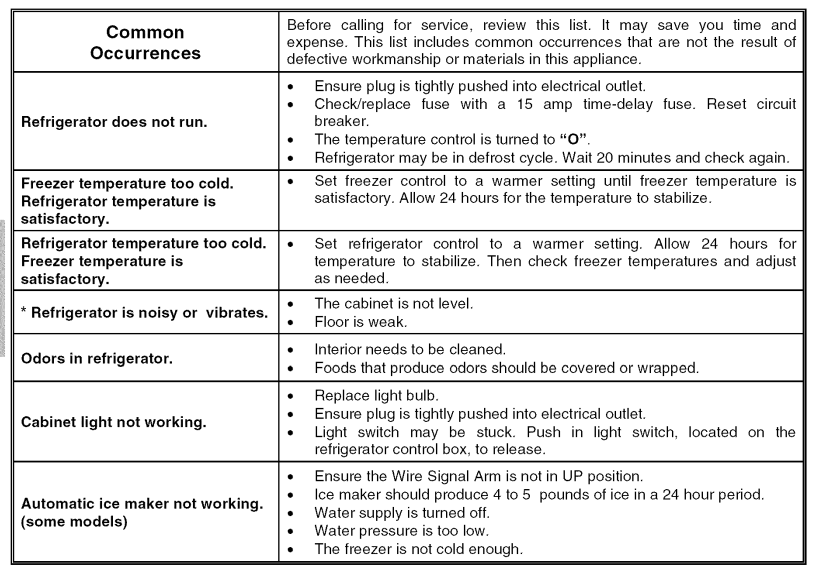
FOR MORE MANUALS BY KENMORE, VISIT MANUALSLIBRARYY
Kenmore 253 French Door Refrigerator-FAQs
Q1. What is the capacity of the Kenmore 253 refrigerator?
The Kenmore 253 model offers a storage capacity of about 16.7 cu. ft., designed for efficient food organization.
Q2. What is the ideal temperature setting for this refrigerator?
Set the fridge to 37°F (3°C) and the freezer to 0°F (-18°C) for safe and optimal food storage.
Q3. Why is my Kenmore French Door refrigerator not cooling properly?
Check and clean the condenser coils, ensure the evaporator fan is running, and test the thermostat. Blocked vents or faulty controls can also affect cooling.
Q4. How long does it take for a Kenmore refrigerator to get cold after plugging in?
It generally takes 6–8 hours to start cooling and up to 24 hours to stabilize at the correct temperature.
Q5. How long do Kenmore French Door refrigerators usually last?
With proper care and maintenance, they typically last 12 to 15 years.
Q6. How can I tell if my refrigerator compressor is bad?
If the back of the fridge feels unusually hot, makes loud noises, or gives off a burning smell, the compressor may need servicing.
Q7. Do all Kenmore refrigerators have filters?
Most Kenmore French door refrigerators include a water and air filter, which should be replaced about every 6 months for best performance.
Q8. How do I level my Kenmore refrigerator?
Adjust the leveling legs at the bottom until the unit sits firmly and the doors close smoothly without wobbling.
Q9. What is the most common problem with French door refrigerators?
The most frequent issues include ice maker malfunctions and inconsistent cooling, often due to airflow or electronic control problems.

