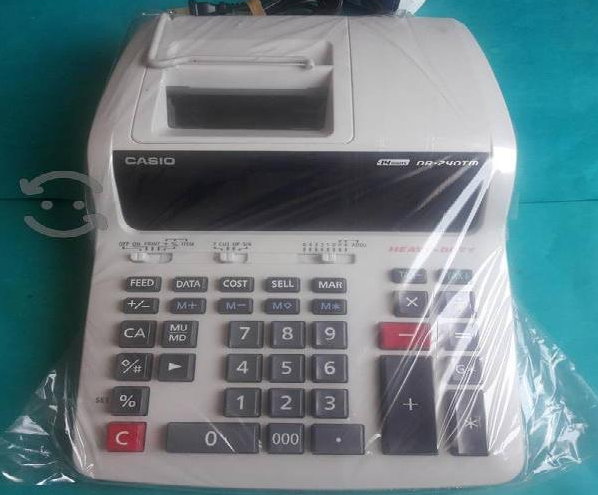
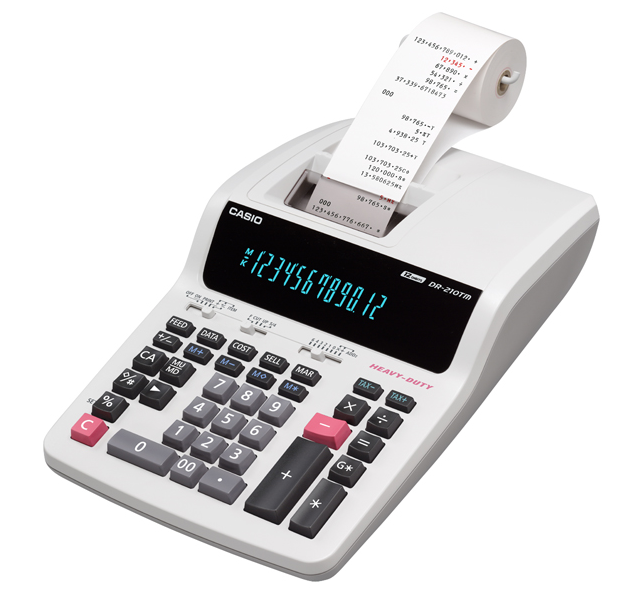
Casio DR210TM Digital Printing Calculator
GUIDELINES LAID DOWN BY FCC RULES FOR USE OF THE UNIT IN THE U.S.A. (not applicable to other areas).
NOTICE: This equipment has been tested and found to comply with the limits for a Class B digital device, pursuant to Part 15 of the FCC Rules. These limits are designed to provide reasonable protection against harmful interference in a residential installation. This equipment generates, uses, and can radiate radio frequency energy and, if not installed and used in accordance with the instructions, may cause harmful interference to radio communications.
However, there is no guarantee that interference will not occur in a particular installation. If this equipment does cause harmful interference to radio or television reception, which can be determined by turning the equipment off and on, the user is encouraged to try to correct the interference by one or more of the following measures:
- Reorient or relocate the receiving antenna.
- Increase the separation between the equipment and receiver.
- Connect the equipment into an outlet on a circuit different from that to which the receiver is connected.
- Consult the dealer or an experienced radio/TV technician for help.
Caution: Changes or modifications to the product not expressly approved by CASIO could void the user’s authority to operate the product.
FOR CALIFORNIA, USA ONLY
Perchlorate Material – special handling may apply. See www.dtsc.ca.gov/hazardouswaste/perchlorate
Before using the calculator for the first time
Pull out the insulating paper in the direction indicated by the arrow.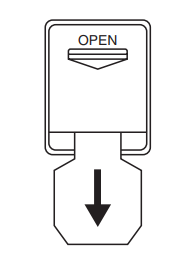
NOTICE
Handling the Calculator
- The spools of the printing ribbon are secured in place by tape before the calculator is shipped from the factory. Be sure to remove this tape before using the calculator for the first time.
- Never try to take the calculator apart.
- To clean the calculator, wipe it off with a soft cloth.
- Switch the power off after use or if you do not plan to use the calculator. It is best to unplug from the AC outlet if you do not plan to use the calculator for a long time.
- In no event will CASIO and its suppliers be liable to you or any other person for any damages, including any incidental or consequential expenses, lost profits, lost savings, or any other damages arising out of the use of this product.
About the Input Buffer
Depending on the model, the calculator’s input buffer can hold up to 12 or 14 key operations (both number entries and function commands). This means you can continue key input even while another operation is being processed.
Back-up Battery (DR-250TM/270TM)
This calculator comes with a built-in memory backup battery that provides power to retain the values stored in memory when the calculator is not plugged into an AC power outlet. The memory backup battery requires periodic replacement, about once every 11 months. After that time, input data may change or be deleted while you are using the calculator. Refer to “Replacing the Battery” when replacing the battery.
Caution: Incorrectly replacing the battery creates the risk of explosion. Use a CR2032-type battery only. Dispose of used batteries according to the battery manufacturer’s instructions.
RESET Button
- Pressing the RESET button deletes calculation memory contents, independent memory contents, grand total memory contents, tax rate settings, time and date settings, data content settings, etc. Be sure to keep separate records of all important settings and numeric data to protect against accidental loss.
- Press the RESET button on the back of the calculator to restore normal operation whenever the calculator does not operate correctly. If pressing the RESET button does not restore normal operation, contact your original retailer or nearby dealer.
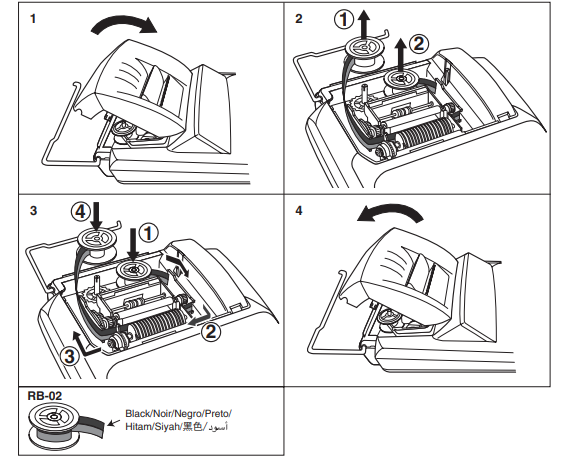
Replacing the Printer Ribbon (Type RB-02 (black/red))
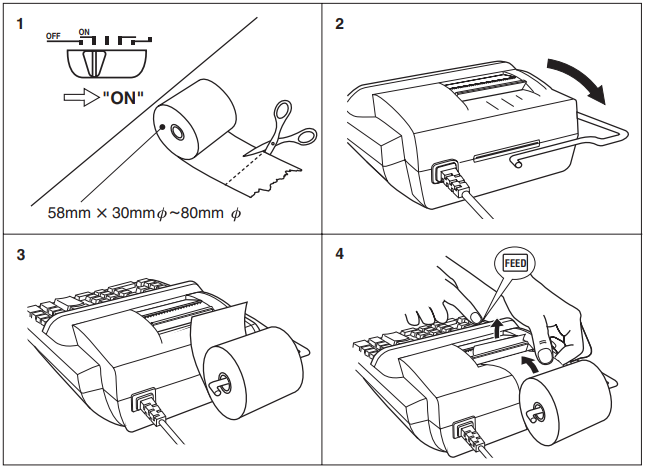
Loading the Paper Roll
GENERAL GUIDE
About the Selectors
Function Selector
- OFF: Power is off.
- ON: Power is on, but no printing is performed except when
 is pressed to print a reference number. Calculations appear on the display only.
 - PRINT: Power is on and printing is activated. Calculations also appear on the display.
- ITEM+: Power is on and printing is activated. The total number of addition and subtraction items is printed with the result when
 and
and  is pressed. Pressing the
  key prints the number of items (number of
  key operations) added to the grand total memory. Pressing the
  key prints the total number of
  and
and  key operations up to that point, along with the value stored in the independent memory.
 - ITEM+/–: Power is on and printing is activated. The total number of addition items less the total number of subtraction items is printed with the result when
 and
and  are pressed. Pressing the
  key prints the number of items (number of
 key operations) added to the grand total memory. Pressing the
 key prints the total number of
 key operations less the total number of
  key operations up to that point, along with the value stored in the independent memory.
Decimal Mode Selector
- F: Floating decimal
- CUT: Cut off to the number of decimal places specified by the Decimal Place Selector setting.
- UP: Round up to the number of decimal places specified by the Decimal Place Selector setting.
- 5/4: Cut off (0, 1, 2, 3, 4) or round up (5, 6, 7, 8, 9) to the number of decimal places specified by the Decimal Place Selector setting.
Important: All input and calculations are rounded for addition and subtraction. For multiplication and division, the calculation is performed with values as input, and the result is rounded.
Decimal Place Selector
- 6, 4, 3, 2, 1, 0: Number of decimal places
- ADD2×, ADD2+: ADD Mode calculations always add two decimal places, except when the Decimal Mode Selector is at “F”. Use ADD2+ for addition and subtraction, and ADD2× for multiplication and division.
Data Print Function
Setting Method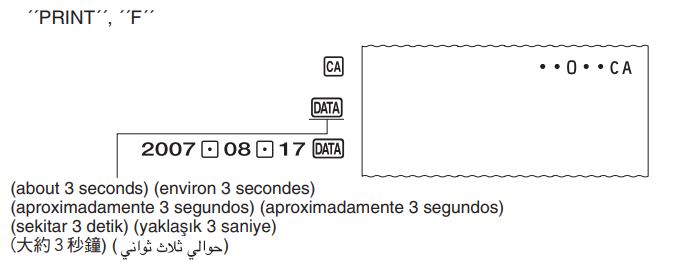
Printing Method
Data print (Inserts reference point during calculation.)
Using the Clock
Printing the Current Time and Date
- While the current time is displayed, you can press
 to toggle the display between 12-hour and 24-hour timekeeping.
 - The following shows display and print examples when 12-hour timekeeping is selected.

Setting the Time and Date
Pressing ![]() here will switch between AM and PM.
here will switch between AM and PM.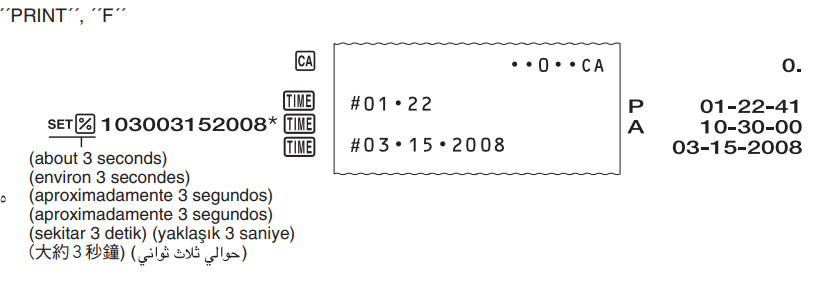
Specifying the Date Format
During date setting or display, press ![]() to cycle through the three available date formats.
to cycle through the three available date formats.
Month Day Year MM-DD-YYYY
Day Month Year DD-MM-YYYY
Year Month Day YYYY-MM-DD
Making Corrections

To clear errors when accumulating a grand total:
- When calculating a grand total, the result of the current operation is transferred to the grand total memory each time you press the
 key.
key. - If you find you made a wrong entry in the current operation but have not yet pressed
 , use
, use  to clear the error or adjust it before pressing
 .
.
Example: If you enter: 2+3+5+5+6, and wish to change the first 5 to 4, enter 5 followed by +4 before pressing
Printing Reference Numbers

Errors
The following causes the error symbol “E” to appear on the display. Clear the error as indicated and continue. Independent memory contents are retained when an error is cleared.
- Whenever you input a value that is longer than 12 or 14 digits. Clear the input value only by pressing
 , or the entire calculation by pressing
  .
. - Whenever the integer part of a result (whether intermediate or final) is longer than 12 or 14 digits. In this case, the display shows the 11 (12-digit model) or 13 (14-digit model) most significant digits of the result. The true decimal point of the result is 12 or 14 places to the right of the decimal position shown in this display. Clear the entire calculation by pressing
 .
. - Whenever the integer part of a total being accumulated in memory is longer than 12 or 14 digits. Clear the entire calculation by pressing
 .
. - Attempting to calculate an average value while the item count is 000. The item count will become 000 when you perform an operation that adds to the count while it is 999. Depends on the calculator model.
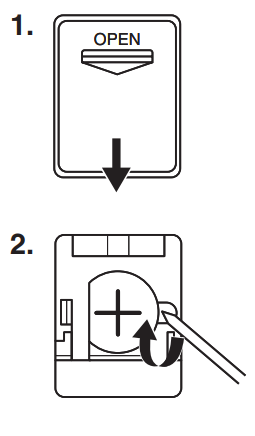
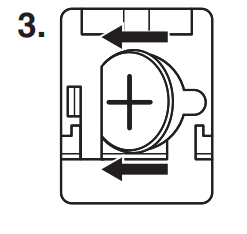
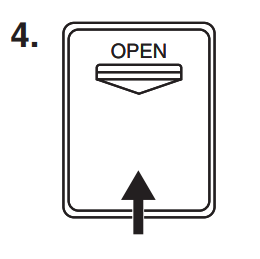
Replacing the Battery
- Insert a thin, pointed non-metal object (such as a toothpick) into the hole and remove the old battery.

- Wipe off the surface of the new battery with a soft, dry cloth. Load it into the calculator so that its positive (+) side is facing up.


Specifications
Ambient temperature range: 0°C to 40°C (32°F to 104°F)
Power supply: The rated current and voltage are printed on the calculator.
Dimensions: 109.3mmH × 214.5mmW × 382mmD (4 1/4″ H × 8 1/2″ W × 15″ D) roll holder extended
Weight: Approximately 1.7 kg (3.8 lbs)
Consumable supplies: Printer Ribbon (RB-02), Roll Paper (width 58 × 60 φ mm)
The AC outlet must be located near the unit and must be easily accessible.
For More Manuals By Casio, Visit ManualsLibraryy.
Casio DR210TM Digital Printing Calculator-FAQs
Q1: Why is my Casio DR210TM calculator not printing?
A1: First, check if the batteries are working and make sure there is no paper jam inside the printer. If both are fine, while the calculator is in “Print” mode, press the [CA] (or [AC]) button 20 times in a row to clear the memory buffers.
Q2: What is the purpose of a printing calculator like the Casio DR210TM?
A2: A printing calculator prints out calculations on paper instantly, making it very helpful for finance, accounting, and business tasks where keeping a physical record is important.
Q3: How do I load paper into the Casio DR210TM printing calculator?
A3: Insert the end of the paper roll through the slot at the back, feed it into the internal slot, hold down the [FEED] key to advance the paper, then secure the paper roller and replace the cover.
Q4: Does the Casio DR210TM require ink for printing?
A4: No, it uses thermal printing technology which does not require ink.
Q5: How can I reset the Casio DR210TM calculator?
A5: To reset, follow the manual instructions provided—typically this involves clearing settings or memory buffers by using specific key sequences like pressing [CA] or [AC].
Q6: What do keys like M+, MR, MC mean on the Casio DR210TM?
A6: M+ adds the current number to memory, MR recalls memory, and MC clears the memory storage.
Q7: Who is the intended user of the Casio DR210TM printing calculator?
A7: It is designed for professionals in accounting, finance, and business management where printed calculation records are frequently needed.
Q8: How do I clean and maintain the Casio DR210TM calculator?
A8: Use compressed air to blow away dust from keys, clean with a microfiber cloth and mild disinfectant for hygiene, and keep the paper feed clear of jams for smooth operation.

