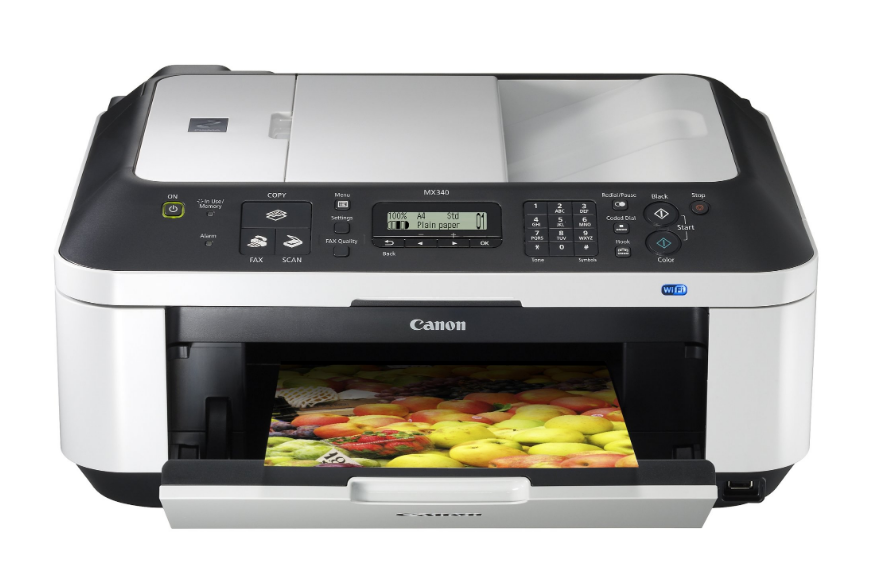
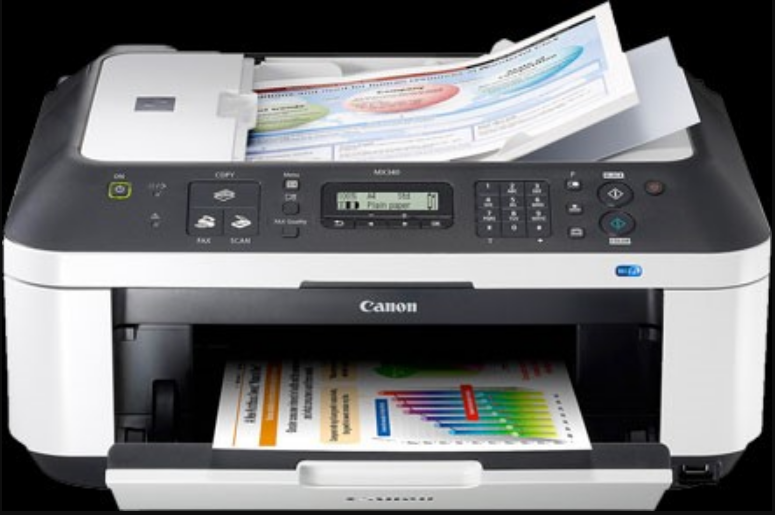
Canon PIXMA MX340 Wireless Office All-in-One Printer
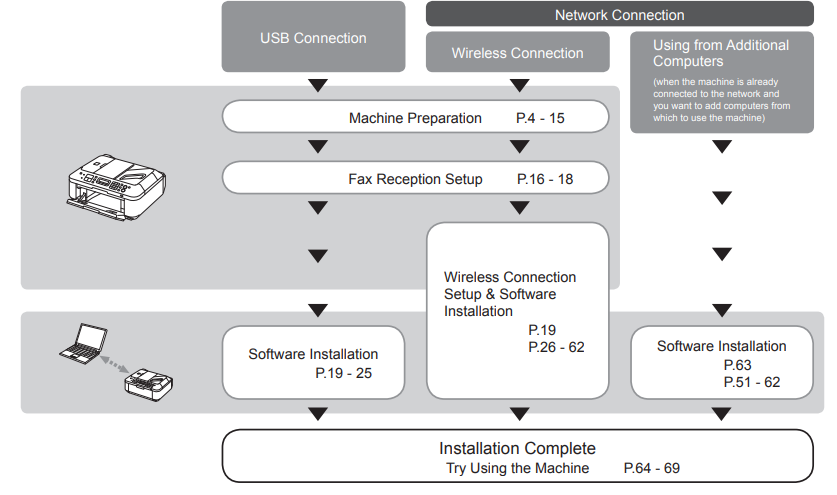
Machine Installation Flow
 Devices Required for Wireless Connection
When using the machine over a wireless connection, the following devices are required.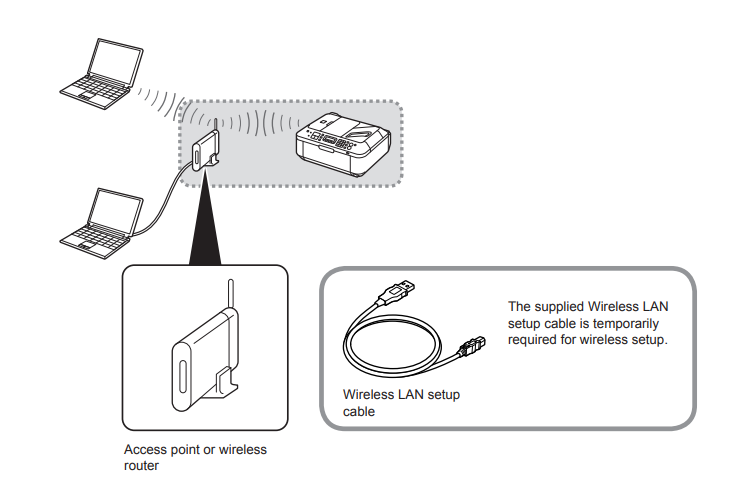
A commercial access point or router that supports IEEE802.11b/g is required.
Check the Included Items
Check that all the items shown below are included in the box.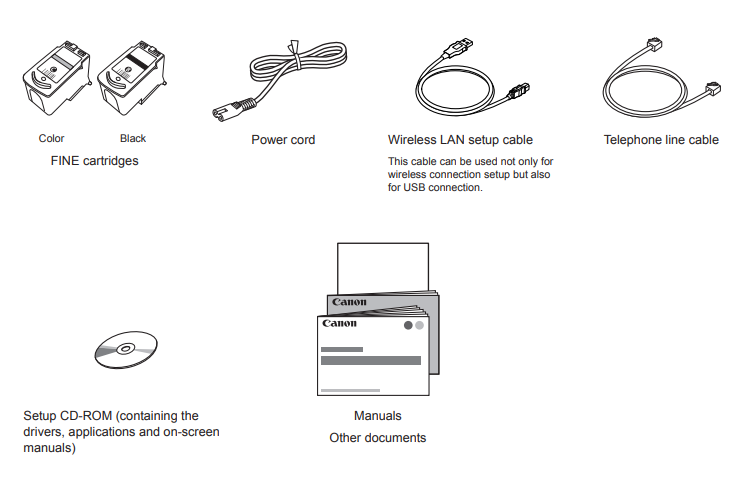
Remove the Protective Material
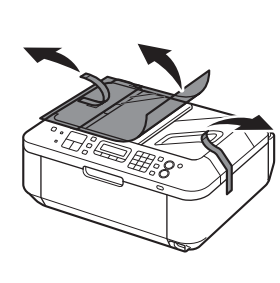
- Remove all the protective materials and orange tape from the outside of the machine.

- The tape and protective materials may differ in shape and position from what they actually are.

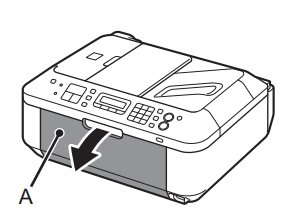
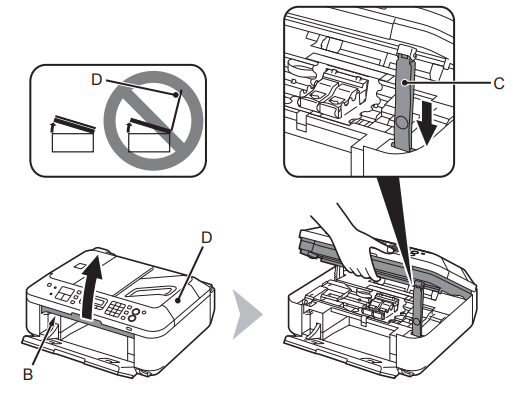
- Open the Paper Output Tray (A). Lift the Scanning Unit (Cover) (B) and fix it with the Scanning Unit Support (C). Close the Document Cover (D) and lift it with the Scanning Unit (Cover).

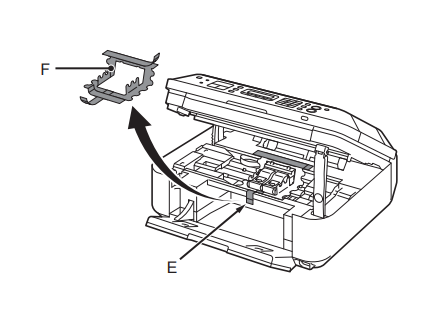
- Remove the orange tape (E) carefully. The protective material (F) is removed along with the orange tape.

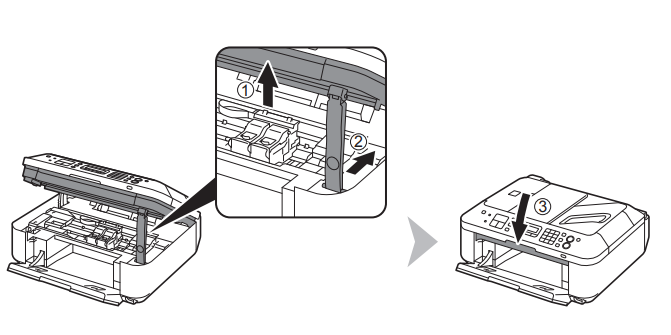
- Lift the Scanning Unit (Cover) slightly (1) and fold the Scanning Unit Support (2), then gently close the Scanning Unit (Cover) (3).

Connect the Telephone Line
Do not turn the power on yet.
To use the machine as a fax, a telephone line needs to be connected. This section describes the basic method of the telephone line connection. For other connection methods, refer to the on-screen manual:
Basic Guide.
When not using as a fax:
- →Go to “4 Turn the Power On” page 9.
When using it as both a fax and a telephone:
- →1 2
When using as a fax only:
- →1 only
- If you cannot send faxes after installing the machine, check the telephone line type. For details, refer to “Confirming the Telephone Line Connection” in the on-screen manual: Basic Guide.
Connect the machine with a telephone line using the supplied telephone line cable (A).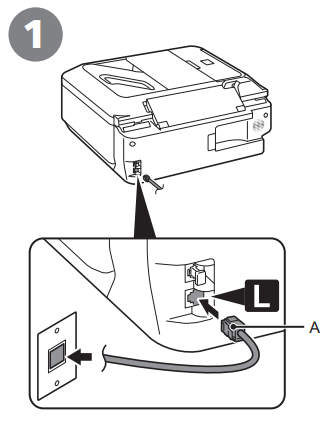
When using as a fax only:
- →Go to “4 Turn the Power On” on page 9.
Only when connecting a telephone: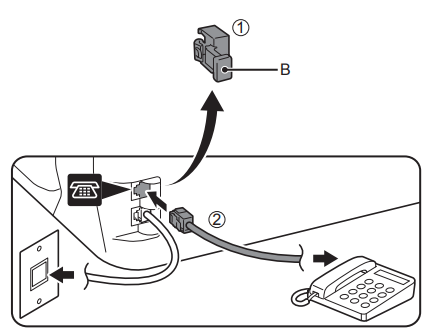
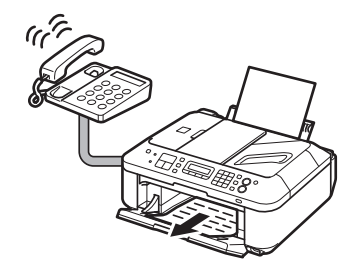
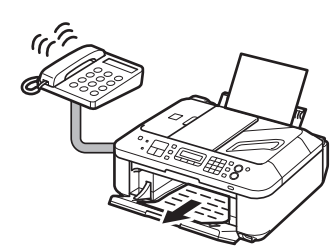
Remove the Cap (B) (1), then connect a telephone with the telephone line cable (2).
- Do not connect the machine and a telephone in parallel to the same telephone line using a distribution adapter. The machine may not operate properly.
Turn the Power On
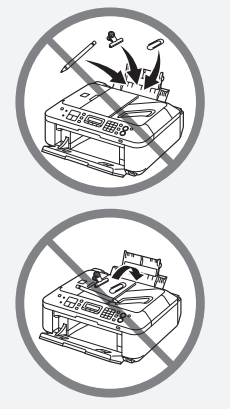
- Do not install the machine where an object may fall on it. The object may fall inside the machine, resulting in a malfunction.
- Do not place any object on top of the machine. It may fall into the machine when opening covers, resulting in a malfunction.

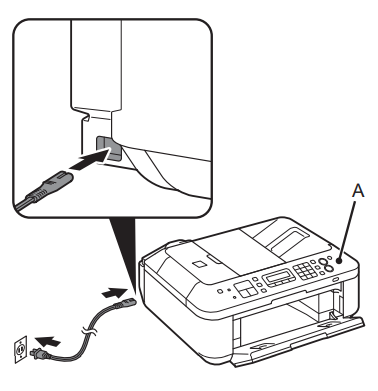
1. Insert the power cord into the connector on the left side of the machine and into the wall outlet.
- Do NOT connect the Wireless LAN setup cable (USB cable) at this stage.
- Make sure that the Document Cover (A) is closed.

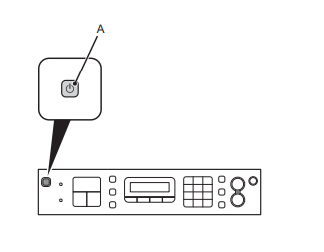
2. Press the ON button (B) to turn on the machine.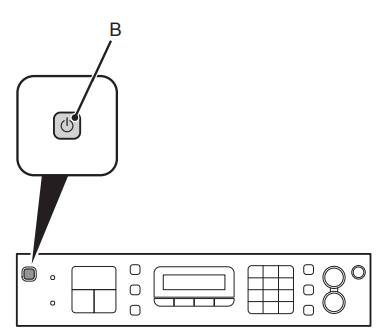
3. Use the ![]() button (C) on the Operation Panel to select the language for the LCD (Liquid Crystal Display) (D), then press the OK button.
button (C) on the Operation Panel to select the language for the LCD (Liquid Crystal Display) (D), then press the OK button.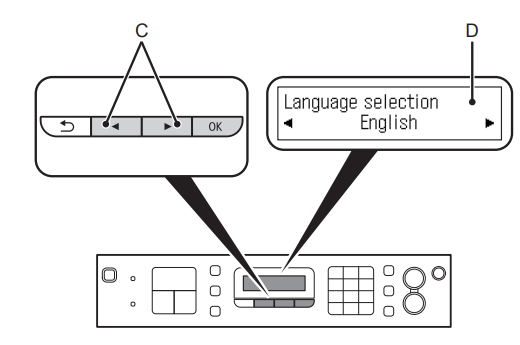
4. Make sure that the above screen is displayed, and go to the next step.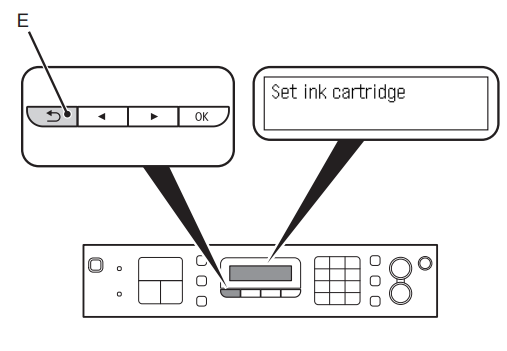
- If an unintended language is displayed on the LCD, press the Back button (E) to return to the Language selection screen.
Turning the power off:
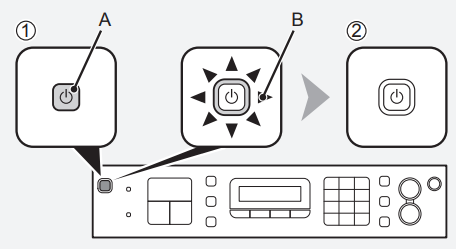
Be sure to follow the procedure below.
- Press the ON button (A) to turn off the machine.
- Make sure that the lamp (B) of the ON button is not lit.

Operating noise may continue for up to 25 seconds until the machine turns off.
![]()
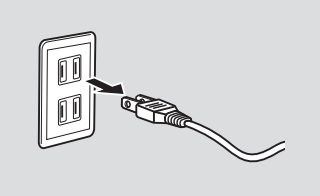
- When removing the power plug, make sure that the lamp of the ON button is not lit before removing the plug. Removing the power plug while the lamp of the ON button lights up or flashes may cause drying and clogging of the FINE Cartridges, resulting in poor printing.

- If your machine is used as a fax, removing the power plug deletes all faxes stored in memory. Send or print faxes as necessary before removing the power plug.
Install the FINE Cartridges
1. Lift the Scanning Unit (Cover) (A) and fix it with the Scanning Unit Support (D). Close the Document Cover (E) and lift it with the Scanning Unit (Cover).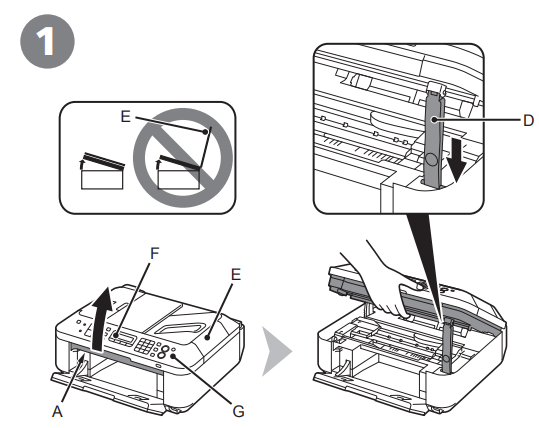
- Do not touch the buttons or LCD (F) on the Operation Panel (G). May result in unintended operation.
- When opening the Scanning Unit (Cover), the FINE Cartridge Holder moves automatically.
- If the FINE Cartridge Holder does not move, make sure that the machine is turned on.
- If the Scanning Unit (Cover) is left open for more than 10 minutes, the FINE Cartridge Holder moves to the right. In this case, close and reopen the Scanning Unit (Cover).
2. Make sure that the FINE Cartridge Holder (H) moves to the installation position.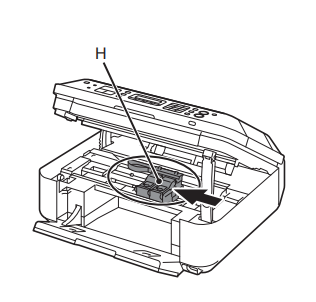
3. Follow the next procedure to insert the Black (B) and Color (C) FINE Cartridges into their corresponding slots (B) and (C). →Go to the next page.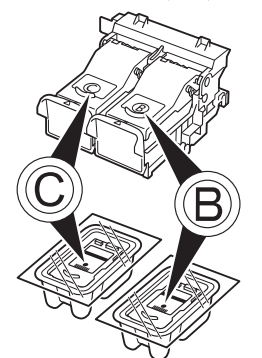
4. Open the Ink Cartridge Locking Cover (B) on the right side. Pinch (I) firmly and pull up the cover.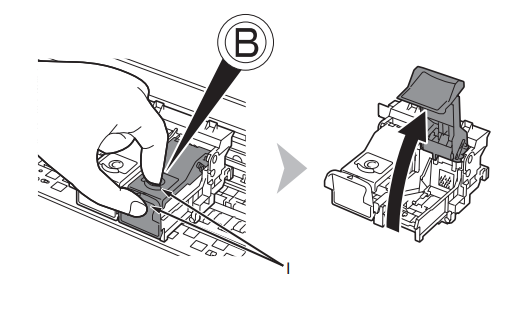
5. Remove the Black FINE Cartridge (B) from its package.
6. Pull the orange protective tape (J) in the direction of the arrow and remove it carefully.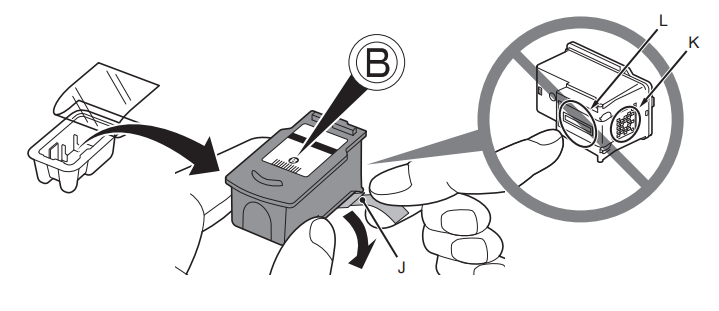
- Handle the FINE Cartridges carefully. Do not drop or apply excessive pressure to them.
- Be sure to use the supplied FINE Cartridges.
- Be careful not to stain your hands or the surrounding work area with ink on the removed protective tape.
- Do not touch the Electrical Contacts (K) or Print Head Nozzles (L) on a FINE Cartridge. The machine may not print properly if you touch it.
7. Place the Black FINE Cartridge (B) into the right slot.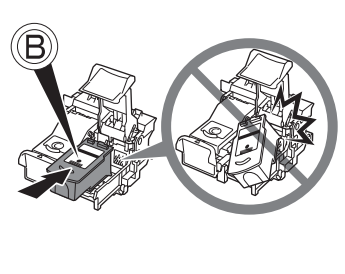
- Do not knock the FINE Cartridge against the sides of the holder.
- Install in a well-lit environment.
- Install the Black FINE Cartridge (B) into the right slot (B), and the Color FINE Cartridge (C) into the left slot (C).
8. Push down (B) the Ink Cartridge Locking Cover until you hear a click to close it completely. View the Ink Cartridge Locking Cover (B) straight on and check that it is locked correctly (not at an angle).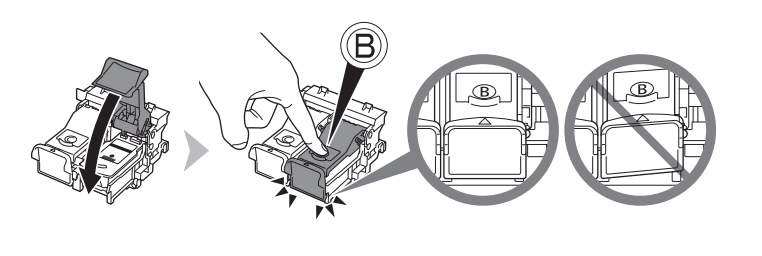
9. Insert the Color FINE Cartridge (C) into the left FINE Cartridge Holder (C) in the same way as the Black FINE Cartridge.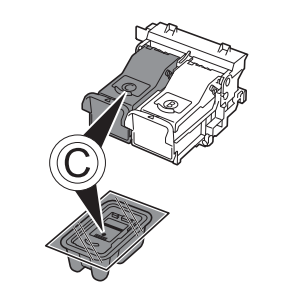
10. Lift the Scanning Unit (Cover) slightly (1) and fold the Scanning Unit Support (2), then gently close the Scanning Unit (Cover) (3).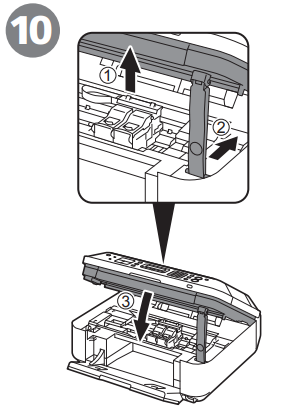
- Do not touch the buttons or LCD on the Operation Panel. May result in unintended operation.
11. Make sure that the LCD changes as shown in the illustration and go to the next step.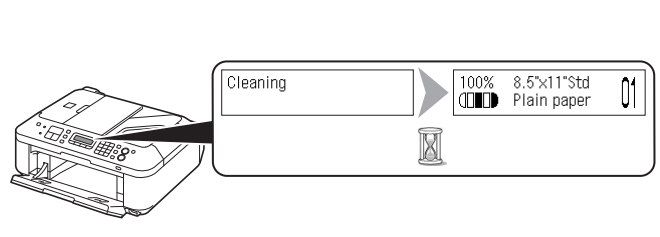
- It takes about 1–2 minutes before the LCD changes.
- Once you have installed the FINE Cartridges, do not remove them unnecessarily.
- If an error message is displayed on the LCD, make sure that the FINE Cartridges are correctly installed.
- The LCD will turn off if the machine is not operated for about 5 minutes. To restore the display, press any button except the ON button.
Load Paper
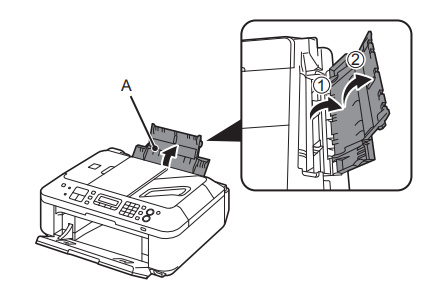
- Open the Paper Support (A).

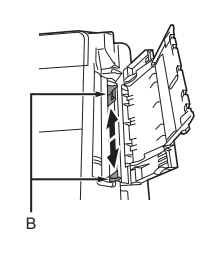
- Move the Paper Guides (B) to both edges.

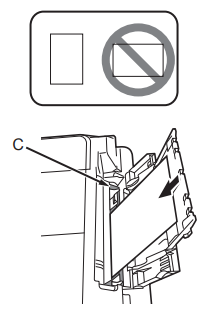
- Load paper in the center of the Rear Tray (C). Load paper in portrait orientation with the printing side facing up.

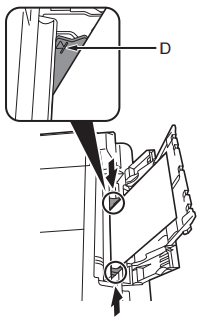
- Slide the left and right Paper Guides against both edges of the paper. Make sure that the height of the paper stack does not exceed the line (D).

- For details on how to handle paper, refer to “Loading Paper” in the on-screen manual: Basic Guide, after installation is complete.
Set Up for Fax Reception
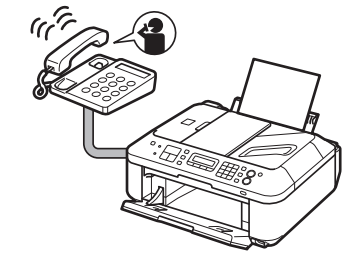
Read this section only when using the machine as a fax. If not using the machine as a fax, go to “8 Select Connection Method” on page 19. The following four modes are available for receiving faxes. Select a receive mode according to your needs. You can change the receive mode at any time. Refer to the on-screen manual: Basic Guide.
Intended Use
- Want to use a telephone line for voice calls and faxes.
- Want to prioritize voice call reception over fax call reception because there are more opportunities to receive voice calls.
- Want to use a telephone line for voice calls and faxes.
- Want to prioritize fax call reception over voice call reception because there are more opportunities to receive faxes.
- Want to use a dedicated fax line.
- Want to use it as a fax only.
- If you use the Distinctive Ring Pattern Detection (DRPD) service.
Receive Mode
- TEL priority mode: Voice calls cannot be received unless a telephone is connected.
- FAX priority mode
- FAX only mode
- DRPD
Responses to Calls in Each Mode
When a fax call arrives:
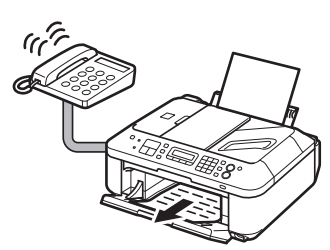
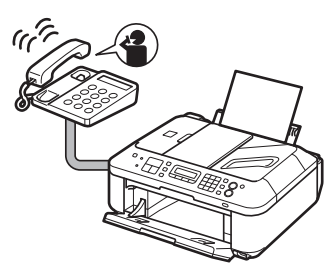
- While the telephone’s ringtone sounds, pick up the handset. When the fax reception starts, replace the handset. If an answering machine is connected, the fax is received automatically.

- The telephone’s ringtone sounds. The fax is received automatically.

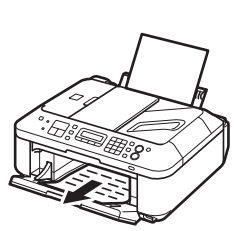
- The fax is received automatically.

- The telephone’s ringtone sounds. The fax is received automatically when the machine detects the fax ring pattern.

When a voice call arrives:
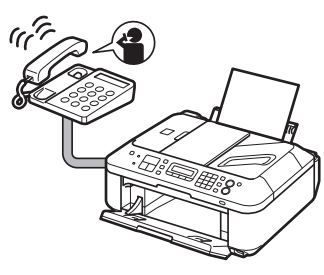
- While the telephone’s ringtone sounds, pick up the handset to answer the call.

- While the telephone’s ringtone sounds, pick up the handset to answer the call. When it switches to the machine’s ringtone, pick up the handset and press the Stop button to answer the call.

- The call cannot be answered.

- The telephone continues to ring. Pick up the handset to answer the call.

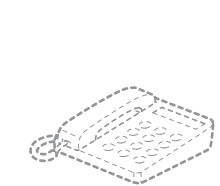
![]() Even when a telephone is connected to the machine, the telephone’s ringtone may not sound for an incoming call, depending on the type or settings of the telephone.
Even when a telephone is connected to the machine, the telephone’s ringtone may not sound for an incoming call, depending on the type or settings of the telephone.
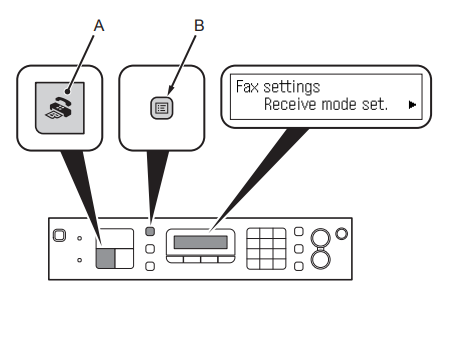
- Press the FAX button (A), then press the Menu button (B). The Fax settings screen is displayed.

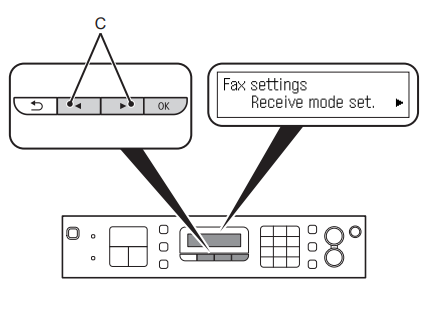
- Use the
 button (C) to select the Receive mode set, then press the OK button—the Receive mode set. The screen is displayed.
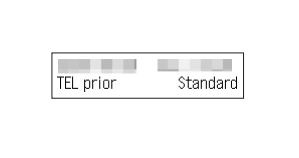
- Select a receive mode, then press the OK button. The selected receive mode is displayed.

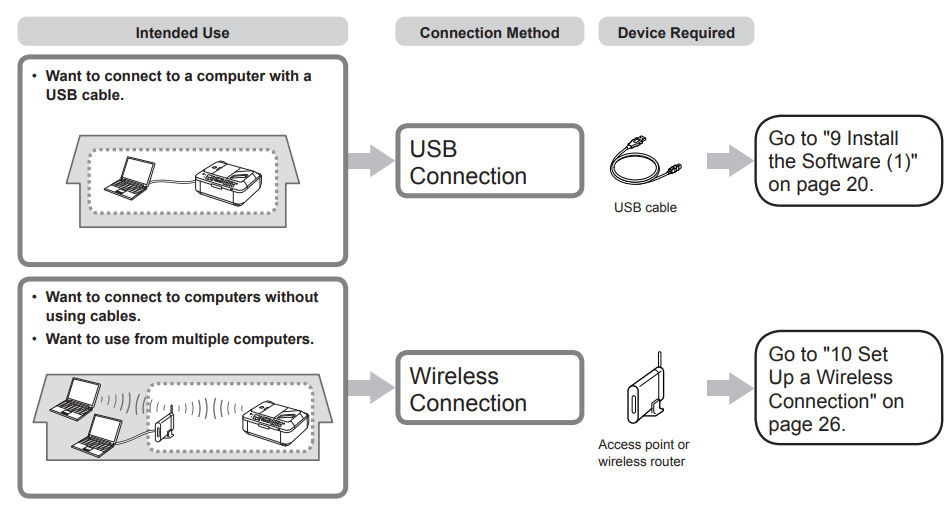
Select Connection Method
What is the Network?
A system to exchange information between computers by connecting them to each other with cables or via wireless communication. The Internet and LAN are types of networks.
What is a LAN (Local Area Network)?
A type of network that connects computers to each other within a limited area (room, building, etc.).If it is uncertain whether your device (access point, router, etc.) supports wireless connection, refer to the manual supplied with the device, or contact its manufacturer. If your device supports wireless connection, check if it supports IEEE802.11b/g.
Install the Software (1)
Do not connect the USB cable yet.
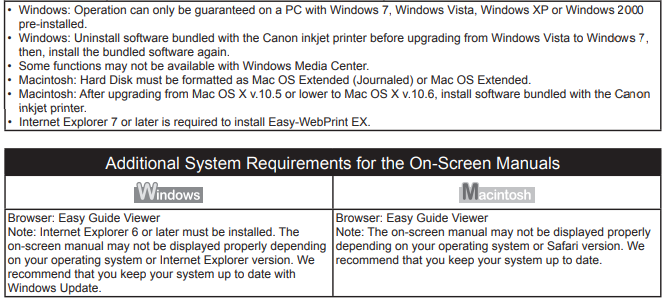
- To use the machine by connecting it to a computer, software, including the drivers, needs to be copied (installed) to the computer’s hard disk. The installation process takes about 20 minutes. (The installation time varies depending on the computer environment or the number of applications to be installed.)
- Screens are based on Windows Vista Ultimate and Mac OS X v.10.5.x.
![]()
- Quit all running applications before installation.
- Log on as the administrator (or a member of the Administrators group).
- Do not switch users during the installation process.
- An Internet connection may be required during the installation. Connection fees may apply. Consult the Internet service provider.
- It may be necessary to restart your computer during the installation process. Follow the on-screen instructions and do not remove the Setup CD-ROM during restarting. The installation resumes once your computer has restarted.
- Mac OS 9, Mac OS X Classic environments, or Mac OS X v.10.4.10 or earlier are not supported.
Windows
- If you connect the machine via USB cable before installing the software:
For Windows 7:
- Remove the USB cable connected to your computer.
- Proceed to 0 on page 21.
For Windows Vista/Windows XP/Windows 2000:
The following dialog box may appear.
- Remove the USB cable connected to your computer. If the dialog box closes, proceed to 0 on page 21.
- Click Cancel.
- Proceed to 0 on page 21.
Easy-WebPrint EX
If you are using Internet Explorer 7 or later, you can use the Web print software Easy-WebPrint EX. An Internet connection is required for installation.
Press the ON button (A) to turn off the machine. Operating noise may continue for up to 25 seconds until the machine turns off.
- Do NOT connect the USB cable to the computer and the machine yet. If you have already connected the cable, disconnect it now.

Turn on the computer, then insert the Setup CD-ROM into the CD-ROM drive. If you are using Windows, the setup program starts automatically.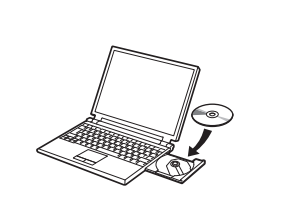
For Windows:
- If the program does not start automatically, double-click the CD-ROM icon in Computer or My Computer. When the CD-ROM contents appear, double-click MSETUP4.EXE.
Set Up a Wireless Connection
Before connecting the machine to the network, the computer needs to be connected to the network. Make sure that the configuration of the computer and access point, or the router, is complete.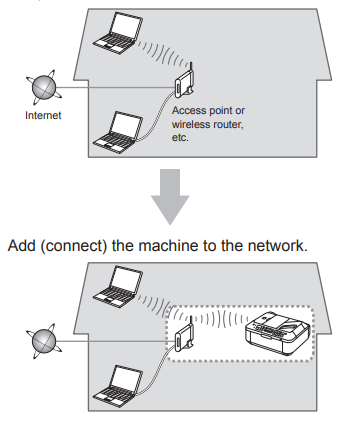
Notes on Wireless Connection
- The configuration, router functions, setup procedures, and security settings of the network device vary depending on your system environment. For details, refer to your device’s instruction manual or contact its manufacturer.
- In an office setup, consult your network administrator.
- If you connect to a network that is not protected with security measures, there is a risk of disclosing data such as your personal information to a third party.
- If an error message appears or if you have trouble with the network connection, refer to the printed manual: Network Setup Troubleshooting.
An “Ad-hoc connection,” which establishes a direct connection to the computer over a wireless connection without using an access point, is not supported. Be sure to prepare an access point.
If your access point or router supports WPS (Wi-Fi Protected Setup): A wireless connection can be set up easily. Go to “Wireless Setup Using WPS (Wi-Fi Protected Setup)” on page 41.
- If you are using Windows 7/Windows Vista and have a USB flash drive, you can configure wireless connection settings by using the WCN (Windows Connect Now) function as well. For details, refer to “Wireless Setup Using WCN (Windows Connect Now)” on page 45.
Install the Software (2)
Do not connect the Wireless LAN setup cable yet.
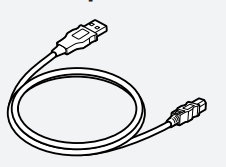
Software installation requires the temporary use of the Wireless LAN setup cable.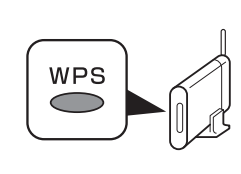
- To use the machine by connecting it to a computer, software, including the drivers, needs to be copied (installed) to the computer’s hard disk. The installation process takes about 20 minutes. (The installation time varies depending on the computer environment or the number of applications to be installed.)
- Screens are based on Windows Vista Ultimate and Mac OS X v.10.5.x.
![]()
- Quit all running applications before installation.
- Log on as the administrator (or a member of the Administrators group).
- Do not switch users during the installation process.
- An Internet connection may be required during the installation. Connection fees may apply. Consult the Internet service provider.
- It may be necessary to restart your computer during the installation process. Follow the on-screen instructions and do not remove the Setup CD-ROM during restarting. The installation resumes once your computer has restarted.
- If the firewall function of your security software is turned on, a warning message may appear that Canon software is attempting to access the network. If such a warning message appears, set the security software to always allow access.
- Mac OS 9, Mac OS X Classic environments, or Mac OS X v.10.4.10 or earlier are not supported.
Windows
- If you connect the machine via the Wireless LAN setup cable before installing the software:
For Windows 7:
- Remove the Wireless LAN setup cable connected to your computer.
- Proceed to 0 on page 28.
![]() For Windows Vista/Windows XP/Windows 2000:
For Windows Vista/Windows XP/Windows 2000:
The following dialog box may appear.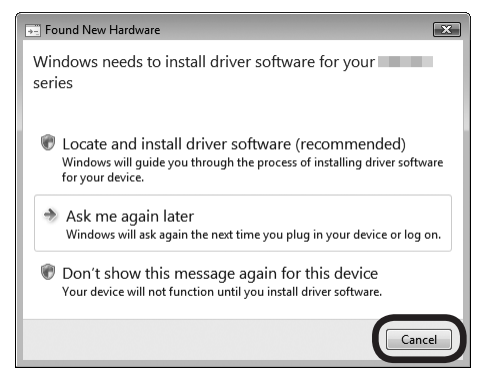
- Remove the Wireless LAN setup cable connected to your computer. If the dialog box closes, proceed to 0 on page 28.
- Click Cancel.
- Proceed to 0 on page 28.
Easy-WebPrint EX
If you are using Internet Explorer 7 or later, you can use the Web print software Easy-WebPrint EX. An Internet connection is required for installation.
Maintenance
After a period of use, the inside of the machine may become stained with ink. To avoid staining your hands or clothes with ink, it is recommended that you clean the Ink Cartridge Locking Cover (A) and the inside of the tray (B) with a facial tissue or the like as required. If the Scanning Unit (Cover) is left open for more than 10 minutes, the FINE Cartridge Holder moves to the right automatically.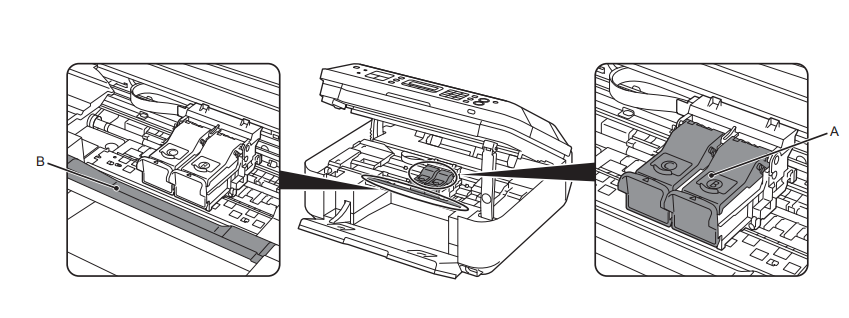
Specifications
Specifications are subject to change without notice.
About Consumables
Consumables (ink tanks / FINE Cartridges) are available for 5 years after production has stopped.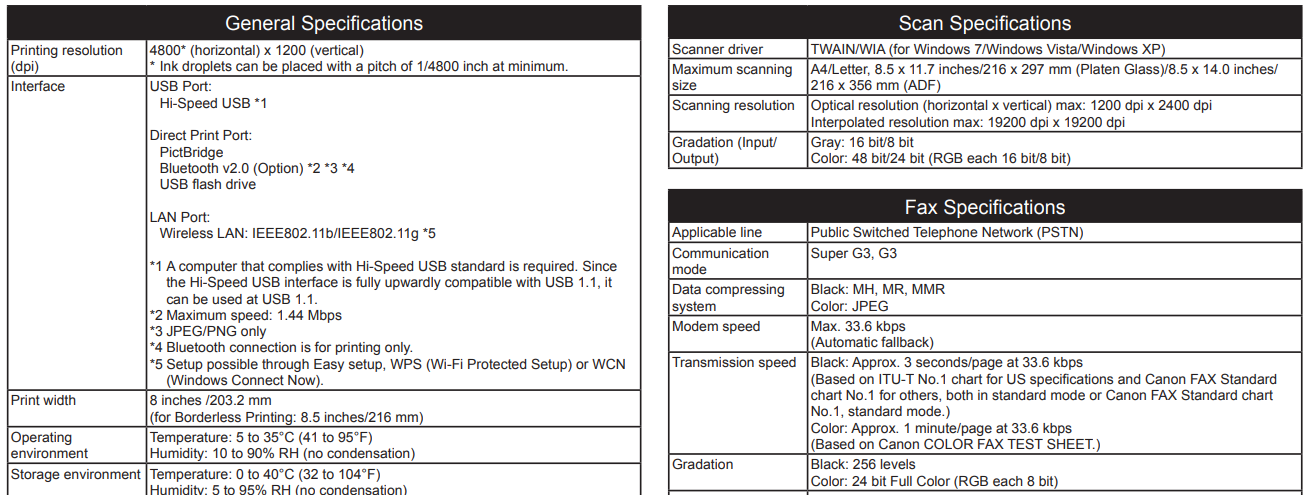


Getting Help from Canon
Email Tech Support — www.usa.canon.com/support
Toll-Free Tech Support — 1-800-OK-CANON
This option provides live telephone technical support, free of service charges, Monday–Friday (excluding holidays), during the warranty period. Telephone Device for the Deaf (TDD) support is available at 1-866-251-3752.
Ordering Information
The following ink cartridges are compatible with this machine.
Call 1-800-OK-CANON to locate a dealer near you, or visit the Canon online store at www.shop.usa.canon.com.
CANON U.S.A. INC.
One Canon Plaza, Lake Success, NY 11042 U.S.A.
www.usa.canon.com
For More Manuals By Canon, Visit ManualsLibraryy.
Canon PIXMA MX340 Wireless Office All-in-One Printer-FAQs
What type of ink does the Canon MX340 use?
The Canon MX340 uses PG-210 black and CL-211 color cartridges. It also supports high-yield PG-210XL and CL-211XL cartridges.
Can the Canon MX340 connect with Bluetooth?
Yes. With the optional Canon BU-30 Bluetooth adapter, you can print wirelessly from Bluetooth-enabled devices.
How do I scan a document on the Canon MX340?
Place your document face-down on the platen, then use the MP Navigator EX software on your computer to start scanning.
Can I scan documents directly to my computer?
Yes. From the printer’s control panel, choose the connected computer as the destination and select your scan settings.
How do I load paper into the Canon MX340?
Open the paper support and output tray, adjust the paper guides, then place paper in the rear tray with the print side facing up.
How do I connect the Canon MX340 to Wi-Fi?
Go to Device Settings > LAN Settings > Wireless LAN Setup. Choose WPS connection and follow the on-screen steps to complete setup.
Can I print photos with the Canon PIXMA MX340?
Yes. The MX340 supports photo printing on various paper types, including glossy photo paper.
What does a blinking light on the Canon MX340 mean?
A slow blinking light indicates low ink, while a fast blinking light means the ink cartridge is empty and needs replacement.

 Devices Required for Wireless Connection