Canon PIXMA MX410 Wireless All-in-One Inkjet Printer

Network Setup Troubleshooting
This manual describes problems that may be encountered when setting up a network and their possible causes and solutions. Find a description related to your problem and follow the solution. For problems not described here or which occur after setup, refer to the on-screen manual: Basic Guide/Advanced Guide. Screens are based on Windows 7 Home Premium.
![]()
- Names of functions, etc., may differ from this manual depending on your access point or application software.
Problems during Software Installation
- The Target Access Point is Not Displayed (Detected) on the Detected Access Points List Screen
- An access point could not be detected. is Displayed
- Check Access Point to Be Used Screen is Displayed
- Check that the Settings Screen is Displayed
- Set Printer IP Address Screen is Displayed
- The Machine is Not Displayed (Detected) on the Detected Printers List Screen
WPS/WCN/Additional Computer Setup
- Set Up New Printer Screen is Displayed
Problems during Network Setup
WPS
- Multiple APs detected are displayed
- Failed to connect is displayed
- PIN codes do not match is displayed
Other Troubleshooting Tips
- Forgotten or Do Not Know the Access Point Name/Network Name (SSID), Security Protocol (encryption standard), and Network Key
- The Machine is Not Detected after the Network Environment is Changed
Reference Information
- Configuring Wireless LAN Settings Manually
- Restoring the Machine’s Default LAN Settings to Perform Setup Again
Connection Checklist
The following symbols are used in this manual.
![]() Instructions as notes for operation or additional explanations.
Instructions as notes for operation or additional explanations.
- Windows: Description for Windows users.
- Macintosh: Description for Macintosh users.
Problems during Software Installation
The Target Access Point is Not Displayed (Detected) on the Detected Access Points List Screen
Check
If the target access point is not displayed on the Detected Access Points List screen, check the following points.
Check 1
Make sure that you follow the “Connection Checklist” on page 11, then click Refresh (A) to search for the access point again.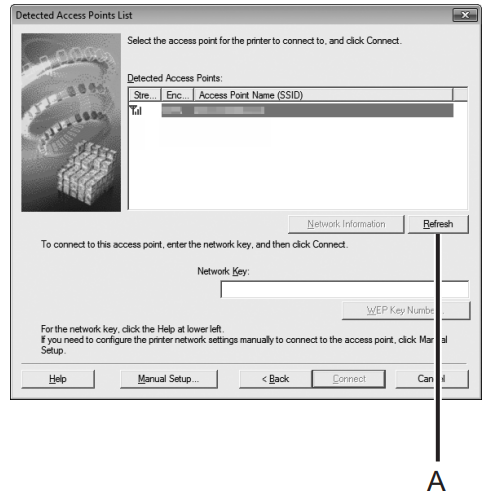
Check 2
Turn off the access point, turn it back on, then click Refresh (A) to search for the access point again.
Check 3
Is the SSID broadcast (connection via “ANY” SSID, etc.) disabled, or is the stealth mode enabled on the access point?
- For details on how to check the settings of the access point, refer to the manual supplied with the access point or contact its manufacturer.
- Enable SSID broadcast (connection via “ANY” SSID, etc.) or disable the stealth mode, then click Refresh (A) to search for the access point again.
- For details on how to change the settings of the access point, refer to the manual supplied with the access point or contact its manufacturer.
- To establish a connection without changing the access point settings, refer to 3 and onward in “Configuring Wireless LAN Settings Manually” on page 8.
Check 4
Is “WPA/WPA2 Enterprise” set as a security protocol (encryption standard) on the access point? “WPA/WPA2 Enterprise” is not supported on the machine. Change the security protocol (encryption standard) for the access point, then configure settings again.
- For details on how to change the security protocol (encryption standard) for the access point, refer to the manual supplied with the access point or contact its manufacturer.
- For the procedure to configure settings of the machine, refer to “7 Set Up a Wireless Connection” in the printed manual: Getting Started.
Glossary
SSID
An identifier to identify the specific access point. Also called an access point name or a network name.
SSID broadcast
An access point’s periodic transmission of a signal revealing its SSID.
Stealth mode
A function to prevent the SSID of the access point from appearing on other wireless devices. An access point could not be detected. is Displayed
Check
The message appears when no access point can be detected. Click OK to display the Detected Access Points List screen, then try to detect the access point again by referring to “The Target Access Point is Not Displayed (Detected) on the Detected Access Points List Screen” on page 2.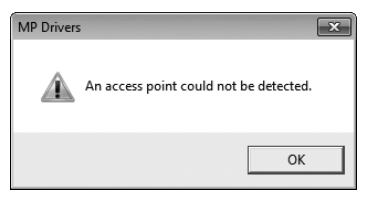
Check Access Point to Be Used Screen is Displayed
Action
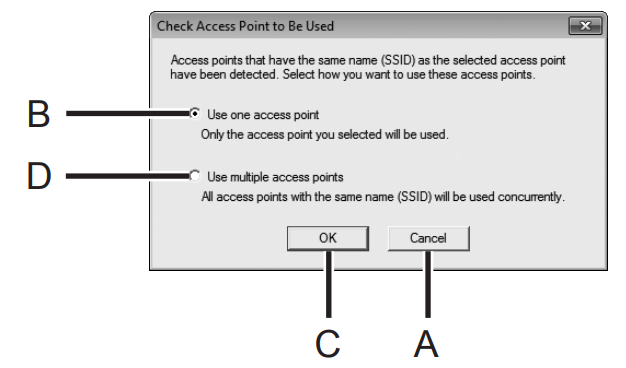
The message appears when multiple access points with the same name are found.
When you have only one access point. The access point selected in the Detected Access Points List screen will be used. Make sure that the target access point is selected correctly by following the procedure below, then proceed with the setup.
Click Cancel or Back (A).
- The Detected Access Points List screen returns.

Select the access point name/network name (SSID) that matches the MAC address of the target access point, then click Connect.
- The Check Access Point to Be Used screen is displayed.
- For details on how to check the MAC address of the access point, refer to the manual supplied with the access point or contact its manufacturer.
Select Use one access point (B), then click OK or Continue (C).
- When using multiple access points (roaming). To use roaming, select Use multiple access points (D), then click OK or Continue (C).
Check Settings Screen is Displayed
Check
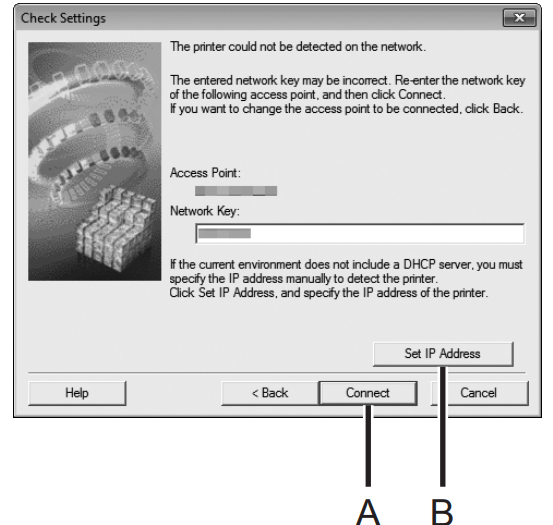
The screen appears when an IP address is not obtained automatically due to an incorrect network key or an inactive DHCP function. It may also appear when using the MAC address filtering feature or the firewall function.
Check 1
If the network key is incorrect, enter the network key again and click Connect (A).
- For details on how to check the network key of the access point, refer to the manual supplied with the access point or contact its manufacturer.

Check 2
Make sure that the DHCP function of the access point is active.
- For details on how to check the settings of the access point, refer to the manual supplied with the access point or contact its manufacturer. If the DHCP function is inactive, enable the DHCP function of the access point or specify the IP address of the machine, then click Connect (A).
- For details on how to change the settings of the access point, refer to the manual supplied with the access point or contact its manufacturer.
- To specify the IP address of the machine, click Set IP Address (B), then follow the procedure in Check 4 of “Set Printer IP Address Screen is Displayed” on page 4.
Check 3
Is the MAC address filtering enabled on the access point?
- For details on how to check the settings of the access point, refer to the manual supplied with the access point or contact its manufacturer. Set the access point to accept the MAC address of the machine.
- For details on how to change the settings of the access point, refer to the manual supplied with the access point or contact its manufacturer.
- To check the MAC address of the machine, print the Network Configuration Page, then check the MAC Address. To print the Network Configuration Page, select Device settings using the Menu button, then select LAN settings > Print LAN details using the
 and OK buttons.
Check 4
Is the firewall function of your security software active?
- A message may appear on the computer monitor warning that Canon software is attempting to access the network. If the warning message appears, set the security software to always allow access.
Glossary
Network Key
A password is required to prevent unauthorized access to communication.
DHCP function
A function to automatically assign required information (IP address, etc.) to computers, printers, or other devices connected to the network.
IP address
A numerical identification assigned to each computer or network device connected to a network.
MAC address
A unique number assigned to each network device.
MAC address filtering
A function to block access from unauthorized wireless devices by saving the MAC addresses of specific wireless devices (computers, printers, etc.) to the access point beforehand.
Firewall
A system to use computers connected to the Internet and corporate networks safely. It protects computers and corporate networks against unauthorized access, or restricts unauthorized access to corporate networks and the Internet.
Set Printer IP Address Screen is Displayed
Check 1
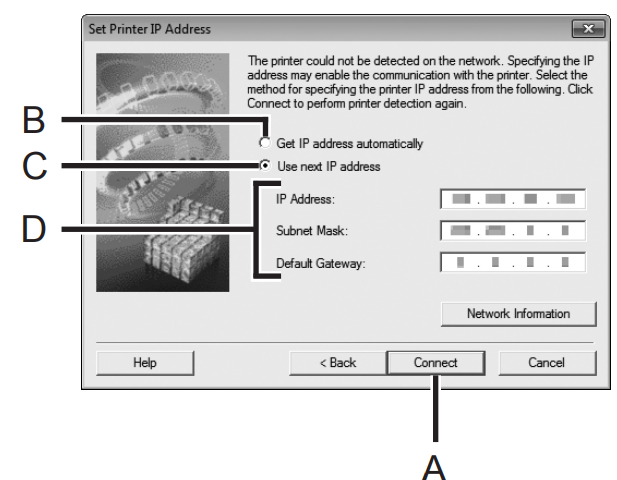
Make sure that you follow the “Connection Checklist” on page 11, then click Connect (A).
Check 2
Turn off the access point, turn it back on, then click Connect (A).
Check 3
When obtaining an IP address automatically, make sure that the DHCP function of the access point is active.
- For details on how to check the settings of the access point, refer to the manual supplied with the access point or contact its manufacturer.
- Enable the DHCP function of the access point, select Get IP address automatically (B), then click Connect (A).
- For details on how to change the settings of the access point, refer to the manual supplied with the access point or contact its manufacturer.

Check 4
If the problem is not solved even after following Check 1 to 3, follow the procedure below to specify the IP address.
- Select Use next IP address (C).
- Enter the value you want to specify for each of IP Address, Subnet Mask, and Default Gateway or Router (D).
- Click Connect (A).
Glossary
IP address
A numerical identification assigned to each computer or network device connected to a network.
DHCP function
A function to automatically assign required information (IP address, etc.) to computers, printers, or other devices connected to the network.
Subnet mask
A number used to distinguish the network and host portions of an IP address.
Default gateway
A device required to connect to external networks.
The Machine is Not Displayed (Detected) on the Detected Printers List Screen
Check 1
Make sure that you follow Check 1, 2, 3, 4, and 6 of “Connection Checklist” on page 11, then click Redetect.
Check 2
Is the machine connected to a network?
- To check if the machine is connected to a network, print the Network Configuration Page, then make sure that Link Status is set to Active. To print the Network Configuration Page, select Device settings using the Menu button, then select LAN settings > Print LAN details using the • and OK buttons.
- If the machine is not connected to a network, perform setup again by following the procedures from “7 Set Up a Wireless Connection” in the printed manual: Getting Started.
Check 3
Is the IP filtering feature enabled on the access point?
- For details on how to check the settings of the access point, refer to the manual supplied with the access point or contact its manufacturer. Set the access point to accept the IP address of the machine.
- For details on how to change the settings of the access point, refer to the manual supplied with the access point or contact its manufacturer.
- To check the IP address of the machine, print the Network Configuration Page, then check the IP Address. To print the Network Configuration Page, select Device settings using the Menu button, then select LAN settings > Print LAN details using the
 and OK buttons.
Check 4
When obtaining an IP address automatically, make sure that the DHCP function of the access point is active.
- For details on how to check the settings of the access point, refer to the manual supplied with the access point or contact its manufacturer.
Enable the DHCP function of the access point, then click Redetect.
- For details on how to change the settings of the access point, refer to the manual supplied with the access point or contact its manufacturer.
Check 5
Is the privacy separator feature enabled on the access point?
- For details on how to check the settings of the access point, refer to the manual supplied with the access point or contact its manufacturer.
- Disable the privacy separator feature.
- For details on how to change the settings of the access point, refer to the manual supplied with the access point or contact its manufacturer.
Glossary
IP address
A numerical identification assigned to each computer or network device connected to a network.
IP address filtering
A function to allow or block traffic from network devices with specified IP addresses.
DHCP function
A function to automatically assign required information (IP address, etc.) to computers, printers, or other devices connected to the network.
Privacy separator feature
A function to prevent communication between multiple wireless devices (such as computers and printers) connected to an access point.
WPS WCN Additional Computers Setup
Refer to the troubleshooting tip below only when configuring wireless settings by using WPS or WCN, or when setting up on an additional computer.
Set Up New Printer Screen is Displayed
Check
The screen appears when the machine cannot be detected during setup using WPS or WCN, or when setting up on an additional computer.
Check 1
Make sure that you follow Check 1, 2, 3, 4, and 6 of “Connection Checklist” on page 11, then click Redetect. Proceed with the setup.
Check 2
Is the machine connected to a network?
- To check if the machine is connected to a network, print the Network Configuration Page, then make sure that Link Status is set to Active. To print the Network Configuration Page, select Device settings using the Menu button, then select LAN settings > Print LAN details using the
 and OK buttons.
 - If the machine is not connected to a network, perform setup again by following the procedures from “7 Set Up a Wireless Connection” in the printed manual: Getting Started.
Check 3
Is the IP filtering feature enabled on the access point?
- For details on how to check the settings of the access point, refer to the manual supplied with the access point or contact its manufacturer.
Set the access point to accept the IP address of the machine.
- For details on how to change the settings of the access point, refer to the manual supplied with the access point or contact its manufacturer.
- To check the IP address of the machine, print the Network Configuration Page, then check the IP Address. To print the Network Configuration Page, select Device settings using the Menu button, then select LAN settings > Print LAN details using the
 and OK buttons.
Check 4
When obtaining an IP address automatically, make sure that the DHCP function of the access point is active.
- For details on how to check the settings of the access point, refer to the manual supplied with the access point or contact its manufacturer.
Enable the DHCP function of the access point, then click Redetect.
- For details on how to change the settings of the access point, refer to the manual supplied with the access point or contact its manufacturer.
Check 5
Is the privacy separator feature enabled on the access point?
- For details on how to check the settings of the access point, refer to the manual supplied with the access point or contact its manufacturer.
Disable the privacy separator feature.
- For details on how to change the settings of the access point, refer to the manual supplied with the access point or contact its manufacturer.
Glossary
IP address
A numerical identification assigned to each computer or network device connected to a network.
IP address filtering
A function to allow or block traffic from network devices with specified IP addresses.
DHCP function
A function to automatically assign required information (IP address, etc.) to computers, printers, or other devices connected to the network.
Privacy separator feature
A function to prevent communication between multiple wireless devices (such as computers and printers) connected to an access point.
Problems during Network Setup (WPS)
Multiple APs detected is displayed
Action
The message appears when multiple access points are detected. Wait for a while, then configure the settings again.
Failed to connect is Displayed
Check
The message appears when an error occurs. Check the access point settings, then configure WPS settings again.
- For details on how to check the settings of the access point, refer to the manual supplied with the access point or contact its manufacturer.
- For the procedure to configure WPS settings of the machine, refer to “Wireless Setup Using WPS (Wi-Fi Protected Setup)” in the printed manual: Getting Started.
- When using an access point that does not support WPS, configure the settings by referring to “7 Set Up a Wireless Connection” in the printed manual: Getting Started.
PIN codes do not match is Displayed
Action
The message appears when the setup is not completed within 10 minutes. Follow the procedure below to configure WPS settings again.
Select the PIN code method on the WPS screen, then press the OK button.
- A new PIN code appears.
Set the new PIN code for the access point or computer.
- For details on how to set PIN codes for the access point or computer, refer to the manual supplied with your access point or contact its manufacturer.
Connection Checklist
Check 1
Before connecting the machine, are the computer and network device (router, access point, etc.) configured, and can the computer connect to the network? Configure the computer and network device.
- For the procedures, refer to the manuals supplied with the computer and network device, or contact their manufacturers.
Check 2
Are the machine and network device (router, access point, etc.) turned on? Turn on each device. If the machine is already turned on, turn it off, then turn it back on.
Check 3
Are the access point and machine installed in an open space where wireless communications are possible? Also, is there a microwave oven, refrigerator, etc., nearby? Install them in an open space with as few obstacles as possible. Leave some space between the installation location and a microwave oven, refrigerator, etc., so that its radio waves will not affect those from the access point and the machine.
Check 4
Is the access point operating in IEEE802.11n, IEEE802.11g, or IEEE802.11b (2.4 GHz)?
- For details on how to check the operating mode of the access point, refer to the manual supplied with the access point or contact its manufacturer. Set the access point to operate in IEEE802.11n, IEEE802.11g, or IEEE802.11b (2.4 GHz).
- For details on how to change the operating mode of the access point, refer to the manual supplied with the access point or contact its manufacturer.
Check 5
Is the network setup cable connected properly?
- The network setup cable is required for network settings when configuring wireless settings without using the WPS or WCN function. Connect the network setup cable properly.
- For the connection procedure, refer to “Software Installation (1)” in the printed manual: Getting Started.
Check 6
Is the firewall function of your security software active? A message may appear on the computer monitor warning that Canon software is attempting to access the network. If the warning message appears, set the security software to always allow access.
For More Manuals By Canon, Visit ManualsLibraryy.
Canon PIXMA MX410 Wireless All-in-One Inkjet Printer-FAQs
Does the Canon PIXMA MX410 support Bluetooth?
Yes, the MX410 supports Bluetooth, USB, PictBridge, cable, and wireless LAN connections, making it easy to connect to both Windows and Mac computers.
How do I set up the Canon MX410 on Wi-Fi?
Turn the printer on, go to the Setup menu, select Network, then choose Wi-Fi setup. From there, follow the on-screen instructions to connect to your wireless network.
Which ink cartridges does the Canon MX410 use?
This model uses Canon PG-210XL (black) and Canon CL-211XL (color) cartridges.
How do I scan documents on the MX410?
Place the document face-down on the platen glass, open the MP Navigator EX software, select Scan/Import, choose the document type, and start scanning.
How do I connect the MX410 to a computer?
You can connect it with a USB cable—insert the flat end into your computer and the square end into the printer—or set it up wirelessly via Wi-Fi or Bluetooth.
Can I print directly from my phone?
Yes, you can print from a smartphone using Bluetooth or wireless connection after pairing with the printer.
How do I change the ink cartridges?
Open the printer cover, wait for the cartridge holder to move into position, remove the old cartridge, and insert the new one. Make sure it clicks into place before closing the cover.
How can I check the ink levels?
Press the COPY, FAX, or SCAN button on the printer. The ink level will display on the LCD screen for a few seconds.


