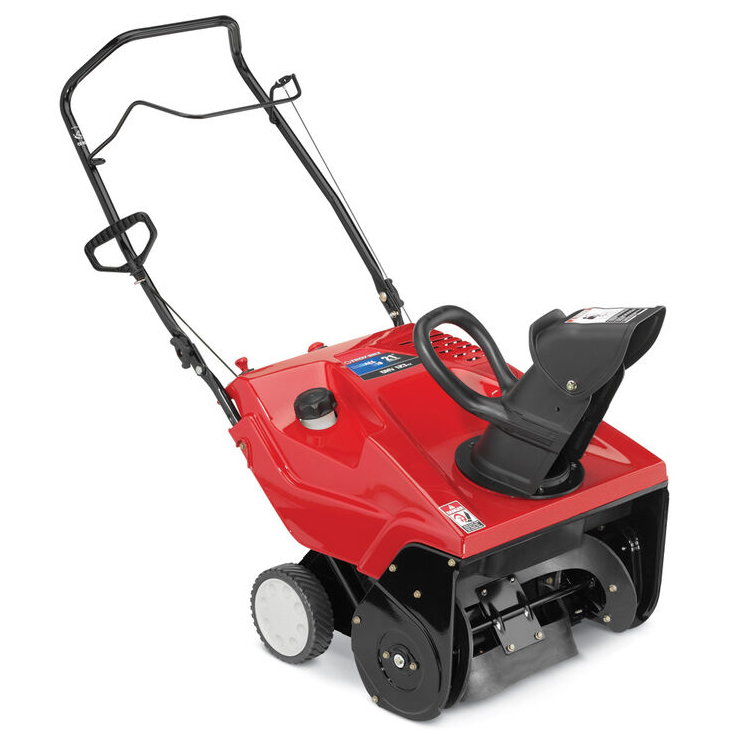
Troy-Bilt Squall 210 Snow Blower
Important Safe Operation Practices
Training
- Read, understand, and follow all instructions on the machine and in the manual(s) before attempting to assemble and operate. Keep this manual in a safe place for future and regular reference and for ordering replacement parts.
- Be familiar with all controls and their proper operation. Know how to stop the machine and disengage it quickly.
- Never allow children under 14 years of age to operate this machine. Children 14 and over should read and understand the instructions and safe operation practices in this manual and on the machine, and be trained and supervised by an adult.
- Never allow adults to operate this machine without proper instruction.
- Thrown objects can cause serious personal injury. Plan your snow-throwing pattern to avoid discharge of material toward roads, bystanders, and the like.
- Keep bystanders, pets, and children at least 75 feet from the machine while it is in operation. Stop the machine if anyone enters the area.
- Exercise caution to avoid slipping or falling, especially when operating in reverse.
Preparation
Thoroughly inspect the area where the equipment is to be used. Remove all doormats, newspapers, sleds, boards, wires, and other foreign objects, which could be tripped over or thrown by the auger/impeller.
- Always wear safety glasses or eye shields during operation and while performing an adjustment or repair to protect your eyes. Thrown objects that ricochet can cause serious injury to the eyes.
- Do not operate without wearing adequate winter outer garments. Do not wear jewelry, long scarves, or other loose clothing, which could become entangled in moving parts. Wear footwear that will improve footing on slippery surfaces.
- Use a grounded three-wire extension cord and receptacle for all machines with electric start engines.
- Disengage all control levers before starting the engine.
- Never attempt to make any adjustments while the engine is running, except where specifically recommended in the operator’s manual.
- Let the engine and machine adjust to the outdoor temperature before starting to clear snow.
Clearing a Clogged Discharge Chute
Hand contact with the rotating impeller inside the discharge chute is the most common cause of injury associated with snow throwers. Never use your hand to clean out the discharge chute.
To clear the chute:
- SHUT THE ENGINE OFF!
- Wait 10 seconds to be sure the impeller blades have stopped rotating.
- Always use a clean-out tool, not your hands.
Maintenance & Storage
- Never tamper with safety devices. Check their proper operation regularly. Refer to the maintenance and adjustment sections of this manual.
- Before cleaning, repairing, or inspecting the machine, disengage all control levers and stop the engine. Wait until the auger/impeller comes to a complete stop. Disconnect the spark plug wire and ground it against the engine to prevent unintended starting.
- Check bolts and screws for proper tightness at frequent intervals to keep the machine in a safe working condition. Also, visually inspect the machine for any damage.
- Do not change the engine governor setting or over-speed the engine. The governor controls the maximum safe operating speed of the engine.
- Snow thrower, shovels, plates, and skid shoes are subject to wear and damage. For your safety protection, frequently check all components and replace with original equipment manufacturer’s (OEM) parts only. “Use of parts which do not meet the original equipment specifications may lead to improper performance and compromise safety!”
- Check control levers periodically to verify they engage and disengage properly and adjust, if necessary. Refer to the adjustment section in this operator’s manual for instructions.
- Maintain or replace safety and instruction labels, as necessary.
- Observe proper disposal laws and regulations for gas, oil, etc., to protect the environment.
- Prior to storing, run the machine for a few minutes to clear snow from the machine and prevent freeze-up of the auger/impeller.
- Never store the machine or fuel container inside where there is an open flame, spark, or pilot light, such as a water heater, furnace, clothes dryer, etc.
- Always refer to the operator’s manual for proper instructions on off-season storage.
- Check fuel line, tank, cap, and fittings frequently for cracks or leaks. Replace if necessary.
- Do not crank the engine with the spark plug removed.
- According to the Consumer Products Safety Commission (CPSC) and the U.S. Environmental Protection Agency (EPA), this product has an Average Useful Life of seven (7) years, or 60 hours of operation. At the end of the Average Useful Life, have the machine inspected annually by an authorized service dealer to ensure that all mechanical and safety systems are working properly and not worn excessively. Failure to do so can result in accidents, injuries, or death.
Assembly & Set-Up
Contents of Carton
- One Snow Thrower
- One 20 oz. Bottle 5W-30 Oil
- Two Ignition Keys
- One Chute Assembly
- One Chute Rotation Control (If equipped.)
- One Set of Drift Cutters (If equipped.)
- One Snow Thrower Operator’s Manual
- One Engine Operator’s Manual
NOTE: This Operator’s Manual covers several models. Snow thrower features may vary by model. Not all features in this manual are applicable to all snow thrower models and the snow thrower depicted may differ from yours.
NOTE: All references to the left or right side of the snow thrower are from the operator’s position. Any exceptions will be noted.
Assembly
Positioning the Upper Handle
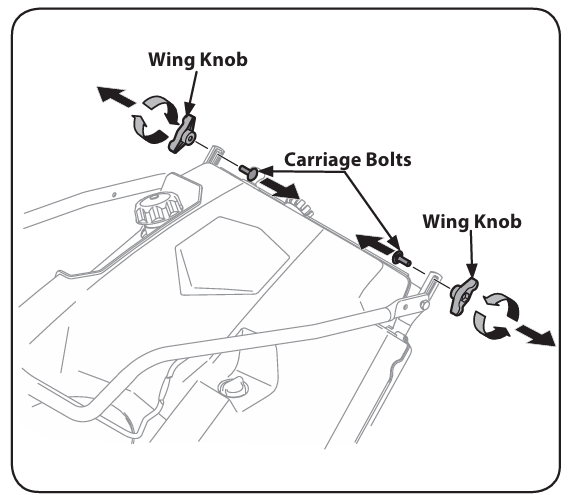
- Remove the wing knob and carriage bolt from the top of the lower handle. See Fig. 3-1. It is not necessary to remove the shoulder screw and flange lock nut below the wing knob and carriage bolt.

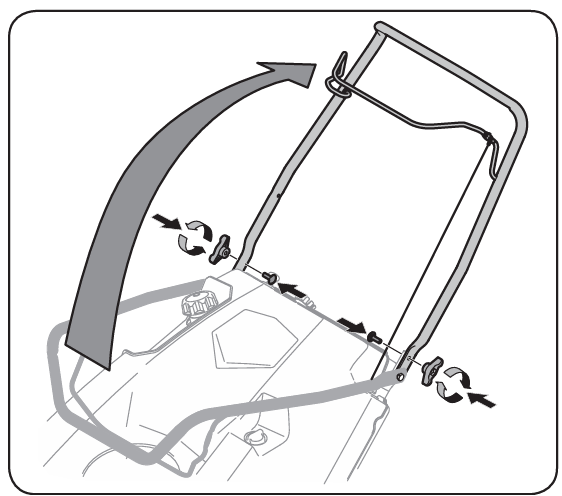
- Pivot the upper handle into the operating position. Be sure not to pinch any of the cables in the process. See Fig. 3-2.

Installing the Chute
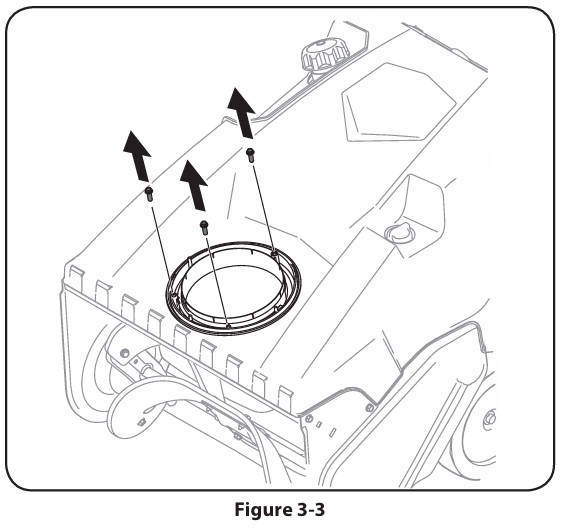
- Remove the hex washer screws in the chute base. See Fig. 3-3.

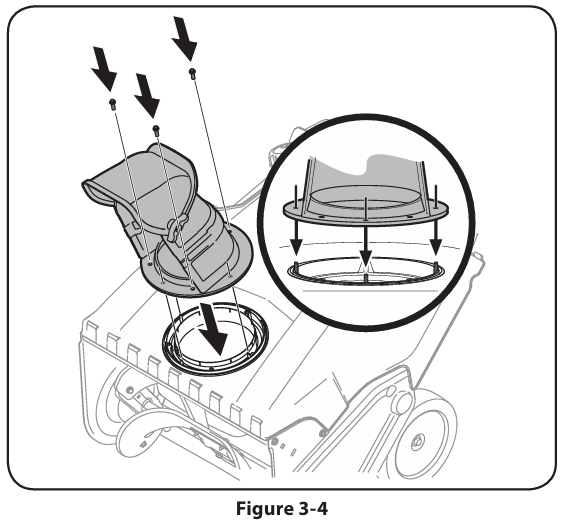
- Align the holes in the chute base with the holes in the lower chute and secure with the previously removed hex washer screws. See Fig. 3-4.

Installing the Chute Rotation Control (If so equipped)
To install the chute rotation control (only models so equipped) proceed as follows:
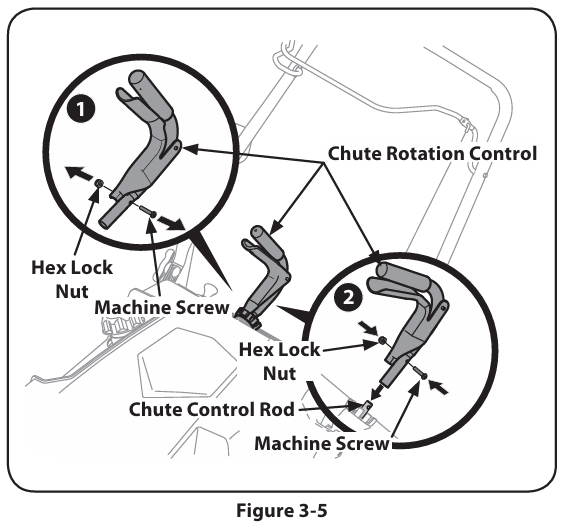
- Remove the hex lock nut and machine screw from the chute rotation control. See Fig. 3-5.

- Place the chute rotation control onto the chute rotation rod and secure with the hex lock nut and machine screw removed in step 1. See Fig. 3-5.
Installing the Drift Cutters (If so equipped)
- Remove the carriage bolts and flange lock nuts from the drift cutters.
- Install the drift cutters and secure with the carriage bolts and flange lock nuts removed in step 1. See Fig. 3-6.

Installing the Recoil Starter Handle
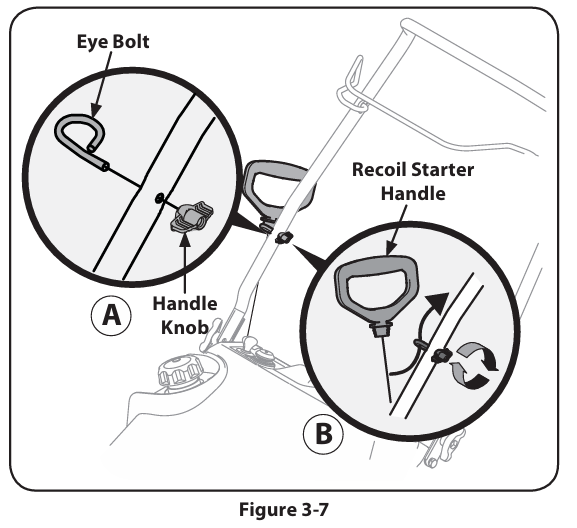
- Remove the eye bolt and handle knob from the manual bag.
- Place the eye bolt and handle knob on the upper handle as shown in Fig. 3-7. Do not fully tighten the hardware until instructed to do so.

- Slowly pull the recoil starter handle up towards the eye bolt.
- Slip the recoil starter rope into the eye bolt from the back of the snow thrower. See Fig. 3-7.
- Securely tighten the eye bolt and handle knob.
Set-Up
Adding Oil
Refer to the Engine Operator’s Manual packed with your snow thrower for information on adding and checking oil.
Adding Fuel
Refer to the Engine Operator’s Manual packed with your snow thrower for information on adding fuel.
Controls & Features
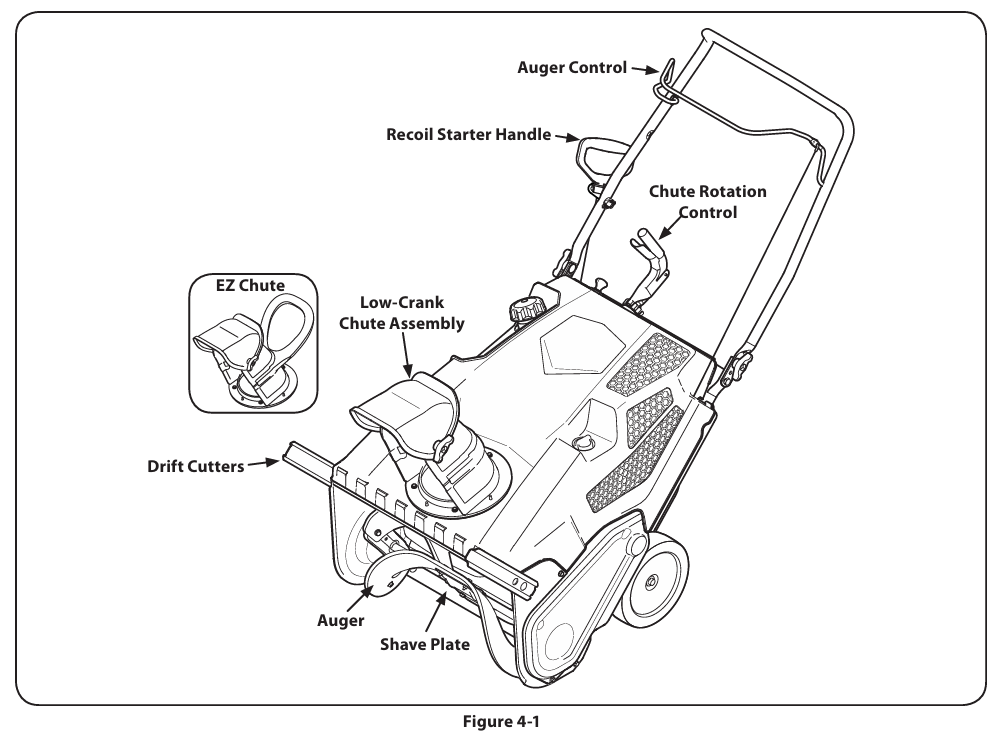
NOTE: This Operator’s Manual covers several models. Snow thrower features may vary by model. Not all features in this manual are applicable to all snow thrower models, and the snow thrower depicted may differ from yours.
Engine Controls
See the Engine Operator’s Manual for the location and function of the controls on the engine.
Auger
When engaged, the auger rotation draws snow into the auger housing and throws it out the discharge chute. Rubber paddles on the auger also aid in propelling the snow thrower as they come in contact with the pavement.
Auger Control
Located on the upper handle, the auger control is used to engage and disengage drive to the auger. Squeeze the control against the upper handle to engage the auger; release it to disengage.
Chute Assembly
EZ Chute (If so equipped)
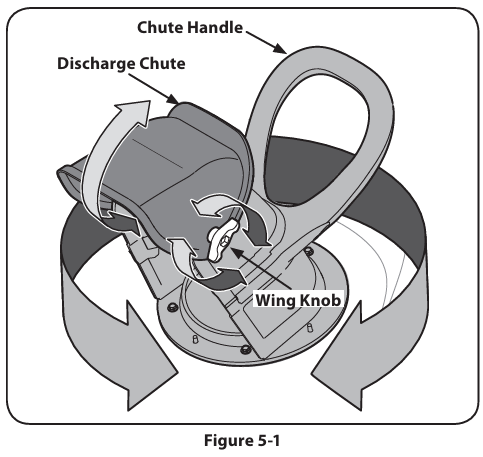
Rotate the discharge chute to the left or right using the chute handle. The pitch of the discharge chute controls the angle at which the snow is thrown. Loosen the wing knob on the side of the discharge chute before pivoting the discharge chute upward or downward. Retighten the knob once the desired position has been achieved.
Low-Crank Chute Assembly (If so equipped)
Rotate the discharge chute to the left or right using the chute rotation control. The pitch of the discharge chute controls the angle at which the snow is thrown. Loosen the wing knob on the side of the discharge chute before pivoting the discharge chute upward or downward. Retighten the knob once the desired position has been achieved.
Shave Plate
The shave plate maintains contact with the pavement as the snow thrower is propelled, allowing snow close to the pavement’s surface to be discharged.
Recoil Starter Handle
The recoil starter handle is used to manually start the engine.
Chute Rotation Control (If so equipped)
The chute rotation control is located on the back of the snow thrower. To rotate the chute to the left, squeeze the lever against the chute rotation control and rotate left. To rotate the chute to the right, squeeze the lever against the chute rotation control and rotate right.
Drift Cutters (If so Equipped)
The drift cutters are designed for use in deep snow. Their use is optional for normal snow conditions. Maneuver the snow thrower so that the cutters penetrate a high-standing snow drift to assist snow falling into the augers for throwing.
Operation
Starting & Stopping the Engine
WARNING! Always keep hands and feet clear of moving parts. Do not use a pressurized starting fluid. Vapors are flammable.
Refer to the Engine Operator’s manual packed with your snow thrower for instructions on starting and stopping the engine.
Engaging the Auger
To engage the auger and start throwing snow, squeeze the auger control against the handle. Release to stop the auger.
Engaging the Drive
Lift up slightly on the handle to allow the rubber paddles on the auger to contact the pavement and propel the snow thrower forward. Pushing downward on the handle will raise the auger off the ground and stop the forward motion.
NOTE: Excessive upward pressure on the handle will result in premature wear on the rubber auger blades, which are not covered by the warranty.
Adjusting the Chute
EZ Chute (If so equipped)
- Rotate the discharge chute to the left or right using the chute handle. See Fig. 5-1.

- To adjust the pitch, loosen the wing knob on the side of the discharge chute and pivot the discharge chute upward or downward. Retighten the knob once the desired position has been achieved. See Fig. 5-1.
Low-Crank Chute Assembly (If so equipped)
- Rotate the discharge chute to the left or right using the chute rotation control. See Fig. 5-2.

- To adjust the pitch, loosen the wing knob on the side of the discharge chute and pivot the discharge chute upward or downward. Retighten the knob once the desired position has been achieved. See Fig. 5-2.
Clearing a Clogged Discharge Chute
WARNING! Never use your hands to clear a clogged chute assembly. Shut off the engine and remain behind the handles until all moving parts have stopped before using a clean-out tool to clear the chute assembly.
Hand contact with the rotating impeller inside the discharge chute is the most common cause of injury associated with snow throwers. Never use your hand to clean out the discharge chute.
To clear the chute:
- SHUT THE ENGINE OFF!
- Wait 10 seconds to be sure the impeller blades have stopped rotating.
- Always use a clean-out tool, not your hands.
Maintenance & Adjustments
Adjustments
WARNING! Before servicing, repairing or inspecting the snow thrower, disengage the auger control. Stop the engine and remove the key to
prevent unintended starting.
Shave Plate
To check the adjustment of the shave plate, place the machine on a level surface. The wheels, the shave plate, and the auger should all contact the level surface. Note that if the shave plate is adjusted too high, snow may blow under the housing. If the shave plate wears out excessively, or the snow thrower does not self-propel, the shave plate may be too low and needs to be adjusted.
NOTE: On new snow throwers or machines with a new shave plate installed, the auger may be slightly off the ground.
To adjust the shave plate, proceed as follows:
- Drain the gas from the snow thrower.
- Pull the starter cord until resistance is felt. Then tip the snow thrower back until it rests on the handles.
- Loosen the four flange lock nuts and carriage screws that secure the shave plate to the housing. See Fig. 6-1. Move the shave plate to the desired position and retighten the flange lock nuts and carriage screws securely.

- Tip the snow thrower back to the operating position and pull the starter handle a few times to see if it is difficult to pull.
- If the starter is difficult to pull, remove the spark plug and pull the handle several times to ensure that any oil trapped in the head is removed.
CAUTION: Oil may come out of the spark plug hole when it is removed and the starter handle is pulled. - Inspect the spark plug. If it is wet, clean off any oil before re-installing.
Auger Control Cable
As a result of both the auger control cable and the auger drive belt stretching due to wear, periodic adjustments may be necessary. If the auger seems to hesitate when rotating, proceed as follows: The upper hole in the auger control provides for an adjustment in cable tension. To adjust, disconnect the end of the control cable from the bottom hole in the auger handle and reinsert it in the upper hole. Insert the cable from the outside as shown in Fig. 6-2.
Test the snow thrower to see if there is a noticeable difference. If, after the adjustment to the auger control cable, the auger still hesitates when rotating, see the Service section to replace the belt.
Chute Assembly
Refer to the Operation section for instructions on adjusting the chute assembly.
Maintenance
Lubrication
Lubricate the pivot points on the control handle and the extension spring at the end of the control cable with a light oil once every season and before the snow thrower is put into storage at the end of the season.
Off-Season Storage
If the snow thrower will not be used for 30 days or longer, follow the instructions below.
- Refer to the Engine Operator’s manual packed with your snow thrower for information on the storage of the engine.
- Store the equipment in a clean, dry area.
- If storing in an unventilated area, rustproof the machine using a light oil or silicone to coat the snow thrower.
- Clean the exterior of the engine and the snow thrower.
- Lubricate pivot points on the control handle and extension spring at the end of the control cable with a light oil.
Service
Replacing Belt
- Run the snow thrower until the fuel tank is empty.
- Pull the recoil starter handle until resistance is felt. Then tip the snow thrower back until it rests on the handles.
- Slide a board up through the auger and through the chute to secure the auger in place.
- Remove the belt cover by removing the two hex washer screws and one hex lock screw that secure it to the frame. See Fig. 7-1.

- Remove the flange nut that secures the auger pulley to the auger shaft. See Fig. 7-2.

- Remove the auger pulley and the belt.
To replace the belt, follow these instructions and refer to Fig. 7-3.
- Route the belt around the drive pulley and under the idler pulley.
- Route the end of the belt around the auger pulley and slide the pulley back onto the auger shaft. It may be necessary to push down on the idler pulley to get the auger pulley under the belt keeper.
- Replace the flange nut and tighten securely.
- Reinstall the belt cover removed earlier.
- Remove the board from the auger and chute.
Replacing the Shave Plate
- The shave plate is attached to the bottom of the auger housing and is subject to wear. It should be checked periodically. There are two wearing edges, and the shave plate can be reversed.
- Run the snow thrower until the fuel tank is empty.
- Pull the recoil starter handle until resistance is felt. Then tip the snow thrower back until it rests on the handles.
- Remove the four carriage bolts and flange lock nuts that attach it to the snow thrower housing.
- Reverse the existing shave plate or install a new one, making sure the new shave plate and the heads of the carriage bolts are on the inside of the housing.
- Adjust the shave plate as instructed on page 11.
- Tighten securely once adjusted.
Troubleshooting

Replacement Parts

Warranty
respect to new merchandise purchased and used in the United States and/or its territories and possessions, and by MTD Products Limited with respect to new merchandise purchased and used in Canada and/or its territories and possessions (either entity, respectively, “Troy-Bilt”). “Troy-Bilt” warrants this product (excluding its Normal Wear Parts and Attachments as described below) against defects in material and workmanship for a period of two (2) years commencing on the date of original purchase and will, at its option, repair or replace, free of charge, any part found to be defective in materials or workmanship. This limited warranty shall only apply if this product has been operated and maintained in accordance with the Operator’s Manual furnished with the product, and has not been subject to misuse, abuse, commercial use, neglect, accident, improper maintenance, alteration, vandalism, theft, fire, water, or damage because of other peril or natural disaster. Damage resulting from the installation or use of any part, accessory or attachment not approved by Troy-Bilt for use with the product(s) covered by this manual will void your warranty as to any resulting damage.
Normal Wear Parts are warranted to be free from defects in material and workmanship for a period of thirty (30) days from the date of purchase. Normal wear parts include, but are not limited to, items such as: batteries, belts, blades, blade adapters, tines, grass bags, wheels, rider deck wheels, seats, snow thrower skid shoes, friction wheels, shave plates, auger spiral rubber, and tires.
Attachments — Troy-Bilt warrants attachments for this product against defects in material and workmanship for a period of one (1) year, commencing on the date of the attachment’s original purchase or lease. Attachments include, but are not limited to, items such as: grass collectors and mulch kits.
HOW TO OBTAIN SERVICE: Warranty service is available, WITH PROOF OF PURCHASE, through your local authorized service dealer. To locate the dealer in your area:
In the U.S.A.
Check your Yellow Pages, or contact Troy-Bilt LLC at P.O. Box 361131, Cleveland, Ohio 44136-0019, or call 1-866-840-6483,
1-330-558-7220 or log on to our website at www.troybilt.com.
In Canada
Contact MTD Products Limited, Kitchener, ON N2G 4J1, or call 1-800-668-1238 or log on to our website at www.mtdcanada.com. This limited warranty does not provide coverage in the following cases:
- a. Log splitter pumps, valves, and cylinders have a separate one-year warranty.
- b. Routine maintenance items such as lubricants, filters, blade sharpening, tune-ups, brake adjustments, clutch adjustments, deck adjustments, and normal deterioration of the exterior finish due to use or exposure.
- c. Service completed by someone other than an authorized service dealer.
- d. Troy-Bilt does not extend any warranty for products sold or exported outside of the United States and/or Canada, and their respective possessions and territories, except those sold through Troy-Bilt’s authorized channels of export distribution.
- e. Replacement parts that are not genuine Troy-Bilt parts.
- f. Transportation charges and service calls.
- g. Troy-Bilt does not warrant this product for commercial use.
No implied warranty, including any implied warranty of merchantability or fitness for a particular purpose, applies after the applicable period of express written warranty above as to the parts as identified. No other express warranty, whether written or oral, except as mentioned above, given by any person or entity, including a dealer or retailer, with respect to any product, shall bind Troy-Bilt. During the period of the warranty, the exclusive remedy is repair or replacement of the product as set forth above.
The provisions as set forth in this warranty provide the sole and exclusive remedy arising from the sale. Troy-Bilt shall not be liable for incidental or consequential loss or damage, including, without limitation, expenses incurred for substitute or replacement lawn care services or for rental expenses to temporarily replace a warranted product. Some states do not allow the exclusion or limitation of incidental or consequential damages, or limitations on how long an implied warranty lasts, so the above exclusions or limitations may not apply to you. In no event shall recovery of any kind be greater than the amount of the purchase price of the product sold. Alteration of safety features of the product shall void this warranty. You assume the risk and liability for loss, damage, or injury to you and your property and/or to others and their property arising out of the misuse or inability to use the product. This limited warranty shall not extend to anyone other than the original purchaser or to the person for whom it was purchased as a gift.
HOW STATE LAW RELATES TO THIS WARRANTY: This limited warranty gives you specific legal rights, and you may also have other rights which vary from state to state.
IMPORTANT: Owner must present Original Proof of Purchase to obtain warranty coverage.
For more manuals by Troy-Bilt, visit ManualsLibraryy
Troy-Bilt Squall 210 Snow Blower-FAQs
Why won’t my Troy-Bilt snow blower start or turn over?
Check the basics first—make sure the battery is charged, the spark plug is clean and undamaged, the fuel is fresh, and the carburetor is not clogged.
What type of fuel should I use in my Troy-Bilt snow blower?
Use unleaded gasoline with an octane rating between 84–90 and less than 10% ethanol content for best performance.
What kind of oil does the Troy-Bilt Squall 210 use?
This model runs best with SAE 5W-30 4-cycle engine oil, designed to perform well in cold weather conditions.
How do I start the Troy-Bilt snow blower?
Place the blower on level ground, turn the fuel valve on, set the choke, press the primer bulb as instructed, and then pull the starter handle or use the electric start if equipped.
Do Troy-Bilt snow blowers need oil mixed with gas?
No, all modern Troy-Bilt snow blowers, including the Squall 210, use 4-cycle engines. They require only gasoline in the tank, while oil is added separately to the engine crankcase.
How much oil does the Squall 210 snow blower hold?
It holds approximately 20 ounces of engine oil. Always check the dipstick for the correct fill level before operating.
How long can a Troy-Bilt snow blower last?
With regular maintenance, a Troy-Bilt snow blower can last 10–15 years or longer, depending on usage and care.
What’s the best way to maintain my snow blower?
Check and change the oil each season, use fresh fuel, clean the air filter, inspect the spark plug, and drain fuel if storing for long periods.


