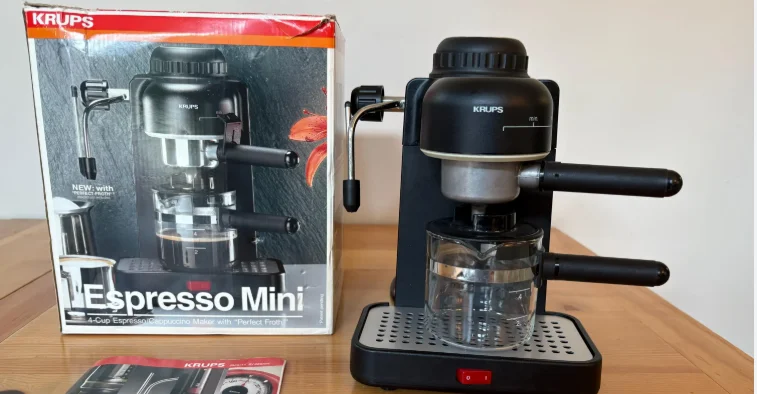
Krups Espresso Mini 963 Coffe Maker
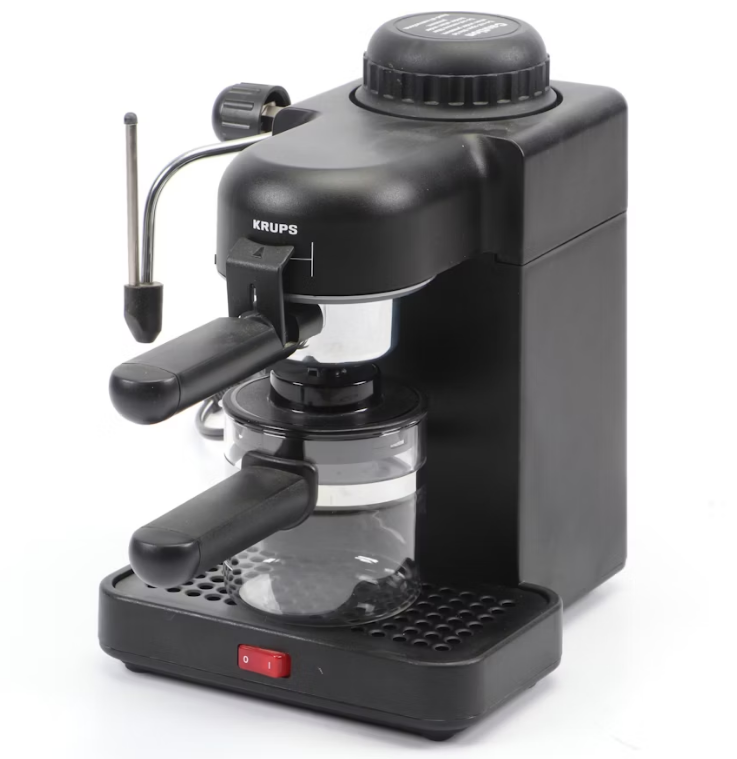
IMPORTANT SAFEGUARDS
When using electrical appliances, basic safety precautions should always be followed to reduce the risk of fire, electric shock, and/or injury to persons, including the following:
- Read the instructions and information in this instruction book and any other literature included in this carton referring to this product before operating or using this appliance.
- Do not touch hot surfaces. Use handles or knobs.
- To protect against fire, electric shock, and personal injury, do not immerse the cord, plugs, or appliance in water or other liquids.
- Close supervision is necessary when any appliance is used by or near children.
- Unplug from the outlet when not in use and before cleaning. Allow the appliance to cool before putting on or taking off parts, and before cleaning it.
- Do not operate any appliance”ce with a damaged cord or plug or after the appliance malfunctions, or has been damaged in any manner. Return the appliance to the nearest authorized service facility for examination, repair, or adjustment.
- The use of accessory attachments not recommended by the appliance manufacturer may result in fire, electric shock, or personal injury.
- Do not use outdoors.
- Do not let the cord hang over the edge of the table or counter, or touch hot surfaces.
- Do not place on or near a hot gas or electric burner, or in a heated oven.
- Always attach the plug to the appliance first, then plug the cord into the wall outlet. To disconnect, turn any control to “off”, then remove the plug from the wall outlet.
- Do not use the appliance for anything other than its Intended use.
- DO NOT unscrew or remove the boiler cap while the machine is in operation. Wait until the brewing cycle is completed and all water and steam have been used up.
- Appliances with Glass Containers
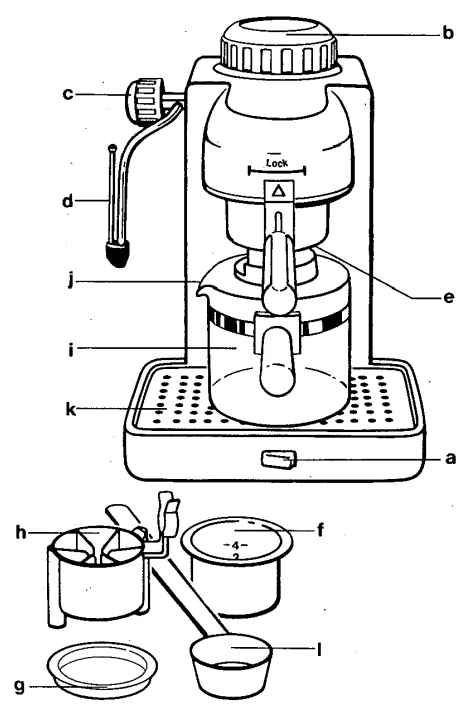
- a – On/Off switch
- b – Cap for boiler container
- c – Steam release knob
- d – Sleom noule with Psrfeci•Froth~ attachment
- e – FIiter holcler
- f – Filter Oolong for coffee
- g – Steam Outlet plug
- h – Cup adaptor
- i – Carafe
- j – Carafe lid
- k – Overllow grid
- I – Measuring spoon
Before you make espresso •••
Preparing espresso or cappuccino is different from brewing regular drip coffee. Electric Espresso/Cappuccino makers use steam pressure to force very hot water through the coffee grinds to make espresso and use steam to froth milk for cappuccino. Since these IT’achlnes use steam pressure, it is very important that you read ALL the instructions, CALMONS, NOTES, and ATTENTIONS and use, espresso maker properly. We recommend that OU get familiar with all the parts of your “Espresso Mini” before operating the machine: insert the filter in the filter holder, fit the filter holder into the filter rings, remove and replace the boiler cap, and turn the steam knob on and off. Wash all loose parts in warm soapy water,
rinse thoroughly and dry.
CAUTION – PRESSURE
NEVER open boiler cap (b) or remove filterholder(e) while your”Espresso Mini” Is turned “ON” or as long as there is pressure in the boiler container. NEVER move or remove the filter holder while the “Espresso Mini” is in operation and under pressure. Please follow the Instructions listed below to see if the machine is still under pressure. Follow these safety precautions while your machine is in use and ten to fifteen minutes after last use.
- Turn the On/Off switch to the “OFF’ position and unplug the appliance.
- Carefully open the steam release knob (c) by slowly turning it counterclockwise. If steam comes out of the nozzle, then the water container is still under pressure. Close the steam knob and proceed with the instructions listed below.
- Take a pitcher filled with cold water and hold it underneath the steam nozzle with the nozzle inserted into the pitcher. Then open the steam release knob (c) by turning it counterclockwise. Leave the steam release knob open until no more steam comes out of the nozzle. When finished, turn the steam knob clockwise to close.
- Now you can remove the boiler cap and the filter holder.
GENUINE ESPRESSO
Espresso is a far richer and stronger brew than regular coffee. It should be deep, dark, and delicious. Most people find that they enjoy it in small quantities because of itsrichnessd and for that reason, espresso is usually served in small (2-oz.) demitasse cups. The mark of real espresso is its wonderful, inviting fragrance and its rich frothed topping: a light brown, cream foam called “crema”. Your “Espresso Mini”, properly used, will always produce espresso that is deep, dark, and delicious. Just follow the instructions and use fresh, well-roasted, pre-ground espresso or espresso beans you grind yourself.
Making espresso

- Place your “Espresso Mini” near an electrical outlet. Then plug in the machine. Make sure the On/Off switch is in the “OFF” position.
- Place your fitter baskel (f) into the filter holder (e) (see figure 2). The basket is marked on the inside, indicating 2 cups or 4 cups. Fill to the desired level, 2 or 4 cups.
- Fill the filter basket with ground espresso coffee. Pack the coffee lightly and clear any excess coffee from the rim of the filter holder. This will ensure a proper lilt into the filler rings (see figure 3).
- To insert the filter holder (e), line up the arrow located on the thumb guard of the filter holder with the arrow on the left side of the machine.
- Raise the 1ilter holder into the brewing head and turn the filter holder firmly to the right 1 mtil it can go no further.
- The arrow on the filter holder should be as far right in the lock range as possible. If the arrow is not at least In lhe middle of the lock range, tlo not operate U,e machine. Rather, remove the filler holder and reinsert it as described above until the arrow is at least in he middle of the lock range (see figure 4).
- Once the filler holder is properly in place. It should never be moved or attempted to be removed while the “Espresso Mini” Is In operation and under pressure.
- Unscrew the boiler cap (b) by turning it counterclockwise (see figure 5).
- Using the glass carafe, fill the boiler container with fresh, cold water (see figure 6).
- Place the boiler cap (bl secu,ely on the machine and turn it clockwise unlll it is secure (see figure 7).
- Place the carafe lid G) on the carafe (i) so that the lid opening points toward the pouring spout of the carafe (see figure 8)

- Position the carafe under the filter holder. Make sure Iha! the nozzle in the filter holder points through the opening of the carakl lid. (see figure 9
- To make esp1esso di1ectlt into the cups, clip the cup adapter (h) onto the filter holder (see figure 10) and make sure that the cups are placed correctly underneath the two spouts (see figure 10a).
- Make sure that tl”the steam release knob (c) is in the ·closed” position (turn counterclockwise). Then tu·rn the On/Off switch on the “ON” position and the indicator light will illuminate (see figure 11).
- After approximately two minutes, the water will have reached the proper tern pressure. The Wateratl this time will pass through the coffee grinds, producing espresso in the glass carafe or in the cups, whichever you choose! ..
- Note that initially, the coffee will drip very slowly. If, aNer4 minLiles. Nowater passes through the coffee grinds. Turn gff ! he machine. Release pressure by following the instructions under CAUTION – PRESSURE listed below, then remove the filter holder, crumpled coffee grinds, and start from the beginning.
- Once the coffee has stopped brewing, turn “Off” the machine with the “On/ Off” switch t he light will go out (see figure 11).
- Before you remove the filter holder for cleaning, make sure that the boiler is no longer under pressure.
CAPPUCCINO
Cappuccino takes its name from the chocolate hues of the robes worn by the Capuchin monks who favored this delicious
dessert coffee. A cappuccino is traditionally made up of espresso and frothed milk; it can be tailored to one’s own taste with cinnamon, sugar, chocolate flakes, or even liquor. Its versatility makes cappuccino a wor1d-wicle gourmet choice.
- The first step in making a cappuccino is to make espresso. Therefore, fill the glass carafe with the amount of water
which is required to make the amount of espresso plus additional water for frothing milk (see section Making Espresso). - Fill a small pilcher1.lil to 1n full with fresh, cold milk and set aside.
- a) As soon as the first drops of coffee are forced through the filter holder, you can start frothing milk.
- b) Hold the pitcher under the steam nozzle. Insert the steam nozzle with “Perfect Froth halfway into the
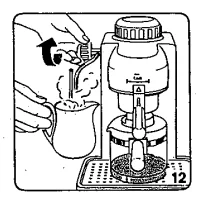
pitcher of milk. Turn the steam control knob almost a full turn. Hold the pitcher steady as you froth the milk(see figure 12). Leave the steam nozzle in the pitcher for approximately 45-60 seconds, depending on how much froth you want and the type of milk you are using.
- b) Hold the pitcher under the steam nozzle. Insert the steam nozzle with “Perfect Froth halfway into the
- Close the steam release knob (c) after the milk is frothed by turning it clockwise while the nozzle is still immersed in the milk. This will prevent splattering of hot milk and foam. If you prefer “stiff” foam, let the frothed milk stand for a minute. If you prefer”creamy” foam, use it immediately.
- Pour the espresso into a cup that has a capacity of at least 5 oz.) Then add the steamed milk to the espresso and spoon on the 1rothed milk. The proportion between espresso and milk is to taste; in Italy, it is normally one part espresso to two parts milk plus the froth.
STEAMING WITHOUT MAKING ESPRESSO
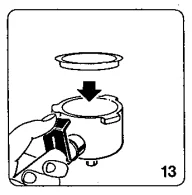
- Insert the steam build-up plug (g) into the filter holder; see figure (13). Then proceed with steps 4 and 5 in section “Making Espresso~.
- Fill the boiler container with cold water. & CAUTION: For steam only i fill the glass carafe to the © mark on the carafe. •This will always give you enough steam.
- Have your pitcher with milk or any other beverage you wish to leave ready.
- Proceed with steps 7, 8, 9, and 11 in section “Making Espresso”.
- Open the Steam Release Knob (c). Immediately alter by turning the machine on. Stand by with your frothing pitcher.
& CAUTION: Do not leave the machine unattended at that time. It will take approximately. Half a minute after turning the machine on for the steam to come out of the steam nozzle, proceed with steps 3b to 5 in section “Making A apcappuccino - When all steam is released, close the Steam Release Knob and turn off the machine. &CAUTION: In case you do not need
All the water for steaming, proceed as follows:- a)turn off the machine,
- b) release the remaining steam pressure into another container.
CLEANING
Before cleaning, turn off the machine. Unplug it, and allow it to cool down. The filter holder, fitter basket, carafe, carafe lid, cup adapter, and overflow grid can be put in the dishwasher’s upper rack away from the heating/drying element. The machine itself wipes clean. Never immerse the body of your “Espresso Mini” in water or any other liquid. Clean the filler ring with a·damp cloth and remove ground coffee. If there is water left in the boiler container, let the machine cool down, remove all loose particles, and empty through the iop opening.
Cleaning the steam nozzle
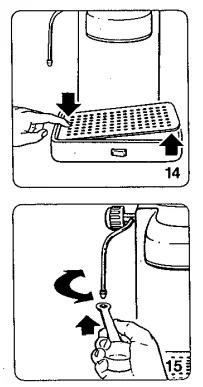
Aean the steam nozzle each time after you have immersed it in the milk, the inside of the nozzle becomes clogged, and milk deposits on the outside harden and become difficult to remove. If it occurs, unscrew the nozzle (see figure 15) and remove all milk particles (use a needle and rinse under the faucet); replace the nozzle, and be sure to screw it on tightly.
Cleaning the Perfect Froth attachment
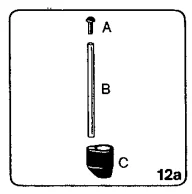
For a thorough cleaning of the “Perfect Froth~ attachment, remove part C (see figure 12a). All parts should be rinsed in
warm water. If the small suction opening in part A is clogged, it can be opened with a fine needle.
PROBLEMS AND CAUSES
Problem:
1. Coffee leaking from the filter holder
Cause:
- Filter holder not properly inserted
- Filter holder not pushed in far enough
- The internal gasket is dirty; clean the gasket
- Gasket without. elasticity, replace
- Coffee powder was not cleaned off the edge of the filter holder
Problem:
2. Coffee does not come out
Cause:
- No water in the boiler container
- No coffee in the filter holder
- Riter clogged up because the coffee mixture is too fine or pressed down too hard
FOR MORE MANUALS BY KRUPS, VISIT MANUALSLIBRARYY
Krups Espresso Mini 963 Coffe Maker-FAQs
Why is my Krups coffee machine not working?
It could be due to mineral buildup, a blocked water line, or a malfunctioning pump. Regular descaling and cleaning usually solve these issues.
How often should I clean my espresso machine?
Clean daily for removable parts and descale every 2–3 months, depending on water hardness.
Can I use tap water in my espresso machine?
Filtered water is recommended to prevent mineral buildup and ensure better taste.
What is the best grind size for espresso?
Use a fine grind, similar to table salt, for optimal extraction and flavor.
How many shots of espresso make one cup of coffee?
One cup of coffee is roughly equal to 5 espresso shots.
What is the lifespan of a Krups espresso machine?
With proper care, most machines last 4–5 years, sometimes longer.
Why is my espresso machine not flowing properly?
Check for clogged filters, scale buildup, or a blocked water line. Regular cleaning usually fixes this.
How do I use a mini coffee machine for beginners?
Add water and coffee, select your brew, and press start. Follow the instruction manual for safety and optimal results.
Which country makes Krups coffee machines?
Krups is a German brand, known for high-quality coffee makers and espresso machines.

