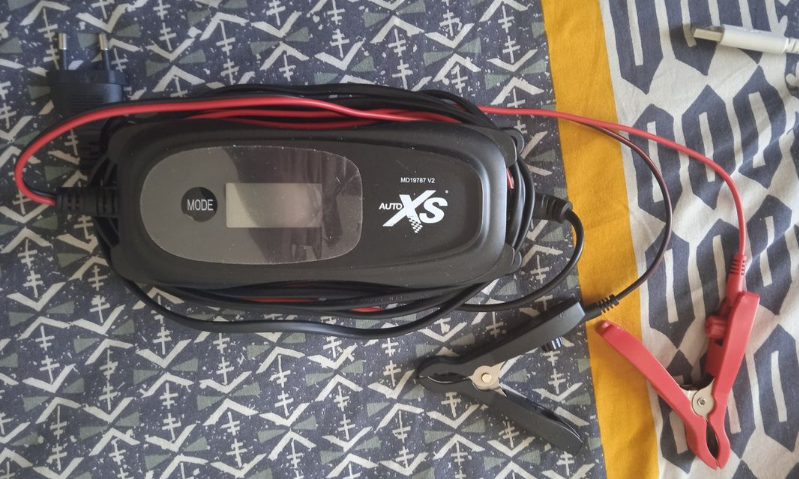
Medion MD19787 Auto XS Car Battery Charger
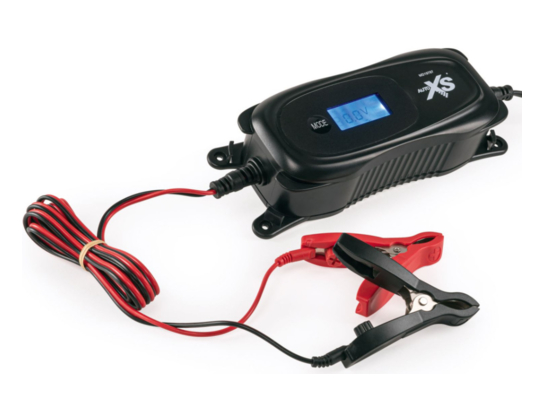
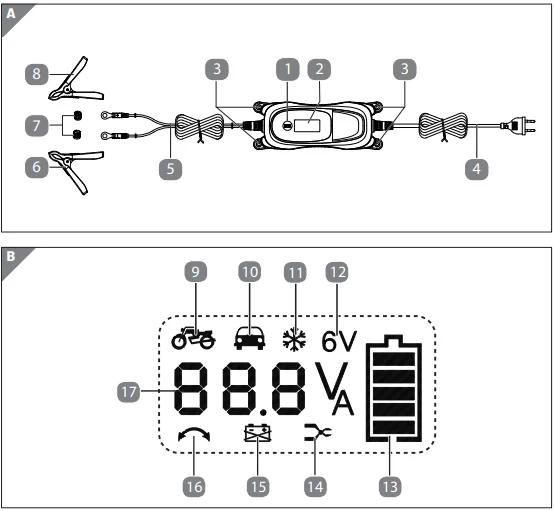
Device parts
- MODE button
- Display
- Fixing holes
- Mains cable with mains plug
- Connection cable with ring terminals
- Negative terminal clamp (black), with connection cable
- Fixing screws
- Positive terminal clamp (red), with connection cable
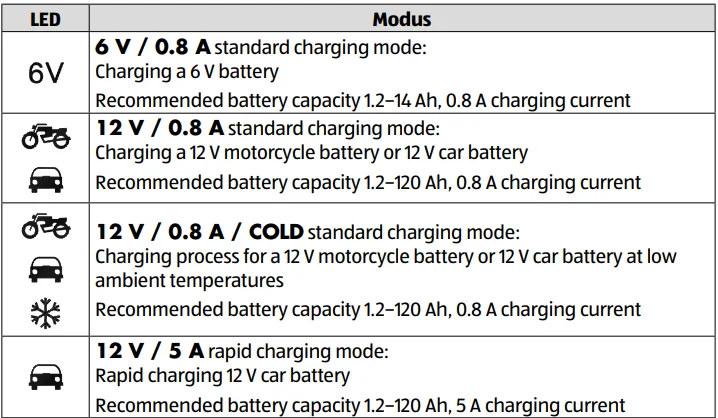
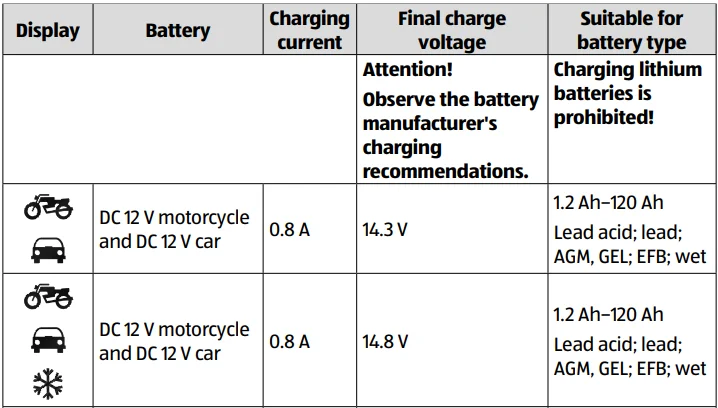
- + 10 12 V / 0.8 A charging mode active – standard charging
- + 10 + 11 12 V / 0.8 A / COLD charging mode active – standard charging at low ambient temperatures
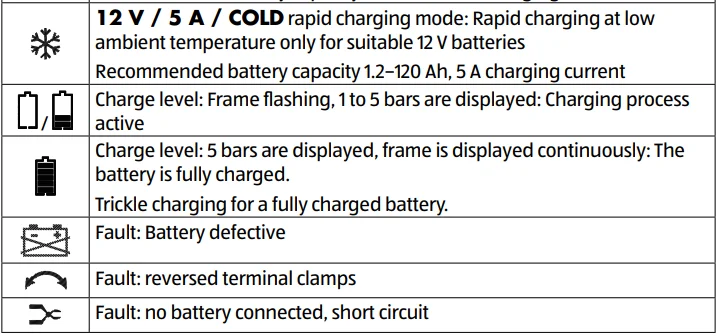
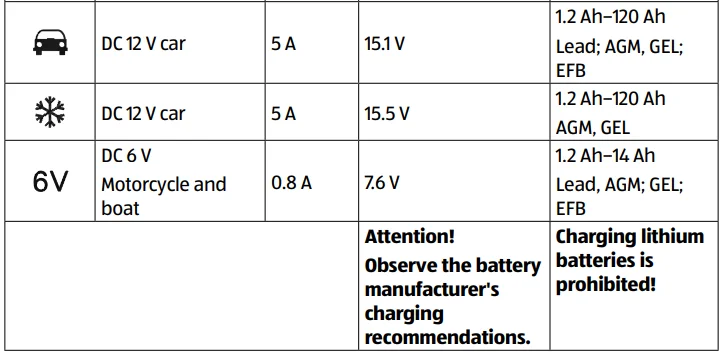
- 12 V / 5 A charging mode active – rapid charging
- 12 V / 5 A / COLD charging mode active – rapid charging at low ambient temperatures
- 6 V / 0.8 A charging mode active – standard charging
- Charge display (see Page <?>)
- Fault display (no battery connected, short circuit)
- Battery defective
- Fault display (incorrectly connected terminals)
- Charging current display/current battery voltage display


Proper use
This appliance is a primary-side switched charging appliance with pulse trickle charging. It is suitable for charging and trickle-charging the following rechargeable 6 V or 12 V lead batteries containing an electrolyte solution or gel, as well as AGM batteries, which are used in motor vehicles:
- 6 V: Capacity from 1.2 Ah to 14 Ah;
- 12 V: Capacity from 1.2 Ah to 120 Ah;
It can also regenerate fully discharged 12 V batteries (regeneration mode). The appliance is not suitable for recharging lithium batteries for vehicles, motorcycles, or boats. Use the charger only to charge the battery types specified in these instructions. No other batteries may be charged with the charger. When using other types of batteries, there is a risk of injury, and the charger could be damaged. Please note the battery manufacturer’s charging recommendations.
The charger charges batteries automatically in several stages and can thus recharge them up to approximately 100% of their capacity. You can also connect a battery that has not been used for a long time to the charger in order to keep it charged. The appliance is only intended for private use and not for industrial/commercial use. Please note that we shall not be liable in cases of improper use:
- Do not modify the appliance without our consent, and do not use any auxiliary equipment that we have not approved or supplied.
- Only use replacement parts or accessories that we have supplied or approved.
- Comply with all the information in this user manual, especially the safety information. Any other use is considered improper and can cause personal injury or property damage.
- Do not use the appliance in potentially explosive atmospheres. This includes petrol stations, fuel storage areas, and areas where solvents are processed. This appliance must also not be used in areas with particle-laden air (for example, flour or wood dust).
- Do not expose the appliance to extreme conditions. Avoid:
- high humidity or wet conditions
- extremely high or low temperatures
- direct sunlight
- open flames.
Package contents
DANGER! Risk of choking and suffocation! There is a risk of choking and suffocation due to swallowing or inhaling small parts or plastic wrap.
- Keep the plastic packaging out of the reach of children.
- Do not let children play with the packaging material.
- Remove the product from the packaging and remove all packaging material.
- Check your purchase to ensure that all items are included. If anything is missing, please contact our Service team within 14 days of purchase.
- Before each use, check the car battery charger for any damage.
- Contact our Service Centre if you find any damage.
The following items are supplied with your product:
- Car battery charger
- User manual and warranty documents
Mounting on the wall
The appliance has fixing holes so that you can attach it to the wall.
WARNING! Risk of electric shock! There is a risk of electric shock from live parts of the appliance.
- Before assembly and maintenance work and before cleaning the appliance, always unplug the mains plug 4 from the mains socket.
- There is a risk of electric shock from live electric lines.
- Do not drill holes into areas that may contain embedded power, gas, or water lines. Use a suitable search tool to locate these lines.
- Select a suitable location on the wall. There must be adequate ventilation.
- Select four rawl plugs and screws that are suitable for the wall and the size of the fixing holes 3.
- Mark the drill holes on the wall.
- Drill the four holes and insert the rawl plugs.
- Screw the appliance tightly.
Operation
- Remove the product from the packaging and remove all the packaging material and the protective film on the display.
Connecting the charger to the battery
The charger will automatically recognize the battery type connected (6 V or 12 V battery).
WARNING! Risk of electric shock! There is a risk of electric shock from live parts of the appliance.
- Always unplug the mains plug 4 from the mains socket before attaching the connection clamps to the terminals on the battery or removing them.
![]() Before disconnecting a car or motorcycle battery, first consult the vehicle’s instruction manual on the potential consequences of disconnecting the battery.
Before disconnecting a car or motorcycle battery, first consult the vehicle’s instruction manual on the potential consequences of disconnecting the battery.
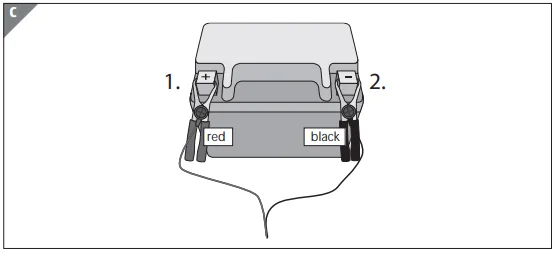
- If the battery that you wish to charge is connected in the vehicle, first disconnect the vehicle’s negative terminal connection cable (black) 6 from the battery’s negative terminal before the charging or trickle charging process. The battery’s negative terminal is usually connected to the vehicle’s bodywork.
- Then disconnect the vehicle’s positive terminal connection cable (red) 8 from the battery’s positive terminal.
- Then attach the charger’s positive terminal clamp (red) to the battery’s positive terminal and then the negative terminal clamp (black) to the battery’s negative terminal, at a distance from the battery and the fuel pipe (see fig. C).
- Connect the battery charger’s mains cable 4 to a mains socket.
Select charging mode
Select a charging mode depending on the battery type and ambient temperature. You can also recharge a completely discharged battery (Page 29). The charger’s electronics start the charging process after connecting the battery in the 6 V or 12 V standard charging mode, depending on the battery type.
- To select a charging mode, press the MODE button 1 several times. The symbol of the respective mode and charging current will be shown on display 2.
- The charger recognizes the standard 6 V or 12 V charging mode suitable for the battery type. Therefore, not every mode can be selected for every battery.
- After selecting a mode, the charger implements it. Now the display indicates the current voltage. If a battery remains attached to the charger once charging is complete, the charger automatically switches to trickle charging. The battery is also trickle-charged if another mode is selected.
Status displays
- While the appliance is switched on, the background lighting is blue.
- During charging, the selected charging mode, the current battery voltage, and the charge level of the battery are displayed.
- During faulty appliance use (e.g., by short circuit), fault symbols are displayed, and the appliance will switch to standby mode if applicable (see also “Protection against wrong polarity” on page 31).


6 V / 0.8 A charging mode (6 V batteries up to max. 14 Ah)
You can identify the battery type from the type plate on your battery. Observe the battery charging recommendations. The charger will normally recognize the 6 V standard charging mode suitable for the battery type. If the battery is not recognized, proceed as follows:
- Set this mode to charge 6 V batteries with a capacity under 14 Ah.
- Press the MODE 1 button several times to select 6 V / 0.8.
- The 6 V 12 symbol is shown on display 2.
- If you do not, then set another mode; the electronics automatically start the charging process with a charging current of around 0.8 A.
- Once the battery is fully charged, the frame around the battery icon 13 stops flashing, and the entire battery symbol lights up continuously. Trickle charging takes place in this state.
12 V / 0.8 A charging mode (12 V batteries up to max. 120 Ah)
You can identify the battery type from the type plate on your battery. Observe the battery charging recommendations. The charger will normally recognize the 12 V standard charging mode suitable for the battery type. If the battery is not recognized, proceed as follows:
- Set this mode to charge batteries with a capacity under 120 Ah.
- Press the MODE button 1 several times to select 12 V / 0.8 A.
- The
 9 and
9 and  10 symbols are shown on display 2.
 - If you do not, then set another mode; the electronics automatically start the charging process with a charging current of around 0.8 A.
- Once the battery is fully charged, the frame around the battery icon 13 stops flashing, and the entire battery symbol lights up continuously. Trickle charging takes place in this state.
12 V / 0.8 A charging mode (12 V batteries up to max. 120 Ah, at low temperatures)
You can identify the battery type from the type plate on your battery. Observe the battery charging recommendations. The charger will normally recognize the 12 V standard charging mode suitable for the battery type. If the battery is not recognized, proceed as follows:
- Set this mode to charge batteries with a capacity of less than 120 Ah and low ambient temperatures. Set this mode also to charge suitable gel and AGM batteries (absorbent glass mat: batteries in which the electrolyte is held in glass fiber mats) with a capacity of up to 1.2 Ah.
- Press the MODE button 1 several times to select 12 V / 0.8 A / COLD.
- The
 9,
9,  10, and
  11 symbols are shown on display 2.
 - If you do not, then set another mode; the electronics automatically start the charging process with a charging current of around 0.8 A.
- Once the battery is fully charged, the frame around the battery icon 13 stops flashing, and the entire battery symbol lights up continuously. Trickle charging takes place in this state.
12 V / 5 A charging mode (rapid charging for 12 V batteries from 1.2 Ah to 120 Ah)
You can identify the battery type from the type plate on your battery. Observe the battery charging recommendations. Proceed as follows:
- Set this mode to charge batteries with a capacity of 1.2 Ah or over, and normal ambient temperatures.
- Press the MODE button 1 several times to select 12 V / 5 A mode.
- The
 10 symbol is shown on display 2. If you do not, then set another mode; the electronics automatically start the charging process with a charging current of around 5 A. Once the battery is fully charged, the frame around the battery icon 13 stops flashing, and the entire battery symbol lights up continuously. Trickle charging takes place in this state.
12 V / 5 A / Cold (charging process for 12 V batteries, from 1.2 Ah to 120 Ah, at low temperatures)
You can identify the battery type from the type plate on your battery. Observe the battery charging recommendations. Proceed as follows:
- Set this mode to charge batteries with a capacity of 1.2 Ah or over and low ambient temperatures. Set this mode also to charge suitable gel and AGM batteries (absorbent glass mat: batteries in which the electrolyte is held in glass fiber mats) with a capacity of 1.2 Ah and over.
- Press the MODE button 1 several times to select 12 V / 5 A / COLD mode.
- The
 11 symbol is displayed.
 - If you do not, then set another mode; the electronics automatically start the charging process with a charging current of around 5 A.
- Once the battery is fully charged, the frame around the battery icon 13 stops flashing, and the entire battery symbol lights up continuously. Trickle charging takes place in this state.
Regenerating/recharging fully discharged 12 V batteries (regeneration mode)
- Connect the fully discharged battery to the charger and start the charging process. In this regeneration mode, the battery is charged until the charger measures a terminal voltage that is high enough for a regular charging mode. The appliance then switches automatically to an appropriate charging mode and continues charging.
Protection against wrong polarity
The appliance is protected against improper start-up. In case of a faulty connection or if the battery voltage falls below 7.5 V for 12 V batteries and below 3.7 V for 6 V batteries, the appliance remains in standby mode.
- If the terminals have the wrong polarity (are connected incorrectly),
 16 is displayed.
 - If the terminal clamps are incorrectly connected and the electric circuit is not closed, the display 2 shows
 14.
14. - If the battery itself is faulty,
 15 lights up on the display.
 - You cannot operate the appliance.
Overheating cut-out
If the appliance temperature exceeds 115°C, the overheating cut-out is triggered, and the charging process is interrupted until the appliance has cooled off. The display continues to show the charge level.
Disconnecting the battery
WARNING! Risk of explosion!
Improper handling of the charger can result in sparks and trigger an explosion. Gaseous hydrogen may flow out of the battery during charging and trickle charging. Contact with an open flame can trigger a highly explosive gas detonation.
- Disconnect the appliance from the mains before disconnecting the terminal clamps on the battery.
- Observe the correct sequence when disconnecting the battery terminal clamps.
When disconnecting the battery from the charger, proceed in the following order:
- After charging, disconnect the appliance from the mains power.
- Detach the negative terminal clamp (black) from the battery’s negative terminal.
- Detach the positive terminal clamp (red) from the battery’s positive terminal.
- Reconnect the vehicle’s positive terminal cable to the battery’s positive terminal.
- Reconnect the vehicle’s negative terminal cable to the battery’s negative terminal.
Switching off
- Switch the charger off by pulling out the mains plug.
Cleaning and care
WARNING! Risk of electric shock!
There is a risk of electric shock from live parts of the appliance.
- Before assembly and maintenance work and before cleaning the appliance, always unplug the mains plug from the mains power supply.
- Before cleaning, pull the mains plug 4 out of the socket. Use a soft, dry cloth to clean the appliance. Avoid the use of chemical solutions and cleaning products because these may damage the appliance surface and/or markings.
- After longer periods of use, also clean the terminal clamps 6 / 8 with a dry cloth to maintain optimum contact with the terminals.
Storing/transporting
- When you are not using the appliance, unplug the mains plug 4 and store the appliance between –20°C and 60°C in a dry, dust-free environment that is not exposed to direct sunlight.
- Do not store the appliance within the reach of children.
- To avoid damage during transport, we recommend that you use the original packaging.
Technical specifications
- Model MD 19787
- Input 220–240 V ~ 50 Hz, 0.8 A
- Output during standby < 0.8 W
- Electrical protection class II
- Voltage tolerance ± 0.3 V
- Current tolerance ± 10% (± 15% for 0.8 A)
- Trickle charge current 50–150 mA
- Cut-off voltage approx. 7.6 V (6 V / 0.8 A charging mode) approx. 14.3 V (12 V / 0.8 A charging mode) approx.
- 14.8 V (12 V / 0.8 A / Cold charging mode) approx. 15.1 V (12 V / 5 A charging mode) approx. 15.5 V (12 V / 5 A / Cold charging mode)
- Output for batteries with rated voltages of 6 V or 12 V
- Charging current approx. 0.8 A / 5 A (12 V batteries) approx. 0.8 A (6 V batteries)
- Suitable for battery type 12 V: 1.2 Ah–120 Ah, 6 V: 1.2 Ah–14 Ah
- Protection class IP65
- Cable length (mains cable with mains plug) 1.80 m
- Cable length (charging cable with battery terminals) 1.90 m
- Operating temperature 0°C to +40°C
- Storage temperature –20°C to +60°C
Service information
Please contact our Customer Service team if your device ever stops working the way you want or expect it to. There are several ways for you to contact us:
- In our Service Community, you can meet other users, as well as our staff, and you can exchange your experiences and pass on your knowledge there. You will find our Service Community at community.medion.com.
- Alternatively, use our contact form at www.medion.com/contact.
- You can also contact our Service team via our hotline or by post.
You can download this and many other sets of operating instructions from our service portal at www.medion.com/gb/service/start/. You will also find drivers and other software for a wide range of devices there. You can also scan the QR code on the side of the screen to download the operating instructions onto your mobile device from the service portal.
For More Manuals By Medion, Visit ManualsLibraryy.
Medion MD19787 Auto XS Car Battery Charger-FAQs
What is the price of a 12V 20A car battery charger in Pakistan?
A good-quality 12V 20A automatic charger, such as the Simtek model, costs around ₨6,000–₨7,500 depending on the brand and features.
How can I tell if my car battery is fully charged?
Use a multimeter to check the voltage. A fully charged 12V battery typically reads 12.6V to 12.8V when the engine is off.
What type of charger do I need for my car battery?
Choose a smart charger compatible with your battery type—lead-acid, AGM, gel, or calcium. The Medion MD19787 works well with most standard 12V car batteries.
What does a 7-stage battery charger mean?
A 7-stage charger automatically goes through steps such as desulfation, bulk charging, absorption, and float maintenance—ensuring your battery gets a complete and safe charge.
How long should I run my car to recharge a weak battery?
Run your car for 20–30 minutes to restore a slightly drained battery. Severely depleted ones may need 30–60 minutes or a full charge using a dedicated charger like the MD19787.
What is the ideal voltage for charging a 12V battery?
The recommended charging voltage is 14.4–14.8 volts. This ensures an efficient charge without overloading the battery.
Can I leave the Medion MD19787 charger connected overnight?
Yes, occasionally. The MD19787 features automatic shut-off, preventing overcharging. However, avoid leaving it connected continuously to extend battery life.
Do car batteries charge while the engine is running?
Yes. The alternator recharges the battery while the engine runs, powering other vehicle systems at the same time.
What is the 80/20 rule in battery charging?
This means you should charge up to 80% for daily use and only go to 100% when needed. Avoid discharging below 20% to preserve battery health.
Can a dead car battery be recharged using the MD19787 charger?
If the battery is not physically damaged, the Medion MD19787’s recovery or desulfation mode may revive it. Severely damaged batteries may still need replacement.

