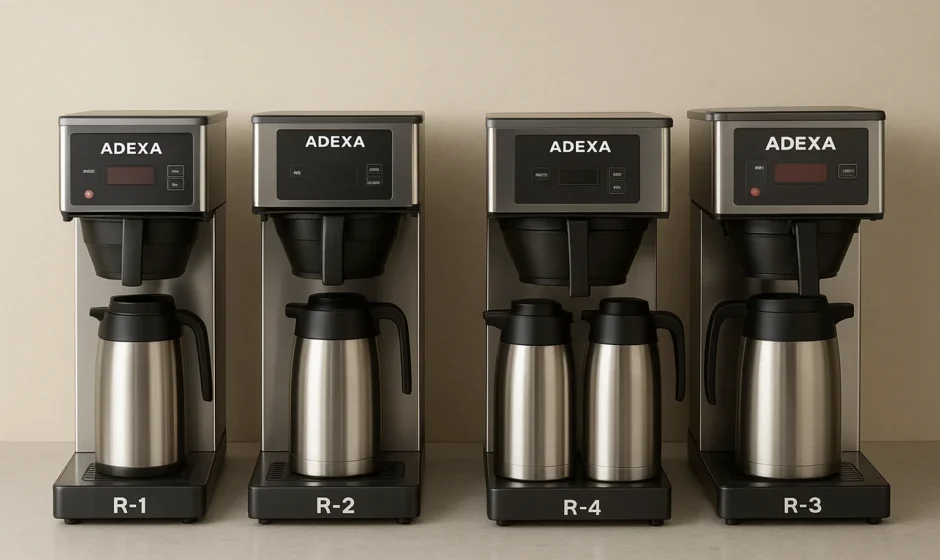
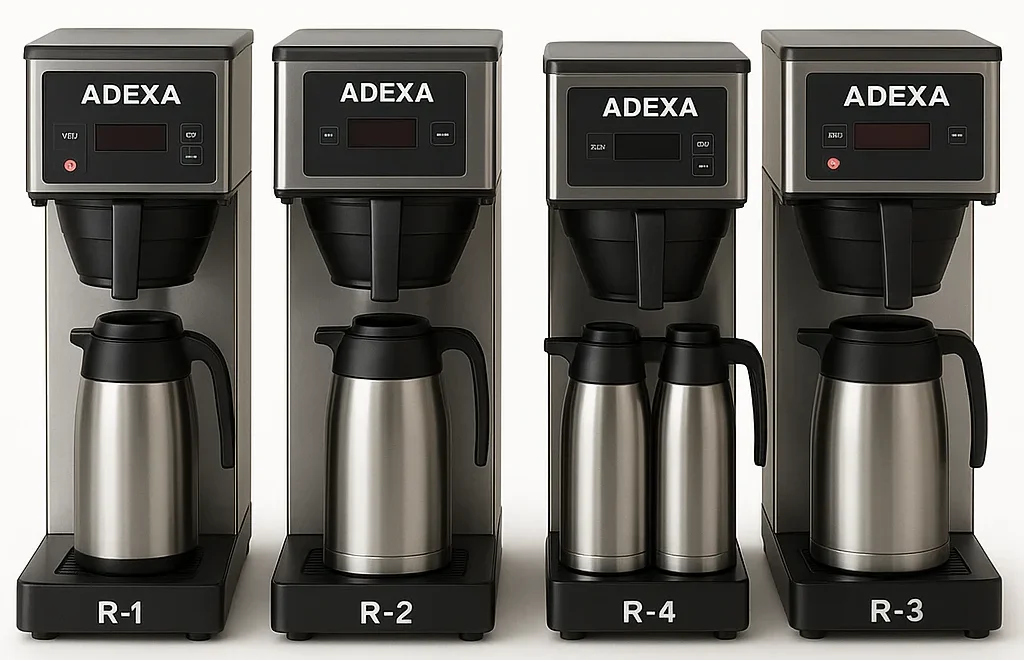
Adexa R-Series Commercial Coffee Brewer
INTRODUCTION:
We are pleased that you have chosen our high-quality Automatic Coffee Machine, and we are confident that you have made the correct decision. Before you use it, please read the following instructions carefully.
WARNING:
The following warnings and precautions must be observed.
- Never immerse the machine in water. If the machine has been soaked, it must be dried and checked by a specialist before using it again.
- Never pour hot water into the Water Reservoir.
- Never pour more than 2.2 liters of water into the Water Reservoir.
- When working, the unit has to be placed in a horizontal position.
- The unit is only suitable for indoor and countertop use.
- Before installation, you should confirm that the rating plate on the machine is suitable for your electric outlet.
- When the machine is in use, some parts of the machine are very hot. Ensure the power cord does not touch the hot parts. The user should also be careful not to touch the hot parts.
- Remain in the vicinity of the machine while the machine is in operation.
- Don’t disconnect the appliance with wet hands, and don’t pull the supply cord.
- If the supply cord is damaged, it must be replaced by the manufacturer, its service agent, or similarly qualified persons to avoid a hazard.
- Please stop using the unit when the power cord is damaged. The power cord should be replaced by a qualified person with the specified type. Please contact the service agent or the Sales Rep. of the distributor.
- In the following pages, all the important items are marked to attract your attention.
MODEL DESIGNATION:
Notice: The * in the model number represents different nameplate designs. The three-digit suffix is the reference code; neither of them do not impacts any specifications, function, or usage of the machine.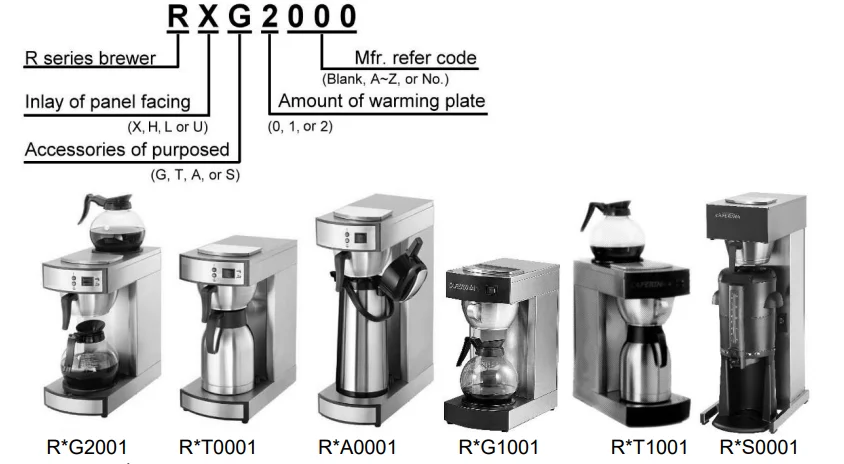
SPECIFICATION:

DIMENSIONS:

ACCESSORIES:
The following accessories may be purchased separately for different models:
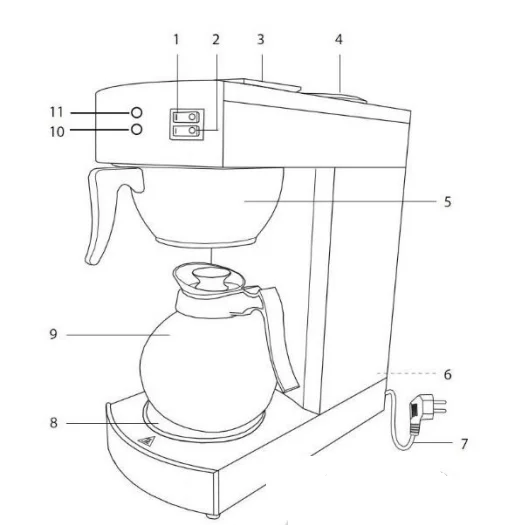
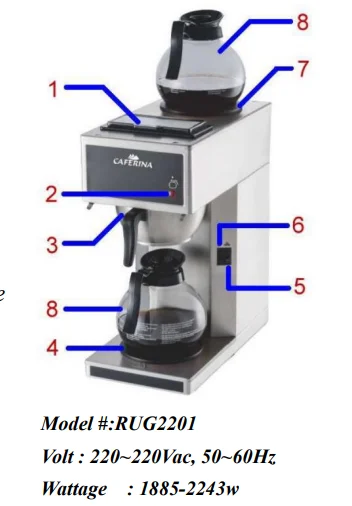
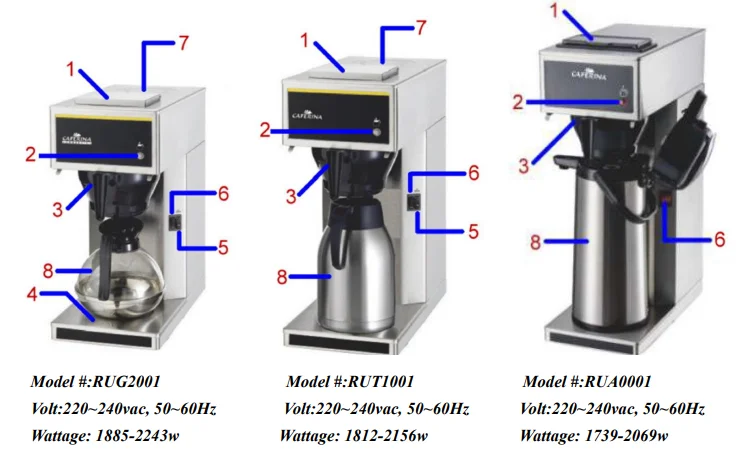
RECOGNIZE:
- Switch off the Extra Warmer on top.
- On/off Switch with Indicator
- Water tank inlet.
- Extra Warming Plate
- Filter Pan with Ring Spring
- Machine Body (Earthing terminal)
- Power cable with plug
- Warming Plate on base
- Decanter (or Thermos)
- “Brewing” Indicator (Green)
- “Warning” indicator (Red)

Caution: The Ring Spring must always wedge well in the bottom of the Filter Pan. Otherwise, coffee will overflow from the Filter Pan.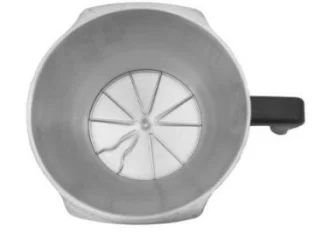
Caution: The spring may lose its elasticity after being used for a while. To expand it a little bit, then it can resume again.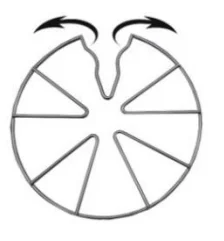
INSTALLATION:
- Place the Machine on a firm and horizontal table.
- Wedge the Spring well and slide the Filter Pan into the position of the machine.
- Pour cold water (no more than 2.2 liters) into the Water Reservoir, wait for 1 minute for the water to force the air out of the Machine.
- Place an empty Glass Decanter, Vacuum Pot, or Thermos at the correct position under the Filter Pan.
- Turn the Switch ON, and the “Brewing” Indicator lights up.
- Hot water starts to flow into the Glass Decanter, Vacuum Pot, or Thermos.
- 4–5 minutes later, the “Brewing” Indicator will turn off; the brewing process has ended.
- You should repeat the above process 2 to 3 times to clean the internal parts of the Machine before brewing coffee for the first time.
- During the above operation, it is normal to hear some hissing and a buzzy sound of water and to see some water vapor coming out.
OPERATION:
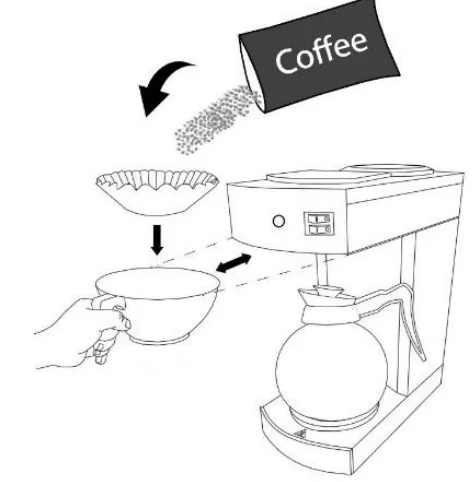
- Assemble the Filter Pan and put the appropriate amount of coffee on a Filter Paper.
- Slide the Filter Pan into position.
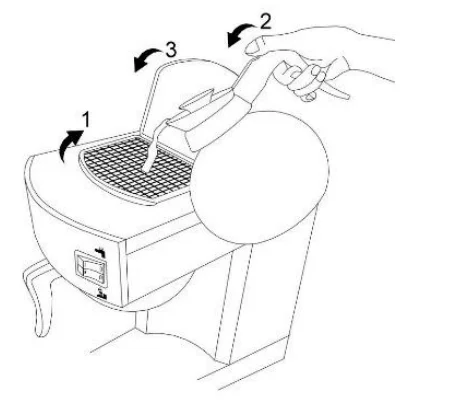
- Pour a pot of cool water into the water tank.
- Place an empty Decanter or Pot at the correct position under the Filter Pan.
- Switch the power ON The “Brewing” Indicator lights up; the process of brewing has begun.

- Coffee starts flowing into the Decanter or Pot.
- When the “Brewing” Indicator light turns off, there is no more coffee flowing out from the unit; a brewing cycle has completed.
- The warmer on the base will continue to heat up until the user turns the switch off.
- For the unit without warmers, please turn the power OFF and lock the cap of the Pot or Thermos. A pot of coffee can now be served.

- Although the machine has an overflow pipe in the Reservoir in case the amount of water in the Reservoir exceeds, the user still should be careful not to let the water exceed 2.2 liters to avoid overflow.
- Since there is always some remaining water in the hoses or boiler of the Machine, if the Machine will not be used for some time or if the Machine needs to be removed, please pour out the remaining water and clean it before storage.
- When the Machine is to be used again after a long period, please repeat steps of Installation steps.
- If the Machine is not to be used for a short time, please clean the Machine with fresh water before using it again.
- When the Warning indicator lights up, it reminds the user to descale in time.
Caution! Remove the Brew Chamber carefully and slowly when it is hot!
Caution! Hot Surface! Do not keep an empty decanter on the Warming Plate.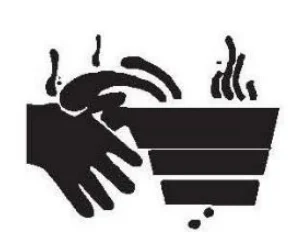
MAINTENANCE:
Cleaning
It is important for the Machine and its accessories to be kept clean after use.
- Unplug the coffee maker and allow it to cool.
- Wipe all external surfaces, including the hotplate, with a damp cloth and dry thoroughly.
- The glass jug, pots, and filter basket should be washed in warm, soapy water, then rinsed and dried thoroughly.
De-sediments
If you operate in a hard water area, we recommend descaling at regular intervals, e.g., every 2–3 months or as required. If the brewing cycle takes longer than usual or the steam condition is higher than normal, it is a signal that descaling is necessary.
- Add 300 ml fresh lemon juice or condensed lemon juice to 1 Liter of warm water (below 50°C).
- Slide the Filter Pan and place an empty decanter or receptacle at the correct position under the Filter Pan.
- Pour the solution of lemon juice into the Water Reservoir and turn the switch ON.
- Some hot water will drop into the decanter or receptacle until the solution of lemon juice pushes out the water remaining in the Machine. When some solution of lemon juice drops into the decanter or receptacle, then turn the switch OFF.
- Wait for 5–6 minutes to enable the rest of the solution to run through with sediments, then turn the switch ON again.
- When the indicator lights off, set the switch OFF and flush the solution away.
- Since some solution will remain in the Machine, we must run the brewing process several times until there is no more smell of lemon juice in the hot water flowing out from the Machine.
- The machine is ready for service again.
Re-setting
In case the brew cycle fails to operate, switch the appliance off and unplug it from the power supply. Remove the rear cover and check to see if you can press the button down on the side of the boiler. If the button is pressed down and clicks, then descale the unit before the next operation. If the problem persists, then contact the Helpline.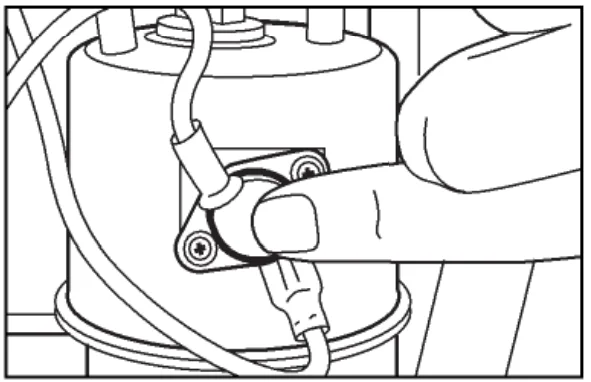
RU/RB series coffee maker
Volt: 220~240Vac, 50~60Hz
Capacity: 24 Cups.
- Water tank
- Function indicator
- Filter Basket
- Hot Plate on base
- Switch on the Hot Plate on top
- Switch for Brewing & Base Hot Plate
- Extra Hot Plate on top
- Decanter/thermos/air pot


Read the instructions before using the appliance.
- This appliance is suitable for commercial use.
- Remain in the vicinity of the machine while the machine is in operation.
- Never immerse the machine in water. If the machine has been soaked, it must be dried and checked by a specialist before using it again.
- Never pour hot water into the Water Reservoir.
- Never pour more than 2.2 Liters of water into the Water Reservoir.
- Do not disconnect the appliance with wet hands, and do not pull the supply cord.
- Only replace the supply cord with the type specified in the instructions. Contact the manufacturer, service agent, or similarly qualified person for further advice.
- When the machine is in use, some parts of the machine are very hot. Ensure the line cord does not touch the hot parts. The user should also be careful not to touch the hot parts.
Installation:
- Place the Machine on a firm and horizontal table.
- Slide the Filter Pan into position.
- Pour cold water (no more than 2.2 Liters) into the Water Reservoir, wait for 2 minutes for the water to force the air out of the Machine.
- Place an empty Glass Decanter at the correct position under the Filter Pan.
- Turn the Switch ON, and the “In Use” Indicator lights up.
- Some hot water starts to flow into the Glass Decanter.
- 5–6 minutes later, the “Indicator” will turn off. The brewing process has ended.
- You should repeat the above process 2 to 3 times to clean the internal parts of the Machine before brewing coffee for the first time.
- During the above operation, it is normal to hear some hissing and buzzing sounds of water and to see some water vapor coming out.
Operation:
- Slide the Filter Pan into position.
- Pour a decanter of cool water into the Water Reservoir.
- Place the empty Glass Decanter at the correct position under the Filter Pan.
- Switch the power ON, the “Indicator” will light up.
- Coffee will start to flow into the Decanter.
- When the “Indicator” light turns off, the brewing cycle has completed.
- Since there will always be some water remaining in the hoses, the boiler, etc., if the Machine will not be used for some time or if the Machine should be removed, you should always pour out the remaining water in the Machine and clean it for storage.
《★》In case the thermostat reaction causes lime build-up, the user must press down and click, then descale the unit before the next operation. The descaling process is as below. If the problem persists, then contact the Helpline to descale. We recommend you use an appropriate…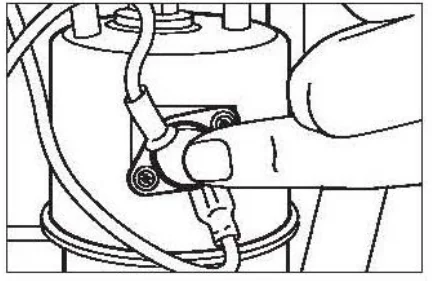
De-scale
In areas of the water boiler, hard water will cause chalk and limestone to accumulate when the machine is used. To keep the Machine in the best condition and ensure each coffee brewing results in the best taste, we recommend that if the Machine has been successively brewed for 200 times or used for 6 months, a descaling operation be carried out as follows:
- Add 300 ml of fresh lemon juice or condensed lemon juice to 1 liter of water.
- Slide the Filter Pan into position.
- Place an empty Decanter at the correct position under the Filter Pan.
- Pour the lemon juice solution into the Water Reservoir.
- Turn the switch ON.
- Some hot water will drop into the jug until the solution of lemon juice pushes out the water remaining inside the Machine, and there is some solution of lemon juice starting to drop into the jug, then turn the switch OFF.
- Wait for 5–6 minutes to enable the rest of the solution to run through with sediments, then turn the switch ON again.
- When the solution of lemon juice is no longer dripping out, set the switch OFF and flush the solution away.
- Since some lemon juice solution will remain in the Machine, please run the brewing process several times until there is no more taste and smell of lemon juice in the hot water flowing out from the Machine.
For More Manuals By Adexa, Visit ManualsLibraryy.
Adexa R-Series Commercial Coffee Brewer-FAQs
How much coffee should I use in a commercial coffee maker?
The standard ratio is 3.25–4.25 oz (92–120 g) of coffee per 64 oz (1.9 L) of water. Keep the showerhead, filter basket, and pots clean to avoid stale flavors.
Do commercial coffee machines need plumbing?
Yes, most commercial brewers require a direct water line. Machines with water reservoirs are usually smaller or home-use models.
What type of water is best for brewing coffee?
Use filtered water with balanced minerals (like calcium and magnesium). Avoid fully distilled water, as it can produce flat-tasting coffee.
Can I use bottled or tap water in the Adexa R-Series?
Bottled water is fine if it contains some minerals. Tap water can be used if it’s filtered to remove chlorine or heavy metals. Avoid distilled water for optimal flavor.
How do I ensure the best espresso extraction?
Follow the 2:1 coffee-to-liquid ratio: for every gram of coffee, aim for 2 grams of espresso in the cup. Extract a double shot in 20–30 seconds for balanced flavor.
What is the ideal TDS for espresso water?
Total Dissolved Solids (TDS) should be 90–150 ppm, providing enough minerals for extraction without affecting taste.
How long do commercial coffee machines last?
With regular maintenance, the Adexa R-Series can last 10–15 years, depending on usage and water quality.
How do I descale and clean the brewer?
Run a cleaning cycle using a descaling solution recommended by Adexa. Regularly rinse the showerhead, filter basket, and pots to prevent coffee oil buildup.
What is the “Golden Rule” for espresso shots?
A double shot should yield 2–2.5 fl oz (60–75 ml) of espresso in 20–25 seconds, ensuring balanced flavor.
What is the 30-second rule for espresso?
Espresso should extract in about 25–30 seconds for a standard 30–60 ml shot to prevent under- or over-extraction.

