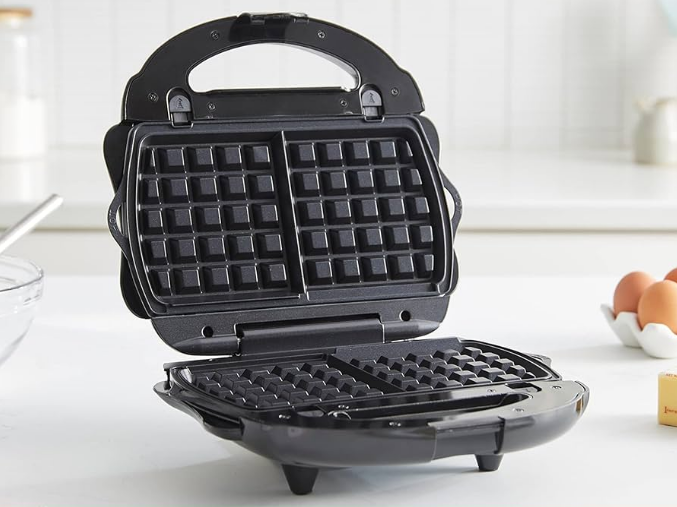
Amazon Basics B0BCPT6JLY 3-in-1 Waffle Maker
IMPORTANT SAFEGUARDS
Read these instructions carefully and retain them for future use. If this appliance is passed to a third party, then these instructions must be included. When using electrical appliances, basic safety precautions should always be followed including the following:
- Read all instructions.
- Do not touch hot surfaces. Use handles or knobs.
- To protect against electric shock, do not immerse cord, plugs, or the main appliance in water or other liquid.
- Close supervision is necessary when any appliance is used by or near children.
- Unplug from outlet when not in use and before cleaning. Allow to cool before putting on or taking off parts,
and before cleaning the appliance. - Do not operate any appliance with a damaged cord or plug or after the appliance malfunctions, or has been damaged in any manner. Return appliance to the nearest authorized service facility for examination, repair
or adjustment. - The use of accessory attachments not recommended by the appliance manufacturer may cause injuries.
- Do not use outdoors.
- Do not let cord hang over edge of table or counter, or touch hot surfaces.
- Do not place on or near a hot gas or electric burner, or in a heated oven.
- Extreme caution must be used when moving an appliance containing hot oil or other hot liquids.
- Do not use appliance for other than intended use.
- Cooking, grilling while the appliance is not closed damages the heating element after some time.
- A short power-supply cord is provided to reduce the risk resulting from becoming entangled in or tripping over
a longer cord. - Extension cords are available and may be used if care is exercised in their use.
- If an extension cord is used:
- The marked electrical rating of the extension cord should be at least as great as the electrical rating of the appliance.
- The longer cord should be arranged so that it will not drape over the countertop or table top where it can be pulled on by children or tripped over unintentionally.
SAVE THESE INSTRUCTIONS
Intended Use
- This appliance is intended for making waffles, sandwiches and grilling food.
- This appliance is intended for household use only.
- This appliance is intended to be used in dry indoor areas only
Appliance Description
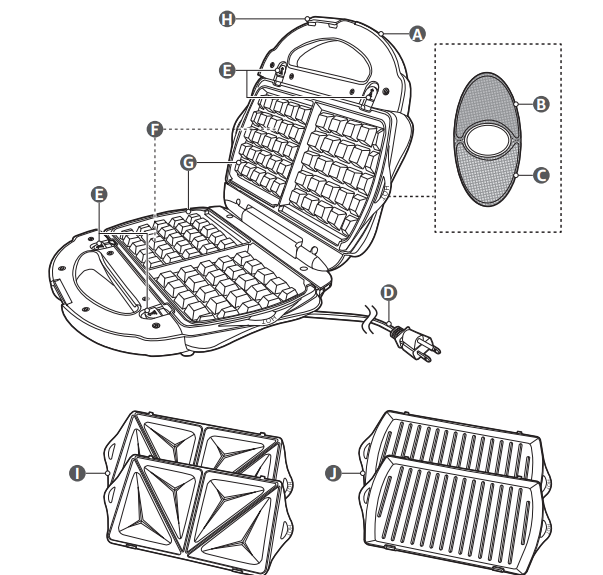
- A Handle
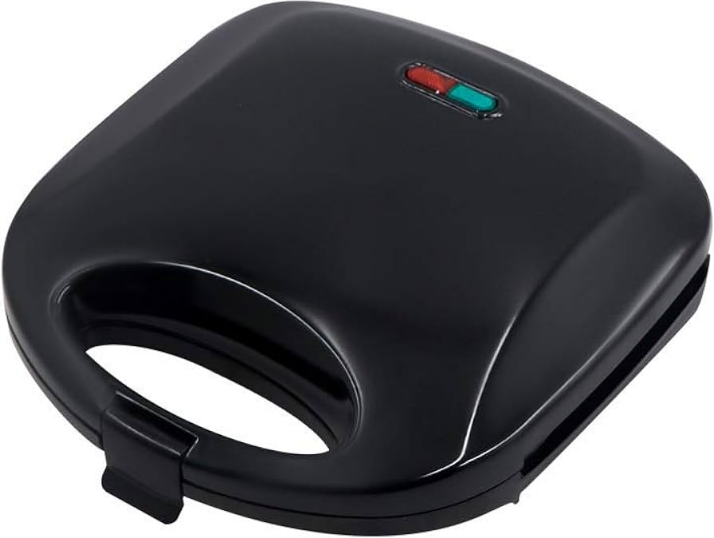
- B Red indicator
- C Green indicator
- D Power cable with plug
- E Plate release switch
- F Heating element (under plate)
- G Waffle iron plate x2
- H Latch
- I Sandwich maker plate x2
- J Grill plate x2
Before First Use
DANGER Risk of suffocation! Keep any packaging materials away from children and pets – these materials are a potential source of danger, e.g. suffocation.
- Remove all the packing materials.
- Remove and review all components before use.
- Check the appliance for transport damages.
- Clean the appliance before first use.
- Before connecting the appliance to the power supply, check that the power supply voltage and current rating corresponds with the power supply details shown on the appliance rating label.
- The appliance may emit a slight smell or smoke when it is first used. This is entirely safe and harmless. Ensure
there is adequate ventilation in the room.
Operation
Attaching/detaching plates
CAUTION Risk of burns! The appliance operates at high temperatures that may cause burns when coming in contact with the skin. If the appliance is recently used and is still hot, unplug the appliance and let the appliance fully cool down before changing the plates (G/I/J).
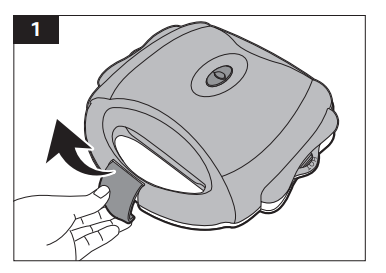
- To attach the plates (G/I/J), unlock the appliance by opening the latch (H) (Fig. 1).
- Open the appliance.

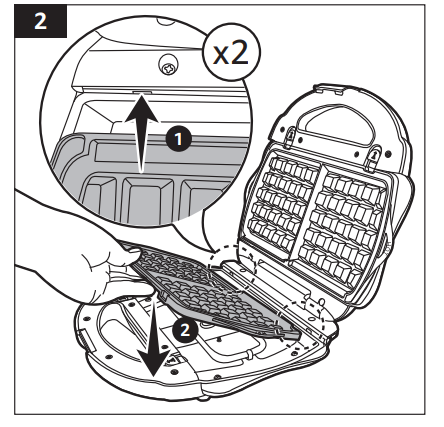
- Insert the tabs on one side of the plate (G/I/J) to the indents on the appliance (Fig. 2).
- Push down on the plate (G/I/J). The plate is attached when 2 clicks are heard (Fig. 2).

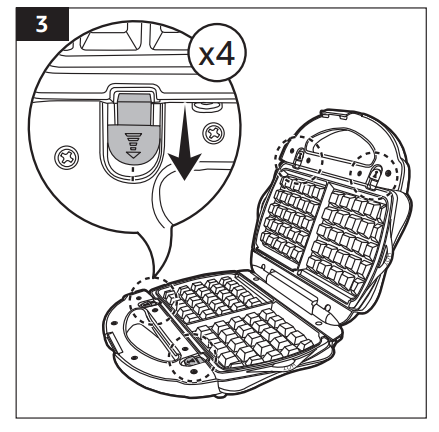
- To detach the plates (G/I/J), slide the plate release switches (E) outwards. The plate (G/I/J) unlocks and can be taken out (Fig. 3).
Making waffles
NOTICE: For recipes and tips on using the appliance, see chapter 10 and chapter 11.
- Attach the waffle iron plates (G) to the appliance then close the appliance with the latch (H).
- Connect the power plug (D) to a suitable power outlet. The red indicator (B) lights up. The appliance is preheating.
- When the appliance is preheated, the green indicator (C) lights up.

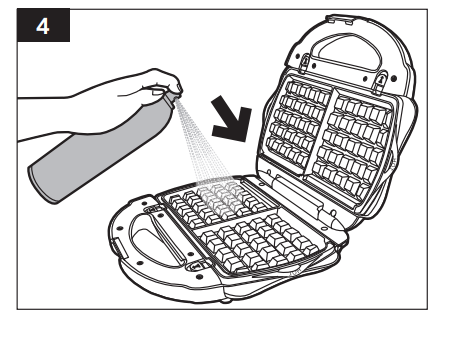
- Open the appliance and lightly spray or apply cooking oil to the waffle iron plates (G) (Fig. 4)

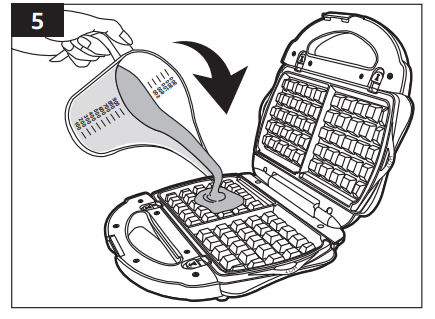
- Pour waffle batter into the center of the bottom waffle iron plate (G) (Fig. 5).
NOTICE Do not overfill the waffle iron plate (G). The waffles may expand while cooking. Overfilling may cause waffle batter to leak out of the seams. Pour less batter in the first batch as a test and adjust the amount of batter accordingly afterwards. - Close the appliance with the latch (H).
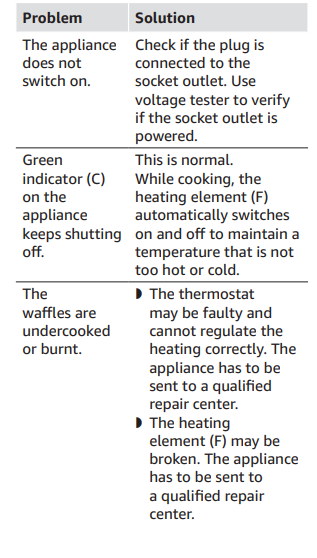
NOTICE It is normal for the green indicator (C) to light up and go off during cooking. - Cooking time may vary from 1.5 – 5 minutes. Let the waffles cook for at least 1.5 minutes before opening to check. If they are not done yet, close and lock the appliance again to continue cooking.
- Cook the waffles until they are done to your preference.
- When the waffles are done, open the appliance and use wooden/silicone cookware to take them out.
- Place the waffles on a wire rack to cool down.
- To continue to make more waffles, repeat steps 4 to 10.
- After use, unplug the appliance from power and let it fully cool down before cleaning.
Making sandwiches
- Attach the sandwich maker plates (I) to the appliance then close the appliance with the latch (H).
- Connect the power plug (D) to a suitable power outlet. The red indicator (B) lights up. The appliance is preheating.
- When the appliance is preheated, the green indicator (C) lights up.

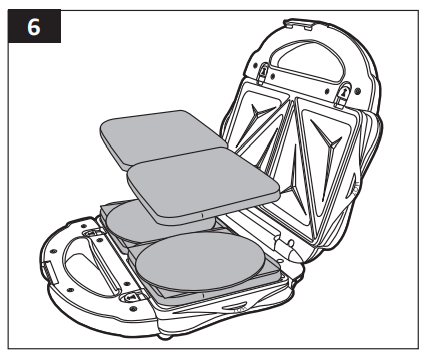
- Place bread on the bottom sandwich maker plate (I) then place on the filling ingredients and top with bread again.
- Close the appliance with the latch (H) (Fig. 6).
NOTICE: It is normal for the green indicator (C) to light up and go off during cooking. - Cooking time may vary from 1 – 2 minutes. Let the sandwich heat up for at least 1 minute before opening to check. If they are not done yet, close and lock the appliance again to continue cooking.
- Heat up the sandwiches until they are done to your preference.
- When the sandwiches are done, open the appliance and use wooden/silicone cookware to take them out.
- Place the sandwiches on a wire rack to cool down.
- To continue to make more sandwiches, repeat steps 4 to 9.
- After use, unplug the appliance from power and let it fully cool down before cleaning.
Grilling food
- Attach the grill plates (J) to the appliance then close the appliance with the latch (H).
- Connect the power plug (D) to a suitable power outlet. The red indicator (B) lights up. The appliance is preheating.
- When the appliance is preheated, the green indicator (C) lights up.
- Open the appliance and lightly spray or apply cooking oil to the grill plates (J).

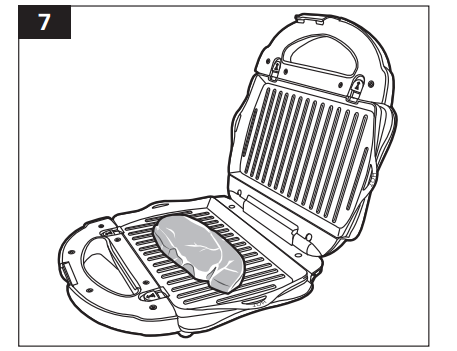
- Place the food on the bottom grill plate (J) (Fig. 7).
- Close the appliance with the latch (H).
NOTICE: It is normal for the green indicator (C) to light up and go off during cooking. - Cooking time may vary depending on the type of food being grilled. Cook the food until it is done to your preference.
- When the food is done, open the appliance and use wooden/silicone cookware to take it out.
- To continue grilling, use a paper towel to wipe away any excess oil on the grill plate (J) then repeat steps 4 to 9.
- After use, unplug the appliance from power and let it fully cool down before cleaning.
Cleaning and Maintenance
![]() WARNING Risk of electric shock!
WARNING Risk of electric shock!
- To prevent electric shock, unplug the appliance before cleaning.
- During cleaning do not immerse the appliance in water or other liquids. Never hold the appliance under running water.
Cleaning
![]() CAUTION Risk of burns!
CAUTION Risk of burns!
Let the appliance fully cool down before removing the plates (G, I, J) for cleaning.
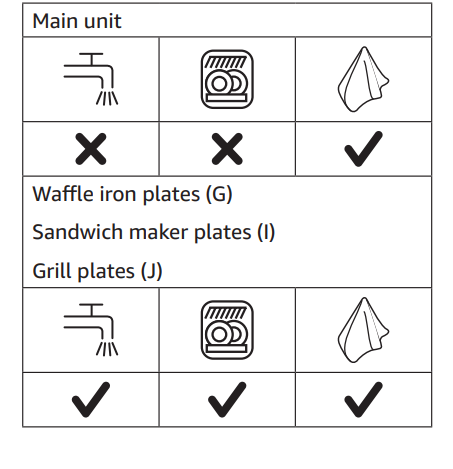
- To clean the appliance, wipe with a soft, slightly damp cloth.
- Wipe the appliance dry after cleaning.
- Never use corrosive detergents, wire brushes, abrasive scourers, metal or sharp utensils to clean the appliance.
- The plates are dishwasher safe and can be cleaned in a dishwasher
Storage
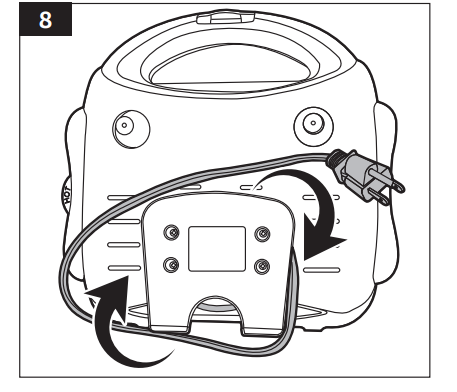
- Store the power cable (D) by winding it around the cable storage located at the back of the appliance (Fig. 8).
- Store the appliance in its original packaging in a dry area. Keep away from children and pets
Specifications
- Rated voltage 120 V~, 60 Hz
- Rated current 700
- Type of protection Plug with ground pin
- Net weight (without plates) approx. 3.46 lbs (1.5 kg)
- Waffle plates 0.88 lbs (399.2 g)
- Sandwich plates 0.58 lbs (264.2 g)
- Grill plates 0.72 lbs (326.5 g)
- Dimensions (W x H x D) approx. 11 x 4.3 x 10″ (28 x 11 x 25.4)
Frequently Asked Questions
Feedback and Help
We would love to hear your feedback. To ensure we are providing the best customer experience possible, please consider writing a customer review.If you need help with your Amazon Basics product, please use the website or number below. amazon.com/gp/help/customer/contact-us +1 877‑485‑0385
Recipes
Traditional waffles
- Ingredients (6-10 pieces):
- 1 cup milk
- 3 egg
- 7 big spoons vegetable oil
- 1 big spoon sugar
- 1.75 cup flour
- 2 teaspoons baking powder
Preparation
In a medium mixing bowl place in the dry ingredients. In a separate bowl, whip the egg whites to hard peaks. Add the egg yolks, vegetable oil and milk to the dry ingredients and mixing until thoroughly combined with no lumps. After that, gently stir in the whipped egg whites into the batter.
Crispy waffles
- Ingredients (6-10 pieces):
- 200 ml cold water
- 200 g flour
- 300 g butter (40% fat)
Preparation:
In a medium mixing bowl, mix the flour and water together. In a separate bowl,whip the butter until stiff, then add it to the flour and water mixture. Then thoroughly combine the mixture until there are no lumps
Tips
- The waffle mixture should be fairly thick. Use enough mixture to ensure it fills the baking surfaces.
- When made, do not pile the waffles on top of one another, otherwise they may soften. Place them on a wire rack to cool down and then sprinkle with icing sugar.
- If you prefer crispy waffles, substitute the milk with water. Milk makes waffles softer and darker in color.
- Use only best quality flour.
- If the waffles are spotty, perhaps the ingredients use were of different temperature. To ensure a consistent color and result, take all ingredients out of the refrigerator an hour beforehand.
- It is recommended to use very soft butter, and that the ingredients are thoroughly mixed.
- A lot of sugar also makes waffles darker.
- Do not use too much baking powder. Waffles need only a little or try leaving it out altogether.
- f the mixture is too thin, try adding a few fine bread crumbs.
- Waffle are at their best when eaten warm . If you want to store them, use a mixture with a higher fat content and allow them to cool down before storing in an air-tight container. Or store in the deep freezer.
- All types of waffles can be made, but before experimenting, gain some experience preparing basic recipes first.
For more Manuals by Amazon, visit ManualsLibraryy
How do I use the waffle maker for the first time?
Before first use, wipe the plates with a damp cloth and dry thoroughly. Then, to season the non-stick surface, preheat the iron, lightly coat the plates with cooking oil or spray, and let it heat for a few minutes. This initial seasoning helps prevent sticking.
Do I need to grease the plates before each use?
Yes. For best results and to ensure your waffles release easily, apply a light coating of cooking spray, vegetable oil, or melted butter to the plates before preheating for each batch. Avoid using aerosol sprays with lecithin, as they can damage the non-stick coating over time.
How long do I preheat the waffle maker?
Preheating is crucial for crispy waffles. Allow the iron to preheat for at least 5-10 minutes until it reaches the desired temperature. Most models have an indicator light (usually red) that signals when it’s heating and another (usually green) that signals when it’s ready.
How much batter should I use?
A good starting point is about ¾ cup of batter, poured directly onto the center of the bottom plate. The amount may vary depending on the waffle plate style (Belgian vs. traditional). The batter will spread naturally toward the edges when you close the lid. Avoid overfilling to prevent batter from leaking out the sides.
How long does it take to cook a waffle?
Cooking time typically ranges from 3 to 8 minutes, with an average of 5-6 minutes. The exact time depends on your recipe, batter thickness, and desired crispness. A good rule is to wait until steam stops escaping from the sides of the iron. Do not open the lid prematurely to check.
Can I use pancake mix in a waffle maker?
Yes, but for the best texture, modify the mix. To make pancake mix more suitable for crispy waffles, add an extra tablespoon of oil or melted butter per cup of dry mix. This adds fat, which helps achieve a crisp exterior.
Can I make the batter the night before?
Absolutely. Preparing batter the night before can actually improve the flavor and texture. Simply cover the bowl and refrigerate it overnight. For best results, give it a gentle stir before using. Let it sit at room temperature for 10-15 minutes before cooking if it’s very cold.
What’s the secret to making fluffy waffles?
The key is to avoid overmixing the batter; lumps are okay. For extra fluffiness, separate the eggs. Whisk the yolks into the wet ingredients, whip the whites to stiff peaks, and then gently fold them into the combined batter at the very end.

