Aqara Smart Doorbell Camera Hub G410
Product Introduction
The Doorbell Camera Hub G410 is a newly launched, upgraded doorbell product by Aqara. It consists of an outdoor doorbell and an indoor chime. The doorbell activates via radar, which effectively reduces the false activation issue caused by traditional PIR in outdoor environments. The doorbell lens has been upgraded to a 176° ultra-wide-angle field of view, the image sensor aspect ratio is 4:3, and the vertical field of view is improved.
The camera features an upgraded 3MP resolution for sharper video clarity, complemented by ten 940nm non-intrusive infrared lights to significantly enhance night vision performance. The doorbell has a built-in face recognition algorithm running locally (within the doorbell itself), which can mark and identify the identity of visitors. The indoor chime is also a Zigbee/Thread dual-protocol hub, which can connect to other Aqara smart devices. The wireless connection between the chime and the outdoor doorbell is 10 meters, allowing for versatile placement in the home.
The doorbell is powered by 6 AA batteries, a 12-24V AC-AC power supply, or an AC-DC power supply. In addition to being able to connect to the Aqara Home App for smart linkage, this product can also be connected to third-party ecosystem platforms such as Apple HomeKit for cross-ecosystem convenience.
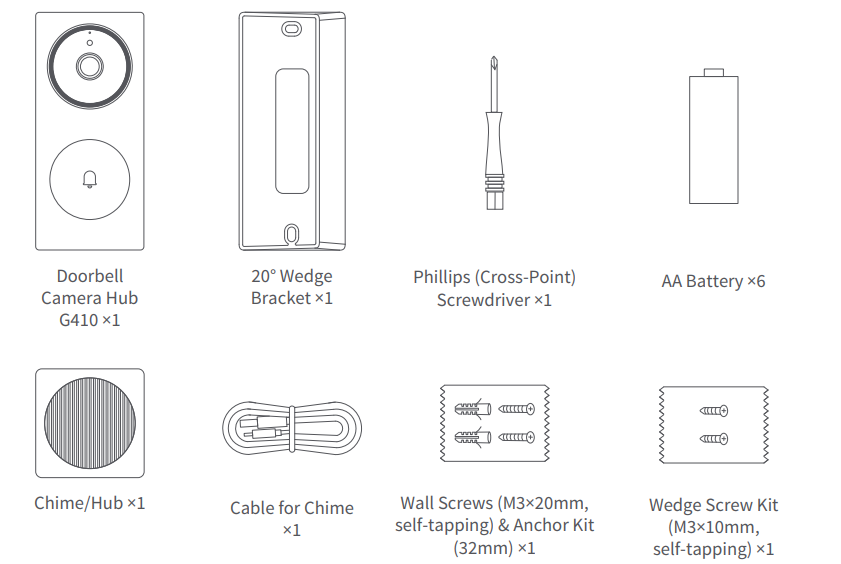
Packing List
Outdoor Doorbell
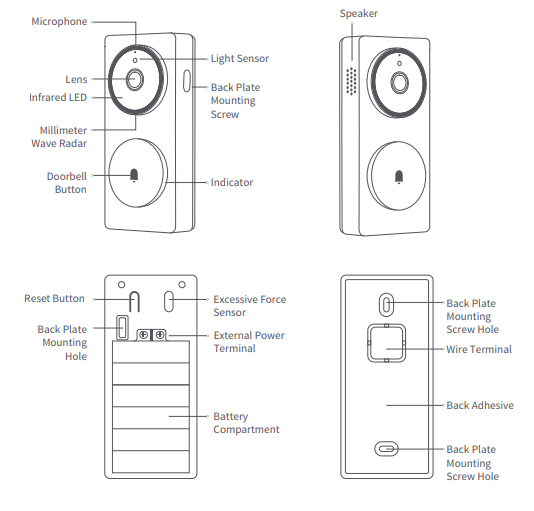
Description of the function buttons:
- Doorbell Button: Press to make the doorbell and chime ring.
- Reset Button: Long-press for 10 seconds to restore the factory settings.
- Excessive Force Sensor: When the sensor detects excessive pulling force, it will trigger an alarm to sound and push an alarm message (this function takes effect after it is turned on, and this function is turned off by default)
Indoor Chime
Description of the Menu button:
- Short-press once: Turn off the bell/alarm sound.
- Long-press for 10 seconds: Reset the network and unbind the device.
- Press 10 times quickly: Restore the factory settings.
Product installation
1. Select the installation location
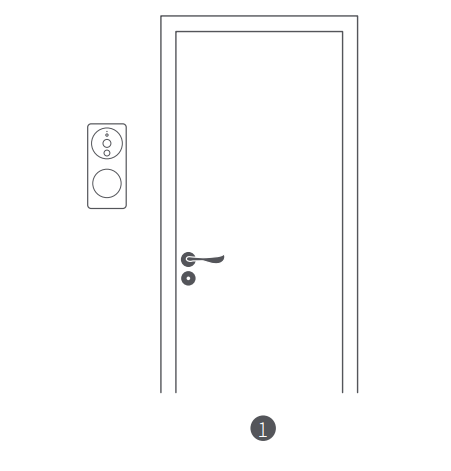
As shown in the figure below, it is recommended to install the Doorbell on an outdoor wall or door. If the door is metal, it is advisable to install the Doorbell on the wall next to the door. The suggested installation height is 1.4–1.5 meters from the ground. The recommended installation position for the Indoor Chime/Hub is within a horizontal distance of ≤10 meters from the wall of the entrance door to ensure a strong wireless connection to the Doorbell. The linear distance between the Chime/Hub and the wireless router should be within 20 m.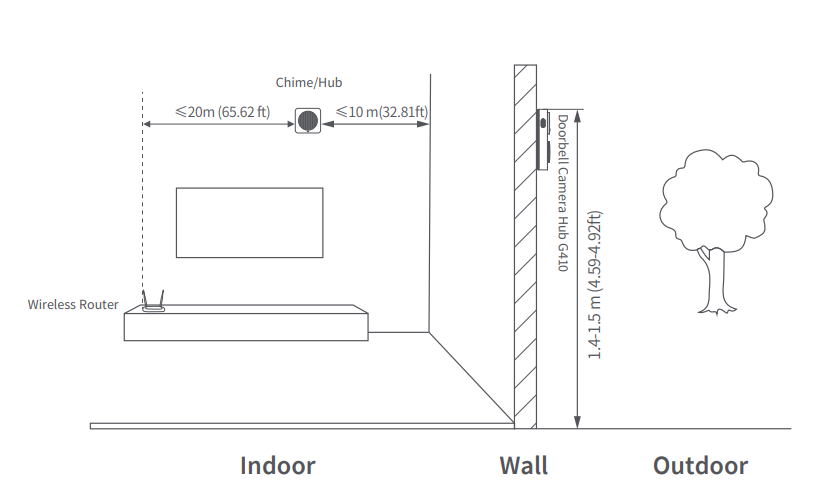
2. Select the power supply mode
The outdoor unit supports two power supply modes: battery or external power supply. Please make your choice based on the actual conditions at the door. The specific operation is as follows:
1) Battery power: Refer to the following steps and schematic diagrams.
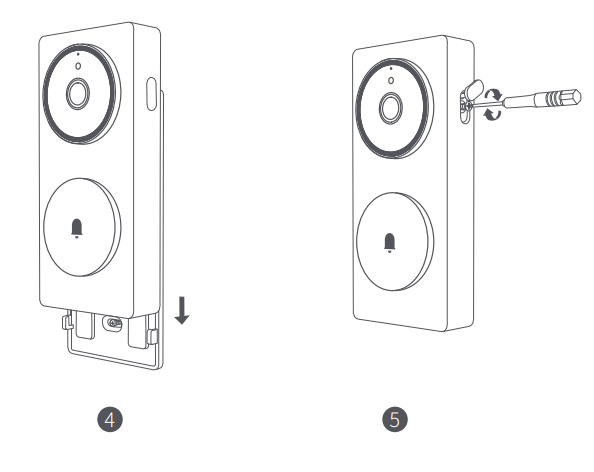
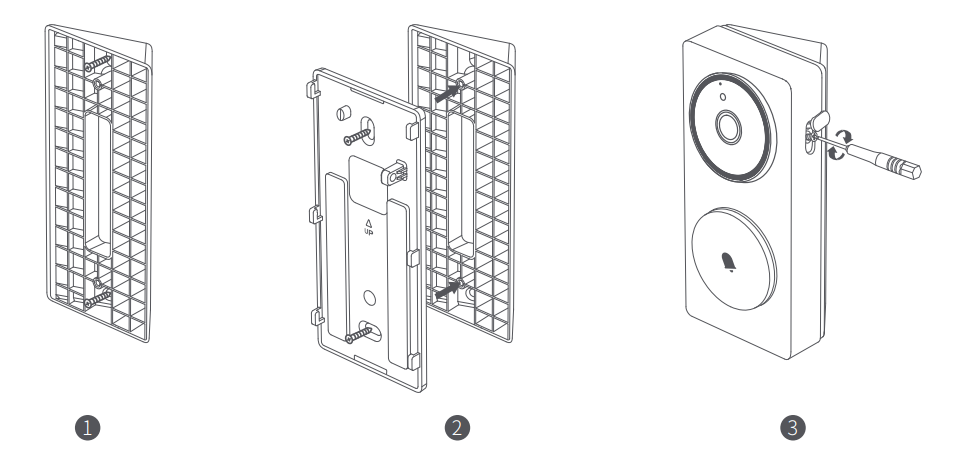
- When using it for the first time, please use the Phillips (cross-point) screwdriver in the accessories to loosen the screws on the lateral side, then hold the doorbell, and slide the back plate down to take it out.
- Install the batteries according to the positive and negative poles marked in the battery compartment (please install the batteries after the Chime/Hub is connected to the network, according to the requirements in the chapter “Connecting the Device”).

2) External power supply: If an external power supply is used, please do the following when connecting the back plate:
- Use appropriate tools to remove the wire entry hole cover from the backplate.
- Feed the power cord through the wire entry hole.
- Connect the power cord to the external power terminal of the doorbell and securely tighten the screw. Ensure proper insulation to avoid any risk of a short circuit.

3. Select an installation method for the outdoor doorbell.
The back plate can be fixed in the following two ways:
Method 1 (adhesive installation method).
The adhesive method is suitable for installing on wooden doors, ceramic tile walls, and other materials that are inconvenient to punch holes in. The installation steps and schematic diagrams are provided below:
- To prevent installation misalignment of the Doorbell from affecting the image display, please ensure that the Doorbell is aligned correctly in both horizontal and vertical directions, as shown in Figure 1, before installation.

- Remove the adhesive protection paper, stick the back plate on a flat and clean wall or door, and press it firmly to the surface to ensure that the back plate will not fall off.
- Slide the Doorbell onto the backplate from top to bottom along the guide track until it fully locks into place and overlaps securely.
- Use a Phillips (cross-point) screwdriver to fix the screw on the right side of the Doorbell and secure the silicone waterproof cover.

Method 2 (Screw Installation Method)
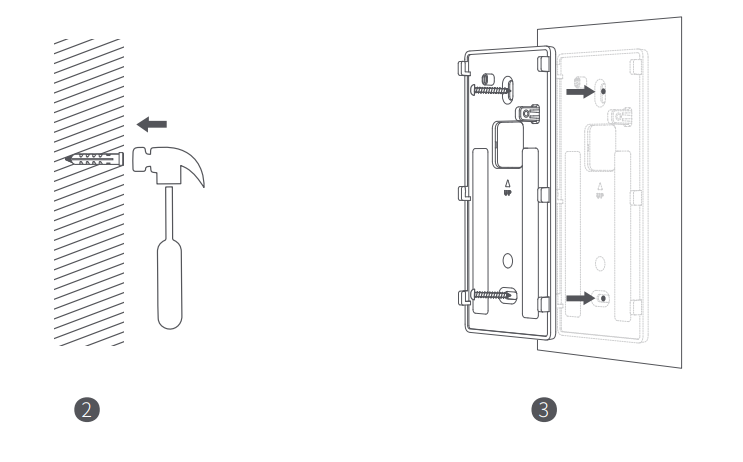
- Align the wall-mounted back plate to whichever surface you want to mount it to; mark the drilling positions based on the screw holes on the bracket, then use a 6mm diameter drill bit to drill holes into the wall to a depth of more than 32mm.

- Insert the wall anchor from the accessory package into the drilled hole using a hammer, ensuring it is flush with the surface.
- Use the self-tapping screws from the accessory package to mount the wall bracket on the wall.

- Slide the Doorbell onto the backplate from top to bottom along the guide track until it fully locks into place and overlaps securely.
- Use a Phillips (cross-point) screwdriver to fix the screw on the right side of the Doorbell and secure the silicone waterproof cover.

Method 3 (Adding a 20° Steering Bracket)
When the doorbell is installed on both sides of the door, the lens orientation can be adjusted by adding an oblique triangular bracket from the accessories kit. The specific operations are as follows:
- Install the triangle bracket on the wall first, and secure it with screws.
- Then use screws to lock the back plate of the doorbell on the triangular bracket.
- Finish the installation by fastening the screws, and then mount the Doorbell onto the backplate to complete the setup.

4. Installing the indoor Chime/Hub
The indoor Chime/Hub can be placed on a platform or attached to the wall with adhesive. Refer to the following steps and schematic diagrams for installation:
- Remove the adhesive protection paper, stick the Chime/Hub on a flat and clean surface, and press it once, firmly, after placing it to ensure that the product will be secured in place.
- Plug the Type-C power cord into the device to power it on, and confirm that the indicator lights turn on normally, signifying that the device has turned on normally.

Connecting the Device
- Download the App. Search for “Aqara Home” in the Apple App Store, Google Play, Xiaomi GetApps, Huawei App Gallery, or scan the QR code below to download the Aqara Home app.

- Add the Doorbell Camera Hub G410 in the Aqara app. Please first power on the Chime/Hub and ensure that your phone is connected to the Wi-Fi network that the doorbell is about to connect to. When the status indicator light of the Chime/Hub flashes yellow, open the Aqara Home App, and the doorbell will be automatically discovered and displayed on the app. Click on the discovered device and follow the app’s instructions to connect the device. Alternatively, click on the “+” icon in the upper right corner of the App’s homepage and select “Doorbell Camera Hub G410” to connect it to the App. After a successful connection, the indicator light on the Chime/Hub will remain on with a solid blue light.
- The outdoor doorbell and Chime/Hub are paired before leaving the factory and cannot be unpaired by the user. They cannot be mixed with other doorbells.
- Connect the Chime/Hub to your home’s Wi-Fi network and connect it to the Aqara App. After the outdoor doorbell is powered on, it will automatically connect to the Chime/Hub.
- If the Chime/Hub fails to connect to the network after 10 minutes of being powered on, the device will enter a cut-off state indicated by a solid white light. To restart the network, please unplug the power and reconnect, or long-press the function key for 10 seconds to reset the network. When the indicator light turns yellow and flashes rapidly, you can reconnect to the network.
- When connecting to the network, please keep your phone as close as possible to the Chime/Hub and ensure that it is connected to the same Wi-Fi network that the Chime/Hub will connect to.
- Access Apple HomeKit. Open the Apple “Home” app. Click the “+” in the upper right corner to go to the Add Accessories page. Scan or manually enter the HomeKit setting code at the bottom of the Chime/Hub (HomeKit QR code), and bind the device to HomeKit. Common reasons for HomeKit setup failure: A prompt stating “No accessories can be added”. The error message cached in the iOS system cannot be resolved due to repeated failures to add a device. Restart the iOS device(iPhone or iPad) and reset the Chime/Hub before trying again. A prompt stating that “accessories have been added”. Please restart the iOS device and reset the Chime/Hub, and then add the doorbell by manually entering the HomeKit pairing code. A prompt stating that “no accessories are found”. Please reset the Chime/Hub. Wait for 3minutes, and then manually enter the HomeKit pairing code to add it again.
- Bind sub-devices. The indoor chime is a Zigbee hub and supports connecting Thread sub-devices. Please add sub-devices according to the requirements of the sub-device’s manual and App guidance.
- Other functions. For more device functions, please log in to the Aqara Home app
Indicator status:

Specifications
Doorbell Camera Hub G410
- Model: CH-C09E/CH-C09D
- Video Resolution: 2048×1536
- Viewing Angle: 175°(diagonal)
- Wireless Protocols: Wi-Fi IEEE 802.11 b/g/n 2.4 GHz
- Battery: 6 * LR6 AA Alkaline Batteries
- Wired Input: 12V-24V AC 0.2A 50/60Hz or 12V-24V DC 0.5A
- Operating Temperature: -18°C~50°C (-0.4°F~ 122°F)
- Operating Humidity: 0~95% RH, no condensation
Chime/Hub
- Model: CH-C11E/CH-C11D
- Loudspeaker Power: 2W
- Wireless Protocols: Wi-Fi lEEE 802.11 a/b/g/n/ac 2.4/5 GHz, Zigbee/Thread IEEE 802.15.4
- Bluetooth
- Power Port: USB-C
- Input: 5V 1A
- Local Storage: MicroSD card (not included). CLASS 10 or above is supported, up to
- 512GB storage.
- OperatingTemperature: 0°C~40°C (32°F~ 104°F)
- Operating Humidity: 0~95% RH, no condensation
- Power Consumption: Networked standby mode: ≤ 2.0 W
- Time to Enter the Condition: Networked standby mode: ≤ 20 min
Notes
- When installing the device with adhesive backing, it is necessary to ensure that the installation surface is smooth and clean, and the adhesive has sufficient contact area with the installation surface. The best surface materials for installation are glass, ceramic tile, marble, and latex paint.
- The external power supply can’t charge the batteries in the battery compartment. When the batteries are installed and the device is connected to an external power supply, the Doorbell will use the external power supply. When a DC power supply is used as an external power supply, the power terminals do not distinguish between positive and negative poles, and both terminals can be connected to positive or negative poles. Please ensure there are no short circuits between the terminals.
- When the batteries are used for a power supply, the Doorbell defaults to low power consumption mode, and it will automatically enter sleep mode when there is no ringing or other triggering sources. Only when someone stays or rings the bell will it activate, and the battery life is directly related to the actual activation frequency. When an external power supply is used, the Doorbell will always be active and will not enter sleep mode. Please use LR6 AA batteries. The mixed use of new and old batteries will seriously affect the operating time and safety of the Doorbell. Each time you replace the batteries, please ensure all six batteries are brand new.
- Warranty is not given if the tamper-evident label attached to the screw inside the battery compartment is torn, damaged, or destroyed. The Doobell can only be paired with the Chime/Hub it is shipped with, and vice versa. Confirmation can be made through the HomeKit QR codes at the bottom. After-sales services require a full set of returns.
Ways for the doorbell to enter standby mode:
- When the doorbell’s radar sensor detects no approaching targets, it will automatically enter standby mode.
- Log in to the app, go to the doorbell’s function settings page, and change the doorbell’s working mode to “Power Saving Mode.” The doorbell will continue to operate in standby mode.
Notice
Use of the Works with Apple badge means that an accessory has been designed to work specifically with the technology identified in the badge and has been certified by the developer to meet Apple performance standards. Apple is not responsible for the operation of this device or its compliance with safety and regulatory standards.
A 10-day recording history from your Doorbell Camera Hub G410 is securely stored in iCloud and available to view in the Apple Home app on your iPhone, iPad, or Mac. You can add one camera to a 50GB plan, up to five cameras to a 200GB plan, or up to an unlimited number of cameras to a 2TB plan at no additional cost.
Camera recordings don’t count against your iCloud storage limit. Communication between iPhone, iPad, Apple Watch, HomePod, HomePod mini, or Mac and the HomeKit-enabled Doorbell Camera Hub G410 is secured by HomeKit technology. Apple, Apple Watch, HomeKit, HomePod, HomePod mini, Siri, iPad, iPad Air, and iPhone are trademarks of Apple Inc., registered in the U.S. and other countries.
Online Customer Service: www.aqara.com/support
Manufacturer: Lumi United Technology Co., Ltd.
Address: Room 801-804, Building 1, Chongwen Park, Nanshan iPark, No. 3370, Liuxian
Avenue, Fuguang Community, Taoyuan Residential District, Nanshan District,
Shenzhen, China.
Email: [email protected]
Made in China
For More Manuals By Aqara, Visit ManualsLibraryy.
Aqara Smart Doorbell Camera Hub G410-FAQs
What is the Aqara Doorbell Camera Hub G410 Select?
The Aqara G410 is a 2K smart video doorbell that also functions as a Zigbee hub, Thread Border Router, and Matter controller. It works with Apple HomeKit, Alexa, and Google Home, offering radar detection, local face recognition, flexible storage, and reliable alerts.
What are the key features of the Aqara G410?
It includes a 2K ultra-HD wide-angle camera, 95dB built-in chime, dual-band Wi-Fi (2.4GHz & 5GHz), WPA3 security, mmWave radar detection, and smart home hub functions for seamless device integration.
What power supply does the Aqara G410 require?
The doorbell uses a 12V 1A DC power supply (12W). It can also run on six LR6 alkaline AA batteries, which should be replaced together for best performance.
Does the Aqara G410 need a subscription?
No subscription is required. It supports up to 512GB MicroSD cards for 24/7 recording and offers free 7-day cloud storage, with optional upgrades for extended cloud plans.
What is the video resolution of the Aqara G410?
When connected to the Aqara Home app, it supports up to 1536p resolution. In Apple HomeKit, the resolution is limited to 1600×1200p due to platform restrictions.
Is the Aqara G410 compatible with Wi-Fi and smart assistants?
Yes. It supports both 2.4GHz and 5GHz Wi-Fi networks and works with Apple HomeKit, Amazon Alexa, and Google Home for easy control and automation.
How does the hub function of the G410 work?
As a smart hub, the G410 lets you connect and control multiple devices, including lights, thermostats, locks, and sensors, all from one interface with real-time notifications and scheduling.
Is the Aqara Doorbell Camera G410 secure?
Yes. Aqara provides advanced encryption, secure local and cloud storage, and privacy-focused features to keep your data and recordings safe.

