Arlo Essential Wire-Free Video Doorbell
1. Get to Know Your Doorbell
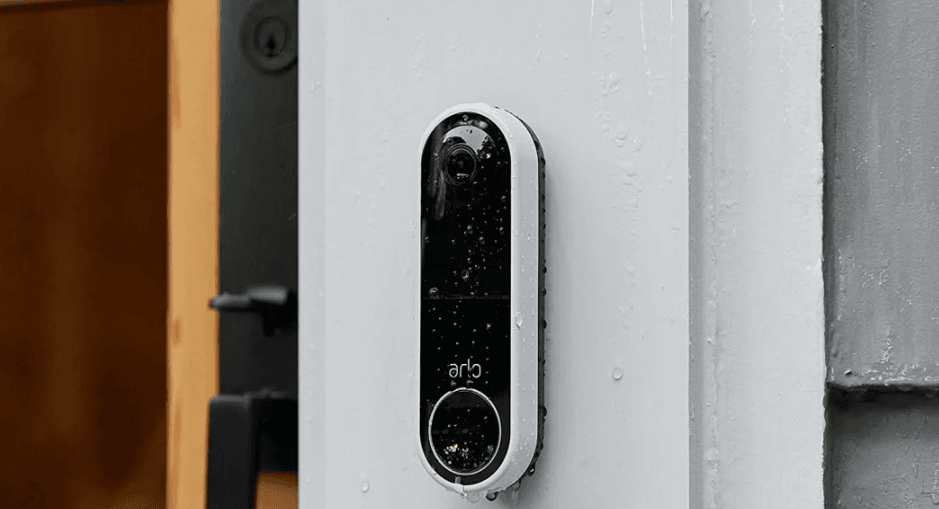
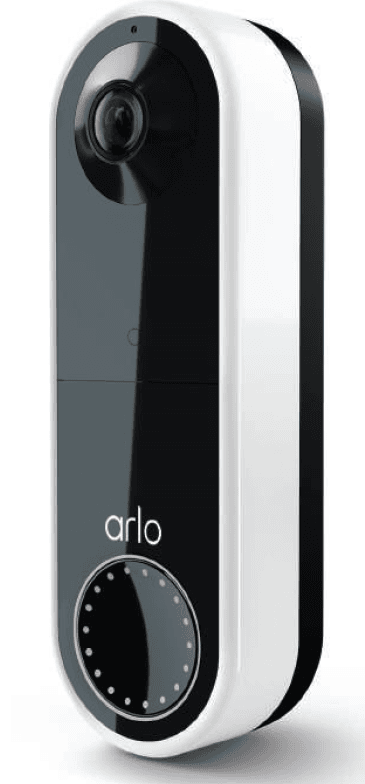
A better way to see the complete picture at your door. Your Arlo Essential Wire-Free Video Doorbell can be powered by a rechargeable battery or hardwired. Connect directly to WiFi for easy setup. When motion is detected, receive notifications and view live video from your phone. See what’s at the door, from head to toe or a package on the ground during the day or in low light with night vision, without opening your door. Speak to visitors with two-way audio or use pre-recorded quick reply messages when you’re busy.
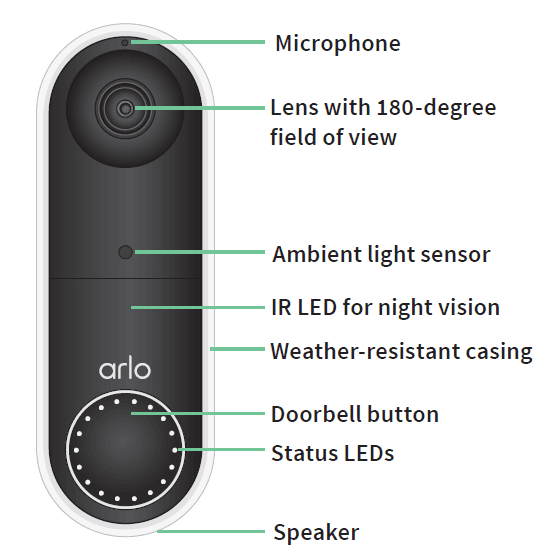
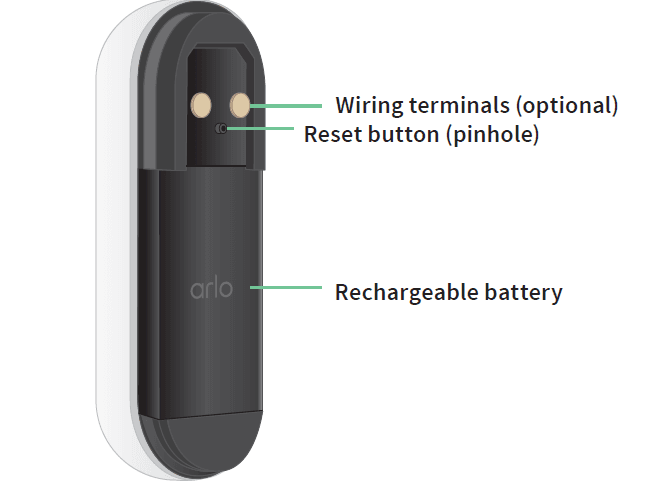
If you choose to wire your doorbell
The wire-free Arlo Essential Doorbell comes with a rechargeable battery, which provides power to the doorbell. Wiring is not required for installation. If you want to hardwire your wire-free Essential Video Doorbell, you can.
The voltage must be 8 – 24VAC. If you want to install or upgrade a transformer, contact a licensed electrician or visit arlo.com for information about installation services. For more information about optional wiring, see 3. Optional: Connect a wired chime on page 22.
Get the Arlo Secure App
Download the Arlo Secure App. The Arlo Secure App lets you create an Arlo account in the cloud and set up and manage all your Arlo devices.
Features
- See more at your front door. See a person from head to toe or a package on the ground with a 180 degree diagonal viewing angle optimized for the front door.
- Security in the palm of your hand. Receive notifications when motion is detected and watch live streaming video from your smartphone or tablet.
- More ways to answer. See and speak to visitors with clear two-way audio, or respond with pre-recorded quick reply messages when you’re busy. Receive a video call when your doorbell is pressed and never miss a visitor.
- Night Vision. See who’s at your door at night, even without a light on.
- Multiple powering options. Install without wires using the rechargeable battery, or hardwire to existing wiring for continuous charging.
- Notifications that matter. Get alerts when your Video Doorbell spots people, vehicles, animals or a package with Arlo Secure1.
- Built-in smart siren. Trigger your siren automatically, or manually from the Arlo Secure App.
- Visitor messaging. Guests can leave you a voice message if you’re unable to answer the door, and you can listen remotely at your convenience.
- Direct to WiFi. Connects directly to WiFi for simple setup.
Do more with Arlo
You can add these options:
- Arlo Chime 2. The Arlo Chime 2 may be included with your Essential Wire-Free Video Doorbell, or sold separately. Your Chime 2 lets you receive instant alerts from your wire-free Essential Video Doorbell and your Arlo cameras. For more information, see Chapter 3. Arlo Chime 2 on page 18.
- Add more Arlo cameras and devices. Cover more areas in and around your home by adding cameras, security lights, and more.
- Upgrade your Arlo subscription. For more information, visit What are the available Arlo subscription plans and how much cloud recording is available?.
2. Get Started
Charge the battery before installation
Your Essential Wire-Free Video Doorbell comes with a rechargeable battery. We recommend that you charge the battery to 100% before you install the doorbell. For help with recharging the battery aft er installation, see Replace battery/umounting on page 15.
Warning: Do not leave the doorbell outdoors without the battery installed. Doing so can result in water intrusion into the doorbell.
To charge the battery before installation:
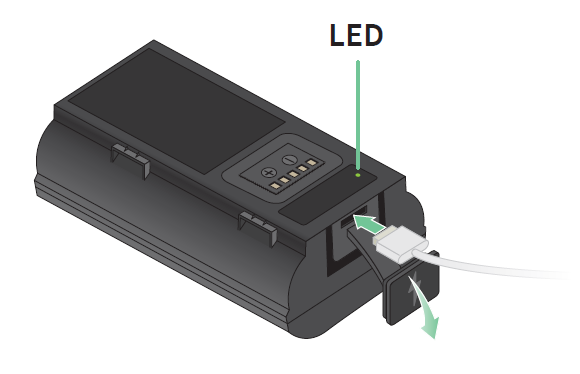
- Connect the rechargeable battery to the USB charging cable that came in the package. The charging cable works with most power adapters.
- Charge the battery to 100%. The battery LED lights red during charging, then turns green when the battery is fully charged.
Note: If you haven’t installed your doorbell yet, we recommend that you wait to insert the battery into the doorbell until you are ready to follow the steps in the Arlo Secure App to install and set up your doorbell.
Use the Arlo Secure App for installation and setup
You must use the Arlo Secure App to install and set up your Essential Wire-Free Video Doorbell. The Arlo Secure App guides you through installation and setup:
- Create your Arlo account. You use the same account to manage all your Arlo devices.

- Follow the instructions in the Arlo Secure App to install and set up your doorbell.
Once you set up your Arlo account, you can access it by using the Arlo Secure App on a smartphone or tablet, or from a computer using a web browser. If you’re using a computer, enter https://my.arlo.com/#/login in the address bar of the browser.
Tips for optimal WiFi performance
The distance between WiFi devices can affect the WiFi signal:
- Maximum recommended distance. Place your WiFi router within range of your doorbell. The maximum line-of-sight range of your WiFi router is reduced by each wall, ceiling, or other major obstruction between the doorbell and the router.
- Minimum recommended distance. To reduce WiFi interference, allow at least 6½ feet (2 meters) between your doorbell and any Arlo cameras that you install.
These materials can reduce WiFi signal strength if they are located between WiFi devices:
- Unusually thick walls and ceilings
- Brick
- Concrete
- Stone
- Ceramic
- Glass, especially mirrors
- Metal Large quantities of water, such as the water in a fish tank or water heater.
Connect your mobile device to a 2.4 GHz WiFi network during setup
If you’re connecting your Essential Wire-Free Video Doorbell directly to your router’s WiFi network, it’s important to understand that your mobile device must connect to the same WiFi network as the doorbell during setup.
Your doorbell can only connect to a 2.4 GHz WiFi network. Many routers broadcast WiFi networks in both 2.4 GHz and 5 GHz bands, so your phone might connect to the 5 GHz WiFi band. During setup, connect your phone to your 2.4 GHz WiFi network, then connect your Video Doorbell to that same 2.4 GHz WiFi network.
Find your 2.4 GHz WiFi network name and password
Your phone might connect to your 5 GHz WiFi network most of the time. If you’re not sure about how to find the 2.4 GHz WiFi network:
- Look on your WiFi router label. Many routers have a label that shows the WiFi network name, which is also called an SSID. Your 2.4 GHz network name might have a 2, 2.4, or 2G at the end. Your 5 GHz network name might have a 5 or 5G at the end. If you changed your WiFi settings, then check the place where you saved your custom settings.
- If your WiFi network name or SSID doesn’t indicate whether it’s 2.4 GHz or 5 GHz, ask your Internet service provider (ISP) or the person who set up your WiFi router.
- If you have a mesh WiFi network, it uses only one WiFi network name for both WiFi bands. The doorbell finds and connects to the 2.4 GHz WiFi band. As long as you connect your phone to the same mesh network, Arlo can discover the doorbell.
Connect your iOS (Apple) device to a 2.4 GHz network
- Unlock your device and tap Settings.
- Tap Wi-Fi, near the top of the list of Settings options.
- Turn on WiFi by tapping the switch next to Wi-Fi at the top.
Note: WiFi is activated when the switch is green. - Select a 2.4 GHz WiFi network. This is commonly indicated by a 2, 2.4, or 2G at the end of the network name.
- If prompted, enter the password for the network. When you’re connected to the WiFi network, a blue check mark appears to the left of the network name.
Connect your Android device to a 2.4 GHz network
- Unlock your device and tap Settings.
- Tap Network & Internet > Wi-Fi.
- Turn on WiFi by tapping Use WiFi at the top.
- Select a 2.4 GHz WiFi network. This is commonly indicated by a 2, 2.4, or 2G at the end of the network name.
- If prompted, enter the password for the network. When you’re connected to the WiFi network, the word Connected appears under the network name.
Doorbell LED
The LED is on the outside of your doorbell and indicates how the doorbell is operating. This section describes how the LED works if you didn’t change the default LED settings. For information about changing the LED behavior, see Control the LED on page 30.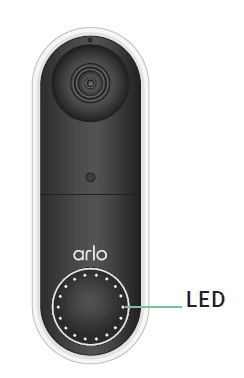
The LED behaviors on your doorbell vary, depending on whether you have set it up.
LED behavior during setup
- Off . The battery is not in the doorbell, or the battery isn’t charged. For more information, see Charge the battery on page 8.
- Single white flash. The battery is correctly inserted in the doorbell.
- Flashing white. The doorbell is ready to connect to your WiFi router. After you scan the QR code in the Arlo Secure App, one of the following two behaviors happens:
- Rapid flashing white. The Arlo Secure App discovered your doorbell.
- Flashing amber. The Arlo Secure App did not discover your doorbell. Make sure that both your doorbell and your mobile device are connected to the same 2.4 GHz WiFi.
LED behavior after setup
- Slow breathing pattern white. The doorbell detected motion.
- Solid white. The doorbell is connected to a call.
- Fading white. The call from the doorbell ended.
Choose a good spot to mount your doorbell
The best location for your doorbell varies by household and outdoor environment. Place your doorbell with the fullest view of the area leading up to the front entry. This provides the best opportunity to capture motion detection events and video clips that include a person approaching the door. You can use the included angled mounting wedge to optimize the angle of your doorbell.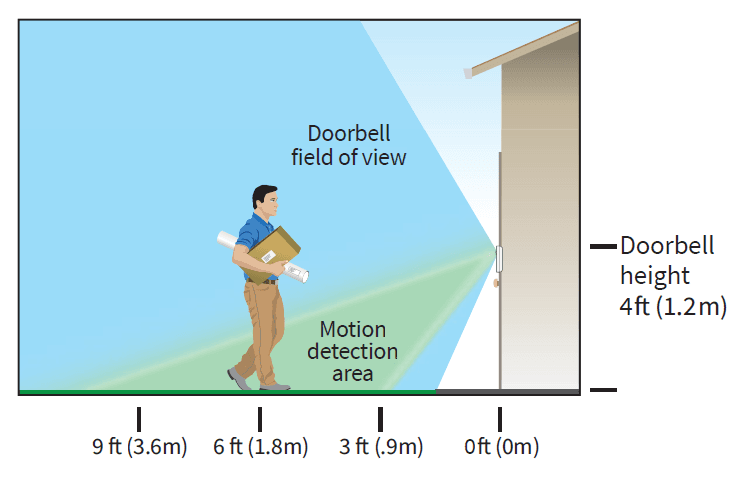
When mounting your doorbell:
- Place the doorbell about 4 feet (1.2 m) above the ground.
- Make sure that nearby walls and other objects do not obstruct the view of your doorbell.
- The lower half of the camera’s field of view is the motion-sensitive part of the image. The doorbell begins recording when it detects motion in this area.
Mount your doorbell wire-free
Note: If you want to hardwire your doorbell, which is optional, see Hardwire your Essential Wire-Free Video Doorbell on page 24.
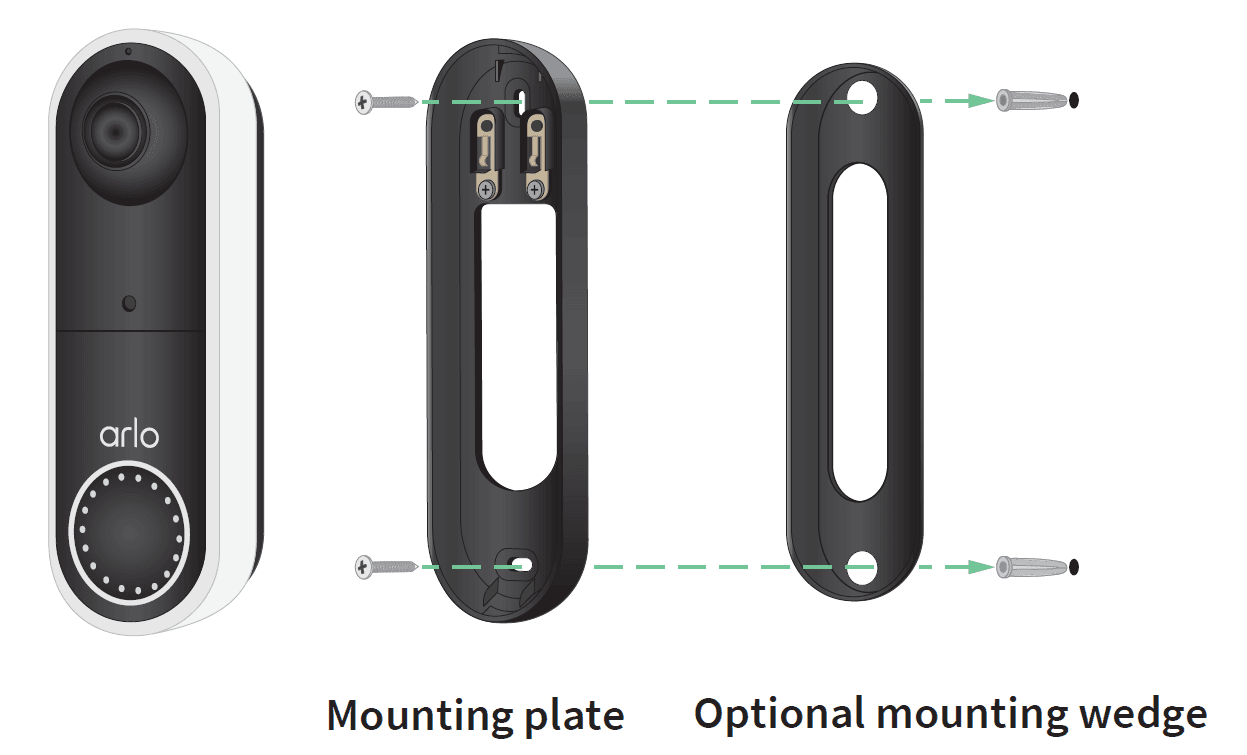
- Place the mounting plate on the wall where you want to mount your doorbell, and mark the locations for the two screw holes.
- Decide whether to use the angled mounting plate to adjust the area your doorbell faces.
- Use a 6 mm (15/64 inch) drill bit to drill two holes.
- Align the mounting plate with the two holes in the wall.
- While holding the mounting plate over the two holes (and the angled mounting plate, if you’re using it), use a screwdriver to put a screw into each of the holes. If you’re mounting the doorbell on drywall, we recommend that you use the provided wall anchors.

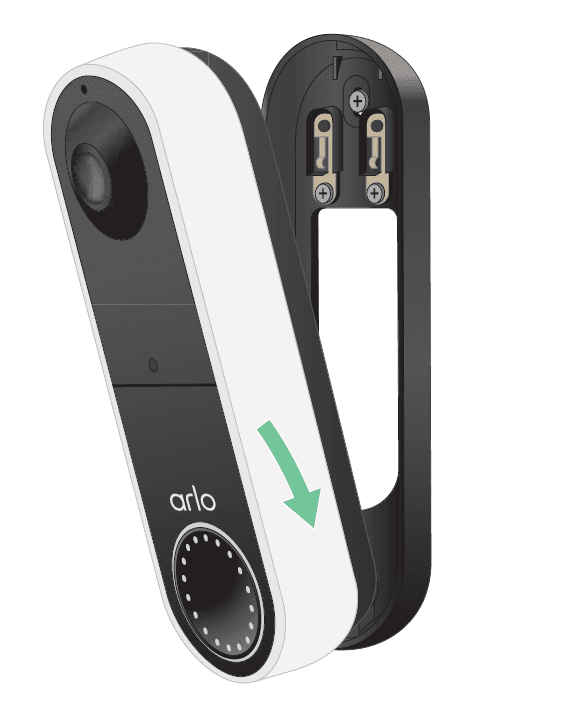
- Place the doorbell on the mounting plate in a down-and-in motion. When the doorbell is secured, there is a click sound.

Test motion detection
You can use the motion detection test to find the right motion sensitivity setting for your doorbell.
- Open the Arlo Secure App.
- Tap the gear icon next to the Essential Wire-Free Video Doorbell.
- Tap Device Utilities > Motion Detection Test.
- Move in front of the camera. During this test, the camera LED blinks white when motion is detected.
- Move the slider to adjust the motion sensitivity level as needed.
Note: This motion sensitivity setting is only for use during the motion detection test so that you can identify the setting you want to use. - After you fi nd a setting that works well, edit the mode rule to change the sensitivity level to your preferred setting so that it takes effect.
For more information about how to edit a mode rule, see Change motion sensitivity on page 54.
Customize your doorbell settings
You control the rules your doorbell uses to record and alert you by selecting a mode. You can also arm or disarm all your Arlo devices.
The Arlo Secure App comes with four modes:
- Armed
- Disarmed
- Schedule
- Geofencing
You can customize each mode and you can also create custom modes. For information, see Chapter 6. Modes, Rules, and Alerts on page 51.
Recharge the battery after installation
Warning: Do not leave the doorbell outdoors without the battery installed. Doing so can result in water intrusion into the doorbell.
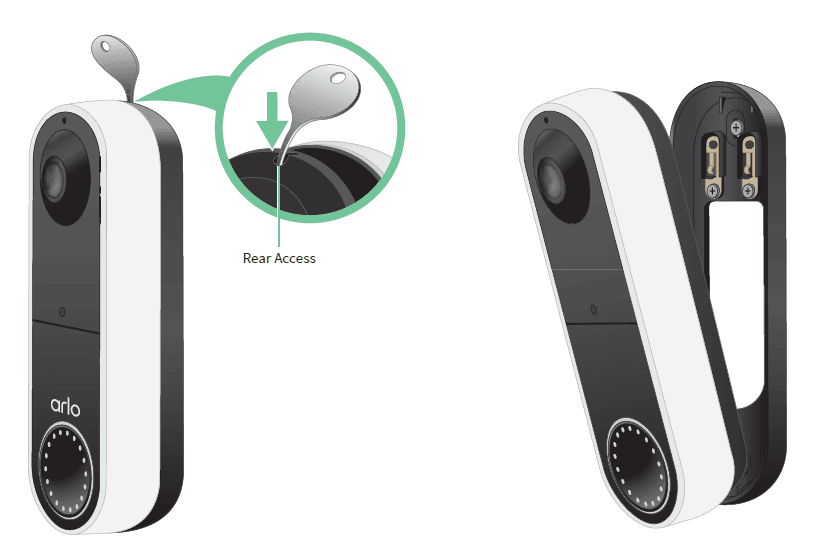
- Locate the release pin that came with your Essential Wire-Free Video Doorbell. Alternatively, you can use a paperclip or a similar object.
- Insert the release pin into the release pinhole at the top of the doorbell mount. A click occurs, and the doorbell is released from the mount.

- Pull the doorbell off the mount in an up-and-out motion.
- Bring the doorbell indoors.
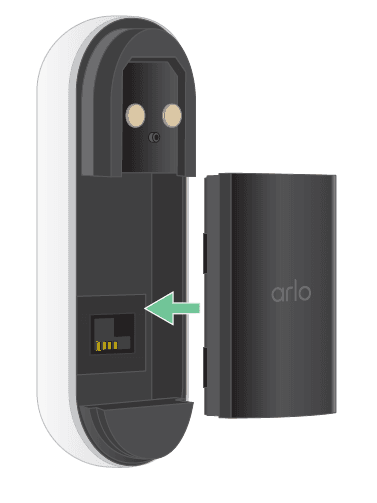
- Remove the battery from the doorbell.
- Connect the battery to the USB charging cable that came in the package. The charging cable works with most power adapters.

- Charge the battery to 100%.The battery LED lights red during charging, then turns green when the battery is fully charged.
- Place the battery back into the doorbell.

- Place the doorbell on the mounting plate in a down-and-in motion. When the doorbell is secured, there is a click sound.

Chime options for your doorbell
The Essential Wire-Free Video Doorbell offers several chime options. To hear a ring when someone presses your doorbell, you can connect the doorbell to an Arlo Chime 2, your home’s traditional chime, a smart home voice assistant system, your mobile device (for SIP video call), or an Arlo Chime with a compatible Arlo SmartHub or base station.
Wire-free chime solutions
You can take advantage of a variety of wire-free options to hear a ring and receive notifications when someone presses your Arlo doorbell.
- Doorbell video phone call. Your doorbell is connected to the mobile device you used to set up the doorbell in the Arlo Secure App. Your phone rings when someone presses your doorbell, and you can answer the phone to speak with the person who rang the doorbell. If you have an iOS device, you can assign a contact name and ringtone to the doorbell. For more information, see Answer your doorbell from your smartphone on page 27.
- Arlo Chime 2. The Arlo Chime 2 may be included with your Essential Wire-Free Video Doorbell, or sold separately. Your Chime 2 lets you receive instant alerts from your Arlo doorbell and your Arlo cameras. For more information, see Chapter 3. Arlo Chime 2 on page 18.
- Smart home voice assistant systems. You can use a home voice assistant system—like Amazon Alexa or Google Assistant—to make an announcement when someone presses your Essential Wire-Free Video Doorbell. Your doorbell is also compatible with Samsung SmartThings and IFTTT. For more information, see Chapter 9. Arlo Connect on page 62.
- Arlo Chime, sold separately. If you have an Arlo SmartHub or base station, you can use it to add an Arlo Chime to your Arlo account. When an Arlo chime is on your account, you can pair it with your Arlo doorbell. See Connect an optional Arlo Chime (sold separately).
Traditional chime solution
Your Arlo doorbell is fully wire-free, but you can connect it to your existing doorbell wiring (if applicable) to ring your household chime and to continuously charge the doorbell. For more information, see Chapter 3. Optional: Connect a wired chime on page 22.
Connect an Arlo Chime (sold separately)
You can connect your Essential Wire-Free Video Doorbell to an Arlo Chime. When a chime is connected, a ring plays when someone presses your video doorbell. This is a useful wire-free solution if you don’t already have a mechanical or digital chime to connect to your doorbell.
Note: The Arlo Chime requires connection to an Arlo SmartHub or base station.
To connect an Arlo Chime to your doorbell:
- Open the Arlo Secure App.
- Tap Settings > My Devices.
- Select your Arlo Essential Video Doorbell.
- Scroll to the bottom of Device Settings, and tap Add Chime.
- Follow the Arlo Secure App to connect your Arlo Chime.
When your Arlo Chime is connected to your Arlo Essential Video Doorbell, the chime appears under PAIRED DEVICES on the Device Settings page.
3. Arlo Chime 2
The Arlo Chime 2 is optional. Depending on the product you purchase, the Arlo Chime 2 may be included with your Essential Wire-Free Video Doorbell, or sold separately. The Arlo Chime 2 lets you receive instant alerts from your Arlo doorbell and your Arlo cameras.
Meet your Chime 2
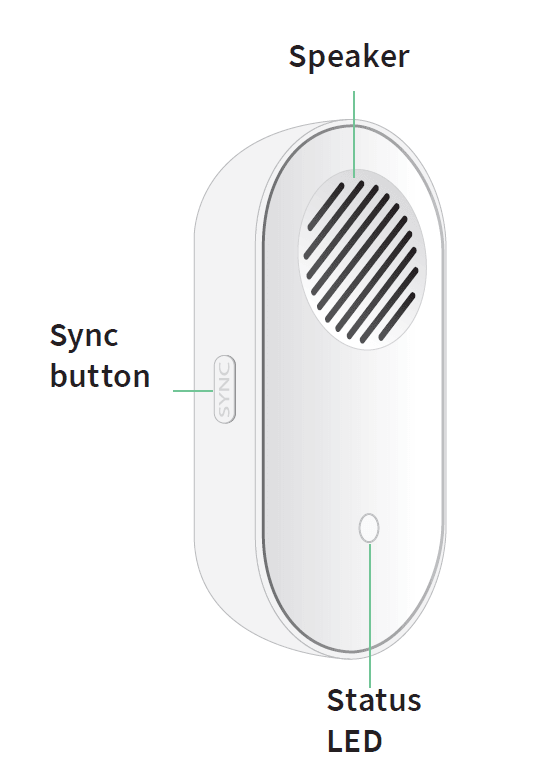
Front view, integrated items and features:
- Speaker: The speaker rings or plays a melody when someone presses your doorbell. You can also set up audio alerts or a siren sound to alert you when motion or audio is detected on an Arlo camera.
- Sync button: Use the sync button to help set up your Arlo Chime 2, or to factory reset the chime.
- Status LED: The LED indicates the status of your Arlo Chime 2.

Rear view, integrated items and features:
- QR code: Use the QR code to set up your Arlo Chime 2.
- Power prongs: Plug your Arlo Chime 2 into a wall outlet.
Do more with your Chime 2
You can add an unlimited number of Arlo Chime 2 devices to your Arlo account. These devices do not count toward the device limit of an Arlo subscription.
You can pair more than one Arlo doorbell with your Chime 2. For example, if you have two Arlo Essential Video Doorbells (Wired or Wire-Free), you can set both to trigger your Arlo Chime. You can also customize your Arlo doorbell’s melody, so you know which doorbell rang.
Find a good location for your Chime 2
When placing your Arlo Chime 2:
- Place your chime in a central area in your home. This helps to ensure that you hear the chime from multiple areas of your home.
- Place your chime in a room where you are most often present. If you need to select one of many rooms in your home to place your chime, place the chime wherever you are most likely to be when someone presses your doorbell.
- If possible, use a raised wall outlet. A higher position for your Arlo Chime 2 improves audio and WiFi connectivity.
- Use a vertical wall outlet. Place your chime into an outlet that is vertical along a wall, rather than horizontal like a power strip.
- Use multiple chimes throughout your home. If you have a large home, you might benefit from placing a separate Arlo Chime 2 on each floor or wing of your home.
Set up your Chime 2
Set up your Essential Wire-Free Video Doorbell first, and then set up your Chime 2 to pair with your doorbell1.
- Open the Arlo Secure App.
- Tap Add New Device.
- Follow the instructions in the Arlo Secure App to install and set up your Chime 2.
When your Arlo Chime 2 is connected to your Arlo Essential Video Doorbell, the chime appears under PAIRED DEVICES on the Device Settings page in the Arlo Secure App.
Chime 2 LED
The Arlo Chime 2 LED indicates the chime status and activity. When the chime first powers on, the LED lights solid white for a brief period. During regular operation, the LED is off except when the Chime 2 is making a sound.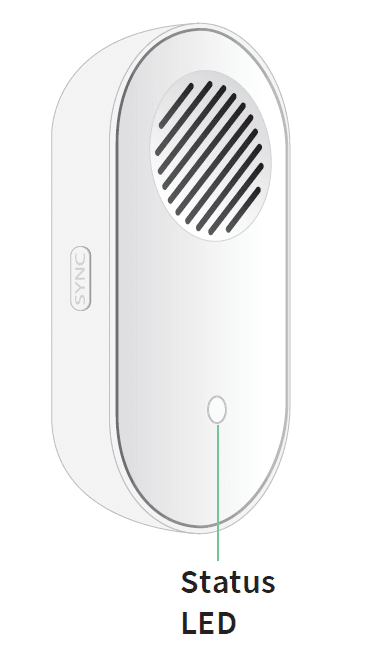
LED behaviors during setup
- Fading white. The chime is in pairing mode, and is ready to be set up.
- Fast blinking white. The chime connected to your WiFi network and your Arlo account.
- Slow blinking amber. A setup error occurred. See Arlo doesn’t discover your Chime 2 during setup on page 70.
LED behaviors after setup
- Alternating flashing white and amber. A firmware update is in progress. Do not remove, reset, or unplug the chime.
- Fast blinking white. The chime completed a factory reset. For information about resetting, your chime, see Reset the Chime 2 on page 71.
- Slow blinking white. The chime is ringing or playing audio.
- Slow blinking amber. The chime is off line.
Select a melody for your Chime 2
You can select one of seven melodies to play when someone presses your Arlo doorbell and triggers your Arlo Chime 2. If you have multiple Arlo doorbells associated with one chime, you can set a different melody for each doorbell so that you know which doorbell was pressed.
To select a melody for your Arlo Chime 2:
- Open the Arlo Secure App.
- Tap Settings > My Devices.
- Select an Arlo doorbell that is paired with your Arlo Chime 2.
- Tap Melody > Chime Melody.
- Select a melody.
Your settings are saved.
Use silent mode to stop the Chime 2 from ringing
The Chime 2 rings when it’s paired to your Essential Video Doorbell and someone presses the doorbell button. To stop the Chime 2 from ringing, select silent mode for the doorbell.
To turn silent mode features on and off :
- Open the Arlo Secure App.
- Tap the gear icon next to the doorbell.
- Tap Silent Mode.
- Adjust the settings.
For more detailed information, see Turn Silent mode on and off on page 29.
4. Optional: Connect a wired chime
The Essential Wire-Free Doorbell comes with a rechargeable battery, which provides power to the doorbell. Wiring is not required for installation. If you want to hardwire your Essential Wire-Free Video Doorbell, you can. Hardwiring your doorbell lets you connect it to your home’s existing chime and allows the doorbell to trickle charge when it’s not in use.
Voltage requirements
If you choose to wire your Essential Wire-Free Video Doorbell, the voltage must be 8 – 24 VAC and a transformer is required. If your voltage doesn’t meet the power requirements, and you need to install or upgrade a transformer, contact a licensed electrician or visit arlo.com for information about installation services. We recommend that you check the voltage on the transformer that powers your existing doorbell before installing your Essential Wire-Free Video Doorbell. If the transformer’s voltage isn’t 8 – 24 VAC, you must upgrade your transformer before you use the doorbell.
You can check the voltage level of your doorbell transformer by one of these methods:
- Use a multimeter to test the voltage. A multimeter is an electronic tool that measures the precise voltage level of your existing doorbell wiring. Using a multimeter gives you the most accurate estimate of your transformer’s voltage, and it can be done without finding the transformer. We recommend that you measure at the existing doorbell wiring or at your chime.
- Check if the voltage is printed on the transformer that provides power to your existing doorbell. The estimated voltage is commonly printed on transformers. This is typically accurate, but it isn’t as precise as using a multimeter.
Use a multimeter to check the voltage of a transformer
- Disconnect your existing doorbell. To do this, unmount or unscrew your existing doorbell to expose the wiring or AC terminals on the back.
- Set your multimeter to AC (the V with a wavy line on top or next to it).
- Connect the two probes from the multimeter to the wires from your doorbell.
- Read the voltage level on your multimeter’s display to make sure it’s between 8-24 VAC.
Check the voltage level printed on the doorbell transformer
A doorbell transformer is a device that steps down your household AC voltage to a lower voltage suitable for powering an electric doorbell.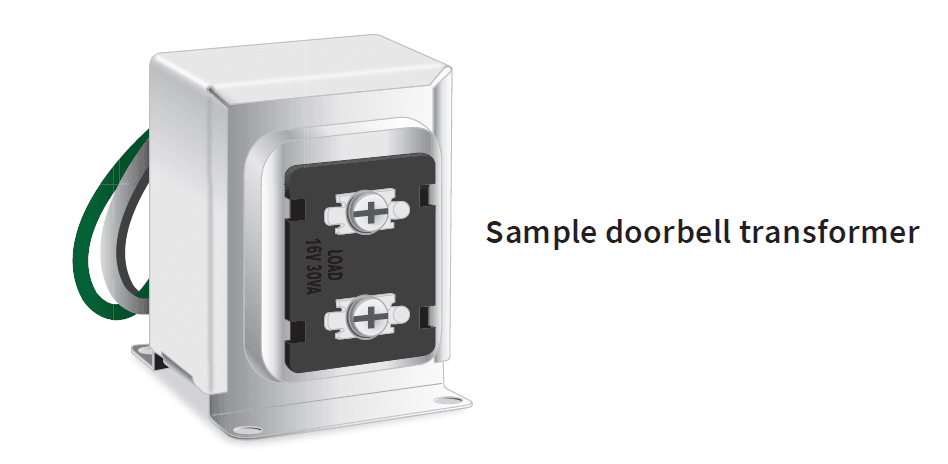
The transformer is typically found:
- In the front closet near your existing doorbell
- Near your house’s circuit breaker
- In the basement or attic
- In the garage
- Near your house’s furnace
- In the crawl space under your house
Change from wire-free to wired installation
If you already set up your doorbell wire-free, and now want to hardwire it, you must first remove the doorbell from your Arlo account, then re-add it in the Arlo Secure App and follow the instructions for a wired doorbell.
- Open the Arlo Secure App.
- Tap Settings > My Devices.
- Scroll to the bottom, and tap Remove Device.
- Tap the Devices tab.
- At the bottom of the Devices tab, tap Add New Device.
- Select your Arlo doorbell.
Hardwire your Essential Wire-Free Video Doorbell
This process is optional. The Essential Wire-Free Video Doorbell is battery operated, but you can hardwire it if you like. Hardwiring your doorbell lets you connect it to your home’s existing chime and allows the doorbell to trickle charge when it’s not in use.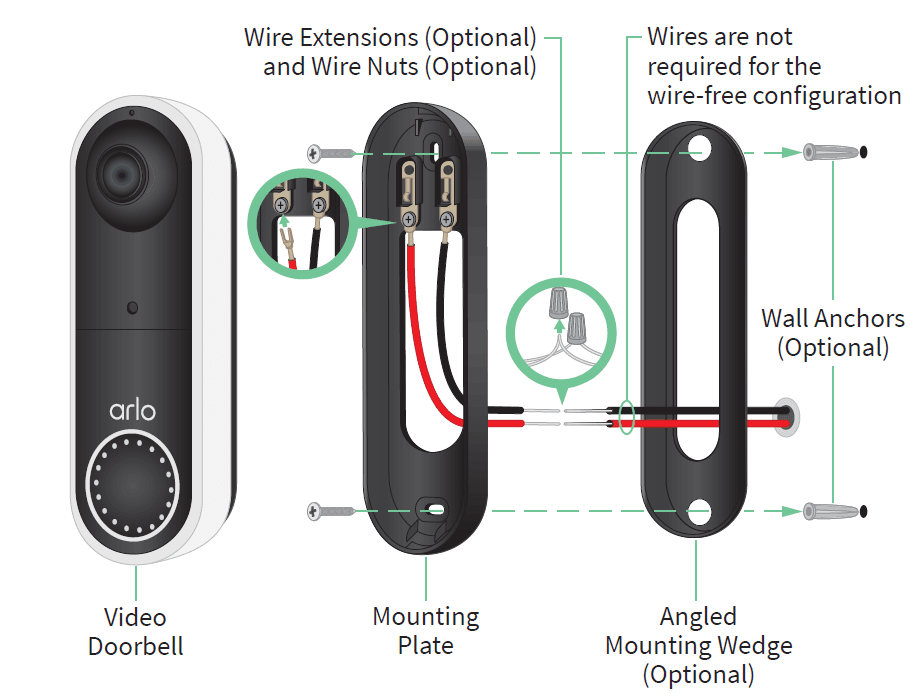
Tools
- A Phillips screwdriver is required to install the doorbell (not provided).
- You might also benefit from having a drill, a level, and a ladder (to reach the chime).
Installation overview
You must use the Arlo Secure App for installation and setup. The Arlo Secure App guides you through hardwired installation in this order:
- Turn off your power at the breaker.
Warning: Failure to turn off your power might result in serious injury. - Follow the instructions in the Arlo Secure App to connect the wires and install your doorbell.
- Turn on power at the breaker.
- Check the LED on your doorbell. See LED during setup on page 19.
- Connect your doorbell to your home network’s 2.4 GHz WiFi.
- Determine whether to use the fl at mounting plate on its own, or combine it with the angled mounting plate to adjust the field of view for your doorbell. Installing with an angled mounting plate depends on the position of the doorbell and the walkway to your home. The angled mounting plate lets you install your doorbell so that it is angled toward the left or angled toward the right.
Use the optional wire extensions
Two identical wire extensions and fasteners come in the package with your doorbell.
If the existing wires for your doorbell are too short to connect your Arlo doorbell, you can use the wire extensions and fasteners to lengthen the wires.
To connect wire extensions to your Arlo doorbell:
- Remove the rubber ends from the wire extensions.
- Attach a wire extension to one of your existing doorbell wires. To do this, connect the wire end of the wire extension (not the prong end) to your existing doorbell wire and twist the wires together securely.
- Attach the second wire extension to the other doorbell wire.
- Place the fasteners on top of the connected wire ends, and twist the fasteners. The fasteners funnel and secure the wires together.
- Attach the extended wires to the mounting plate.
- Tuck the wire extensions and the fasteners into the wiring cavity in the wall, behind your doorbell. You can use the optional mounting plate to get a better vantage point for the doorbell if it isn’t facing straight out at the desired entryway.
- Place your doorbell onto the mounting plate. Ensure that the mounting screws are completely screwed in and flush with the mounting plate so that your Arlo doorbell clips securely into the mounting plate.
You are ready to use the Arlo Secure App to continue the setup process to hardwire your doorbell.
Battery charging with a hardwired doorbell
The Essential Wire-Free Video Doorbell comes with a rechargeable battery, which provides power to the doorbell. Wiring is not required for installation.
If you choose to hardwire your doorbell to an 8-24VAC transformer, your doorbell draws a small current through the wiring to trickle charge the battery and reduce the need to take it out for recharging. This means that your doorbell always consumes battery power while it is active, and gradually recharges while it is asleep.
For safety and long-term reliability, the doorbell battery starts trickle charging when the battery level drops below 65 percent, then stops charging when it reaches 80 percent. The rate of charging and overall battery level is dependent on usage and weather conditions. Additionally, frequent use of the doorbell can result in complete battery drain because the doorbell battery only charges when not in use. You can use the Arlo Secure App to verify changes in the battery percentage, but you will not see a charging icon when the doorbell is hardwired.
Frequent use of the doorbell can result in complete battery drain because the doorbell battery only charges when not in use. You can choose to bring the battery indoors and charge using the micro USB cable to 100%, if desired.
5. Use Your Doorbell
Answer your doorbell from your smartphone
When a visitor presses your Essential Wire-Free Video Doorbell, your mobile device receives a video call through an Internet connection. You must install the Arlo Secure App on your smartphone and you must be logged in to the Arlo Secure App. The caller displays as the name you gave to your Essential Wire-Free Video Doorbell. You can accept or decline the call the same way you do for other calls that you receive on your smartphone.
When your smartphone rings, you can do the following:
- Accept the call and speak to your visitor.
- Answer the call with a Quick Reply. Select a recorded message for the doorbell to play for the visitor.
- Decline the call. If a visitor presses your doorbell and you decline the call or don’t answer your smartphone after 20 seconds, your doorbell prompts the visitor to leave a message. If the visitor leaves a message, it is saved as a Doorbell recording in your Arlo library.
If you want to receive the call on a different phone, you can log out of the Arlo Secure App on the first smartphone and log into the Arlo Secure App on another smartphone or tablet.
To receive the call on multiple phones, you can create a grant access account (add doorbell to the grant access account) and log in to the Arlo Secure App using the grant account on the other smartphone. (See Grant access to friends on page 44.)
Accept a call from your doorbell
To accept a call on your smartphone from your Essential Wire-Free Video Doorbell:
- When you receive a call from the doorbell, tap Accept.
- If you are prompted to allow Arlo to access the camera, tap OK. The incoming call page displays.
- To talk to the visitor, speak into your phone as you normally do. You can also tap a button to toggle between hands-free and earpiece mode, play a quick reply message for the visitor, or mute your sound.
- To toggle between hands-free and earpiece mode, tap the speaker button.
- To play a quick reply message, tap the message icon and select a message from the list.
- To mute yourself so that the visitor doesn’t hear sound, tap the microphone button.
- When you’re finished, tap End.
Respond to a visitor with a Quick Reply
- When you receive a call from the Essential Wire-Free Video Doorbell, tap Accept.
- If you’re prompted to allow Arlo to access the camera, tap OK. The incoming call page displays.
- To play a quick reply message, tap the message icon and select a message from the list. The messages are:
- We will be right there.
- Leave the package outside.
- Sorry, I’m not interested.
- Can I help you?
- I’m busy right now.
Change the language for Quick Reply messages
- Open the Arlo Secure App.
- Tap the gear icon next to the Essential Wire-Free Video Doorbell.
- Scroll down and tap Language.
- Select a language.
Play a message from a visitor
If a visitor leaves a message after pressing your doorbell, the message is saved in your Arlo library.
- Open the Arlo Secure App.
- Tap Library.
- Tap the doorbell recording.
Use silent mode for the doorbell
Silent mode allows you to temporarily disable incoming calls and/or chime rings on your doorbell.
To turn Silent mode features on and off :
- Open the Arlo Secure App.
- Tap the gear icon next to the doorbell.
- Tap Silent Mode.
- Move the Silent Mode slider to enable or disable silent mode. When Silent Mode is enabled, all the doorbell-press notifications are disabled by default. If you want your chime to ring or receive a phone call when someone presses your doorbell, you can move the individual sliders to enable each feature. When the toggle is green, the feature is enabled.
- Depending on your settings and whether you use an optional chime, select which of the following you want to be silent:
- Incoming Call. Your mobile device receives a call when someone presses your Arlo doorbell
- Arlo Chime 2 or Arlo Chime. If you have an optional Arlo Chime 2 or Chime (sold separately), you can select it
- Traditional Chime. The chime that you wired your Arlo doorbell to rings when someone presses your Arlo doorbell.
Note: When Silent Mode is enabled, third-party smart home assistants—such as Amazon Alexa and Google Assistant are disabled for your doorbell.
Control the doorbell LED
The LED on your Video Doorbell indicates how the doorbell is operating. By default, the doorbell lights white in a slow breathing pattern when motion is detected and lights solid white when a video call is accepted and active. You can toggle these LED patterns on and off .
To change the settings for the Status LEDs:
- Open the Arlo Secure App.
- Tap the gear icon next to the Essential Wire-Free Video Doorbell.
- Tap Doorbell LED.
- Tap Breathe LED on Motion Detection to enable or disable this setting. When Breathe LED is enabled, the LED lights in a slow breathing pattern when motion is detected. When this setting is disabled, the LED remains off when motion is detected.
- Tap LED on Call Accepted to enable or disable this setting.
When this setting is enabled, the LED lights solid white when a video call is accepted and active. When this setting is disabled, the LED remains off when a call is accepted.
Change the call settings
- Open the Arlo Secure App.
- Tap the gear icon next to the Essential Wire-Free Video Doorbell.
- Scroll down and tap Call Settings.
- To turn the speaker on your mobile phone on and off , tap Speaker.
- To mute the audio on your mobile phone, tap Mute.
- To allow a visitor to leave a video message if you don’t accept a doorbell call after 20 seconds, or if you decline the call, tap Leave your message.
Turn the doorbell siren on and off
Your doorbell includes a siren that you can turn on to discourage tampering by an unwanted visitor. With an Arlo Secure plan, you can activate the siren from the push notification sent on motion detection.
- Open the Arlo Secure App.
- Tap Siren on the upper right.
- Tap Activate Siren. If you have multiple Arlo devices with sirens, you’re prompted to select a device.
- Swipe the Siren icon to the right. The siren remains active for five minutes or until you turn it off .
- To turn off the siren, tap the slider at the top of the Devices page.
6.View and Record Videos
When you open the Arlo Secure App, the Devices page displays your doorbell’s camera feed.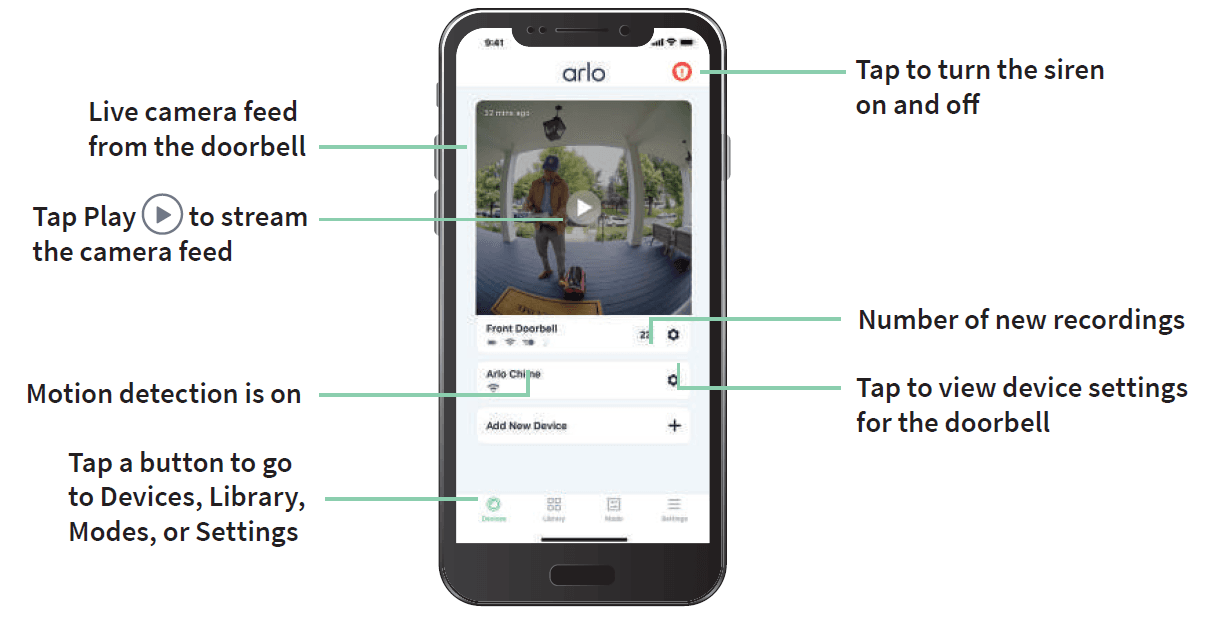
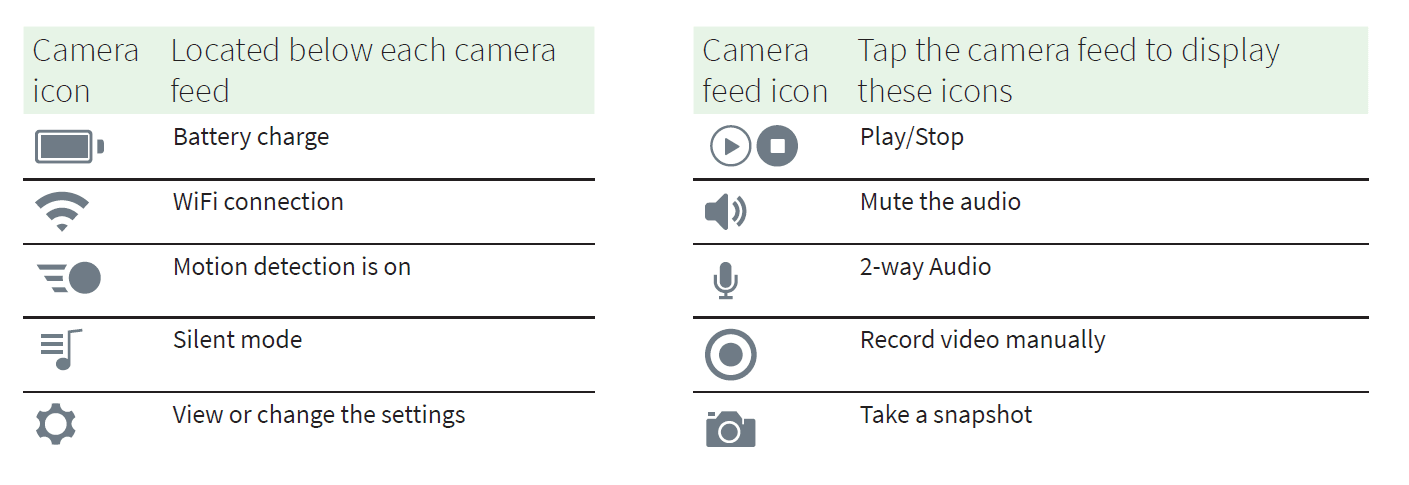
View your doorbell’s camera feed
- Open the Arlo Secure App.
- Tap Play on the camera feed. The camera feed updates and camera feed icons display.
- To stop viewing the live feed, tap Stop.
Pan and zoom video
You can pan and zoom to focus in on the high-definition details of any live or recorded video. Just pinch and drag any image as you do with photos on your smartphone. You can also pinch and zoom in live feed, or use pinch and zoom to adjust your field of view from the Video Settings.
- Open the Arlo Secure App.
- Tap Library.
- Tap any live video or prerecorded video from your Arlo library. A full screen view displays.
- To pan and zoom using a mobile device.
- Pinch to zoom in and out of the video.
- Touch and drag to move around the zoomed-in frame.
- To pan and zoom using a computer:
- Click the Zoom icon.
- Use your mouse to move around the frame.
Record clips from live video
This feature requires an Arlo Secure subscription.
- Open the Arlo Secure App.
- Tap the camera feed image.
- Tap Record to begin recording. This icon turns red to indicate that you’re recording the live feed.
- To stop recording, tap Record again.
Take a snapshot from live video
This feature requires an Arlo Secure subscription.
- Open the Arlo Secure App.
- Tap the camera feed image.
- Tap Snapshot. The snapshot is saved in your library.
2-Way Audio
The doorbell includes a microphone that supports 2-Way Audio.
- Open the Arlo Secure App.
- Tap the camera feed image.
- Tap the microphone icon.
- The first time you use 2-Way Audio, allow Arlo to use your phone’s microphone.
- Tap the microphone button. Two-way audio automatically opens, allowing you to use 2-Way Audio.
Change the order of the camera feeds
If you use more than one camera, you can change the order in which the camera feeds display on the Devices page.
- Open the Arlo Secure App.
- Tap Settings.
- Under SYSTEM, tap Device Order.
- If you’re using a smartphone or tablet, tap Edit at the top of the page. A list icon displays.
- Tap and hold the list icon and drag each device to the correct position on the list.
- Tap Save.
Motion detection activity zones
With an Arlo Secure subscription, you can designate zones within the doorbell camera view where you want the camera to detect and record motion.
Add an activity zone
- Open the Arlo Secure App.
- Tap Settings > My Devices.
- Select the doorbell.
- Under VIDEO, tap Activity Zones.
- Tap +. An activity zone box displays in the camera feed image.
- Move the zone to the desired position in the camera feed image.
- To reposition the zone, tap and hold the zone and move it.
- To customize the zone name, tap Edit and enter a name. If you’re using a web browser, click > next to the zone name.
- Tap Save.
Change an activity zone.
- Open the Arlo Secure App.
- Tap Settings > My Devices.
- Select the doorbell.
- Under VIDEO, tap Activity Zones.
- Tap a zone to select it.
- Move the zone to the desired position in the camera feed image.
- To reposition the zone, tap and hold the zone and move it.
- To customize the zone name, tap Edit and enter a name. If you’re using a web browser, click > next to the zone name.
- Tap Save.
Delete an activity zone
- Open the Arlo Secure App.
- Tap Settings > My Devices.
- Select the doorbell.
- Under VIDEO, tap Activity Zones.
- Tap a zone to select it.
- Delete the device. On an iOS device, slide the motion detection zone to the left and tap Delete. On an Android device, slide the motion detection zone to the left .
View recordings and snapshots
With an Arlo Secure plan, your recordings and snapshots are stored in your Arlo library. You can use the filter and the calendar to fi nd and view specific recordings.
Access cloud recordings
Your Essential Wire-Free Video Doorbell records when it is in an armed mode and detects motion. Your Arlo recordings are sent to your Arlo account in the cloud and stored in your library. Recordings are encrypted with your user name and password.
You can access your recordings from the Arlo Secure App on your mobile device or by using a web browser to visit https://my.arlo.com/#/login. You can download recordings from the cloud and save them.
Use the Library
You can use the library to fi nd and view recordings based on the date.
- Open the Arlo Secure App.
- Tap Library. A green circle indicates the selected day. A green dot below the date indicates each day on which a video clip was recorded.
- Tap a highlighted date. Recordings from that date display below the calendar.
Use the filter
You can use the filter to fi nd and view recordings based on criteria that you select.
- Open the Arlo Secure App.
- Tap Library.
- Tap Filter in the upper left corner of the page.
- Tap the filtering criteria that you want to use.
- Tap Done.
Turn off the filter
- Open the Arlo Secure App.
- Tap Library.
- Tap Filter in the upper left corner of the page.
- Tap Reset.
- Tap Done.
Download recordings
- Open the Arlo Secure App.
- Tap Library.
- Tap a recording.
- Tap Download.
- Tap OK to confirm.
Make a recording a favorite
- Open the Arlo Secure App.
- Tap Library.
- Tap a recording.
- Tap Favorite.
Share recordings
- Open the Arlo Secure App.
- Tap Library.
- Tap a recording.
- Tap Share.
- Share the file.
Donate recordings for research
You can donate video or snapshot fi les to Arlo to use for research and development of Arlo products.
- Open the Arlo Secure App.
- Tap Library.
- Tap a recording.
- Tap Donate.
- Tap OK to confirm.
Delete recordings
- Open the Arlo Secure App.
- Tap Library.
- Tap a recording.
- Tap Delete.
- Tap OK to confirm.
7. Change Your Settings
Once you set up your Arlo account, you can access it by using the Arlo Secure App on a smartphone or tablet, or from a computer using a web browser. If you’re using a computer, enter https://my.arlo.com/#/login in the address bar of the browser.
Two-step verification
Two-step verification helps protect your account by adding another layer of security when you log in to your Arlo account. Arlo will verify your identity anytime you sign in with a new device. You can have up to five different two-step verification methods, in addition to the email address associated with your Arlo account.
You must enable two-step verification enabled to access your Arlo account. This is to protect your data and add an extra layer of security to your Arlo account. Before you set up two-step verification, make sure that you can log in to the email address associated with your Arlo account. Your account email is always used as a backup option to log in to your account.
Note: If you’re a Friend on someone’s Arlo account, and the account owner sets up two-step verification, you don’t have to use two-step verification to log in. Likewise, if you set up two-step verification as a Friend on an Arlo account, the account owner isn’t affected.
How two-step verification works
To sign in with two-step verification, you must first enter your email address and password. Then, you must verify your identity with a security code (delivered by SMS text message or email) or confirmation from an already trusted device. Requiring two pieces of information helps to prevent any unwanted log in, even if someone has your Arlo account password.
- Trusted device. You can trust a device on your Arlo account so that you never have to verify your log in with a push notification or text message. The device shows up under the list of trusted devices in Settings > Profile > Login Settings > Two-Step Verification.
- Push notification. When someone attempts to log in to your Arlo account on a new device, Arlo sends a push notification to a previously trusted (and currently logged in) iOS or Android device. Tap the push notification on the trusted device to approve or deny the log in.
- SMS text message. When someone attempts to log in to your Arlo account, Arlo sends a text message to the phone number that you verified for two-step verification. Enter the security code from the text message to complete the log in.
- Email. If you can’t access a trusted device with push notifications, or if you can’t receive SMS text messages, you can request a security code to be sent to the email associated with your Arlo account.
Set up two-step verification from the Arlo Secure App
Before you set up two-step verification, make sure you can log in to the email that you’re using for your Arlo account. Email is your backup two-step verification option.
To enable two-step verification from your mobile device:
- Open the Arlo Secure App.
- Tap Settings.
- In the ACCOUNT section, select Profile > Login Settings > Two-Step Verification.
- Tap the switch next to Enable.
- Select Push Notification and/or SMS Text Message as your verification method. Note: Your Arlo account email is an automatic back-up option.
- Follow the instructions in the app to complete your two-step verification setup. Two-step verification is enabled for your account.
Set up two-step verification from a computer
To enable two-step verification from your desktop:
- Log in to my.arlo.com.
- Click Settings > Profile > Two-Step Verification.
- Click the switch next to Enable.
- Click Add SMS Verification as your verification method.
Note: Your Arlo account email is an automatic back-up option. - Follow the instructions to complete your two-step verification setup. Two-step verification is enabled for your account.
Note: Push notification verification cannot be enabled on my.arlo.com. You must use the Arlo Secure App to enable push notification verification.
Add a phone number or device to two-step verification
- Open the Arlo Secure App.
- Tap Settings.
- In the ACCOUNT section, select Profile > Login Settings > Two-Step Verification.
- To add a phone number, tap Add SMS Verification and enter the phone number.
- To add a trusted device, tap Add Trusted Device.
Remove a phone number or device from two-step verification
- Open the Arlo Secure App.
- Tap Settings.
- In the ACCOUNT section, select Profile > Login Settings > Two-Step Verification.
- Tap the trashcan icon next to a phone number or trusted device.
Use face or fingerprint authentication
You can use Touch ID® or Face ID® with a compatible Apple device. With a compatible Android device, you can use fingerprint authentication.
Your device must meet the following minimum requirements:
- Apple devices: iOS version 10.3 or higher. A Touch ID compatible device (iPhone 5s, iPad Air 2, or newer) A Face ID compatible device (iPhone X, iPad Pro 2018, or newer)
- Android devices: Android OS version 6.0 or higher. A compatible Android device with fingerprint authentication.
Turn fingerprint authentication on and off for the Arlo Secure App
- Enable fingerprint authentication on your iPhone or Android device.
- Open the Arlo Secure App.
- Tap Settings.
- In the ACCOUNT section, select Profile > Login Settings.
- Slide the toggle for fingerprint or Touch ID to the right (on) or left (off ).
Turn face authentication on and off for the Arlo Secure App
- Enable Face ID authentication on your iPhone.
- Open the Arlo Secure App.
- Tap Settings.
- In the ACCOUNT section, select Profile > Login Settings.
- Slide the toggle Face ID to the right (on) or left (off ).
Customize your profile
You can enter your name, add a profile photo and home address, and opt-in or opt-out of Arlo news and support updates.
Add a profile picture
- Open the Arlo Secure App.
- Tap Settings.
- In the ACCOUNT section, select Profile > Edit Profile.
- Tap the profile picture at the top of the page.
- Select Take Photo or Choose from Library.
Note: If you already have a profile picture, you can also select Remove Current Photo. - Upload your preferred profile picture.
- Tap Save at the bottom of the page.
Edit profile settings
You can enter your name, add a profile photo and home address, and opt-in or opt-out of Arlo news and support updates.
- Open the Arlo Secure App.
- Tap Settings.
- In the ACCOUNT section, select Profile > Edit Profile.
- Enter your profile settings.
- Tap Save at the bottom of the page.
Change your Arlo password
You can change your password in the Arlo Secure App or by logging in to my.arlo.com.
- Open the Arlo Secure App.
- Tap Settings.
- In the ACCOUNT section, select Profile > Login Settings.
- Enter your old password.
- Enter a new password and then confirm it.
- Tap Change Password.
Your new password is saved.
Reset a forgotten password
If you forgot your Arlo password, you can reset it with a verified email address.
- Open the Arlo Secure App.
- Tap Forgot Password?.
- Enter your email address.
- Tap Send Email. An email is sent from [email protected] to your verified email address.
- Tap the link provided in that email.
- Enter a new password.
- Tap Submit.
Your password is reset.
Grant access to friends
You can add friends to your Arlo account. Friends can view live streams from your cameras; record video clips; view, share, mark as favorite, and delete clips from your library; and take snapshots. Friends are granted limited access to some of the settings and features of your Arlo account. You can select which cameras friends can see and what administrative rights are available to them.
Friends without access rights can:
- Play and view library content.
- View live footage.
- Zoom and drag video footage.
- Control brightness.
- Enter full-screen view.
Friends who are granted access rights can also:
- Play and pause video footage.
- Record video footage.
- Mute the speaker.
- Access and change modes.
- View motion detection statuses.
- Manually record.
- Take snapshots.
- Mark as a favorite, share, download, and delete video footage.
- Use a camera’s microphone.
Add a friend
- Open the Arlo Secure App.
- Tap Settings.
- Under ACCOUNT, tap Grant Access.
- Tap Add or +.
- Enter your friend’s first name, last name, and email address.
- Tap the Arlo devices that you want your friend to access.
- To grant access rights to your friend, tap Allow Access Rights. Selecting Allow Access Rights allows this friend to change your account and camera settings.
- Tap Send Invite. An email message is sent inviting your friend to create an Arlo account. This friend’s name is displayed with the status Pending. When the friend accepts your invitation, the status changes to Accepted.
Edit a friend’s access privileges
- Open the Arlo Secure App.
- Tap Settings.
- Under ACCOUNT, tap Grant Access. A list of your friends displays with the status of their accounts.
- Tap the friend, and tap Edit.
- Tap cameras to select or deselect them.
- Tap Allow Access Rights. Selecting Allow Access Rights allows this friend to change your account and camera settings.
- Tap Done.
Delete a friend
- Open the Arlo Secure App.
- Tap Settings.
- Under ACCOUNT, tap Grant Access.
- Select the friend, and tap Edit.
- Tap Delete Friend.
- Tap Yes.
Change the time zone
- Open the Arlo Secure App.
- Tap Settings > My Devices.
- Tap the Essential Wire-Free Video Doorbell.
- Tap Time Zone.
- Tap a time zone. If you’re using a mobile device, your settings are saved.
- If you’re using a computer, click Save.
Doorbell settings
You can view or change the settings for your doorbell using either of these methods:
- Tap Settings > My Devices and select the doorbell.
- Tap the gear icon below the doorbell’s camera feed.
Change the doorbell name
- Open the Arlo Secure App.
- Tap the gear icon next to the Essential Wire-Free Video Doorbell.
- Tap Edit next to the doorbell name.
- Enter a new name. Names are limited to 32 characters.
- Tap Save.
Change the type of traditional chime the doorbell triggers
You can set your Essential Wire-Free Video Doorbell to trigger a mechanical, digital, or no chime when someone presses the doorbell button.
Note: If you already added your doorbell in the Arlo Secure App and you selected battery (not wired), then you’ll need to remove your doorbell from the Arlo Secure App and re-add it selecting wired in order to change the chime setting.
To change the type of chime that your doorbell triggers when the doorbell is setup as wired:
- Open the Arlo Secure App.
- Tap the gear icon next to the Essential Wire-Free Video Doorbell.
- Tap Traditional Chime.
- Select Mechanical, Digital, or None.
- Mechanical. Mechanical chimes make a traditional ding-dong sound when rung.
- Digital. Digital or electronic chimes have a speaker and can play a melody or ding-dong when rung.
- None. Use this setting if you’re bypassing the doorbell chime or are installing to a transformer, without any chime connected.
Change the brightness of the video
This change takes effect on the next video stream or motion recording.
- Open the Arlo Secure App.
- Tap the gear icon next to the Essential Wire-Free Video Doorbell.
- Tap Video Settings.
- Move the slider to increase or decrease the video brightness.
Change the video quality
This change takes effect on the next video stream or motion recording.
- Open the Arlo Secure App.
- Tap the gear icon next to the Essential Wire-Free Video Doorbell.
- Tap Video Settings > Video Quality.
- Tap to select 1536sq, 1080sq, or 720sq.
Turn night vision on and off
When night vision is enabled, the camera automatically turns on the infrared (IR) LED to record in low-light conditions. We recommend that you turn off night vision if the camera is facing reflective surfaces, such as windows. This change takes effect on the next video stream or motion recording,
- Open the Arlo Secure App.
- Tap the gear icon next to the Essential Wire-Free Video Doorbell.
- Tap Video Settings.
- Tap Night Vision.
- If you’re using an Android device, tap the slider.
Turn Auto HDR on and off
High Dynamic Range (HDR) is a soft ware method of adjusting high-contrast video or photo images that include areas of bright highlight and deep shadow. Without HDR, some images with bright areas can appear washed out, while dark areas can appear black, without detail. HDR makes it possible to see detail in both the highlights and shadows.
Your doorbell comes with an Auto HDR feature that is enabled by default. When your doorbell’s camera detects an image that would benefit from HDR, it automatically applies HDR unless you use the Arlo Secure App to disable Auto HDR.

To turn Auto HDR on or off :
- Open the Arlo Secure App.
- Tap the gear icon next to your doorbell.
- Tap Video Settings.
- Tap Auto HDR.
If you’re using an Android device, tap the slider.
Change the audio settings
You can adjust the settings to turn the microphone on and off and adjust the speaker. These settings take effect whether or not the microphone and speaker are enabled for live-streaming and motion recording.
Note: Controls for the speaker and microphone settings of your mobile phone during a doorbell video call are set up within Call Settings. See Change the call settings on page 30.
To change the audio settings:
- Open the Arlo Secure App.
- Tap the gear icon next to the doorbell.
- If you’re using a mobile device, tap Audio Settings.
- Adjust the settings:
- Microphone toggle turns the microphone off and on.
- Speaker toggle and volume. To turn the speaker on and off , tap Speaker. To change the speaker volume, move the Speaker Volume slider.
Adjust the flicker setting
The combination of certain artificial light sources and the Video Doorbell’s camera shutter speed might cause flickering or dark lines in recorded video. The default setting is Auto (60 Hz), but you can change this setting to 50 Hz.
- Open the Arlo Secure App.
- Tap the gear icon next to the Essential Wire-Free Video Doorbell.
- Tap Flicker Adjustment.
- Tap a setting.
View device information
You can view the firmware version, hardware version, and the serial number.
- Open the Arlo Secure App.
- Tap Settings > My Devices.
- Tap the device.
- Tap Device Info.
Remove a device from your account
- Open the Arlo Secure App.
- Tap Settings > My Devices.
- Tap the device.
- Scroll down and tap Remove Device.
Restart the doorbell from the Arlo Secure App
- Open the Arlo Secure App.
- Tap Settings > My Devices.
- Tap the doorbell.
- Scroll down to the bottom of the page and tap Restart.
For more manuals by Arlo, Visit ManualsLibraryy.
Arlo Essential Wire-Free Video Doorbell-FAQs
How does the Arlo wire-free doorbell work?
The Arlo doorbell runs on battery power but can also be hardwired to your existing doorbell chime for continuous charging. Even when hardwired, it primarily uses battery power.
What is the ideal height for installing the Arlo doorbell?
Install the Arlo doorbell about 48 inches (1.2 meters) above the ground for the best view of your front entry area.
How do I open the Arlo doorbell?
To open the doorbell, use the release pin provided or a paperclip. Insert it into the release pinhole at the top or bottom of the mount, and a click will indicate it’s released.
How can I set up my Arlo camera without a Base Station?
From the Devices screen in the Arlo app, tap “Add New Device,” select your camera, and follow the prompts to connect directly to a 2.4 GHz Wi-Fi network without a Base Station.
How do I install the angled mount for my Arlo doorbell?
To install the angled wedge, remove the adhesive covers from the mounting plate, press it against the flat mount until it clicks, and then stack the doorbell onto the angled wedge.
How do I add my Arlo doorbell to a Base Station?
Go to the Devices screen, tap “Add New Device,” and select your doorbell. Follow the in-app instructions until it connects to your SmartHub or Base Station.
Can I use the Arlo doorbell without Wi-Fi?
No, the Arlo doorbell requires Wi-Fi. However, if you need a completely wireless solution, the Arlo Go camera can operate on mobile 3G or 4G LTE networks.
What voltage does the Arlo video doorbell need?
The Arlo Video Doorbell requires 16-24V AC. If you don’t have an existing wired doorbell, you can use a plug-in transformer with at least 1A output.
What features does the Arlo doorbell offer?
The Arlo doorbell includes live video streaming, motion detection, night vision, and two-way audio to help you monitor who is at your door.
How do I connect my Arlo doorbell to Wi-Fi?
In the Arlo app, go to Settings > My Devices, select your doorbell, tap “Wi-Fi Network,” and choose your preferred network from the list.
How do I add users to my Arlo doorbell?
In the Arlo Secure app, go to Settings, then tap “People.” Enter the first name, last name, and email address of the person you want to add.
Where is the best location to install my Arlo doorbell?
Place the doorbell where it has a clear view of the area leading to your front door. This maximizes the chance of capturing motion events and video clips of visitors.

