![]()
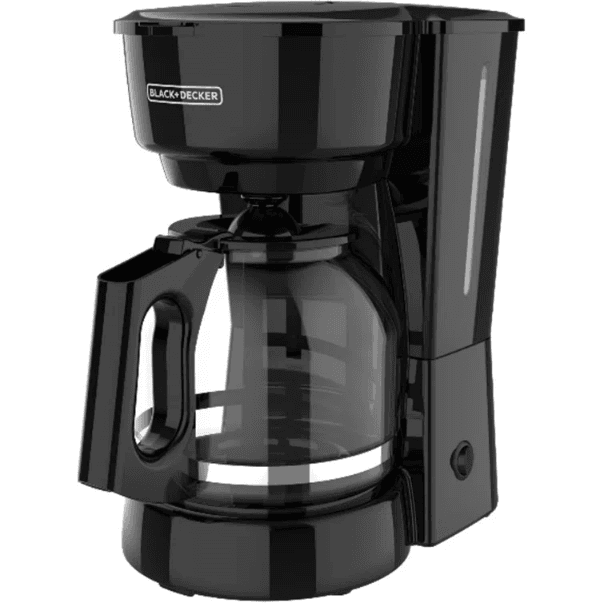
BLACK DECKER DCM100B 12-Cup Programmable Coffee Maker
IMPORTANT SAFEGUARDS
When using electrical appliances, basic safety precautions should always be followed to reduce the risk of fire, electric shock, and/or injury to persons, including the following:
- Read all instructions.
- Do not touch hot surfaces. Use handles or knobs.
- To protect against fire, electric shock, and injury to persons, do not immerse cords, plugs or appliances in water or other liquid.
- Close supervision is necessary when any appliance is used by or near children.
- Unplug from the outlet when not in use and before cleaning. Allow to cool before putting on or taking off parts, and before cleaning the appliance.
- Do not operate any appliance with a damaged cord or plug, or after the appliance malfunctions or has been damaged in any manner. Return the appliance to the nearest authorized service facility for examination, repair, or adjustment. Or, call the appropriate toll-free number on the cover of this manual.
- The use of accessory attachments not recommended by the appliance manufacturer may result in fire, electric shock, or injury to persons.
- Do not use outdoors.
- Do not let the cord hang over the edge of the table or counter, or touch hot surfaces.
- Do not place on or near a hot gas or electric burner, or in a heated oven.
- To disconnect, turn any control to OFF, then remove the plug from the wall outlet.
- Do not use this appliance for other than intended use.
- Keep the lid on the carafe when in use.
- Scalding may occur if the lid is removed during the brewing cycles.
How to Use
This product is for household use only.
GETTING STARTED
- Remove all packing material and any stickers from the product.
- Remove and save literature.
- Wash all removable parts as instructed in the CARE AND CLEANING section of this manual.
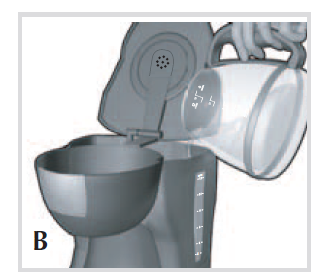
- Open water reservoir/brew basket cover and pour fresh cold water up to 12-cup level mark into the water reservoir (B).

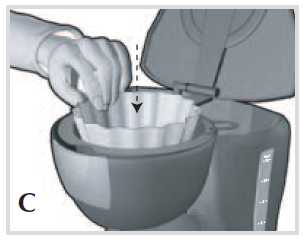
- Place empty 8–12 cup basket-style paper filter into the removable filter basket.
- Place the basket into the brew basket with the handle to the right (C).

- Close the water reservoir/brew basket cover.
- Place lid on the carafe.
- Place the empty carafe on the “Keep Hot” carafe plate.
- Pull the power cord out from the power cord holder in the back of the coffeemaker and plug it into a standard electrical outlet.
- Brew water through the appliance following the BREWING COFFEE instructions, without adding coffee grounds. This removes any dust or residue that may remain in the system during the manufacturing process.
- Discard the water from the carafe and paper filter from filter basket.
- Turn off the appliance, unplug and allow it to cool down.
ADJUSTING THE POWER CORD LENGTH
You can adjust the length of the power cord to suit your needs. To increase the length of the power cord, simply grasp the cord (not the plug) at the rear of the coffeemaker and gently pull down and out of the slot, away from the coffeemaker. To decrease the length of the power cord, simply feed any excess cord into the slot at the rear of the coffeemaker. Lift the cord and lock it into the slot when the cord is at the desired length.
SETTING THE CLOCK
- Plug the appliance into a standard electrical outlet.
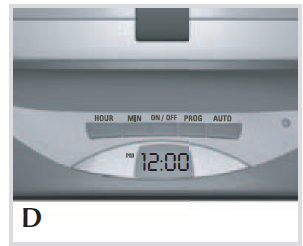
- The digital clock display flashes 12:00 (D).

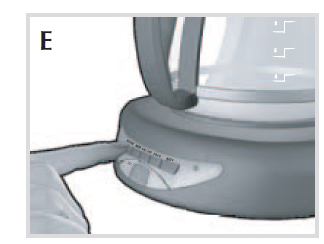
- To change the time: Press the HOUR button until the correct time appears (E).

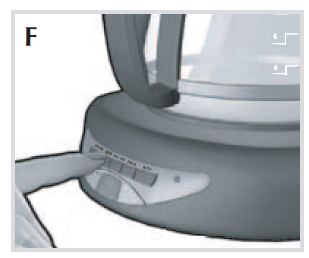
- Repeat with the MIN button (F). (If the minute setting is not changed within 5 seconds, the clock will revert to default time, and the selection of hour and minute must be repeated.

Tip: Hold each button down to make the hours and minutes change rapidly after a short delay. To change the time in 1-minute increments, press and release the button.
Note: If the unit is unplugged or power is interrupted even momentarily, the time may need to be reset.
BREWING COFFEE
It is not necessary to set the clock to brew coffee unless you wish to use delayed brewing.
- Open the water reservoir/brew basket cover.
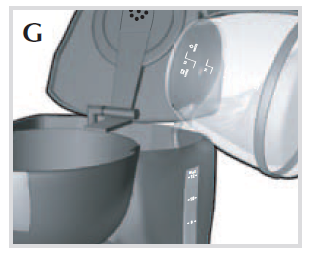
- Fill the water reservoir with the desired amount of cold tap water using the water markings on the side of the reservoir. Do not exceed the 12-cup maximum level (G).

- Place an 8–12 cup basket-style paper filter into the removable filter basket, making sure the filter is centered in the filter basket.
- Add the desired amount of ground coffee.
- Insert filter basket into brew basket following directions in GETTING STARTED.
- Close brew basket/water reservoir cover.
- Place brew-thru lid on the empty carafe.
- Place the empty carafe on the “Keep Hot” carafe plate.
- Plug the cord into a standard electrical outlet.
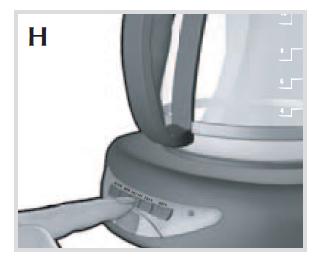
- Press the ON/OFF button (H); the power light is illuminated. Brewing begins OR, to delay brewing, you may set the auto function (see DELAYED BREWING).

- When coffee stops flowing into the carafe, the brew cycle is complete.
- Once the coffee grounds have cooled, carefully open the reservoir/brew basket cover and, using filter basket handle, remove and discard used grounds and paper filter. Close the reservoir/brew basket cover.
- The coffeemaker will keep brewed coffee hot for 2 hours and then automatically turn off.
- To turn off the coffeemaker, press the ON/OFF button.
- Unplug the appliance when not in use.
DELAYED BREWING
- Follow steps 1 through 9 under BREWING COFFEE.
- Make sure the clock has been set to the correct time of day (see SETTING THE CLOCK).
- Press the PROG button; the AUTO light blinks.
- To select the time for delayed brewing: Press the HOUR button until the correct time appears on the display. Repeat with the MIN button within 5 seconds. (If the minute setting is not changed within 5 seconds, the clock will revert to the default time and the selection of hour and minute must be repeated.)
- Press the PROG button again. The delayed brewing time is set.
- Press the AUTO button to activate the delayed brewing. The AUTO light is displayed on the digital display screen.
- To check the preset auto time, press the PROG button and it will display the time selected for delay brewing to begin. (The AUTO light will blink until the AUTO button is pressed.)
- To cancel the AUTO brew, press the ON/OFF button twice. All lights will turn off.
COFFEE BREWING TIPS
- Stir coffee in a carafe before serving to evenly distribute the flavor.
- Coffee that is poured during the brewing cycle may vary in strength from the finished brew.
- Not sure how much coffee to use? Begin by using 1 level scoop of medium-grind coffee for each cup of coffee to be brewed.
- Never reuse coffee filters; they absorb flavors from the brewed coffee and will give the newly brewed coffee a stale flavor. They may also tear and allow grinds to drip into the newly brewed coffee.
- Open coffee grounds are best stored in the refrigerator in a tightly sealed container. Once opened, coffee should be used within 1 month.
- If a filled carafe is left on the hot plate, be sure to remove the coffee grounds from the filter basket as soon as they have cooled slightly. This will keep the coffee from developing a bitter taste.
- For a special occasion, whip some heavy cream with 1 or 2 tablespoons of hazelnut, chocolate or almond liqueur. Use to top off each cup of coffee.
- Add a 2-inch piece of vanilla bean to the sugar bowl. You’ll be surprised at how good it tastes.
- Keep your coffeemaker very clean; you’ll be pleased with the flavor.
- For iced coffee, brew the coffee with twice the normal amount of grounds, as ice dilutes the coffee flavor. You may also make coffee ice cubes from leftover coffee and brew your coffee at its normal strength.
- Remember when pouring hot liquid into a glass, always put a spoon in the glass before adding the hot liquid.
- Rinse both the carafe and the brew basket holder with warm water immediately after each use to maintain good coffee flavor.
Care and Cleaning
This product contains no user-serviceable parts. Refer service to qualified service personnel.
Caution: Do not overexpose the control panel to water. Water may cause permanent damage and make the coffeemaker inoperable.
- Make sure the unit is unplugged and cooled before cleaning.
- Open water reservoir cover.
- Remove the brew basket by its handle and lift straight up.
- Discard the paper filter with the grounds.
- Clean parts as follows:
- Brew basket, carafe and lid are all top-rack dishwasher safe, or they may be hand washed in warm, sudsy water.
- Wipe the exterior and the “Keep Hot” carafe plate with a soft damp cloth. Do not use abrasive cleansers or scouring pads. Never immerse the coffeemaker in water or other liquids.
TREAT CARAFE WITH CARE
A damaged carafe may result in possible burns from a hot liquid. To avoid breaking:
- Do not allow all liquid to evaporate from the carafe while on the “Keep Hot” carafe plate or heat the carafe when empty.
- Discard the carafe if damaged in any manner. A chip or crack could result in breakage.
- Never use abrasive scouring pads or cleansers; they will scratch and weaken the glass.
- Do not place the carafe on or near a hot gas or electric burner, in a heated oven or in a microwave.
- Avoid rough handling and sharp blows.
MINERAL DEPOSITS AND CLOGGING
Mineral deposits left by hard water can clog your coffeemaker. Excessive steaming and/or a prolonged brewing cycle are signs that a cleaning is needed. The frequency of cleaning out deposits is affected by the regularity of usage and water hardness. During cleaning, more steaming occurs than when brewing coffee and may emit spurts of steam. Cleaning is recommended every 60 brewing cycles.
- Pour white vinegar into the water reservoir up to the 7-cup line on the water level window. Add water up to 12-cup line. Caution: Be careful not to exceed the 12-cup maximum level, to avoid water running out the overflow hole in the back of the coffeemaker.
- Put a paper filter in the brew basket and close the one-piece water reservoir and brew basket cover. Set empty carafe on the “Keep Hot” carafe plate.
- Turn on the coffeemaker and let half the cleaning solution brew into the carafe (till the water level goes down to around the 6-cup line on the water level window). Turn the coffeemaker off and let it soak for at least 15 minutes to soften the deposits.
- Turn on the coffeemaker and brew the remaining cleaning solution into the carafe.
- Turn off the coffeemaker, empty the carafe, and discard the filter.
- Fill the reservoir with fresh water to the 12-cup line, replace the empty carafe on the “Keep Hot” carafe plat,e and then turn on the coffeemaker for a complete brew cycle to flush out the remaining cleaning solution. You may wish to repeat this step again to eliminate any remaining vinegar smell/taste.
- Wash the brew basket and carafe as instructed for normal cleaning.
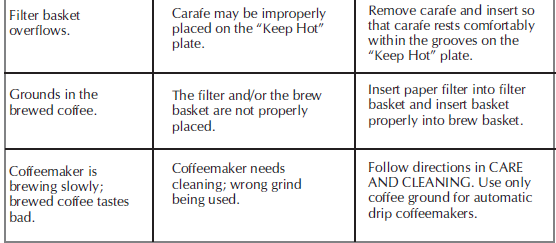
TROUBLESHOOTING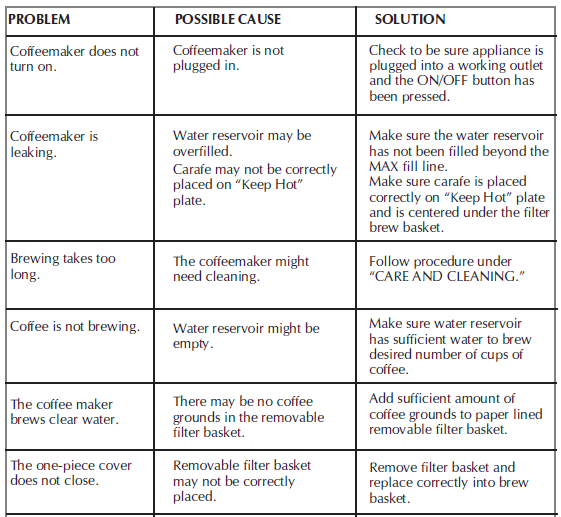
For More Manuals By Black And Decker, Visit ManualsLibraryy.
BLACK DECKER DCM100B 12-Cup Programmable Coffee Maker-FAQs.
How do I set the timer on my BLACK+DECKER coffee maker?
To program your coffee maker:
Press the “PROG” button.
Use the “HOUR” and “MIN” buttons to set your desired brew time.
Press “PROG” again to confirm.
The coffee maker will automatically start brewing at the scheduled time.
How do I clean my BLACK+DECKER coffee maker?
Regular Cleaning:
Wash the carafe, filter basket, and lid with warm, soapy water.
Wipe the exterior with a damp cloth.
Descaling (Every 1-2 months):
Fill the water reservoir with equal parts white vinegar and water.
Run a brew cycle (without coffee).
Rinse by running 2-3 cycles with fresh water.
Note: The “CL” (Clean) indicator will flash after 60 brews, reminding you to descale.
How many scoops of coffee should I use for 12 cups?
Standard ratio: 12-13 scoops (or 24-26 tablespoons) for 12 cups (6 oz per cup).
Adjust to taste—use less for milder coffee or more for stronger coffee.
Does the BLACK+DECKER DCM100B need a paper filter?
Yes, it uses #4 cone-shaped paper filters.
Alternatively, you can use a reusable mesh filter (sold separately).
Why does my coffee maker display “CL”?
The “CL” (Clean) alert appears after 60 brew cycles, indicating it’s time to descale the machine.
Follow the descaling steps above to remove mineral buildup.
How many watts does this coffee maker use?
It uses 900–1200 watts while brewing.
In keep-warm mode, it consumes less power (around 50–100W).
Can I use cold water in my coffee maker?
Yes, but filtered or bottled water is recommended for better-tasting coffee.
Cold water helps preserve oxygen levels, improving flavor extraction.
Why is my coffee weak or watery?
Possible causes:
Too little coffee (use 1-2 tbsp per 6 oz cup).
Old or stale coffee grounds (use freshly ground beans).
Clogged filter or mineral buildup (clean/descale the machine).
How do I stop the “Clean” light from flashing?
Run a descaling cycle (vinegar + water).
If it persists, unplug for 30 seconds and restart.
Is the carafe dishwasher-safe?
Yes, the glass carafe and filter basket are top-rack dishwasher-safe.
Avoid washing the heating plate with water.

