Blendtec Commercial bar blender

IMPORTANT INFORMATION
Read all instructions carefully before using your Commercial series blender. Following these instructions will help prevent injuries and damage to the machine so you have the best possible experience with your Blendtec® Commercial series blender.
SAFETY CERTIFICATION
The Commercial series blenders are certified to the required safety standards and tested for electrical and mechanical safety. The safety standards have been developed over many years to reduce the risk of injury, fire, and damage. Part of the certification process includes quarterly audits.
AVOID CONTACT WITH MOVING PARTS
- ALWAYS keep fingers, hands, hair, and clothing away from all moving parts.
- ALWAYS keep all utensils away from the drive socket and blender jar blades during operation, as utensils may damage blades or the blender jar.
- NEVER put hands into the blender jar or add substances by hand when the blender jar is on the motor base.
- NEVER touch the blade with your fingers, whether it is on or off the motor base.
- NEVER place a jar into the drive socket if the blender motor is operating.
- DO NOT rock or remove the blender jar during operation.
These precautions will help prevent personal injury and/or damage to the blender.
NEVER OPERATE THE BLENDER IF IT APPEARS DAMAGED
If the blender malfunctions, call your service agent first. If it is dropped or damaged in any way, return the blender to a Blendtec service agent immediately for examination, repair, electrical or mechanical adjustment, or possible replacement.
NEVER OPERATE A BLENDER IN LIQUID
To protect against the risk of electrical shock, do not put the motor base in water or other liquids. Do not use the blender outdoors where it is subject to precipitation.
NEVER PUT NON-FOOD ITEMS INTO A JAR
Utensils, rocks, and glass are dangerous if placed in a jar. Damage caused by such foreign objects will void the warranty. Keep hands and utensils out of the jar while blending to reduce the risk of severe injury to persons or damage to the blender. Utensils may only be used when the blender is not running.
NEVER OPERATE THE BLENDER WITHOUT THE LID IN PLACE
NEVER OPERATE THE BLENDER USING ATTACHMENTS NOT SOLD BY BLENDTEC
The use of any unauthorized attachments may cause fire, electric shock, and/or injury and will void the warranty.
BLENDER JAR MUST BE PROPERLY IN PLACE WHILE APPLIANCE IS OPERATING
USE CAUTION WHEN BLENDING HOT LIQUIDS
Your Commercial series blender may have a vented lid that acts as a pressure relief to allow steam to escape. Be careful not to come in contact with any steam.
POWER CORD PRECAUTIONS
NEVER operate with a damaged cord or plug. If the supply cord is damaged, it must be replaced by the manufacturer or an authorized service agent to avoid a hazard.
- DO NOT permit the cord to hang over the edge of the work surface.
- NEVER use an extension cord with the unit.
- Unplug the blender motor when not in use, before changing blender locations, or when cleaning. EACH POWER UNIT MUST BE PROTECTED BY A SEPARATE CIRCUIT BREAKER OR FUSE, SEE MODEL FOR SPECIFICATIONS
UNPACKING – SAVE ALL PACKAGING MATERIALS AND INSTRUCTIONS FOR FUTURE USE
UNPACKING THE BLENDER
You should have received the following items:
- Commercial series blender motor base.
- One or more blender jars with lids.
- Additional literature may be included depending on package configuration.
- Remove the blender motor base, blender jar(s), and lid(s) from packaging.
- Unwind the power cord.
- Check for any packing material that may have blocked ventilation holes on the underside or backside of the blender motor base.
- Inspect all items to ensure no damage occurred during shipment.
- If any damage has occurred, contact your Blendtec® service agent immediately.
REGISTERING YOUR BLENDER
Register online at www.blendtec.com/registration
GETTING TO KNOW YOUR BLENDER
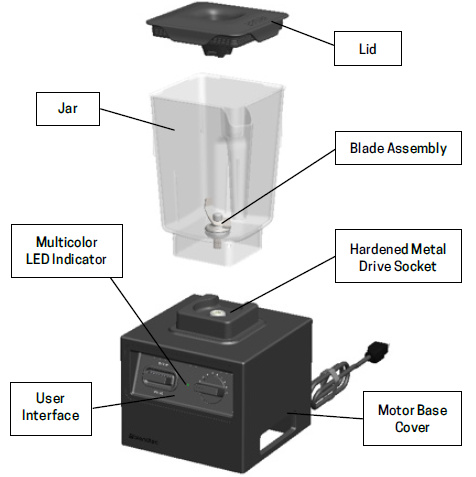
BLENDER MOTOR BASE

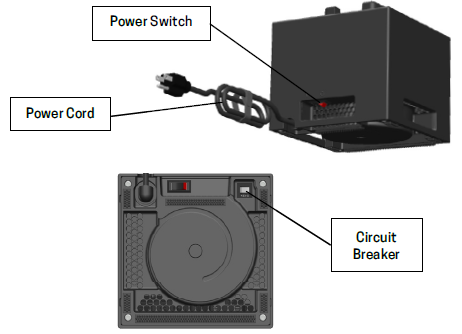
- Power Switch: Located on the back of the blender in the exhaust vent cavity, this switch turns the blender on or off when plugged in.
- User Interface: This simple and easy-to-use user interface has a 3-position switch, and a 180° knob for speed control. The switch has 3 modes: BLEND (up), STANDBY (neutral), and PULSE (down). The knob provides precise and responsive speed control. RPM range: 1,550 – 25,000.
- Multicolor LED Indicator: This light indicator signals that the blender is powered on and gives the user information about the status of the blender. When in diagnostic mode, it is also used to display cycle counts (like the odometer in a car), error states, and error counts.
- Hardened Metal Drive Socket: This is where the jar couples with the motor to turn the blade.
- Motor Base Cover: Houses the power unit in a durable, plastic material.
- Power Cord: The power cord is located at the back of the motor base cover.
- Circuit Breaker: The circuit breaker protects your blender by automatically cutting off power to prevent electrical overload or short circuits. Push to reset the circuit breaker.
BLENDER JAR ASSEMBLY
The blender jar assembly consists of the blender jar, blade assembly, and lid. These components are integrated to help create consistently blended recipes and greater operator safety.
- Lid: The lid seals liquids within the jar during blending. Some models have a vent that provides pressure relief when blending hot foods.
- Jar: Your jar is durable, BPA-free, and easy to clean.
- Blade Assembly: The uniquely designed stainless steel blade provides fast, consistent blending. NOTE: Never operate the blender with more than the marked capacity of the jar.
POWER SPECIFICATIONS
Your Commercial series blender is certified for use with a specific circuit voltage, depending on the model. Make sure to check your model’s power specifications and use a protected circuit when operating your unit.
CARE & CLEANING
CLEANING AFTER USE
- Add hot water and 1-2 drops of liquid dish soap to the blender jar.
- Place the lid tightly onto the jar, place the jar on the motor base, and pulse at speed 7 for 5-10 seconds.
- Rinse all soap from the jar and lid with water.
- If the jar is stored upside down, shake excess water from the jar after cleaning. Note: WildSide+™ and FourSide™ jars can be stacked to save space.
LONG-TERM SANITATION
- Sanitize the jar per local code by filling the blender jar with a sanitizer diluted to the manufacturer’s specifications. Bleach, properly diluted, can be used.
- Leave the diluted sanitizer in the jar for 5 minutes.
- Empty the sanitizer from the jar.
- Rinse jar thoroughly with water.
- If the jar is stored upside down, shake excess water from the jar after cleaning.
MOTOR BASE CLEANING
- Ensure the blender is unplugged before cleaning.
- Wipe down the plastic housing of the motor base, controls, and gaskets with a clean, damp rag. A mild, all-purpose, nonabrasive cleaner may be used.
- The drive socket can be cleaned using a cotton swab or a toothpick.
CLEANING TIPS AND CAUTIONS
- Do not use stiff-bristled brushes or abrasive cloths/pads to clean the blender base, jar, lid, or tamper, as this will dull or scratch the surface.
- Do not use a water jet of any kind to clean the motor base.
- NEVER submerge the motor base in water. Doing so will void the warranty.
- Avoid submerging blender jars for more than 5 minutes. Water penetration through the lower jar seals will reduce the life of the jar.
QUICK START GUIDE – HOW TO OPERATE
- Place the blender on a sturdy, level, and flat surface. Make sure the BLEND/PULSE switch is in the neutral position (centered vertically). Plug the power cord into the power outlet. Make sure there is at least 3 inches (7.5 cm) of space between the back wall of the blender and any object that may block the exhaust airflow.
- The power switch is located on the back of the blender inside the exhaust vent cavity. Flip the switch from OFF ( O ) to ON ( I ). The LED indicator on the front of the blender will light up.
- Place ingredients into the jar and secure the lid to the top of the jar. Make sure the gripping features on the lid are fully engaged. Use the lid cap to cover the hole in the top of the jar lid to prevent ingredients from splashing out of the jar. Do not overfill the jar.
- Place the jar onto the blender and make sure the base of the jar is resting flat on the blender motor base.
DO NOT PLACE A JAR ONTO THE BLENDER WHILE THE MOTOR IS SPINNING. This will damage the jar and motor.
- Operating: The user interface includes a simple and easy-touse 3-position switch to select the mode, and a 180° knob to control the motor speed.
BLEND mode. The switch is flipped up.
When the switch is flipped up, the blender will begin blending at the speed indicated by the knob (1 – 10). The switch will stay in the up position until the user flips the switch back to the neutral position. While in BLEND mode, the speed will change as the user turns the knob to different positions. The BLEND mode has a slightly softer ramp-up speed to improve motor life and prevent ingredients from pushing the lid off at higher speeds.
BLEND mode RPM range: 1,500 – 17,500.
STANDBY mode. The switch is in the neutral position.
When the switch is in the neutral position, or centered vertically, the motor will not run.
PULSE mode. The switch is held down.
When the switch is pressed down, the blender will begin blending at the speed indicated by the knob (1 – 10). This allows the user to take advantage of a variable pulse. The switch will return to the neutral position when released. The PULSE mode is more responsive and will ramp up faster to give instantaneous feedback to the user.
PULSE mode RPM range: 3,130 – 25,000.
- When finished, flip the BLEND/PULSE switch to STANDBY mode (neutral position). WAIT FOR THE MOTOR TO STOP SPINNING before removing the jar from the blender motor base. Removing the jar while the motor is still spinning will damage the jar and the motor.
DO NOT TOUCH THE MOTOR SOCKET OR THE JAR SHAFT AFTER RUNNING THE BLENDER. Both components can become hot during operation.
- Remove the lid from the jar and pour out the blended ingredients.
TROUBLE SHOOTING
While we don’t expect you to have any problems with your blender, sometimes failures do occur. Use the following guidelines to see if the problem is easily fixed or requires service.
Motor will not run – Light indicator is off.
- Make sure the blender power cord is plugged in and the power switch is turned ON ( I ). The power switch is located on the back of the blender in the exhaust vent cavity.
- Check the circuit breaker on the bottom of the blender motor base. Push the button to reset the circuit breaker.
- Check the fuse box or circuit breaker for the outlet the blender is plugged into. Replace any blown fuses or reset any tripped breakers.
- If the light indicator is still off, call Blendtec® customer support. The internal electronics may be damaged. Motor will not run – Light indicator is solid RED (not blinking).
- The motor was beginning to overheat, and the thermal protection safety measures were activated. The LED will remain RED, and the motor will not run until the internal motor temperature drops below 75° C. Unplug the blender and wait 10 minutes for the motor to cool down.
- While waiting for the motor to cool down, examine the blender motor base to ensure all intake and exhaust vents are not obstructed. Maintain at least 3 inches of empty space between the back of the blender motor base and any object that could interfere with the exhaust airflow. All circular holes on the bottom of the blender motor base are intake vents, and all circular holes on the back of the blender are exhaust vents.
- After waiting 10 minutes, plug the blender back in and run the motor at speed 5 without a jar for a few seconds. With the motor running, carefully reach behind the blender and place a hand near the exhaust. The user should feel air flowing out of the blender. Be extremely careful not to let anything touch the spinning motor shaft, including hands, jewelry, or clothing. This is the only time the base should be operated without a jar in place. If the user does not feel air flowing out of the blender, then there is likely a problem with the motor fan. Contact Blendtec® customer support and do not use the blender until it has been serviced by a qualified technician.
- If the light indicator continues to be RED without blinking after having cooled down for at least 30 minutes, contact Blendtec customer support.
Motor will not run – Light indicator is flashing multiple colors.
- The blender has entered diagnostic mode. This happens when the BLEND/PULSE switch is activated during the first 3 seconds after the blender is powered on. The different flashes and colors indicate the cycle count and errors. This information is used by Blendtec technicians and customer service representatives to diagnose problems and verify warranty coverage.
- Set the BLEND/PULSE switch to STANDBY (neutral position), turn the power switch OFF ( O ), wait 5 seconds, then turn the power switch back ON ( I ). Wait at least 3 seconds before activating the BLEND/PULSE switch.
- If the light indicator continues to flash multiple colors, contact Blendtec customer support.
Motor will not run – Light indicator is flashing RED
- The blender has detected an error. Turn the blender off by turning the power switch OFF ( 0 ) and unplugging the power cord from the outlet. Wait 5 seconds, then plug the blender back in and turn the power switch ON ( I ).
- If the light indicator is still flashing RED, contact Blendtec customer support.
WARRANTY
WARRANTY DESCRIPTION
Blendtec® warrants your blender against defects in materials and workmanship under normal use, maintenance, and service for 1–3 years on parts and labor required to repair or replace components that, in the sole discretion of Blendtec, are defective. In order to honor your warranty, Blendtec will require a serial number, model number, and proof of purchase from an authorized dealer at the time of the claim.
In addition, the serial number label on the unit must remain intact and unaltered, or the warranty is void. The following items are not included in the blender warranty coverage:
- Normal maintenance, adjustments, and cleaning as outlined in this manual.
- Repairs due to unauthorized service or modifications to the blender, product tampering, or use of non-standard parts or accessories without prior written approval from Blendtec.
- Damage caused by: improper installation or ventilation of the blender; electrical supply (e.g., electrical power failure, improper electrical connections, the use of extension cords, low voltage or voltage drops to the unit); water supply; drainage; exposure to water; or floods, storms or other acts of God.
- Cost of premium labor rates due to holidays, overtime, shipping, etc.
- Parts or assemblies subjected to misuse, abuse, neglect, or accidents, or a lack of specified maintenance or operational procedures.
- Damage or problems caused by installation, relocation of the unit, cleaning, and/or maintenance procedures inconsistent with the technical instructions provided in this manual.
- Claims for personal injuries, incidental or consequential damages, or economic loss (profit or revenue), however caused.
Warranty periods vary according to the blender model.
For more Manuals by Blendtec, visit ManualsLibraryy
Blendtec Commercial bar blender-FAQs
What can the Blendtec Total Blender Classic blend?
The Blendtec Total Blender Classic comes with six preprogrammed cycles:
Ice Crush – Perfect for finely crushed ice.
Smoothie – Ideal for creamy smoothies.
Hot Soup – Blends and heats soups.
Ice Cream – Makes homemade ice cream.
Whole Juice – Extracts juice from whole fruits and vegetables.
Batters – Prepares dough and batter effortlessly.
How do I choose the right commercial blender?
Consider these factors when selecting a commercial blender:
Material – Durable stainless steel or BPA-free plastic.
Capacity – Choose based on your serving needs.
Horsepower/Wattage – Commercial blenders range from 1,000 to 3,000 watts.
Controls – Variable speed settings for precision blending.
Blender Jar Design – Stackable or ergonomic handles for convenience.
Why is my Blendtec blender blade not spinning?
Possible reasons include:
Hard or thick ingredients – Avoid overloading with tough items.
Loose blade attachment – Check if the blade is firmly secured to the drive shaft.
What is the warranty on Blendtec blenders?
Professional 800 & Tom Dickson Extreme models – 10-year warranty.
Standard models – Typically 8 years for the motor base, 3 years for jars, and lifetime warranty on blades.
Can Blendtec crush ice?
Yes! The Blendtec can crush ice into fine snow in seconds without adding water.
Does Blendtec have a vacuum blender?
Yes, the Blendtec Vacuum Blending System reduces foam and oxidation, keeping smoothies fresher and more vibrant.
What are commercial blenders used for?
Commercial blenders are designed for high-volume use in:
Restaurants – Smoothies, soups, sauces.
Bars – Cocktails, frozen drinks.
Cafés – Frappés, milkshakes.
Can I use a Blendtec blender for commercial purposes?
Yes, Blendtec blenders are built for both home and commercial use, with powerful motors and durable construction.
How many watts should a commercial blender have?
Commercial blenders typically range from 1,000 to 3,000 watts for optimal performance.
Can Blendtec grind wheat and coffee beans?
Yes! The Blendtec can grind:
Whole grains into flour.
Coffee beans into fine or coarse grounds.


