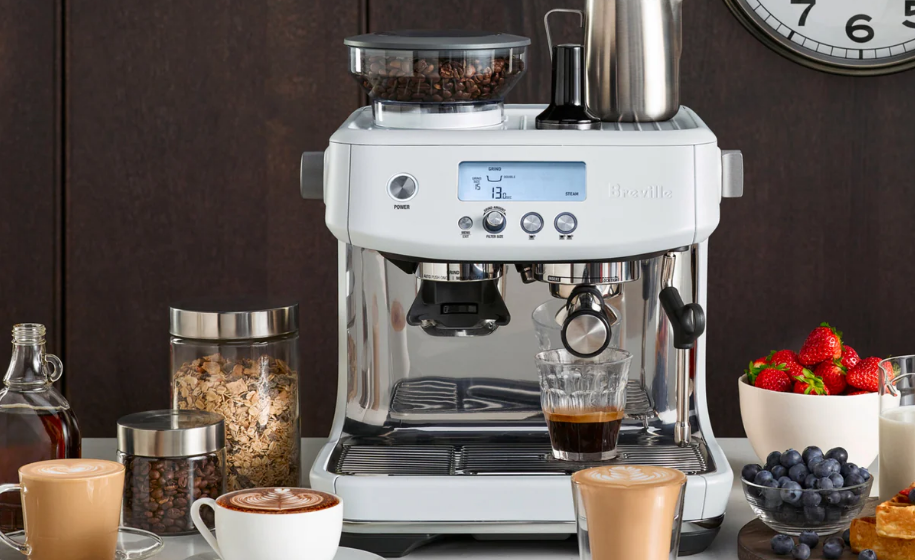
Breville BES878BSS Barista Pro Espresso Machine
IMPORTANT SAFEGUARDS
READ ALL INSTRUCTIONS BEFORE USE AND SAVE FOR FUTURE REFERENCE
- Carefully read all instructions before operating and save for future reference.
- Do not touch hot surfaces. Use handles or knobs as advised in this instruction book.
- To protect against fire, electric shock, and injury to persons, do not immerse the power cord, plug, or appliance itself in water or other liquids.
- Close supervision is necessary when any appliance is used by or near children.
- If the appliance is to be:
- left unattended
- cleaned
- moved
- assembled or
- stored
Always switch off the appliance by pressing the POWER button to off and unplugging it from the power outlet.
- Always allow the appliance to cool before cleaning, moving or storing.
- It is recommended to regularly inspect the appliance and power cord. Do not use the appliance if there is damage to the power cord or plug, or after the appliance malfunctions or has been damaged in any way. Immediately stop use and call Breville Consumer Support.
- The use of accessory attachments not recommended by Breville may result in fire, electric shock, or injury to persons.
- Do not let the power cord hang over the edge of a table or countertop, or touch hot surfaces.
- Do not place the appliance near the edge of a table or countertop. Ensure the surface is level, clean, and free of water and other substances.
- Do not place the appliance on or near a hot gas or electric burner. Do not place it in, or allow it to come into contact with a heated oven.
- Do not operate the appliance if it is in an enclosed space or within a cupboard.
- This appliance is recommended for household use only. Do not use this appliance for anything other than its intended use. Do not use outdoors. Do not use in moving vehicles or boats.
NOTICE TO CUSTOMERS REGARDING MEMORY STORAGE
Please note that in order to better serve our customers, internal memory storage has been embedded into our appliance. This memory storage consists of a small chip to collect certain information about your appliance, including the frequency of use of the appliance and the manner in which your appliance is being used. In the event your appliance is returned for service, the information collected from the chip enables us to quickly and efficiently service your appliance. The information collected also serves as a valuable resource in developing future appliances to better serve the needs of our consumers. The chip does not collect any information regarding the individuals who use the product or the household where the product is used. If you have any questions regarding the memory storage chi,p please contact us at [email protected]
SPECIFIC INSTRUCTIONS
FOR BES878
- It is recommended to plug the espresso machine into a properly grounded and dedicated circuit, separate from other electrical appliances.
- Avoid contact with moving parts.
- Check the bean hopper for the presence of foreign objects before using.
- Use only cold water in the water tank. Do not use any other liquids. Do not use highly filtered, demineralized or distilled water as this may affect the taste of the coffee and how the espresso machine operates.
Components
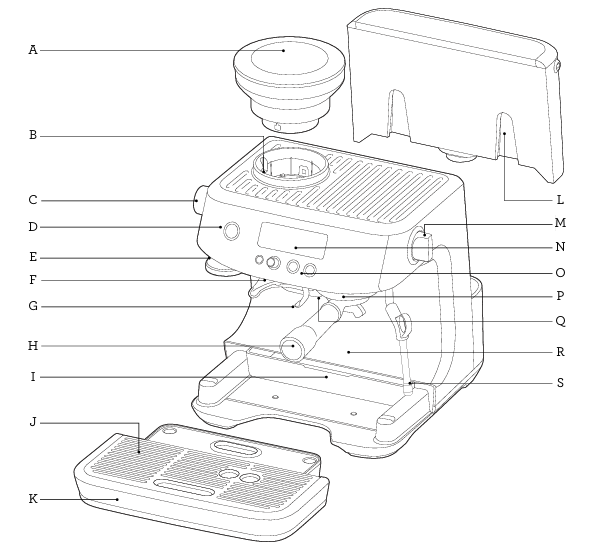
- A. ½ lb (250g) bean hopper
With a locking system for easy removal, storage, and transfer of coffee beans. - B. Integrated conical burr grinder
- C. GRIND SIZE selector
30 espresso grind settings from fine to coarse. - D. POWER button
- E. Integrated removable 54mm tamper
- F. Grinder outlet
- G. Grinding cradle
- H. 54mm stainless steel portafilter
With commercial-style spouts. - I. Storage tray (located behind drip tray)
For storage of accessories. - J. Removable drip tray grid
- K. Removable drip tray
With a tray full indicator. - L. 68 fl. oz (2L) removable water tank
With replaceable water filters to reduce scale and impurities. - M. Steam dial
Selector control for steam and hot water. - N. LCD display
With grinding and extracting progress animations. - O. Control panel
With MENU, GRIND AMOUNT/ FILTER SIZE, 1 CUP, and 2 CUP buttons. - P. Group head
- Q. Dedicated hot water outlet
For making Americanos and pre-heating cups. - R. Extra-tall cup clearance
- S. 360° swivel steam wand
Easily adjusts to the perfect position for texturing milk.
All parts of the Barista Pro™ that come into contact with coffee, water, and milk are BPA Free.
ACCESSORIES
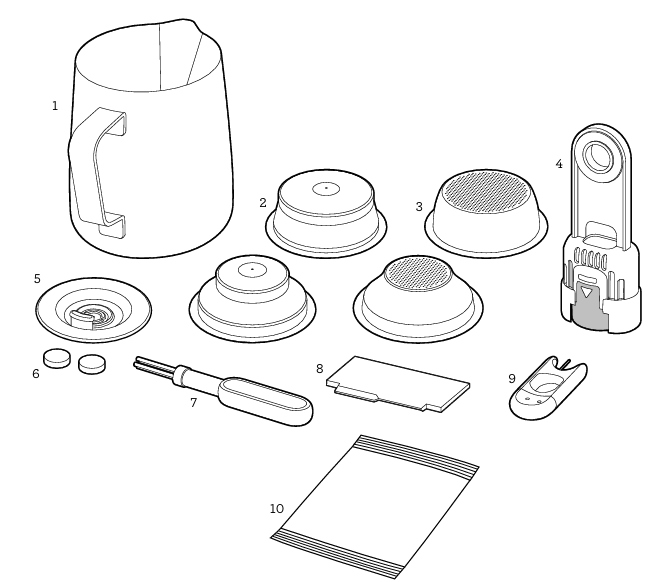
- Stainless steel milk jug
With MIN and MAX markings. - Dual wall filter baskets (1 cup & 2 cup)
Use with pre-ground coffee. - Single wall filter baskets (1 cup & 2 cup)
Use when grinding fresh whole coffee beans. - Water filter and filter holder
All parts of the Barista Pro™ that come into contact with coffee, water and milk are BPA Free. - Cleaning disc
- Cleaning tablets
- Cleaning brush
- The Razor™ precision dose trimming tool
- Steam wand and filter basket cleaning tool
- Descaling powder
Barista ProTM Features
- THERMOJET™ HEATING SYSTEM
Innovative heating system achieves ideal extraction temperature in 3 seconds. - INTEGRATED CONICAL BURR GRINDER
Precision conical burrs maximize ground coffee surface area for a full espresso flavor. Upper and lower burrs are removable for cleaning. - ADJUSTABLE GRIND SIZE
30 espresso grind settings from fine to coarse for optimal extraction. - ADJUSTABLE GRIND AMOUNT
Adjust the amount of fresh ground coffee dosed into the filter basket to suit the fineness or coarseness of the grind. - AUTOMATIC DOSING
The grinder will dispense the required amount of ground coffee for a single or double cup dose. - HANDS FREE GRINDING
Auto stop for hands-free grinding directly into the portafilter. - THE RAZOR™ DOSE TRIMMING TOOL
Patented twist blade trims down the puck to the right level for precision dosing and a consistent extraction. - ADJUSTABLE SHOT TEMPERATURE CONTROL
For optimum coffee flavor. - PID TEMPERATURE CONTROL
Electronic PID temperature control for increased temperature stability. - INSTANT HOT WATER
Dedicated hot water outlet for making Americanos and pre-heating cups. - LOW PRESSURE PRE-INFUSION
Applies low water pressure at the start of the extraction to gently expand grinds for an even extraction. - VOLUMETRIC CONTROL
Pre-set 1 & 2 cup volumes, manual over-ride or programmable shot volumes. - DRY PUCK FEATURE
Removes excess water from the ground coffee in the filter basket after extraction for easy disposal of the coffee puck. - LARGE DRIP TRAY
With more usable workspace.
Assembly
BEFORE FIRST USE
Machine Preparation
Remove and discard all labels and packaging materials attached to your espresso machine. Ensure you have removed all parts and accessories before discarding the packaging. Remove the packaging and the plastics bags containing the water filter and water filter holder. Clean the water tank, portafilter, filter baskets, milk jug, and drip tray using warm water and a gentle dishwashing liquid. Rinse well, then dry thoroughly before reassembling.
INSTALLING THE WATER FILTER
- Remove the water filter and the water filter holder from the plastic bag.
- Soak the filter in cold water for 5 minutes.
- Wash the filter holder with cold water.
- Set the reminder for next month’s replacement. We recommend replacing the filter after 2 months.
- Insert the filter into the filter holder.
- Install the assembled filter holder in the water tank, ensuring it is clicked into place.
- Fill the water tank with cold water before sliding back into position on the back of the machine and locking into place.
- Refer to Care & Cleaning on page 18 for further instructions on installing the filter.
NOTE
DO NOT use highly filtered, demineralized or distilled water in this machine. This may affect the taste of the coffee.
NOTE
For replacement water filters, visit the Breville webpage or contact Breville Consumer Support.
FILLING THE WATER TANK
- Ensure the water filter is securely fitted inside the water tank.
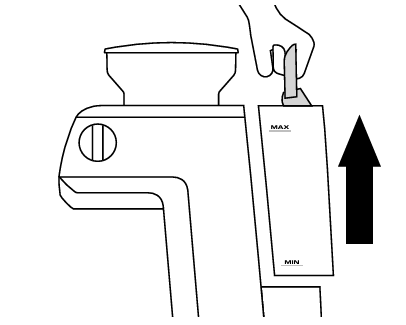
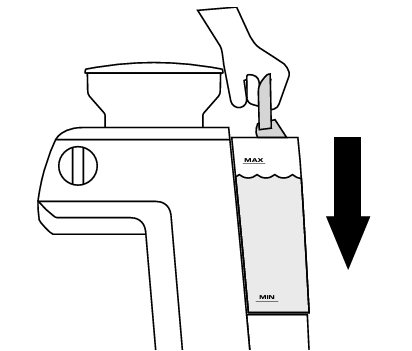
- Use the handle at the top of the water tank to assist in lifting it up and away from the machine.

- Fill the water tank with cold potable tap water to below the MAX marking indicated on the side of the water tank.
- Replace the water tank back on the machine, pressing down to ensure that it is properly positioned and attached to the machine.

NOTE
Replace the water daily. The water tank should be filled with fresh, cold tap water before each use.
ATTACHING THE HOPPER
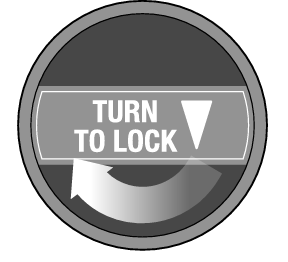
Insert the bean hopper into position on top of the machine.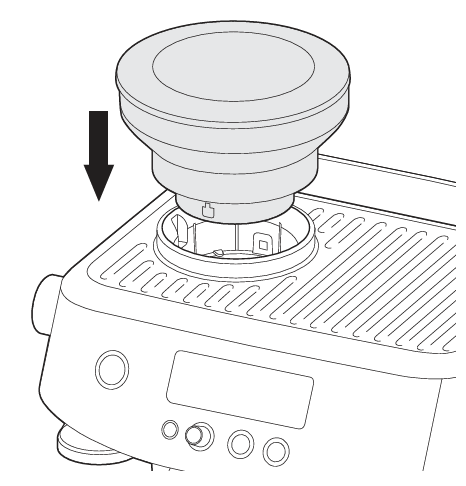 Turn the dial to lock the hopper into place. Fill with fresh coffee beans.
FIRST USE CYCLE
A first use cycle must be completed before the initial use of the machine. The first use cycle rinses the machine and primes the heating system.
- Fill the water tank.
- Ensure the machine is fully assembled with the bean hopper, drip tray, and water tank securely attached to the machine.
- Press the POWER button. The machine will beep and go into FIRST CYCLE mode.
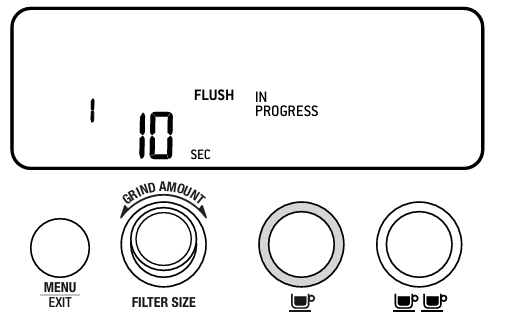
- The LCD will display FLUSH, and the 1 CUP button will be illuminated.

- Press the 1 CUP button. The LCD will show a countdown for the remaining time of the first use cycle.
- Once complete, the machine will go into READY mode.
Functions
TURNING OFF THE MACHINE
To turn the machine off, press the POWER button. Alternatively, the machine has an auto-off, if it is not used for 30 minutes.
FILTER BASKETS
This machine includes 4 filter baskets: 2 x Single Wall and 2 x Dual Wall. Single-wall filter baskets should be used when grinding fresh whole coffee beans. They allow you to experiment with grind, dose, and tamp to create a more balanced espresso. 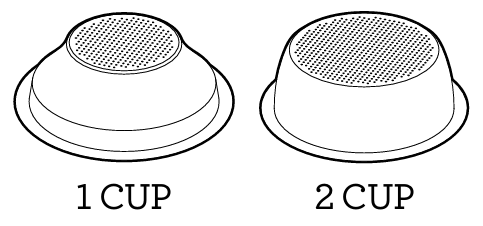 Dual-wall filter baskets should be used when using pre-ground coffee. They regulate the pressure and help to optimize the extraction regardless of the grind, dose and tamp pressure or freshness.
 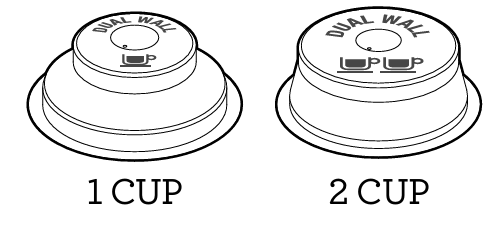 Regardless of whether you use Single Wall or Dual Wall filter baskets, use the 1 CUP basket when brewing a single cup and the 2 CUP basket when brewing two cups or a stronger single cup or mug. You will need to adjust the grind amount and size if switching from a single to a double basket, or vice versa. The provided filter baskets are designed for:
- 1 CUP basket = approx. 8-11g
- 2 CUP basket = approx. 16-19g
NOTE
You may need to experiment with how much coffee is dosed into the filter basket or how long the grinder needs to run to achieve the correct dose. For example, when using a finer espresso grind with the Single Wall filter baskets, you may need to increase the grind amount to ensure the filter basket is correctly dosed.
THE GRIND
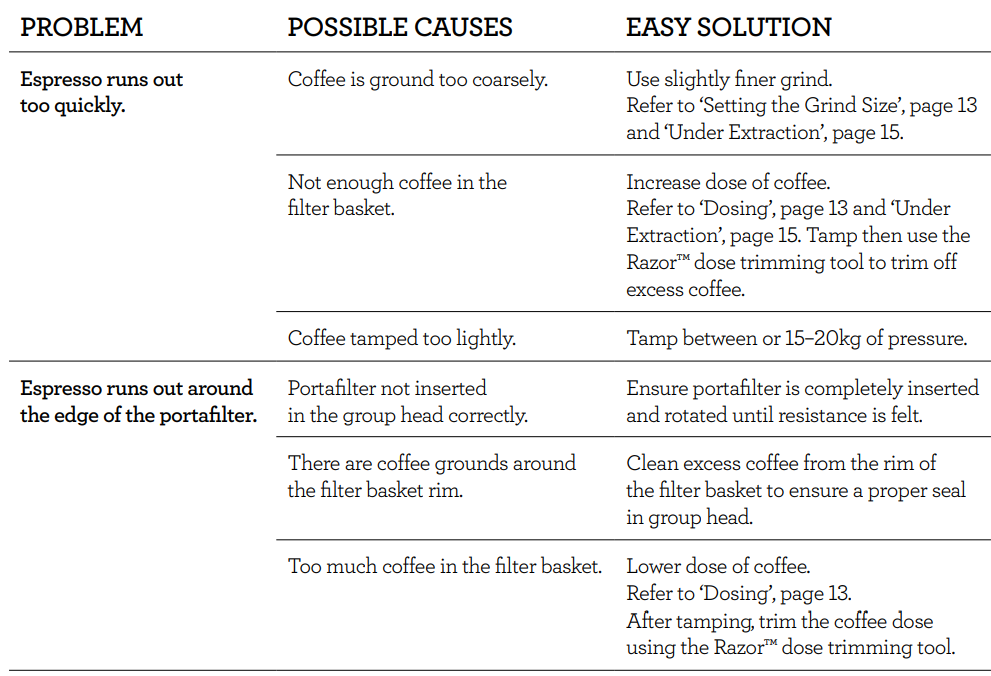
When grinding coffee beans, the grind size should be fine, but not too fine. The grind size will affect the rate at which water flows through the ground coffee in the filter basket and the taste of the espresso. If the grind is too fine (looks like powder and feels like flour when rubbed between the fingers), the water will not flow through the coffee, even when under pressure. The resulting espresso will be over-extracted, dark in color, and bitter in flavor. If the grind is too coarse, the water will flow through the ground coffee in the filter basket too quickly. The resulting espresso will be under-extracted and lacking in color and flavor.
SETTING THE GRIND SIZE
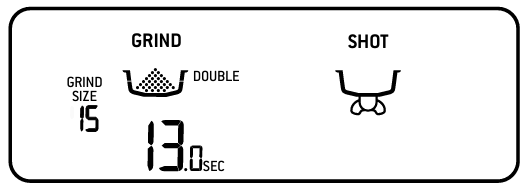
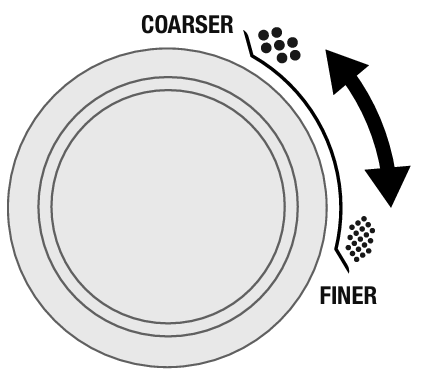
This machine has 30 grind settings to select from, with the size selected displayed on the LCD screen. The default grind size is 15. When adjusting the grind size, a bar will display on the LCD indicating a faster or slower pour.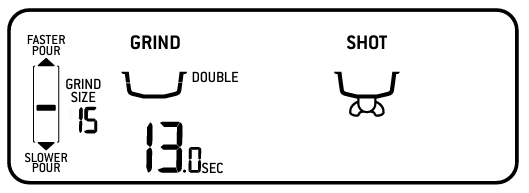 Use the GRIND SIZE selector on the left side of the machine to adjust the grind size.
DOSING THE COFFEE
- Fill the hopper with fresh coffee beans.
- Insert the required filter basket into the portafilter.
- Place the portafilter into the grinding cradle.
- If required, press the FILTER SIZE button to select the filter basket size: Single or Double.
- If required, turn the GRIND AMOUNT dial to change the grind time; clockwise to increase the time and counterclockwise to decrease.
NOTE: The default grind times are 9.5 seconds for a 1-cup filter and 13 seconds for a 2-cup filter. - Press and release the portafilter to activate the automatic dosing. The LCD will show the filter basket filling.

- If you need to pause the grinding function, press and release the portafilter. The LCD will show PAUSED; it will remain paused for 15 seconds before returning to READY mode.
- Press and release the portafilter to resume grinding.
NOTE
It is normal for the portafilter to appear overfilled with ground coffee.
MANUAL DOSING
To manually dose the coffee, press and hold the portafilter in the grinding cradle until the desired amount of ground coffee has been dosed. To stop grinding, release the portafilter. The timer will count up, displaying the grind time.
TAMPING THE GROUND COFFEE
- Remove the portafilter from the grinding cradle.
- Tap the portafilter several times to collapse and distribute the coffee evenly in the filter basket.
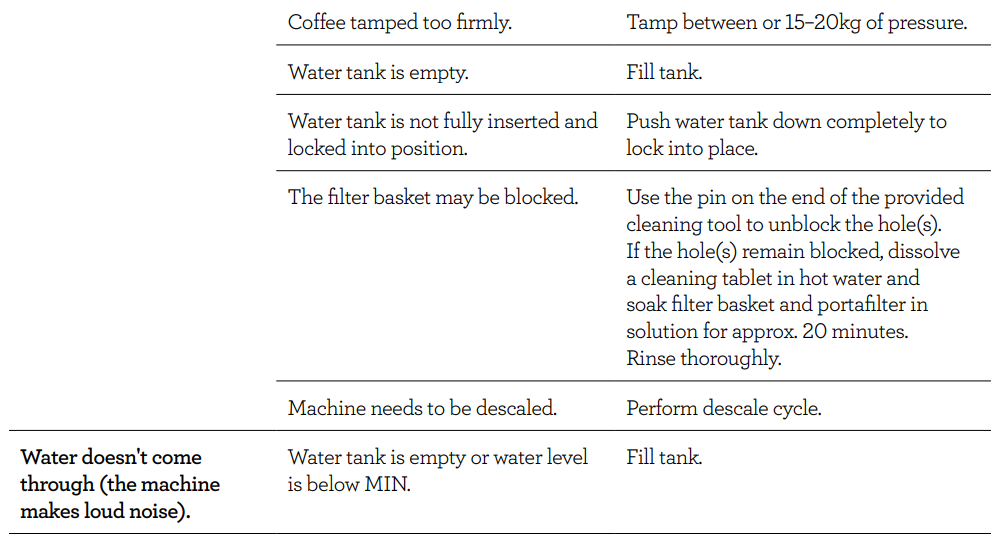
- Using the tamper, tamp down firmly (approx. 15-20kg of pressure). The amount of pressure is not as important as the consistent pressure every time.

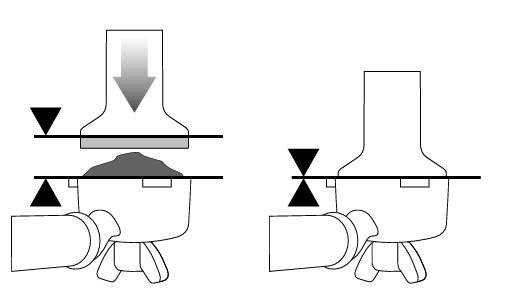
- As a guide, the top edge of the cap on the tamper should be level with the top of the filter basket AFTER the coffee has been tamped.
NOTE
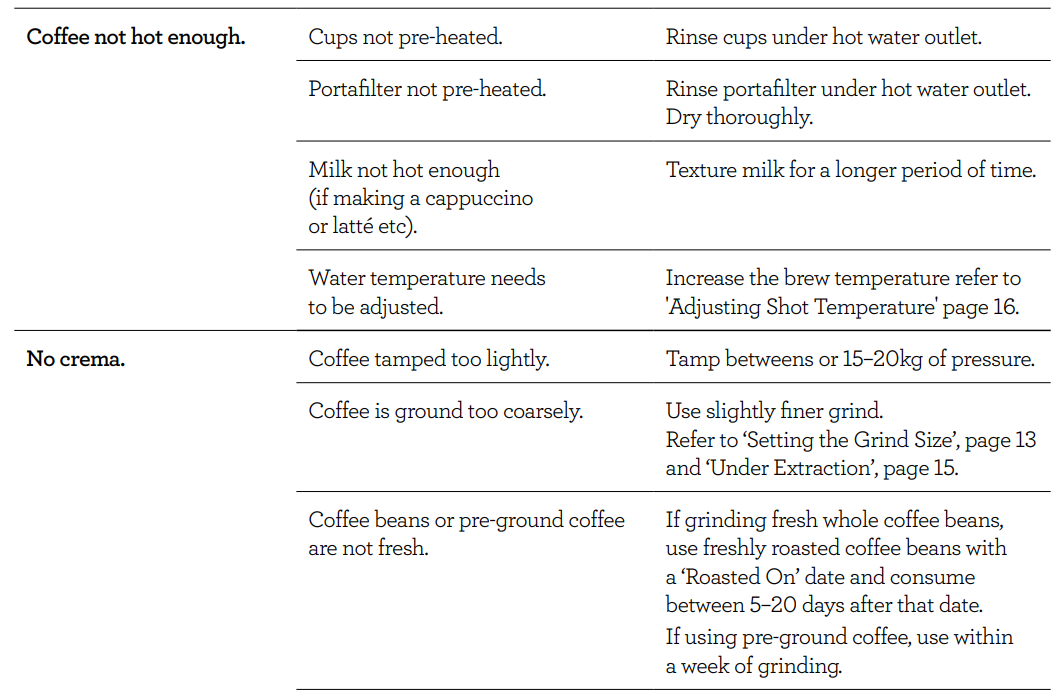
We recommend quality 100% Arabica beans with a ‘Roasted On’ date stamped on the bags, not a ‘Best Before’ or ‘Use By’ date. Coffee beans are best consumed between 5 – 20 days after the ‘Roasted On’ date. Stale coffee may pour too quickly from the portafilter and taste bitter and watery.
TRIMMING THE DOSE
The Razor™ precision dose trimming tool allows you to trim the puck to the right level for a consistent extraction.
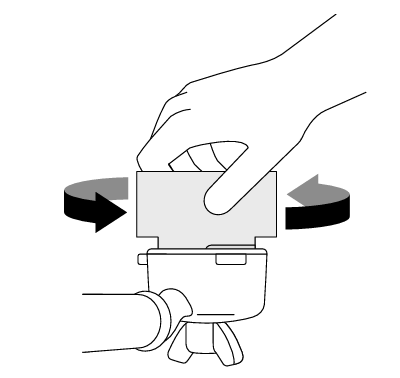
- Insert the Razor™ dose trimming tool into the filter basket until the shoulders of the tool rest on the rim of the basket. The blade of the dose trimming tool should penetrate the surface of the tamped coffee.
- Rotate the Razor™ dose trimming tool back and forth while holding the portafilter on an angle over a knock box to trim off excess coffee grinds. Your filter basket is now dosed with the correct amount of coffee.

- Wipe excess coffee from the rim of the filter basket to ensure a proper seal is achieved in the group head.
PURGING THE GROUP HEAD
Before placing the portafilter into the group head, run a short flow of water through the group head by pressing the 1 CUP button. This will stabilize the temperature prior to extraction and preheat the portafilter for a consistent shot temperature.
INSERTING THE PORTAFILTER
Place the portafilter underneath the group head so that the handle is aligned with the INSERT position. Insert the portafilter into the group head and rotate the handle towards the centre until firm resistance is felt.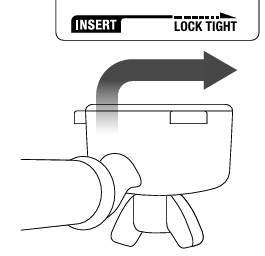
Care & Cleaning
CAUTION: To prevent damage to the appliance, do not use alkaline cleaning agents when cleaning; use a soft cloth and mild detergent.
REPLACING THE WATER FILTER

The water filter provided helps to prevent scale build up which over time can affect the performance of your machine. Replacing the water filter every 2 months will reduce the need to de-scale the machine. If you live in a hard water area, we recommend changing the water filter more frequently.
- Remove the water filter from the plastic bag.
- Soak the filter in cold water for 5 minutes.
- Rinse the filter under cold running water.
- Set the reminder for the next month of replacement. We recommend replacing the filter after 2 months.
- Insert the filter into the filter holder.
- Install the assembled filter holder in the water tank, ensuring it is locked into place.
- Fill the water tank with cold water before sliding back into position on the back of the machine and locking into place.
NOTE: Replacement water filters can be purchased from the Breville website or by contacting Breville Consumer Support.
FLUSH CLEANING CYCLE
The LCD will display a FLUSH alert when a cleaning cycle is required. The cleaning cycle is separate from descaling.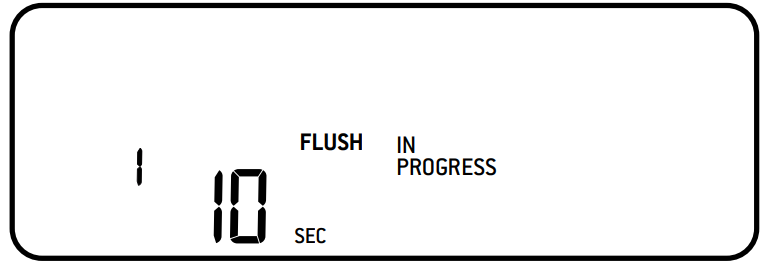
- Insert the cleaning disc into the filter basket in the portafilter.
- Place a cleaning tablet on top of the cleaning disc.
- Lock the portafilter into the group head.
- Empty the drip tray and replace on the machine.
- Fill the water tank to the MAX line, then reattach to the machine.
- Press the MENU button to enter the main menu.
- Use the GRIND AMOUNT dial to navigate the menu to FLUSH, then press to select. The 1 CUP button will illuminate.
- Press the 1 CUP button to start the cleaning cycle. The remaining time for the cleaning cycle will be displayed on the LCD.
- Once the cleaning cycle is complete, the machine will beep and return to READY mode. If any of the cleaning tablets remain in the cleaning disc, repeat the cycle.
- Empty and rinse the portafilter, cleaning disc, and drip tray.
DESCALING
NOTE: Ensure that the water filter is removed from the water tank before adding the descaling powder when descaling the machine.
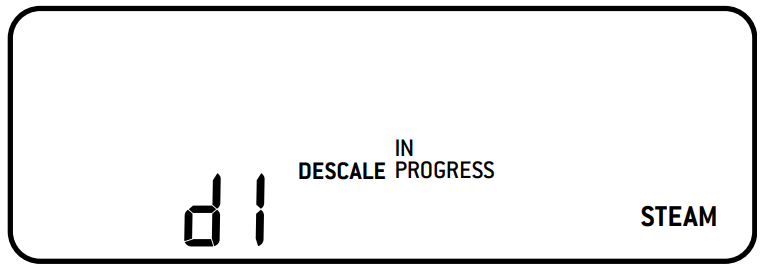
After regular use, hard water can cause mineral buildup in and on many of the inner functioning components, reducing the brewing flow, brewing temperature, power of the machine, and the taste of the espresso. The LCD will display a DESCALE alert when a descaling cycle is required.
- Empty the drip tray and reattach to the machine. Remove the water tank from the machine and remove the filter from the water tank.
- Fill the water tank to the DESCALE line indicated and add the descaling agent to the water. Reattach the water tank to the machine.
- Press the MENU button to enter the main menu. Use the GRIND AMOUNT dial to navigate the menu to DESCALE, then press to select. The 1 CUP button will illuminate.
- Press the 1 CUP button to start the descaling cycle. The descale cycle cleans in 3 stages: coffee, hot water, and steam. After each stage is complete, the machine will beep. The STEAM DIAL must be manually turned to the HOT WATER and STEAM position when indicated on the LCD.

- Once the descale cycle is complete, the machine needs to complete a rinse cycle. The 1 CUP button will illuminate. As with the descale cycle, the STEAM DIAL must be manually turned to the correct position when indicated on the LCD.
- Remove and empty the drip tray, then replace it on the machine. Empty any remaining descaling liquid from the water tank, then fill the water tank to the MAX line and reattach it to the machine.
- Press the 1 CUP button to commence the rinse cycle. The rinse cycle is also 3 stages. The LCD will show which stage it is up to. After each stage, the machine will beep.
- Once the rinse cycle is complete, the machine will beep and return to READY mode.
- Remove and rinse the drip tray and water tank. Dry thoroughly before replacing them on the machine.
Troubleshooting
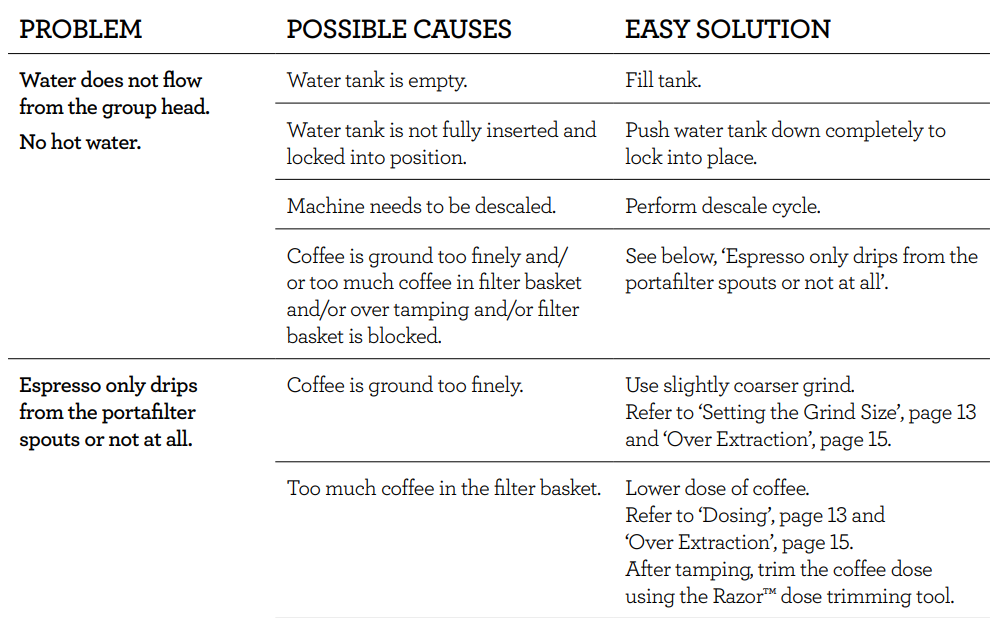
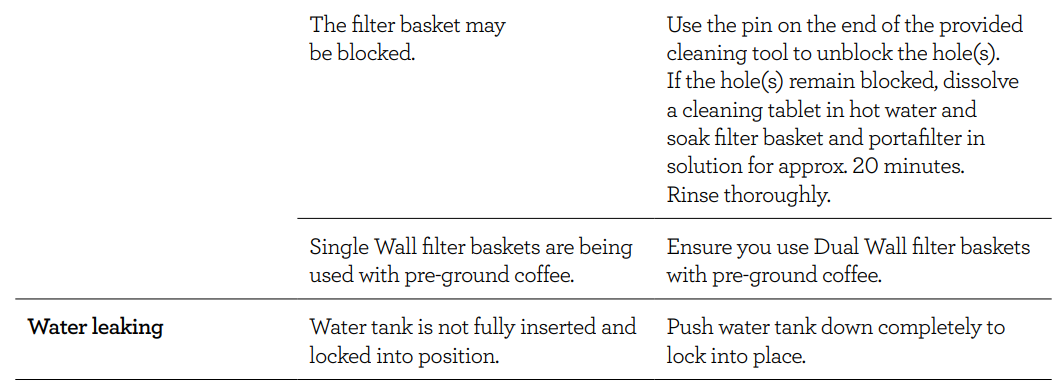
For more manuals by Breville, visit ManualsLibraryy
Breville BES878BSS Barista Pro Espresso Machine-FAQs
Can I leave my Breville Barista Pro on all the time?
No. It’s recommended to turn off the machine using the power button, unplug it from the outlet when not in use, cleaning, moving, assembling/disassembling, or storing it.
What is the size of the Breville Barista Pro?
The machine has a footprint of approximately 12.5″ x 13.8″ and comes with an integrated burr grinder, 16 grind settings, programmable dosing, and a manual steam wand.
Why does my Breville machine stop after a few seconds?
If the machine stops brewing after 3–5 seconds, the issue may lie in a faulty flow meter or a blockage in the water line. Try cleaning the group head, checking for clogs, or replacing the flow meter if needed.
Should I turn off my espresso machine at night?
It depends on your usage, but turning it off helps with energy saving and safety. Instead of worrying about metal fatigue, focus on using filtered water and maintaining the machine properly.
How can I fix my Barista Pro if it stops working in 5 seconds?
Run a blind shot with a cleaning disk, remove the water filter and try a flush cycle, or clear an air lock from the flow meter. If needed, look up instructional videos for step-by-step help.
What is pre-infusion in the Breville Barista Pro?
Pre-infusion is a gentle process of soaking the coffee grounds with low pressure before full extraction. This helps ensure an even flow of water through the entire coffee puck for better flavor.
What is the ideal time for an espresso shot?
The perfect espresso shot should take between 25 to 30 seconds. Adjust the grind size to control the flow—finer grinds slow it down, coarser grinds speed it up.
Can I store espresso for later use?
Yes, you can drink espresso within a day if stored at room temperature. However, for best taste, it’s recommended to enjoy it fresh.

