Dartwood Mountable CD Player
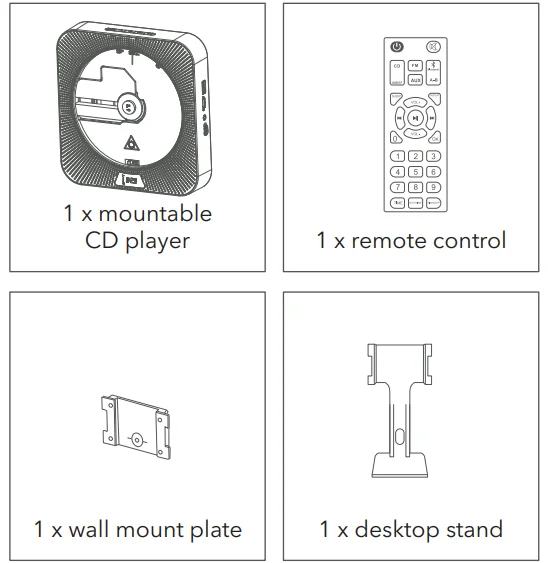
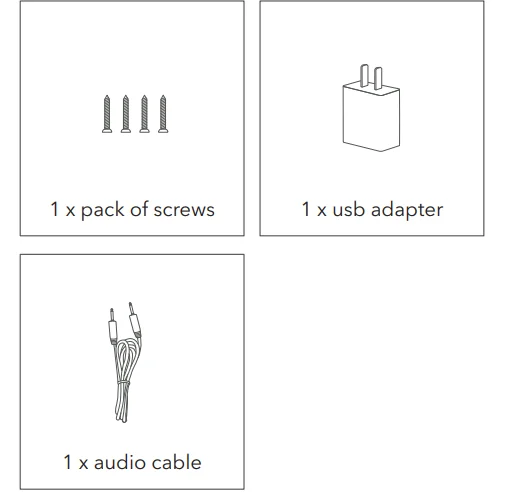
In the Box

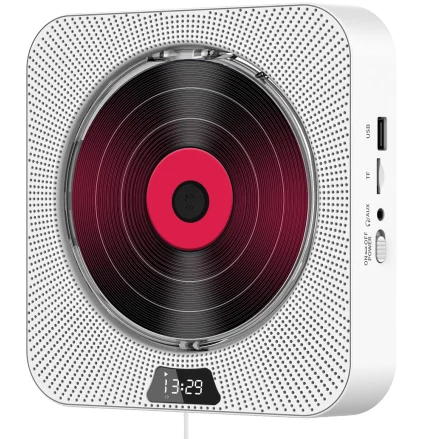
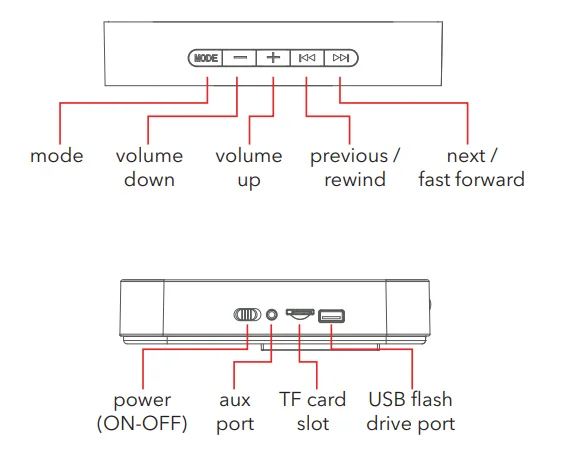
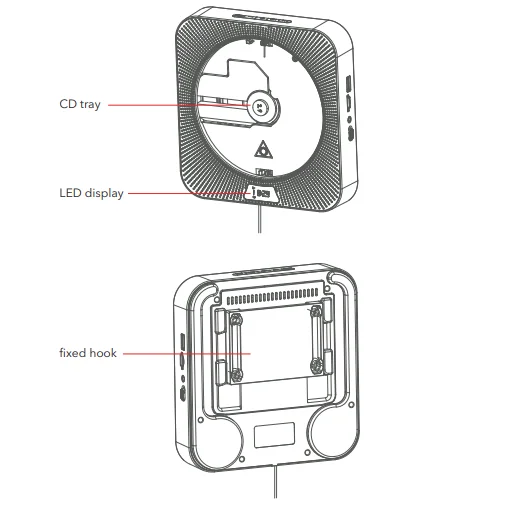
Product Overview

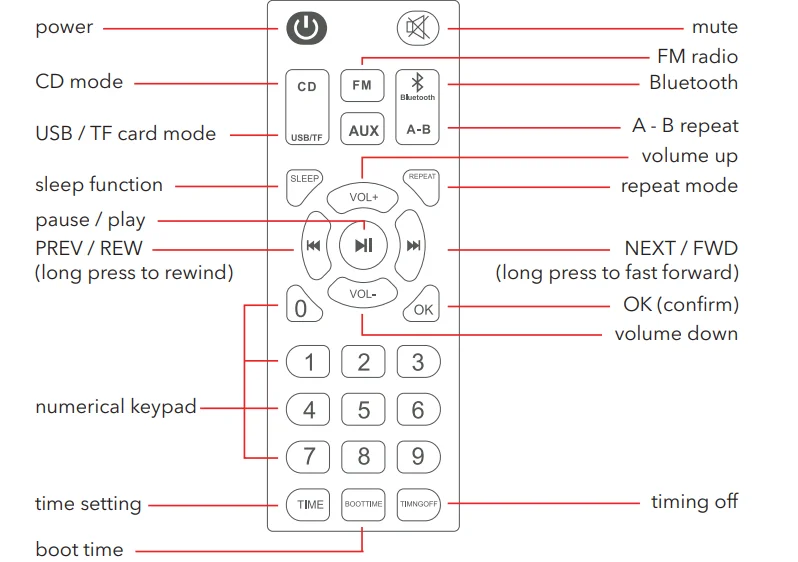
Remote Control
Instructions
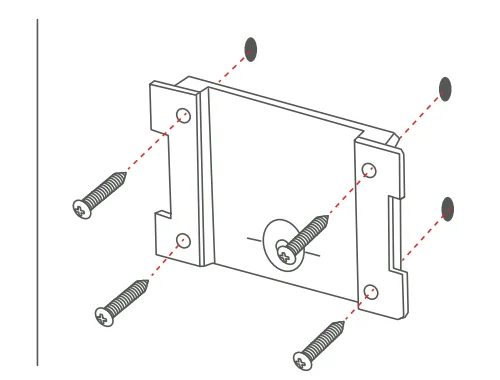
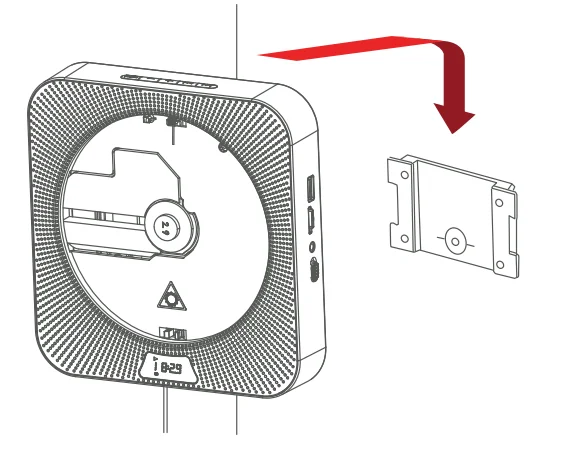
Wall-mounted
- Fix the wall-mounting plate on the wall with the included screws.

- Hang the CD player on the wall-mounting plate.

Desk Stand
Simply mount the player on the desk stand.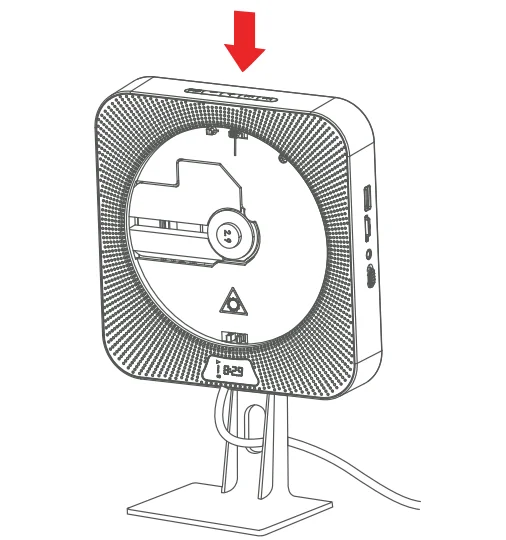
Quick Start
- Remove the insulation sheet before using.
- Plug in the USB cable to the adapter.
- Plug the adapter into the power outlet (110–220 V AC, 50/60 Hz).
- Insert a disc (format: CD, CD-R, CD-RW, MP3, WMA, WAV) into the CD player.
- Switch the power button on the CD player to “ON.”
- The display shows the status of reading the disc (DISC flashes). It will play music after the disc rotates (5–10 seconds).
- Press the “MODE” button or use the remote control to switch functions: “CD,” “USB/TF,” “AUX,” “FM,” and “Bluetooth.”
- The standby button on the remote will show the time in the display, and it can be configured.
- Switch the power button on the CD player to “OFF” to completely turn off the device.
Note: Switching off the power will reset the time.
Modes
The available modes include CD, USB & TF, FM, AUX, and Bluetooth; the display will light up the corresponding mode symbol when switching modes.
CD Mode
- Press the mode button or the CD button on the remote to switch to CD mode. The compact disc will run automatically, and the CD icon will appear on the screen.
Note: CD format support: CD, CD-R, CD-RW, MP3, WMA, WAV.
USB/TF Card Mode
- Plug in a USB or TF card to the CD player USB or TF card slot.
- Press the mode button or the USB/TF card button on the remote control to switch to USB/TF mode. The device will automatically read files from the USB or TF card.
FM Mode
- FM radio range: 87.5 MHz–108.0 MHz.
- Press the mode button or the “FM” button on the remote to switch to “FM mode.”
- Press the “PREV/NEXT” button again to enter the automatic search state, and it will automatically save radio program searches.
AUX Mode
- Press the mode button or the “AUX” button on the remote to switch to “AUX mode.”
- Connect the CD player to external audio devices with the included 3.5 mm male-to-male audio cable.
Note: Standard 3.5 mm audio input/output port.
Bluetooth Mode
- Press the mode button or the “Bluetooth” button on the remote to switch to “Bluetooth mode.” The player will be ready to pair with other Bluetooth devices, such as mobile phones, tablets, etc. You will hear a sound from the speaker, and the Bluetooth icon will appear on the screen.
- Activate Bluetooth on your mobile phone, and it will automatically search nearby Bluetooth devices to pair.
- Choose the device in your mobile phone Bluetooth device list to pair.
- Your mobile phone will be paired/connected to the player in a few seconds.
- Play music on your mobile phone, and the audio will be transmitted to the player speaker through Bluetooth.
Repeat Function
- Press the repeat button on the remote to cycle between playback modes. Available playback modes are “Repeat One” and “Repeat All.”
- Upon pressing the repeat button for the first time, the screen will display “REP,” indicating “Repeat One.”
- Subsequent pressing of the repeat button will display “ALL” on the screen, signifying “Repeat All.”
A-B Repeat Function
- The A-B Repeat function enables playback of a specific section repeatedly by setting the start point (A) and end point (B) for the section.
- Press the “A-B” button on the remote to set the start point (A) while playing. The screen will display “A.”
- Press the “A-B” button again to set the end point (B) while playing. The screen will display “B.”
- The specified section from A to B will be played back repeatedly.
- To exit the A-B repeat, simply press the “A-B” button once again, and the screen will display “OFF.”
Note: A-B Repeat function only works in “CD, USB/TF mode.”
Time Setting
- To set the time, press the time setting button on the remote. This will cause the first digit on the display “00:00” to start blinking.
- Proceed to select your desired time in sequence and press the “OK” button to confirm your selection.
For example, to set the time 07:30:
- Press the “Time Setting” button on the remote.
- Select 0 on the numerical keypad and press the “OK” button.
- Select 7 on the numerical keypad and press the “OK” button.
- Select 3 on the numerical keypad and press the “OK” button.
- Select 0 on the numerical keypad and press the “OK” button to finish.
Boot Time
- Alarm setting: By pressing the “Boot Time” button, the LED screen will display “00:00,” which is the original alarm time shown when resetting.
- Proceed to select your desired time and confirm each selection by pressing the “OK” button. Once you have finished setting the boot time, the LED display will show a “( )” icon. If you wish to cancel the setting, simply long-press “0.”
- For more detailed instructions, please refer to the relevant paragraph in the time setting section.
Time Off
- Alarm setting: To activate the timer off function, press the “OFF Timer” button.
- The LED screen will display “00:00,” which is the original alarm time shown when resetting.
- For more detailed instructions on how to set the timer, please refer to the relevant paragraph in the time setting section.
Sleep Function
- Once you press the “Sleep” button, the sleep function is activated, causing the main display light to turn off.
- To resume normal function, simply press the “Sleep” button again.
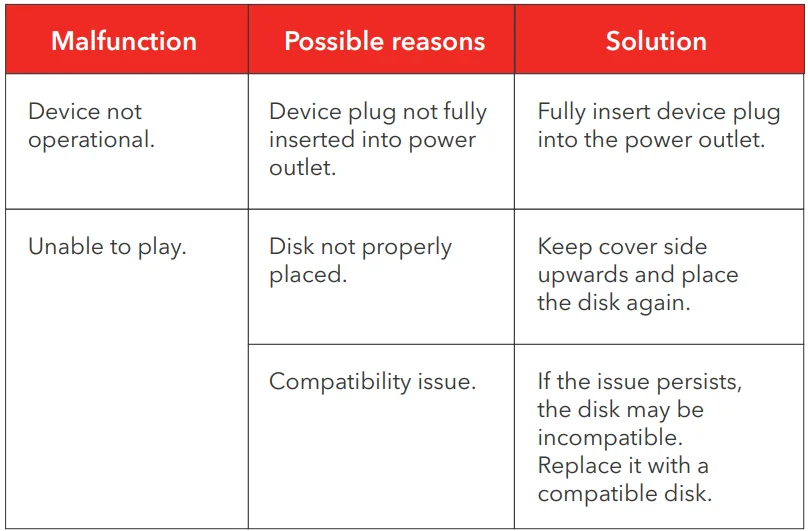
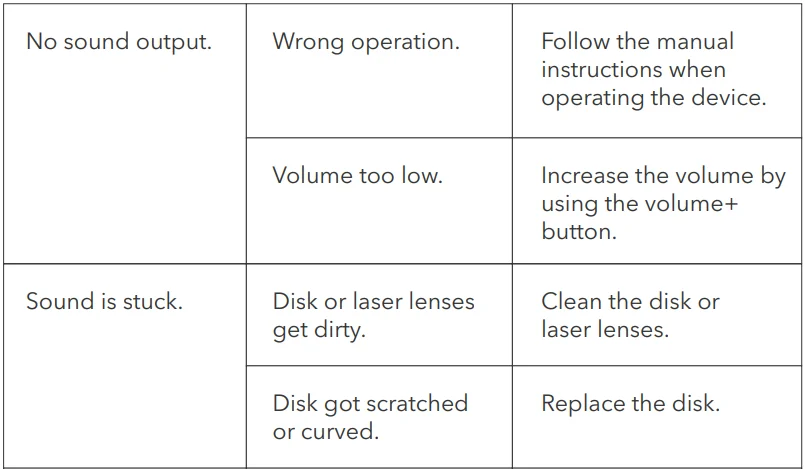
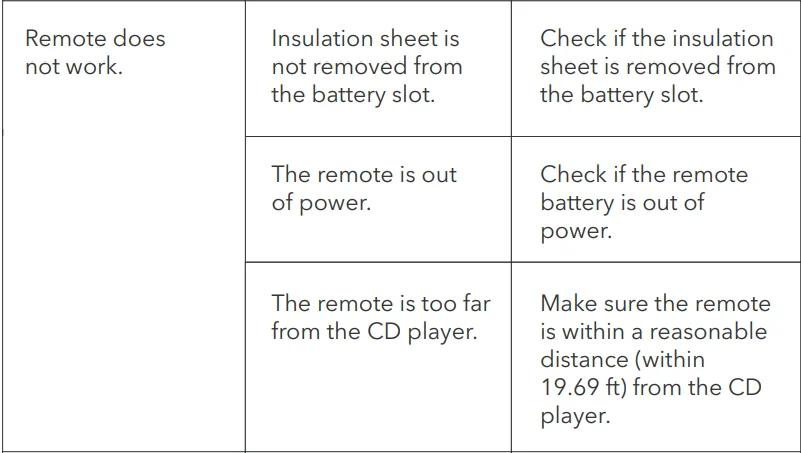
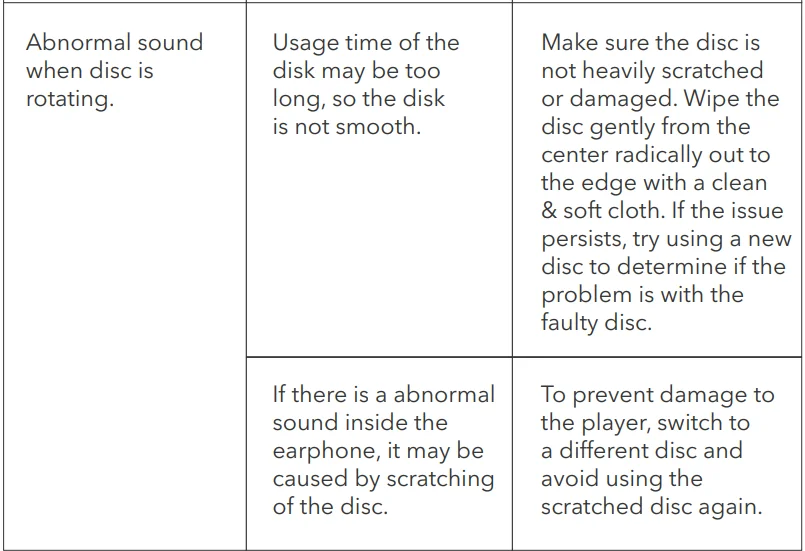
Troubleshooting


Safety Information
- Never use chemicals such as record sprays, anti-static sprays, benzene, or thinners to clean the CD. These chemicals can permanently damage the disc surface.
- To avoid serious scratches on CDs, keep them in their cases after each use. Scratches can cause the laser pick-up to skip during future playback. Do not place stickers or write anything on the disc.
- Never touch the laser of the device. Always use the dust cover to prevent dust from accumulating on the laser.
- If the device is unable to scan discs properly, use a standard commercially available cleaner to clean the laser optics. Other cleaning methods may damage the laser optics.
Specifications
- CD format support: CD, CD-R, CD-RW, MP3, WMA, WAV
- Input power: 110–220 VAC 50/60 Hz
- Power supply: DC 5V/2A
- Rated power: 8W
- Bluetooth: 5.0
- Tuning range: FM 87.5–108 MHz
- Weight: 1.1 lb
- Dimensions: 7.0 × 6.7 × 1.5 in
- Material: ABS plastic
Get More Support
Scan the QR code below or email us at [email protected].
For More Manuals By Dartwood, Visit ManualsLibraryy.
Dartwood Mountable CD Player-FAQs
How do I set up my CD player?
Connect the CD player to a power source using the AC adaptor or insert batteries. If using active speakers, connect via RCA or AUX cables. Place it on a stable surface or mount as desired.
How do I insert a CD correctly?
Press the Eject button to open the tray. Place the CD with the label side up, aligning it with the center spindle. Gently close the tray; the CD will start spinning automatically.
How do I start playing a CD?
Press the Play button or hold the >N button for 2 seconds. Closing the lid after inserting the CD will also start playback automatically.
What if the CD player won’t open?
Power off the device and unplug it for 30 seconds. Try again. If it still won’t open, use a straightened paper clip in the manual eject hole to release the tray.
Why isn’t my CD player reading discs?
Check that the disc is clean, free of scratches, and inserted correctly with the label side up. Try another CD to confirm the player is working.
How do I fix no sound from the CD player?
Ensure volume is turned up and the mute is off. Check connections to speakers or headphones. Test with a different disc if needed.
Do I need an amplifier for my CD player?
If connecting to passive speakers, an amplifier is needed. For active (powered) speakers, you can connect directly without an amp.
How do I eject a CD without power or a button?
Locate the manual eject hole, insert a paper clip, and gently press until the tray opens.
How many songs fit on a CD?
A standard 700 MB CD holds about 80 minutes of audio, roughly 15–20 songs depending on length.

