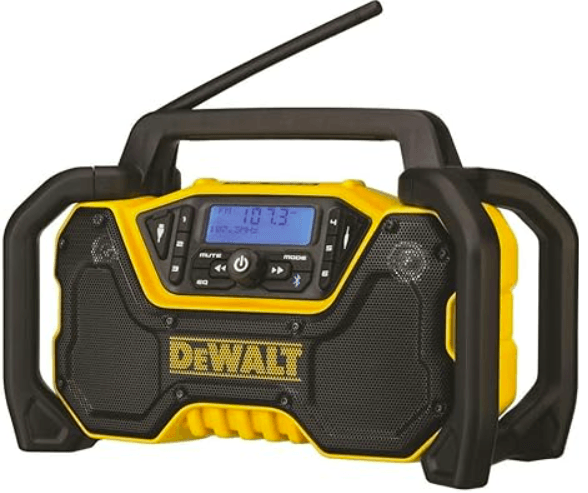
Dewalt DCR028B 12V-20V Bluetooth Radio
Definitions: Safety Alert Symbols and Words
This instruction manual uses the following safety alert symbols and words to alert you to hazardous situations and your risk of personal injury or property damage.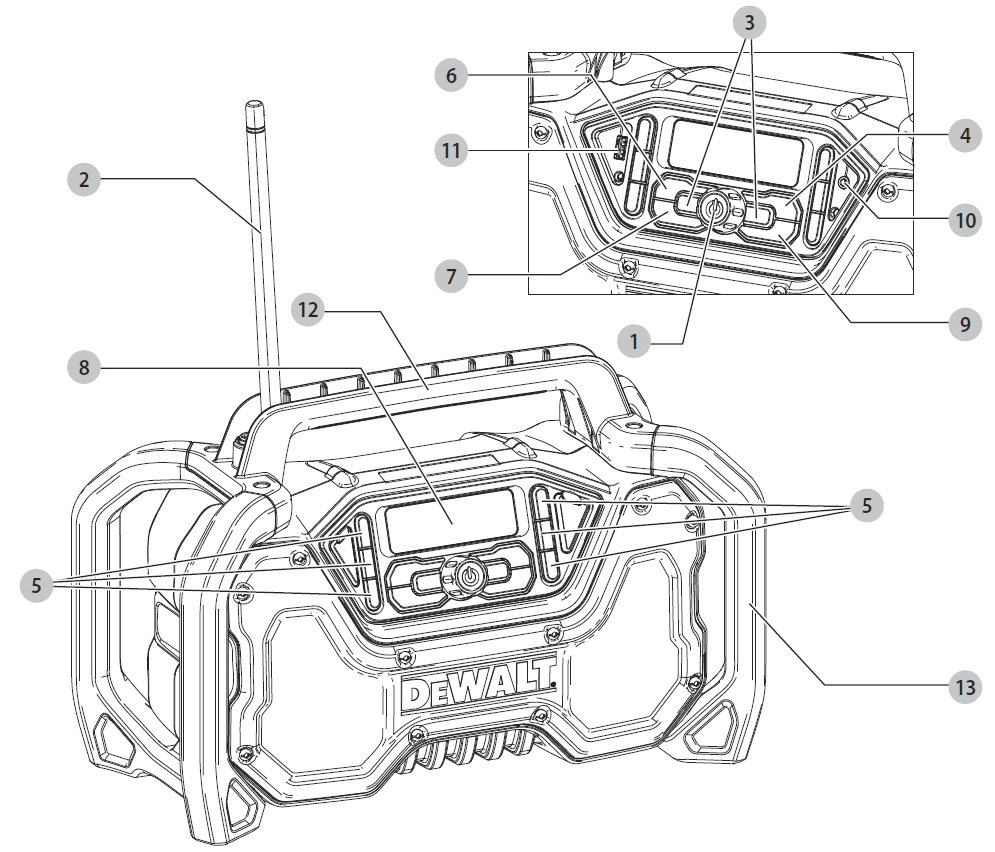
- ON/OFF/Volume button
- Antenna
- Seek/tuner/arrow buttons
- Mode button
- Radio preset buttons
- Mute button
- EQ button
- LCD display
- Bluetooth® button
- AUX audio port
- USB charging port
- Carry handle
- Roll cage
SAVE ALL WARNINGS AND INSTRUCTIONS FOR FUTURE REFERENCE
Important Safety Instructions
- Read these instructions.
- Keep these instructions.
- Heed all warnings.
- Follow all instructions.
- Do not use this apparatus near water.
- Clean only with a dry cloth.
- Do not block any ventilation openings. Install in accordance with the manufacturer’s instructions.
- Do not install near any heat sources such as radiators, heat registers, stoves or other apparatus (including amplifiers) that produce heat.
- Do not defeat the safety purpose of the polarized or grounding-type plug. A polarized plug has two blades one wider than the other. A grounding-type plug has two blades and a third grounding prong. The wide blade or the third prong is provided for your safety. If the provided plug does not fit into your outlet, consult an electrician for rthe eplacement of the obsolete outlet.
- Protect the power cord from being walked on or pinched particularly at plugs, convenience receptacles, and the point where they exit from the apparatus
READ ALL INSTRUCTIONS
Important Safety Instructions for All Battery Packs
- Do not charge or use the battery pack in explosive atmospheres, such as in the presence of flammable liquids, gases, or dust. Inserting or removing the battery pack from the charger may ignite the dust or fumes.
- NEVER force the battery pack into the charger. DO NOT modify the battery pack in any way to fit into a non-compatible charger as the battery pack may rupture causing serious personal injury. Consult the chart at the end of this manual for compatibility of batteries and chargers.
- Charge the battery packs only in designated DeWALT chargers.
- DO NOT splash or immerse in water or other liquids.
- Do not store or use the tool and battery pack in locations where the temperature may reach or exceed 104 °F (40 °C) (such as outside sheds or metal
Transportation
- WARNING: Fire hazard. Do not store or carry the battery pack so that metal objects can contact exposed battery terminals. For example, do not place the battery pack in aprons, pockets, tool boxes, product kit boxes, drawers, etc., with loose nails, screws, keys, etc. Transporting batteries can possibly cause fires if the battery terminals inadvertently come in contact with conductive materials such as keys, coins, hand tools, and the like. The US Department of Transportation Hazardous Material Regulations (HMR) actually prohibit transporting batteries in commerce or on airplanes in carry-on baggage UNLESS they are properly protected from short circuits. So when transporting individual battery packs, make sure that the battery terminals are protected and well insulated from materials that could contact them and cause a short circuit.
- Shipping the DeWALT FLEXVOLT™ Battery
- The DeWALT FLEXVOLT™ battery has two modes: Use and Shipping.
- Use Mode: When the FLEXVOLT™ battery stands alone or is in a DeWALT 20V Max* product, it will operate as a 20V Max* battery. When the FLEXVOLT™ battery is in a 60V Max* or a 120V Max* (two 60V Max* batteries) product, it will operate as a 60V Max* battery.
- Shipping Mode: When the cap is attached to the FLEXVOLT™ battery, the battery is in Shipping Mode. Strings of cells are electrically disconnected within the pack resulting in three batteries with a lower Watt hour (Wh) rating as compared to one battery with a higher Watt hour rating. This increased quantity of three batteries with the lower watt-hour rating can exempt the pack from certain shipping regulations that are imposed upon the higher Watt-hour batteries.
- The battery label indicates two Watt hour ratings (see example). Depending on how the battery is shipped, the appropriate Watt hour rating must be used to determine the applicable shipping requirements. If utilizing the shipping cap, the pack will be considered 3 batteries at the Watt-hour rating indicated for “Shipping”. If shipping without the cap or in a tool, the pack will be considered one battery at the Watt-hour rating indicated next to “Use”.
- For example, the Shipping Wh rating might indicate 3 x 40 Wh, meaning 3 batteries of 40-watt hours each. The Use Wh rating might indicate 120 Wh (1 battery implied).
Fuel Gauge Battery Packs (Fig. B)
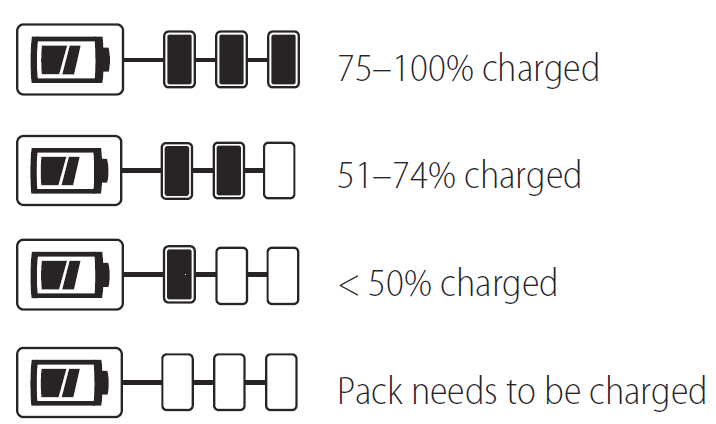
- Some DeWALT battery packs include a fuel gauge which consists of three green LED lights that indicate the level of charge remaining in the battery pack.
The fuel gauge is an indication of the approximate levels of charge remaining in the battery pack according to the following indicators:
- To actuate the fuel gauge, press and hold the fuel gauge button. A combination of the three green LED lights will illuminate designating the level of charge left. When the level of charge in the battery is below the usable limit, the fuel gauge will not illuminate and the battery will need to be recharged.

- NOTE: The fuel gauge is only an indication of the charge left on the battery pack. It does not indicate tool functionality and is subject to variation based on product components, temperature, and end-user application. For more information regarding fuel gauge battery packs, please call 1-800-4-DeWALT (1-800-433-9258) or visit our website www.dewalt.com
Important Safety Instructions for All Battery Chargers
- DO NOT attempt to charge the battery pack with any chargers other than the ones in this manual. The charger and battery pack are specifically designed to work together.
- These chargers are not intended for any uses other than charging DeWALT rechargeable batteries. Any other uses may result in risk of fire, electric shock or electrocution.
- Do not expose the charger to rain or snow.
- Pull by the plug rather than the cord when disconnecting the charger. This will reduce the risk of damage to the electric plug and cord.
- Make sure that the cord is located so that it will not be stepped on, tripped over or otherwise subjected to damage or stress.
- An extension cord must have adequate wire size (AWG or American Wire Gauge) for safety. The smaller the gauge number of the wire, the greater the capacity of the cable, that is, 16 gauge has more capacity than 18 gauge. An undersized cord will cause a drop in line voltage resulting in loss of power and overheating. When using more than one extension to make up the total length, be sure each individual extension contains at least the minimum wire size. The following table shows the correct size to use depending on cord length and nameplate ampere rating. If in doubt, use the next heavier gauge. The lower the gauge number, the heavier the cord.
- Minimum Gauge for Cord Sets
Volts Total length of Cord in Feet (meters)
120 V 25 (7.6) 50 (15.2) 100 (30.5) 150 (45.7) 240 V 50 (15.2) 100 (30.5) 200 (61.0) 300 (91.4) Ampere Rating American Wire gauge
More Than not More Than 0 6 18 16 16 14 6 10 18 16 14 12 10 12 16 16 14 12 12 A
16 14 12 Not Recommended - Do not place any object on top of the charger or place the charger on a soft surface that might block the ventilation slots and result in excessive internal heat. Place the charger in a position away from any heat source. The charger is ventilated through slots in the top and the bottom of the housing.
- Do not operate the charger with a damaged cord or plug.
- Do not operate the charger if it has received a sharp blow, been dropped or otherwise damaged in any way. Take it to an authorized service center.
- Do not disassemble the charger; take it to an authorized service center when service or repair is required. Incorrect reassembly may result in a risk of electric shock, electrocution or fire.
- Disconnect the charger from the outlet before attempting any cleaning. This will reduce the risk of electric shock. Removing the battery pack will not reduce this risk.
Charging a Battery
- Plug the charger into an appropriate outlet before inserting the battery pack.
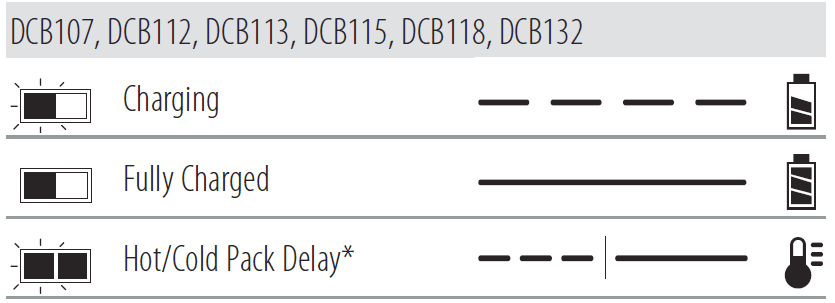
- Connect the charger and battery pack, making sure the battery is fully seated. The (charging) light will blink continuously indicating that the charging process has started.
- The completion of charge will be indicated by the lights remaining ON continuously. The battery pack is fully charged and may be removed and used at this time or left in the charger.
- NOTE: To remove the battery pack, some chargers require the battery pack release button to be pressed

- DCB107, DCB112, DCB113, DCB115, DCB118, DCB132: The red light will continue to blink, but a yellow indicator light will be illuminated during this operation. Once the battery pack has reached an appropriate temperature, the yellow light will turn off and the charger will resume the charging procedure.
- The compatible charger(s) will not charge a faulty battery pack. The charger will indicate faulty battery pack by refusing to light.
- NOTE: This could also mean a problem with a charger. If the charger indicates a problem, take the charger and battery pack to be tested at an authorized service center.
- Hot/Cold Pack Delay
When the charger detects a battery pack that is too hot or too cold, it automatically starts a Hot/Cold Pack Delay, suspending charging until the battery pack has reached an appropriate temperature. The charger then automatically switches to the pack charging mode. This feature ensures maximum battery pack life
- NOTE: To remove the battery pack, some chargers require the battery pack release button to be pressed
Electronic Protection System
- Li-Ion tools are designed with an Electronic Protection System that will protect the battery pack against overloading, overheating or deep discharge.
The tool will automatically turn off if the Electronic Protection System engages. If this occurs, place the lithium-ion battery pack on the charger until it is fully charged
SAVE THESE INSTRUCTIONS FOR FUTURE USE
Intended Use
- This DeWALT Jobsite Bluetooth® Radio is designed for broadcast radio reception or to play/stream audio via a wireless Bluetooth® connection or wired connection to a mobile phone or other audio device.
- DO NOT use under wet conditions or in the presence of flammable liquids or gases.
- DO NOT let children come into contact with the tool. Supervision is required when inexperienced operators use this tool
OPERATION
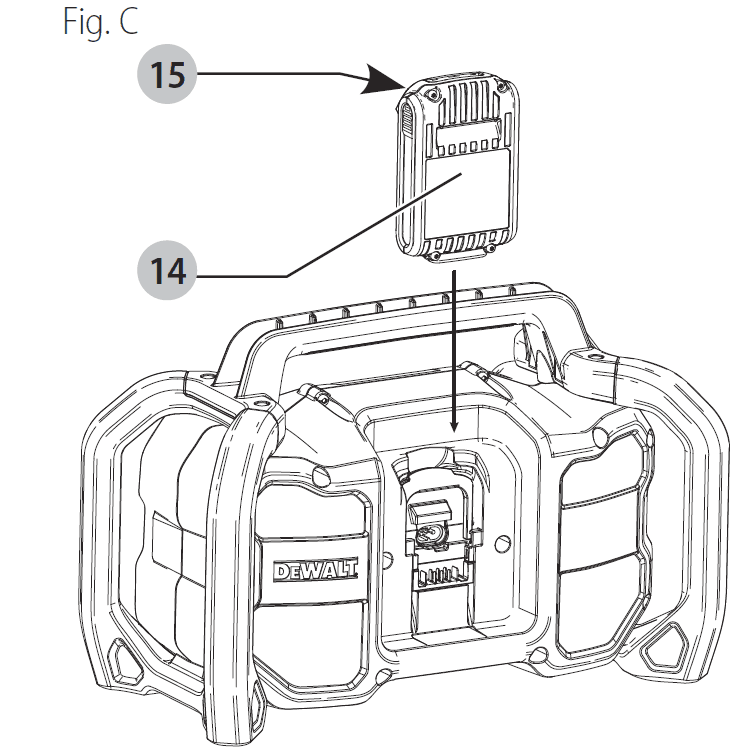
Installing and Removing the Battery Pack (Fig. C)
NOTE: For best results, make sure your battery pack is fully charged.
- To install the battery pack 14 into the radio, align the battery pack with the rails inside the radio and slide it in until the battery pack is firmly seated and ensure that it does not disengage.
- To remove the battery pack from the radio, press the release button 15 and firmly pull the battery pack out of the radio. Insert it into the charger as described in the charger section of this manual.

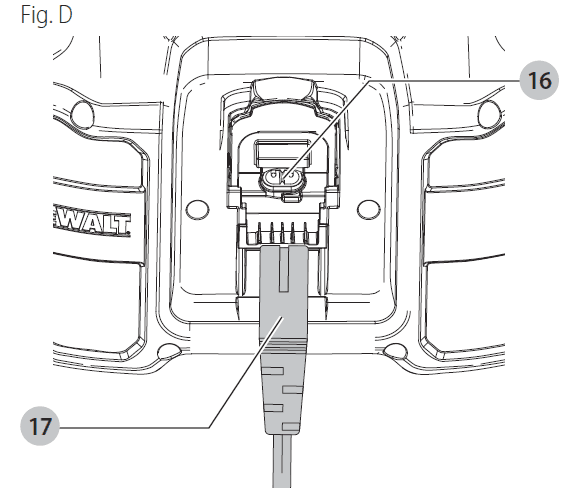
Powering with the AC Power Cord (Fig. D)
- To power the radio using the AC power cord 17 , plug the cord into the radio’s AC power input 16 found on the back of the radio, then plug the 120V AC cord end into the wall outlet or an appropriate-sized extension cord that is plugged into a wall outlet. Always fully extend the cord before each use.
- NOTE: The battery pack must be removed before the AC power cord can be plugged into the AC power input

To Program the Radio Preset Buttons(Fig. A)
There are six presets for FM and six for AM. After programming the buttons, pressing 1, 2, 3, 4, 5 or 6 will instantly change the frequency to the preset station.
- Turn the power on.
- Set the radio to the desired station (see Tune or Seek Function).
- Press and hold one of the desired radio preset buttons 5 until the button number appears on the right side of the LCD. The radio preset button is now set.
Connecting a Previously Paired Bluetooth® Audio Device
- If a Bluetooth® device has been previously paired to the radio it should automatically reconnect when the radio is powered on. Within 4 seconds the radio will go into connecting mode. Once the previously paired Bluetooth® device is recognized and connected, the LCD display will read “Connected”. If connection does not occur and you are unable to stream music please follow the instructions for Pairing Radio with a Bluetooth® Audio Device.
Charging a Cell Phone or Audio Device Via USB (Fig. E)
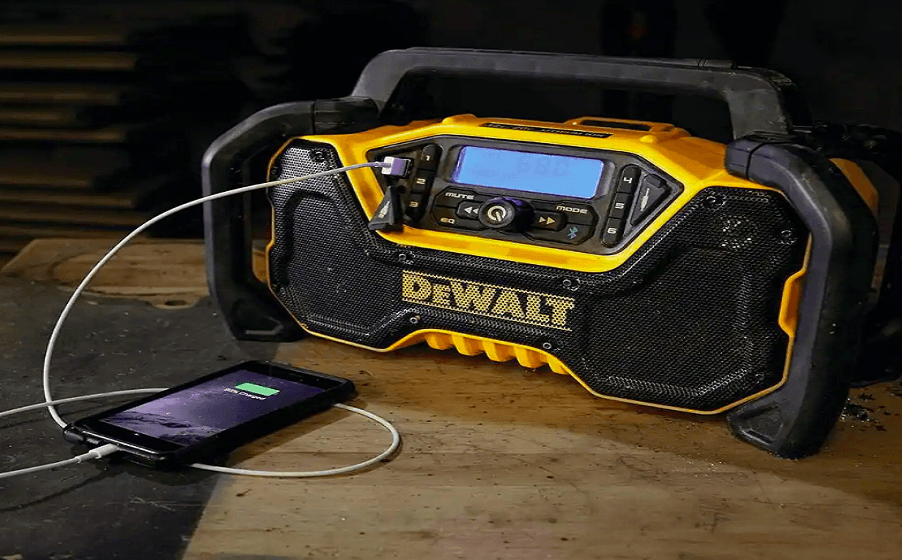
- Your audio device or mobile phone can be charged (up to 2 AMPS) using the USB charging port 11 on the radio. This charging is possible when the unit is on, running off of AC plug power or the battery pack.
Important Radio Notes
- Reception will vary depending on the location and strength of the radio signal.
- Running the radio while connected to certain generators may cause background noise.
- AM reception will most likely be clearer when powered by a battery pack
MAINTENANCE
- WARNING: To reduce the risk of serious personal injury, turn the unit off and remove the battery pack or AC power cord before making any adjustments or removing/installing attachments or accessories. An accidental start-up can cause injury.
- Your DeWALT power tool has been designed to operate over a long period of time with a minimum of maintenance. Continuous satisfactory operation depends upon proper tool care and regular cleaning.
- Cleaning
- WARNING: Blow dirt and dust out of all air vents with clean, dry air at least once a week. To minimize the risk of eye injury, always wear ANSI Z87.1-approved eye protection when performing this procedure.
For more manuals by Dewalt visit, ManualsLibraryy
Dewalt DCR028B 12V-20V Bluetooth Radio-FAQs
What is the purpose of the Bluetooth feature on DeWalt batteries?
DeWalt’s Tool Connect™ Inventory Manager allows you to assign batteries to job sites and users for better tracking. A blue LED light indicates when the battery is paired.
Can the DeWalt radio charge batteries?
Some models, like the DCR015, can charge and run on 12V and 20V MAX battery packs. However, models like the DCR020 are radio-only and do not charge batteries.
Is there a reset button on the DeWalt radio?
Yes, to factory reset the DCR029:
1. Enter AUX mode.
2. Press 1 key and ENT key simultaneously.
3. Navigate to Factory Reset and press ENT.
What frequency do DeWalt radios use?
DeWalt radios operate on 22 FRS frequencies, which can be used license-free for both personal and business purposes.
How long does the DeWalt radio battery last?
Battery life varies based on volume levels but typically lasts up to 10 hours or more on a full charge.
Do all DeWalt radios have Bluetooth?
No, but many models come with Bluetooth connectivity, allowing you to stream music or podcasts from your phone or tablet.
What happens when I reset my DeWalt radio?
Resetting erases clock settings and stored content. Some models lack a dedicated reset button, so refer to your manual for specific reset instructions.
How long is the warranty on a DeWalt radio?
DeWalt radios come with a 3-year limited warranty, 1-year free service, and a 90-day money-back guarantee.

