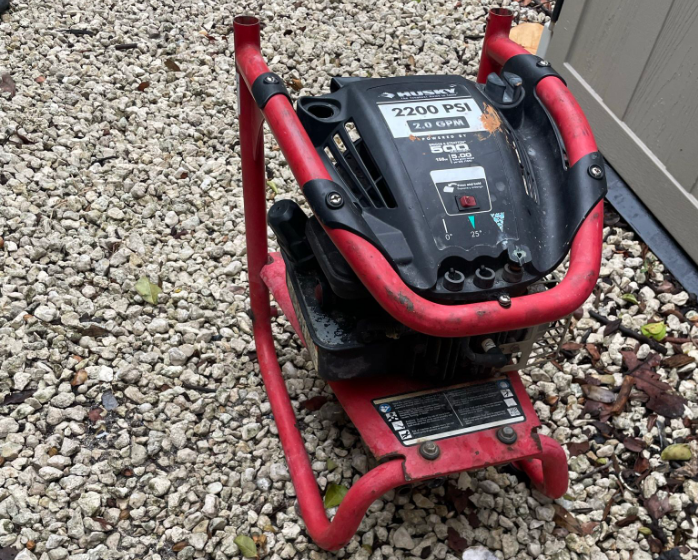
Husky HU80520 Pressure Washer

IMPORTANT SAFETY INSTRUCTIONS
- READ ALL INSTRUCTIONS BEFORE USING THIS PRODUCT
- Know your tool. Read the operator’s manual carefully. Learn the machine’s applications and limitations, as well as the specific potential hazards related to this tool.
- Keep guards in place and in working order. Never operate the tool with any guard or cover removed. Make sure all guards are operating properly before each use.
- Remove adjusting keys and wrenches. Form the habit of checking to see that keys and adjusting wrenches are removed from the tool before turning it on.
- To reduce the risk of injury, keep children and visitors away. All visitors should wear safety glasses and keep a safe distance from the work area.
- Keep the area of operation clear of all persons, particularly small children and pets.
- Do not operate the engine in a confined space where dangerous carbon monoxide fumes can collect. Carbon monoxide, a colorless, odorless, and extremely
dangerous gas, can cause unconsciousness or death. - Use the right tool. Don’t force a tool or attachment to do a job it was not designed for. Don’t use it for a purpose not intended.
- Dress properly. Do not wear loose clothing, gloves, neckties, or jewelry. They can get caught and draw you into moving parts. Rubber gloves and nonskid footwear
are recommended when working outdoors. Also, wear a protective hair covering to contain long hair. - Do not operate the equipment while barefoot or when wearing sandals or similar lightweight footwear. Wear protective footwear that will protect your feet and improve your footing on slippery surfaces.
- Exercise caution to avoid slipping or falling.
- Always wear safety glasses with side shields. Every day eyeglasses have only impact-resistant lenses; they are NOT safety glasses.
- Don’t overreach or stand on unstable support. Keep proper footing and balance at all times.
- Use only recommended accessories. The use of improper accessories may cause risk of injury.
- Follow the maintenance instructions specified in this manual.
- Check damaged parts. Before further use of the tool, a guard or other part that is damaged should be carefully checked to determine that it will operate properly and perform its intended function. Check for alignment of moving parts, binding of moving parts, breakage of parts, mounting, and any other conditions that may affect its operation. A guard or other part that is damaged must be properly repaired or replaced by an authorized service center to avoid risk of personal injury.
- Never leave the tool running unattended. Turn the power off.
- Don’t leave the tool until it comes to a complete stop.
- Keep the engine free of grass, leaves, or grease to reduce the chance of a fire hazard.
- Keep the exhaust pipe free of foreign objects.
- Follow the manufacturer’s recommendations for safe loading, unloading, transport, and storage of the machine.
- Be thoroughly familiar with controls. Know how to stop the product and bleed pressure quickly.
- Keep the tool dry, clean, and free from oil and grease.
PRODUCT SPECIFICATIONS
Engine……………………………………………………………… Briggs and Stratton 500 Series*
Fuel Tank Capacity ……………………………………………………………..1 quart (.95 liters)
Maximum Pounds Per Square Inch Pressure ………………………………2,200 psi
Maximum Gallons Per Minute ……………………………………………………2.0 GPM
* No representation is made as to the horsepower of the Briggs & Stratton 500 Series engine.
FEATURES
KNOW YOUR PRESSURE WASHER
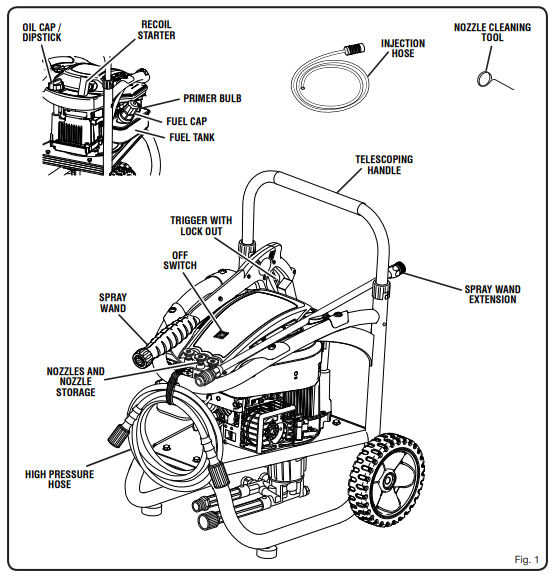
See Figure 1. The safe use of this product requires an understanding of the information on the tool and in this operator’s manual, as well as a knowledge of the project you are attempting. Before using this product, familiarize yourself with all operating features and safety rules.
BRIGGS & STRATTON ENGINE
This Briggs & Stratton 500 Series engine enables the pressure washer to achieve 2,200 PSI (pounds per square inch) at a rate of 2.0 GPM (gallons per minute).
FUEL TANK
This fuel tank has a maximum capacity of 1 quart (.95 liters). Use unleaded automotive gasoline in the engine.
HOSE STORAGE
Once the high-pressure hose is rolled, hang it on the front of the machine using the hook and loop strap for convenient storage.
OFF SWITCH
To turn the engine off, press and hold the OFF switch for a full three seconds or until the engine stops.
RECOIL STARTER
The recoil starter is pulled to start the machine.
SPRAY WAND
The spray wand has a gripping surface that provides added control of the spray wand and helps reduce fatigue. Both the spray wand and extension have storage areas located
on top of the machine.
THERMAL RELIEF VALVE
This pump feature will prevent water temperatures from reaching harmful levels by releasing a small amount of water from a rubber hose. Once the water has drained, the thermal relief valve will reset itself.
TRIGGER WITH LOCK OUT
Pulling the trigger releases a stream of water for high-pressure cleaning. The lockout protects against unauthorized use.
ASSEMBLY
UNPACKING
This product requires assembly.
- Carefully cut the box down the sides, then remove the tool and any accessories from the box. Make sure that all items listed in the packing list are included. NOTE: This tool is heavy. To avoid back injury, lift with your legs, not your back, and get help when needed.
- Inspect the tool carefully to make sure no breakage or damage occurred during shipping.
- Do not discard the packing material until you have carefully inspected and satisfactorily operated the tool.
- If any parts are damaged or missing, please call 1-866-340-3912 for assistance.
PACKING LIST
- Pressure Washer
- 20 ft. High-Pressure Hose
- Spray Wand Assembly (upper)
- Spray Wand Extension (lower)
- Quick-Connect Nozzle (3)
- Nozzle Cleaning Tool
- Injection Hose
- Wheel (2)
- Flat Washer (4)
- Axle (2)
- Hitch Pin (2)
- 4-Cycle Engine Oil (SAE 30)
- Telescoping Handle
- Operator’s Manual
ATTACHING THE WHEEL ASSEMBLY
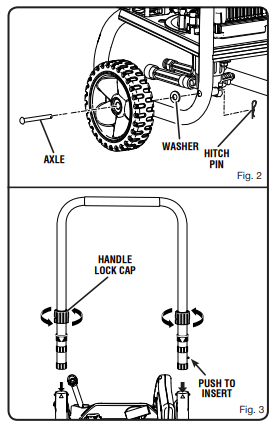
- Locate the axle, hitch pins, and wheels. Remove the hitch pin from the axle.
- Slide the axle/washer through the hole in the center of the wheel.
- Lift the machine and slide the combination into the wheel mounting hole in the machine base as shown.
- Push the hitch pin into the hole on the end of the axle to secure the wheel assembly. NOTE: The hitch pin should be pushed into the axle until the center of the pin rests on top of the axle.
- Repeat with the second wheel.
INSTALLING THE TELESCOPING HANDLE See Figure 3.
To install the telescoping handle:
- Align the arrows on the U-shaped handle with the arrows on the back of the frame.
- Push and hold the button on the handle as you slide the handle into the holes in the frame.
- Lock the handle in place by aligning the slot in the handle lock cap with the pin on the housing bar. Next, push the handle lock cap down while turning the cap clockwise. NOTE: Before use, pull the handle up until the lock button snaps through the locking slot to secure the handle in place.
ADDING OIL TO THE ENGINE
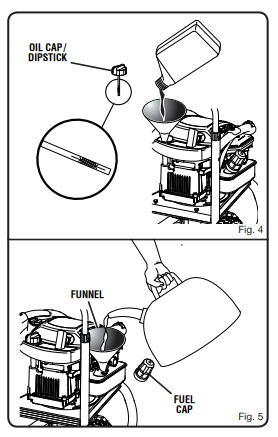
- Place the pressure washer on a flat, level surface.
- Unscrew the oil cap/dipstick by turning counterclockwise.
- Using 4-stroke engine oil (SAE 30), fill to the upper level of the oil filter neck (18 oz., 4-cycle engine oil provided).
- Replace the oil cap/dipstick and securely tighten.
ADDING GASOLINE TO THE FUEL TANK
When adding gas to the pressure washer, make sure the unit is sitting on a flat, level surface. If the engine is hot, let the pressure washer cool before adding gas. ALWAYS fill the fuel tank outdoors with the machine turned off. NOTE: Use unleaded gas only. DO NOT mix oil with gas.
- Before removing the fuel cap, clean the area around it. Remove the fuel cap.
- Insert a clean funnel into the fuel tank, then slowly pour gasoline into the tank. Fill the tank to approximately 1-1/2 in. below the top of the tank neck (this allows for
fuel expansion). - Replace the fuel cap and tighten securely.
- Clean up any spills before starting the engine.
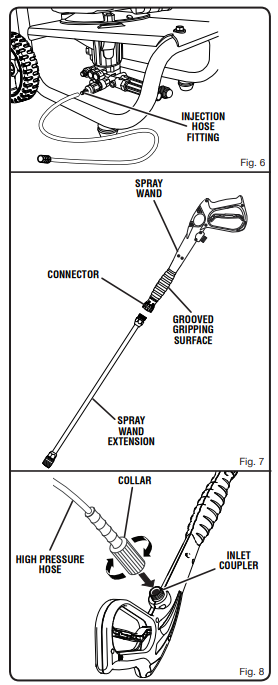
ATTACHING INJECTION HOSE
See Figure 6. Before detergent can be used with this machine, the injection hose must be attached.
- Push the open end of the clear injection hose securely over the fitting as shown in Figure 6.
- Place the filtered end of the injection hose in the bottle of detergent
ASSEMBLING THE SPRAY WAND
See Figure 7.
To attach the spray wand extension:
- Place the threaded end of the wand extension in the connector on the end of the spray wand assembly.
- Turn the connector clockwise until it stops. This secures the wand extension in place.
- When not in use, remove the spray wand extension from the spray wand by turning the connector counterclockwise. When not in use, store both pieces on top of the
pressure washer.
CONNECTING HIGH-PRESSURE HOSE TO SPRAY WAND ASSEMBLY
See Figure 8.
- Screw the collar on the high-pressure hose into the spray wand’s inlet coupler by turning the hose collar clockwise.
- Pull on the hose to be certain it is properly secured.
OPERATION
APPLICATIONS
You may use this tool for the purposes listed below:
- Removing dirt and mold from decks, cement patios, and house siding
- Cleaning cars, boats, motorcycles, outdoor furniture, and grills
STARTING AND STOPPING THE PRESSURE WASHER
Before starting the engine:
- Connect all hoses.
- Check all fluids (oil and gas).
- Turn the garden hose on, then squeeze the trigger to relieve air pressure; hold the trigger until a steady stream of water appears.
To start the engine:
- Push the primer bulb 3 times. NOTE: If starting the engine for the first time, push the primer bulb 5 times.
- Grasp the recoil starter and pull slowly until resistance is felt. Give the recoil starter a short, brisk pull to start the engine.
To stop the engine:
On top of the engine is an OFF ( O ) switch. Press and hold the switch in the OFF position for three (3) seconds or until the engine stops.
USING THE SPRAY WAND TRIGGER
See Figure 13. For greater control and safety, keep both hands on the spray wand at all times.
- Pull back and hold the trigger to operate the pressure washer.
- Release the trigger to stop the flow of water through the nozzle.
To engage the lockout:
- Push up on the lockout until it clicks into the slot.
To disengage the lockout:
- Push the lock out down and into its original position. For the most effective cleaning, the spray nozzle should be between 8 in. and 24 in. from the surface to be cleaned. If the spray is too close, it can damage the cleaning surface.
SELECTING THE RIGHT QUICK-CONNECT NOZZLE FOR THE JOB
See Figure 14 – 15. �Before starting any cleaning job, determine the best nozzle for the job. Each of the three nozzles has a different spray pattern. The nozzle patterns are: detergent (low pressure), 25˚ (medium pressure), and 0˚ (high pressure). NOTE: For a gentle rinse, select the detergent nozzle. Scouring the surface requires a more direct spray of water. Select the 0˚ nozzle for tough jobs. �Apply detergent using the detergent nozzle.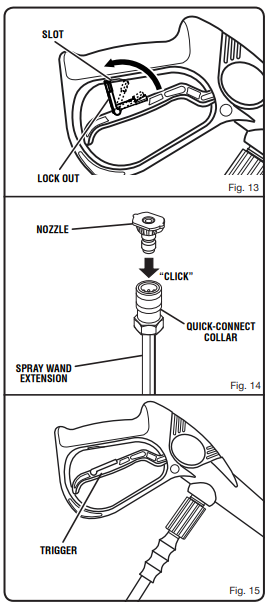
MAINTENANCE
GENERAL MAINTENANCE
Avoid using solvents when cleaning plastic parts. Most plastics are susceptible to damage from various types of commercial solvents and may be damaged by their use. Use clean cloths to remove dirt, dust, oil, grease, etc. Only the parts shown on the parts list are intended to be repaired or replaced by the customer. All other parts should be replaced at an authorized service center. Before running the engine, perform the following pre-operation steps:
- Check that all bolts, nuts, etc., are securely tightened.
- Make sure the air filter is clean.
- Check both the engine oil level and the fuel tank level; refill as needed.
- Inspect the work area for hazards.
- If there is excessive noise or vibration, stop the unit immediately.
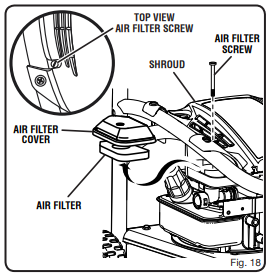
CLEANING THE AIR FILTER
See Figure 18. A dirty air filter will cause starting difficulty, loss of performance, and shorten the life span of the engine. Check the air filter monthly. For best performance, replace the air filter at least once a year.
- Using the hole in the shroud for easy access, remove the air filter screw.
- Remove the air filter cover.
- Lift the edge of the air filter carefully and pull it out.
- Wash the air filter with warm, soapy water.
- Rinse and squeeze to dry.
- Put a small amount of motor oil (SAE 30) on the filter sponge. Squeeze out the excess oil, then reinstall the air filter. NOTE: Make sure the filter is seated properly inside the cover. Installing the filter incorrectly will allow dirt to enter the engine, causing rapid engine wear.
- Reinstall the air filter cover and tighten securely using the air filter screw.
TROUBLESHOOTING

FOR MORE MANUALS BY HUSKY, VISIT MANUALSLIBRARYY
Husky HU80520 Pressure Washer-FAQs
How do I use the Husky HU80520 pressure washer?
Connect the garden hose, attach the spray gun, turn on the water supply, and then start the washer. Select the right nozzle and pull the trigger to begin cleaning.
What are the main parts of a pressure washer?
It consists of a motor or engine, a water pump, a high-pressure hose, and spray nozzles. The pump increases water pressure, which is released through the nozzle for cleaning.
Why does my pressure washer lose pressure?
Loss of pressure can be caused by worn seals, clogged nozzles, air in the system, or insufficient water supply. Cleaning or replacing the faulty part usually fixes it.
Can I run the pressure washer without pulling the trigger?
No, avoid letting it run idle for more than 2–3 minutes. The water inside can overheat, which may damage the internal components.
What chemicals can be used with the Husky pressure washer?
Mild detergents and pressure washer-safe cleaners are recommended. Avoid strong dish soap or harsh chemicals that may damage the pump or environment.
How do I increase the pressure on my washer?
You can adjust the regulator knob (if available) or switch to a smaller nozzle. Always follow the manual instructions to prevent overloading the pump.
What is the most common cause of pressure washer problems?
Leaks in hoses or fittings, clogged filters, or pump issues are common causes. Regular inspection and maintenance help prevent these problems.
How should I maintain my Husky pressure washer?
After each use, flush out detergent, disconnect hoses, drain excess water, and store in a dry place. Clean filters and check oil levels regularly.

