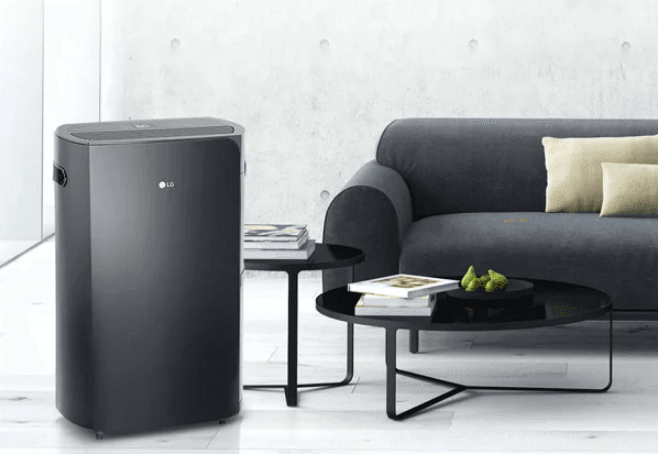
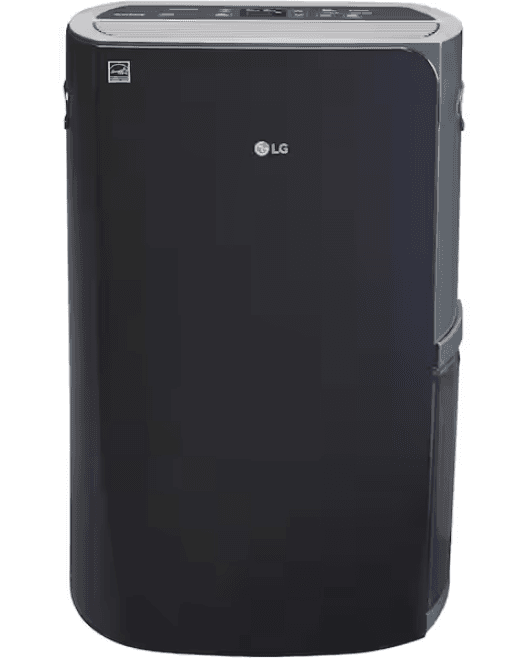
LG UD501KOG5 PuriCare 50 Pint Dehumidifier
IMPORTANT SAFETY INSTRUCTIONS
WARNING
To reduce the risk of explosion, fire, death, electric shock, scalding, or injury to persons when using this appliance, follow basic precautions, including the following:
INSTALLATION
- Adhere to all industry-recommended safety procedures, including the use of long-sleeved gloves and safety glasses.
- Never attempt to operate this appliance if it is damaged, malfunctioning, partially disassembled, or has missing or broken parts, including a damaged cord or plug.
- Do not, under any circumstances, cut or remove the third (ground) prong from the power cord.
- When installing or moving the appliance, be careful not to pinch, crush, or damage the power cord.
- Keep packing materials out of the reach of children. Packaging materials can be dangerous for children. There is a risk of suffocation.
- Destroy the carton, plastic bag, and other packing materials after the appliance is unpacked. Children might use them for play. Cartons covered with rugs, bedspreads, or plastic sheets can become airtight chambers.
- Store and install the appliance where it will not be exposed to temperatures below freezing or to outdoor weather conditions.
- Do not damage, alter, excessively bend, twist, pull, pinch, or heat the power cord.
- Call an authorized service technician to repair or immediately replace all power cords that have become damaged. Do not use a cord that shows cracks or abrasion damage along its length or at either end.
- Do not use multiple-outlet adaptors with this dehumidifier.
- Do not use the product if the outlet is damaged or loose.
- In the event of a gas leak (propane gas, LP gas, etc.) do not operate this or any other appliance. Open a window or door to ventilate the area immediately.
- Do not disassemble, repair, or modify the product.
- Do not store or use flammable gases or materials near the dehumidifier.
- This appliance is not intended for use by persons (including children) with reduced physical, sensory, or mental capabilities, or a lack of experience and knowledge, unless they have been given supervision or instruction concerning use of the appliance by a person responsible for their safety. Children should be supervised to ensure that they do not play with the appliance.
OPERATION
- Read all instructions before using the appliance and save these instructions.
- Do not tamper with controls.
- If the product has been submerged, contact an LG Electronics customer information center for instructions before resuming use.
- Push the power plug all the way into the wall outlet so that it is not loose.
- Do not grasp the power cord or touch the appliance controls with wet hands.
- Do not modify or extend the power cord.
- If the product makes a strange noise or emits a smell or smoke, pull the power plug out and contact an LG Electronics customer information center.
- Avoid placing the dehumidifier or other heavy objects on top of the power cord.
- Do not use water to clean the dehumidifier.
- Keep the air inlet and outlet free from obstructions.
- Do not cover the power cord with a rug or carpeting. Placing heavy objects on top of the cord could damage it.
- Do not place combustion appliances directly in the path of the dehumidifier’s airway. Doing so could result in incomplete combustion or deformation by heat.
- Keep the product away from open flames.
- Do not use the product in places where it could be splashed by water.
- Do not insert fingers, sticks, etc., into the air inlet or outlet. The fan is running at high speeds and could cause personal injuries.
- Do not repair or replace any part of the appliance. All repairs and servicing must be performed by qualified service personnel unless specifically recommended in this owner’s manual. Use only authorized factory parts.
- Connect to a properly rated, protected, and sized power circuit to avoid electrical overload.
CAUTION
To reduce the risk of injury to persons, malfunction, or damage to the product or property when using the appliance, follow basic safety precautions, including the following:
INSTALLATION
- Use this appliance only for its intended purpose. This product is not designed for preserving precision instruments, tableware, or artworks.
- Use the appliance only in a well-ventilated area. Keep the area well ventilated, especially if also using a combustion appliance. Inadequate ventilation reduces the oxygen level in the air.
- Never unplug the appliance by pulling on the power cord. Always grip the plug firmly and pull straight out from the outlet.
- Do not use the product in places where chemicals are used. Chemicals and solvents dissolved in the air in places such as hospitals, factories, laboratories, and hair salons could cause product deformation and leaking, resulting in property damage.
- Turn off the dehumidifier and pull out the power plug before cleaning. Wait for the fan to stop moving.
- Do not operate the dehumidifier without a filter. Using the product without a filter could result in a reduced product lifespan, electric shock, or injury.
OPERATION
- Do not use the product for preserving animals/plants, precision instruments, artworks, etc.
- Do not place vases or water jars on the dehumidifier.
- Turn off the dehumidifier and empty the water bucket before moving the dehumidifier.
- Pull out the power plug if you will not be using the product for an extended period.
- Do not use the product in a very small space, such as a closet. Poor ventilation could result in overheating or fire.
- Do not use wax, thinner, or a strong detergent when cleaning. Wipe the product using a soft cloth. Using inappropriate cleaning products could cause the product to become discolored or develop surface flaws.
- Do not use the product in direct sunlight or rain.
- Do not touch the product with wet hands.
- Position the product on a firm, stable surface.
- Remove cable ties and extend the power cord before use.
- Do not spray foreign substances or water on the product.
- If the supply cord is damaged, it must be replaced by the manufacturer, its service agent, or similarly qualified persons in order to avoid a hazard.
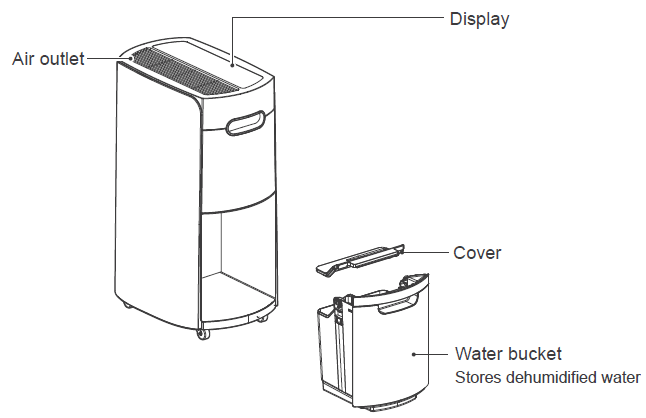
PRODUCT OVERVIEW
Front
Back
Power cord and plug may differ depending on the country where the product is purchased.
Components
BEFORE USE
Indoor temperature and relative humidity affect dehumidification.
- Dehumidification is decreased if the temperature or relative humidity is low.
- The product does not operate unless the desired humidity level is lower than the current humidity level.
This product operates at temperatures from 41 °F – 90 °F (5 °C – 32 °C).
- At temperatures of 32°F (0 °C) or less, water freezes inside the product.
- At temperatures over 90°F (32 °C), the internal temperature of the product trips a protective device, which deactivates the product to avoid product damage.
When the dehumidifier is operating, the indoor temperature will rise.
- The dehumidifier does not have a cooling/heating function.
- Heat is generated during operation, so the room temperature may be increased by about 5°F (3°C), depending on the usage conditions (indoor temperature, size of the room).
The compressor has a 3-minute delay before restarting.
If the product is stopped and immediately restarted, to protect the compressor, there is a 3-minute delay until the compressor restarts.
The product cannot be operated continuously for more than 23 hours.
After 23 hours of continuous operation, the compressor automatically shuts off for one hour to prevent product damage. The compressor will restart after one hour. This Safety Standby function is normal.
Install the product at least 11 13/ 16″ (30 cm) from walls or other obstacles.
The product needs clearance for air intake and exhaust purposes
There may be water in the drain water bucket before first use.
Water may remain in the drain water bucket from the product’s outgoing inspection to check the operation. This is normal.
OPERATION
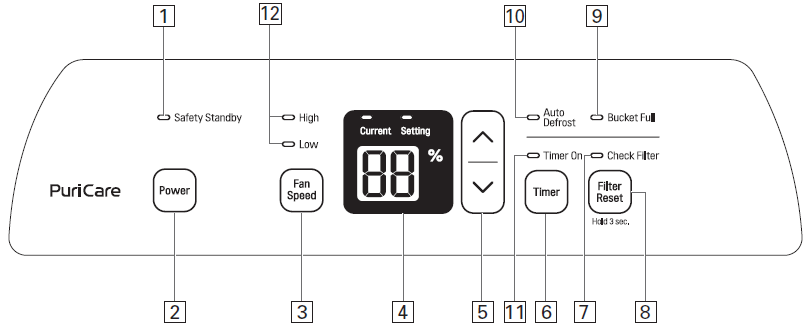
Control Panel and Display
- Safety Standby light (red): After 23 hours of continuous operation, the red lamp lights up for 1 hour.
- Power button: Starts and stops the product.
- Fan Speed control button: Adjusts the fan speed and air volume.
- Humidity display: Displays the current humidity (25-90%) and the humidity setting (30-80%).
- Humidity control button: Adjusts the humidity setting. Desired humidity levels can be set in 5-percent increments from 30-80%.
- Timer button: Sets a time for the product to automatically turn off. Press the button repeatedly to increase the time until shutoff in 1-hour increments up to 12 hours.
- Check the Filter light: Lights up after 350 hours of operation. Check and clean the filter.
- Filter Reset button: After cleaning the filter, press for three seconds to reset the operating time.
- Bucket Full light: Lights up when the drain water bucket is full.
- Auto Defrost light: Lights up when the product is defrosting.
- Timer On light: Lights up when the Timer function is set.
- Fan Speed indicator lights: Light up to indicate fan speed (High/Low).
Dehumidifying
- Press the POWER button to turn on the power. It takes 30 minutes of continuous operation to reach the desired humidity level the first time the product is used. The display shows the current humidity level.
- Press the UP/DOWN button to change the humidity. The desired humidity level can be set in 5-percent increments from 30-80%. The display shows the desired humidity level while it is being set, then reverts to the current humidity level after 5 seconds. The current humidity level is displayed in 5-percent increments from 25-90%. If the humidity level is outside the range, the display continues to show either 25% or 90%.
- Press the FAN SPEED button to change the fan speed. The fan speed has two levels: low and high.
- Press the POWER button to turn off the product.
NOTE
- If the product is restarted immediately after being shut down, to protect the compressor, there is a 3-minute delay until the compressor begins operating.
- It is normal for the compressor to cause the product to vibrate while starting or stopping.
Setting the Timer
- Press POWER to turn on the power.
- Press TIMER to set the automatic shut-off time. Press the button repeatedly to increase the time until shut off in 1-hour increments up to 12 hours.
- Press TIMER to cancel the Timer function. Press the Timer button repeatedly until the Timer On light turns off.
NOTE
Empty the drain water bucket before setting the Timer function.
If the water bucket becomes full during the Timer function, the Bucket Full light goes on, and dehumidification stops.
Safety Standby Light
- After 23 hours of continuous operation, the red Safety Standby light turns on for one hour, and the fan and compressor shut off to prevent product malfunction.
- After an hour with the fan and compressor shut off, the Safety Standby light turns off, and the fan and compressor automatically restart.
Bucket Full Light
- Empty the water bucket within three minutes of the Bucket Full light turning on.
- After the light turns on, the fan operates for an additional three minutes to remove remaining condensed water, and then the product shuts off.
- See Emptying the Water Bucket for further instructions.
Checking the Filter
Check and clean the filter when the Check Filter light turns on.
- After 350 hours of operation, the Check Filter light turns on. Check the filter and clean it if necessary, or wait 24 hours for the light to go off automatically.
- After cleaning the filter, press and hold FILTER RESET for three seconds to reset the operating time.
Auto Defrost Light
The Auto Defrost function automatically removes any frost in the heat exchanger caused by low indoor temperatures.
- The Auto Defrost light turns on while the product automatically defrosts the heat exchanger.
- The compressor stops during the automatic defrost function.
Continuous Drainage Setup
Items Needed:
3/4″ (outer diameter) threaded garden hose near sink or drain.
- Unplug the product. Turn the hose cover at the back of the product counterclockwise to open it.
- Remove the water bucket.
- Insert the drainage adapter into the opening for the hose and turn it clockwise. Insert the provided screw to secure it in place.
- Turn the end of the garden hose clockwise to attach it to the drainage adapter. Firmly attach the garden hose to avoid leaks. Hand tighten; then make an additional 1/8 turn with pliers.
- Reinstall the water bucket.
Emptying the Water Bucket
- Gently pull the top handle of the water bucket to remove the bucket from the product.
- Lift off the cover of the water bucket.
- Pour the water out of the bucket.
- Put the cover back on the water bucket.
- Angle the bottom of the water bucket into place first, then push the top into place.
NOTE
- If the water bucket is removed immediately after turning off the dehumidifier, the water remaining in the heat exchanger may drip into the water bucket storage area. Remove the water with a soft cloth.
- While cleaning, do not touch the water detection device on the inside top of the water bucket storage area.
- Clean the water bucket once a week during use.
- If the ambient temperature is low, there is less moisture in the air for the product to remove.
- Unplug the product before removing the water bucket. If the bucket is removed while the product is operating, the compressor stops. The fan operates for another three minutes to clear the remaining water inside the heat exchanger and then also stops.
CAUTION
Watch the pinch points to avoid injuring fingers when installing the water bucket.
MAINTENANCE
Cleaning the Exterior
Wipe the exterior of the dehumidifier with a soft, damp cloth.
Do not spray water directly on the product. Doing so may cause damage to the insulation or stains on the surface of the product.
Use a vacuum cleaner or soft brush to remove dust from the filter case.
CAUTION
Do not use materials such as thinners, benzene, acid, or sponges to clean the product. They may damage the surface of the product.
Cleaning the Water Bucket
- Lift off the cover of the water bucket.
- Empty the water bucket and use a soft cloth to remove any remaining moisture inside it. Reassemble the cover before using.
CAUTION
Operating the product with the cover of the water bucket missing or assembled improperly may result in leaking.
Cleaning the Air Filter
CAUTION
- Unplug the unit before cleaning it.
- Allow the filter to dry completely, out of direct sunlight, before reinserting it in the product. Operating the product with a damp filter may cause product failure.
- Release the two hooks at the right of the filter case and swing it open to remove it.
- Pull the center tab on the air filter to remove it from the filter case.
- Clean the air filter with a vacuum cleaner or soft brush. If the filter is very dirty, wash it in water and a neutral detergent. Clean the air filter once a month.
- Bend the sides of the air filter inward slightly to reinsert it. Make sure the filter is seated under the tabs inside the filter case.
- Align the hinges on the filter case with the hinge openings on the product, and then swing the case to the right to reattach the two hooks.
NOTE
Service calls to clean the air filter are not covered under the product warranty.
Storing the Product
- Unplug the product.
- Empty the water bucket completely. Remove the lid from the water bucket and use a soft cloth to wipe up any remaining water in the bucket.
- Clean the filter. Let the filter thoroughly dry for several hours in a shaded, well-ventilated area before reinstalling it. Placing the filter in direct sunlight or near a fire may cause product deformation.
- Disconnect the drainage hose and adapter (if connected).
- While the filter is drying, place the dehumidifier out of direct sunlight in a well-ventilated area and allow it to thoroughly dry for several hours. Reinstall the filter and cover the dehumidifier before storing it in an upright position. (A dust cover for storing the dehumidifier is not included.)
TROUBLESHOOTING
If the product does not function properly or does not function at all, check the following before calling for service.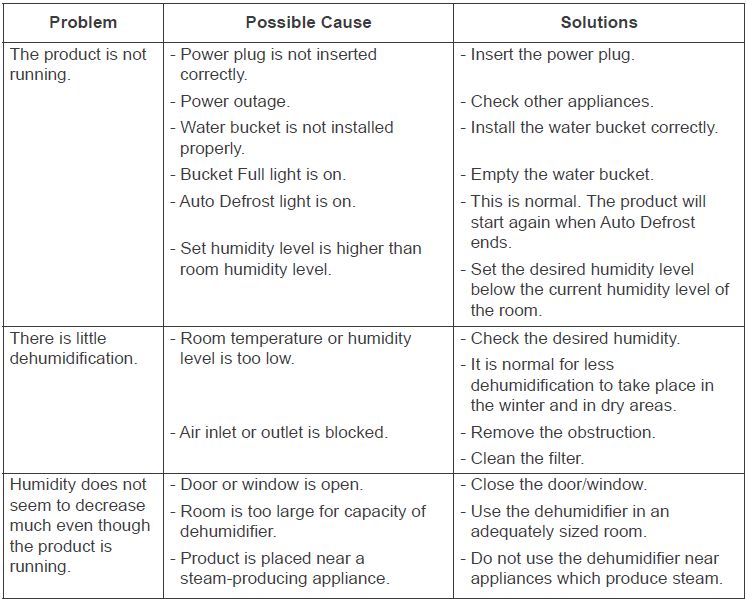
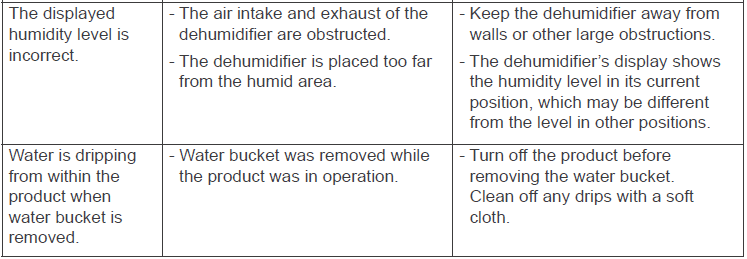
Call for service immediately in the following situations.
- The power cord is too hot or damaged.
- The product continues to operate when the water bucket is full, overflowing the bucket.
For more Manuals by LG, visit ManualsLibraryy
LG UD501KOG5 PuriCare 50 Pint Dehumidifier-FAQs
What is the warranty for the LG UD501KOG5 dehumidifier?
This model comes with a standard 1-year manufacturer warranty covering defects in materials and workmanship.
What is the Safety Standby function on this dehumidifier?
After 23 hours of continuous use, the compressor shuts off automatically for 1 hour to prevent damage. It will restart automatically—this is a built-in safety feature.
What does “warranty period expiry” mean?
It’s the point when your product’s warranty coverage ends, meaning the manufacturer is no longer obligated to offer free repairs or replacements.
What is a 7-year warranty?
A 7-year warranty offers extended coverage for most product issues and typically remains valid for new owners if transferred, such as in the case of used vehicles.
What is the ideal humidity setting for a dehumidifier?
Set your dehumidifier between 30% and 50% relative humidity to prevent mold without drying the air too much.
Should I turn off my dehumidifier at night?
Not necessary. Dehumidifiers work best when they run based on humidity levels, not time. Let it operate automatically—day or night.
What voltage does the LG UD501KOG5 dehumidifier use?
It runs on 115 volts, standard for most household electrical systems.
How do I test the dehumidifier sensor?
To check the sensor, disconnect power, open the unit to access the sensor (near the evaporator coil), and use a multimeter to test resistance or capacitance.

