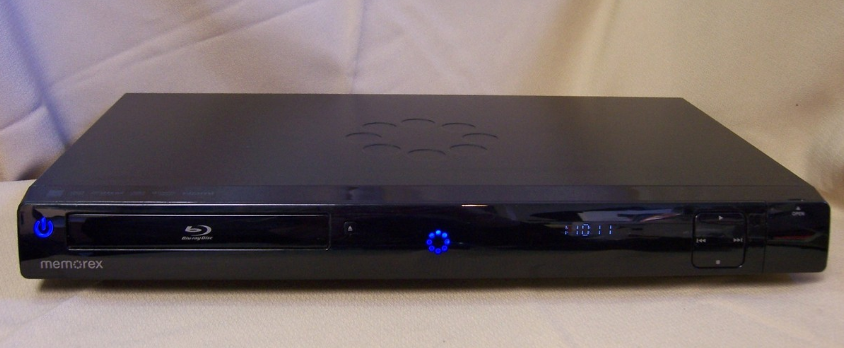
Memorex MVBD2520 Blu-Ray Disc Player
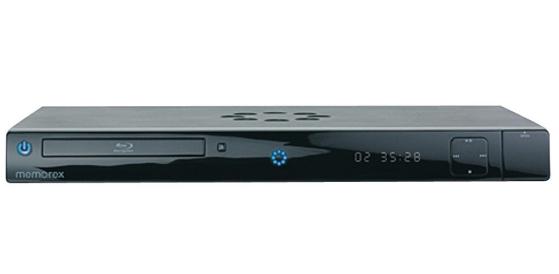
LOCATION OF CONTROLS
FRONT

- POWER/STANDBY button
- Disc Compartment
- Open/Close Button
- Power Indicator/Remote Sensor
- Display
- Skip (
 ) Button
 - Stop (
 ) Button
 - Skip (
 ) Button
 - Play (
 ) Button
 - USB/Card Jack (Inside Compartment)
REAR

- AC Power Jack
- Ethernet Jack
- HDMI Jack
- Component Video (Y, Pb, Pr) Output Jacks
- CVBS (Composite Video) Output Jack
- Stereo Audio Left/Right Output Jacks
- OPTICAL Output Jack
- COAXIAL Output Jack
REMOTE
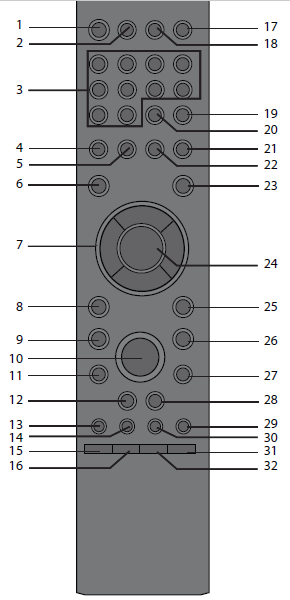
- POWER/STANDBY Button
- HDMI RESET Button
- Number (0–9) Buttons
- Red Button
- Green Button
- SETUP Button
- Navigation (◀, ▶,▼,▲) Buttons
- RETURN Button
- Stop (
 ) Button
 - Play (
 ) Button
 - Skip (
 ) Button
 - SEARCH/REVERSE
 Button
 - AUDIO Button
- SUB MENU Button
- DIMMER Button
- SKIP Button
- OPEN/CLOSE Button
- DISPLAY INFO Button
- SEARCH Button
- CANCEL Button
- Blue Button
- Yellow Button
- DISC MENU Button
- ENTER Button
- POPUP MENU Button
- PAUSE (
 ) Button
 - Skip (
 ) Button
 - SEARCH/FORWARD
 Button
 - PIP (Picture-In-Picture) Button
- USB/SD Button
- ZOOM Button
- Repeat A-B Button
REMOTE CONTROL PART NO. 52RE1-211001-00R*
BATTERY COVER PART NO. 12CA7-217A03-00R*
A/V RCA CABLE PART NO. 13WE1-311200-10R*
*Consumer Replaceable Part (See page 44 to order.)
REMOTE CONTROL
BATTERY INSTALLATION
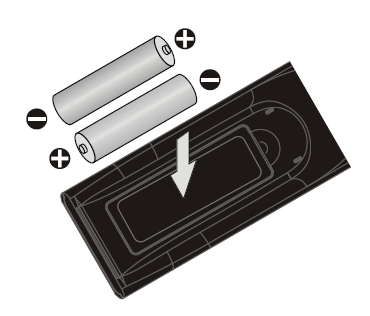
- Remove the Battery Compartment cover by pushing in on the tab and then lifting the cover off.
- Install two (2) “AAA” batteries, paying attention to the polarity diagram in the battery compartment.
- Replace the Battery Compartment cover.
BATTERY PRECAUTIONS
Follow these precautions when using batteries in this device:
- Use only the size and type of batteries specified.
- Be sure to follow the correct polarity when installing the batteries as indicated in the Battery Compartment. A reversed battery may cause damage to the device.
- Do not mix different types of batteries (e.g., Alkaline, Rechargeable, and Carbon-zinc) or old batteries with fresh ones.
- If the device is not to be used for a long period of time, remove the batteries to prevent damage or injury from possible battery leakage.
- Do not try to recharge a battery not intended to be recharged; it can overheat and rupture. (Follow battery manufacturer’s directions.)
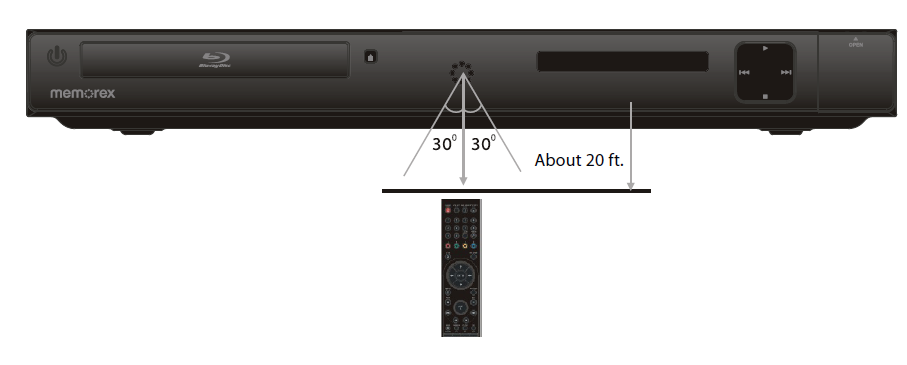
EFFECTIVE DISTANCE OF THE REMOTE CONTROL TRANSMITTER
NOTES:
- When there is an obstacle between the Player and the transmitter, the transmitter may not operate.
- When direct sunlight, an incandescent lamp, a fluorescent lamp, or any other strong light shines on the REMOTE SENSOR of the Player, the remote operation may be unstable.
CONNECTION
CONNECTING THE PLAYER TO A TV USING THE AUDIO/VIDEO OUTPUT JACKS
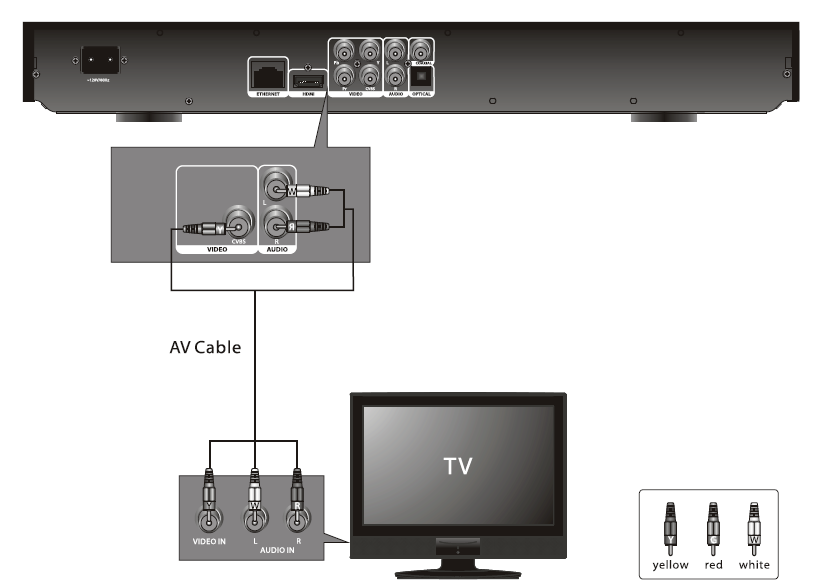
NOTES:
- If your TV has an HDMI input, connect the player with the HDMI cable for the best result; otherwise, use the Component or Video OUT jack on the player.
- Set the TV’s TV/VIDEO button or switch to the VIDEO setting.
- When connecting the Player, refer to the owner’s manual of the TV, as well as this manual.
- When connecting the Player to the TV, make sure the power is off and both units are unplugged before making any connections.
- If your TV only has one audio input, the use of a “Y” connector may be necessary. Visit your local electronics supply store.
- Connect the player to your TV directly. If you connect the player through a VCR, the playback picture will be distorted because video discs are copy-protected.
CONNECTING THE PLAYER TO A TV USING THE Y/Pb/Pr JACKS
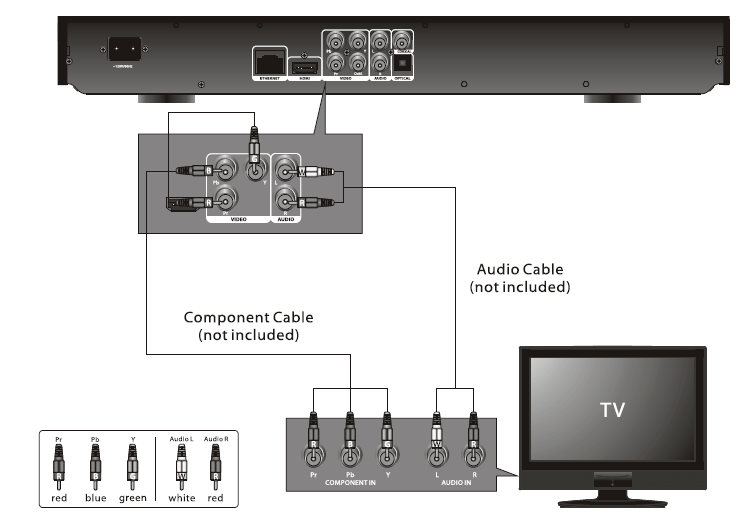
NOTES FOR CONNECTING TO A TV
- If your TV has an HDMI input, connect the player with the HDMI cable for the best result; otherwise, use the Component or Video OUT jack on the player.
- TV must have Y, Pb, and Pr input jacks.
- Set the TV’s TV/VIDEO button or switch to the VIDEO setting.
- When connecting the Player, refer to the owner’s manual of the TV, as well as this manual.
- When connecting the Player to the TV, make sure the power is off and both units are unplugged before making any connections.
- Connect the player to your TV directly. If you connect the player through a VCR, the playback picture will be distorted because video discs are copy-protected.
- If using a TV with a blue screen option, turn the option off on the TV for best results.
- If the TV display shows “No Signal” or is blank after connecting the Y, Pb, and Pr, use the Video Out connection as shown on the previous page.
PROGRESSIVE (Y, Pb, Pr) VIDEO OUTPUT
Use these jacks to connect to a TV with progressive video input jacks. Progressive scan is a video scanning system that displays all lines in a frame in one pass, as opposed to the traditional system, the interlaced scan. This connection provides optimum quality. To ensure optimum picture quality, use three video-grade cables for connections. Note that it is essential to match the color-coded connectors with a compatible TV.
CONNECTING THE PLAYER TO A TV USING THE HDMI OUTPUT JACK
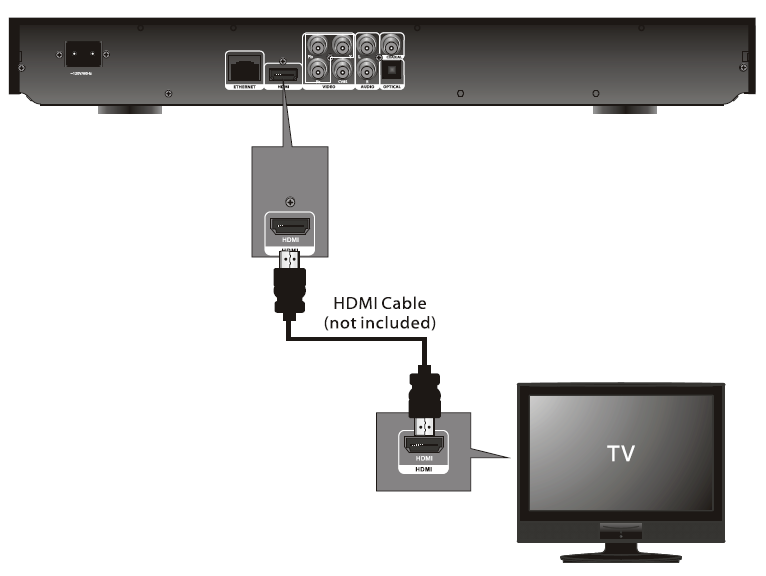
NOTES
- If your TV has an HDMI input, connect the player with the HDMI cable for best results; otherwise, use the Component or Video OUT jack on the player.
- Set the TV’s TV/VIDEO button or switch to the VIDEO setting.
- When connecting the Player, refer to the owner’s manual of the TV, as well as this manual.
- When connecting the Player to the TV, make sure the power is off and both units are unplugged before making any connections.
- Connect the player to your TV directly. If you connect the player through a VCR, the playback picture will be distorted because video discs are copy-protected.
- When using HDMI as your source, set up the HD resolution in the Video menu as described on page 21 and the Digital Output in the Audio menu as described on page 22.
- When you connect the HDMI cable to a TV for the first time, the HDMI output resolution will be automatically set to the highest provided by the TV.
- If connecting to a Receiver and TV that have an HDMI jack, please see the next page.
- Depending on your TV, some HDMI resolutions may not work.
CONNECTING THE PLAYER TO A TV AND RECEIVER USING THE HDMI OUTPUT JACKS
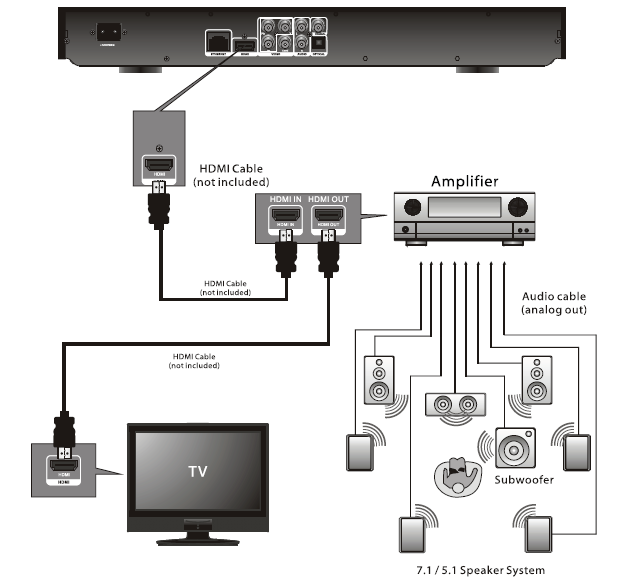
NOTES
- If your TV has an HDMI input, connect the player with the HDMI cable for best results; otherwise, use the Component or Video OUT jack on the player.
- Set the TV’s TV/VIDEO button or switch to the VIDEO setting.
- When connecting the Player, refer to the owner’s manual of the TV and receiver, as well as this manual.
- When connecting the Player to the TV and receiver, make sure the power is off and both units are unplugged before making any connections.
- When using HDMI as your source, set up the HD resolution in the Video menu as described on page 21 and the Digital Output in the Audio menu as described on page 22.
- Depending on your TV, some HDMI resolutions may not work.
CONNECTING THE PLAYER TO A TV USING A DVI CABLE
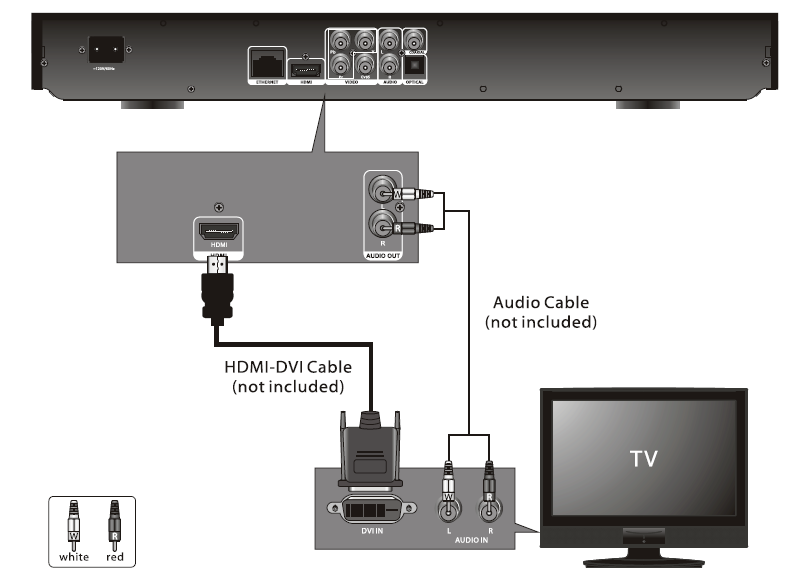
NOTES
- Set the TV’s TV/VIDEO button or switch to the VIDEO setting.
- When connecting the Player, refer to the owner’s manual of the TV, as well as this manual.
- When connecting the Player to the TV, make sure the power is off and both units are unplugged before making any connections.
- Connect the player to your TV directly. If you connect the player through a VCR, the playback picture will be distorted because video discs are copy-protected.
- When using HDMI as your source, set up the HD resolution in the Video menu as described on page 21.
- When you connect the HDMI cable to a TV for the first time, the HDMI output resolution will be automatically set to the highest provided by the TV.
- Depending on your TV, some HDMI resolutions may not work.
CONNECTING THE PLAYER TO A HOME THEATER SYSTEM (VIA COAXIAL OR OPTICAL JACK)
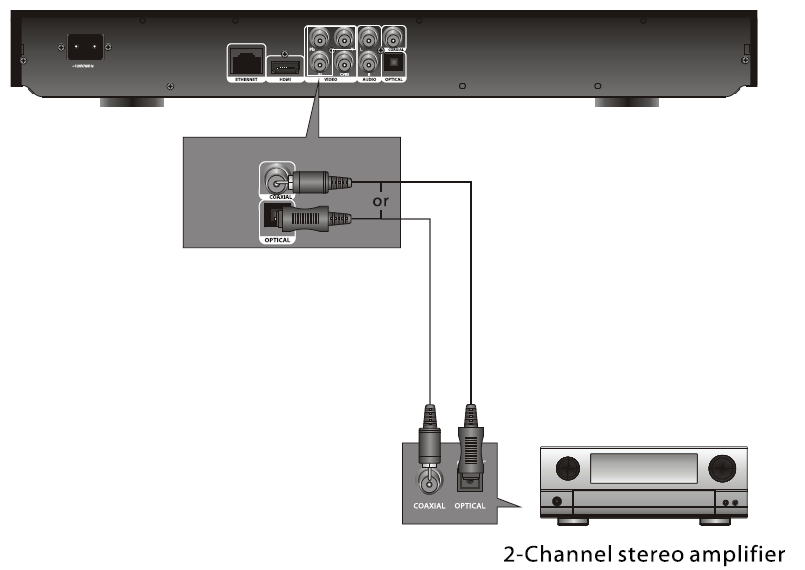
NOTES
- When connecting the Player, refer to the owner’s manuals for the TV and the audio system, as well as this manual.
- When connecting, make sure the power is off and all units are unplugged before making any connections.
- Connect the player to your TV directly. If you connect the player through a VCR, the playback picture will be distorted because video discs are copy-protected.
- If you place the player near a tuner, the radio broadcast sound might be distorted. In this case, move the player away from the tuner.
- When using this connection, Blu-ray Discs with an LPCM audio soundtrack will only be heard over the two front channels.
CONNECTING TO THE NETWORK
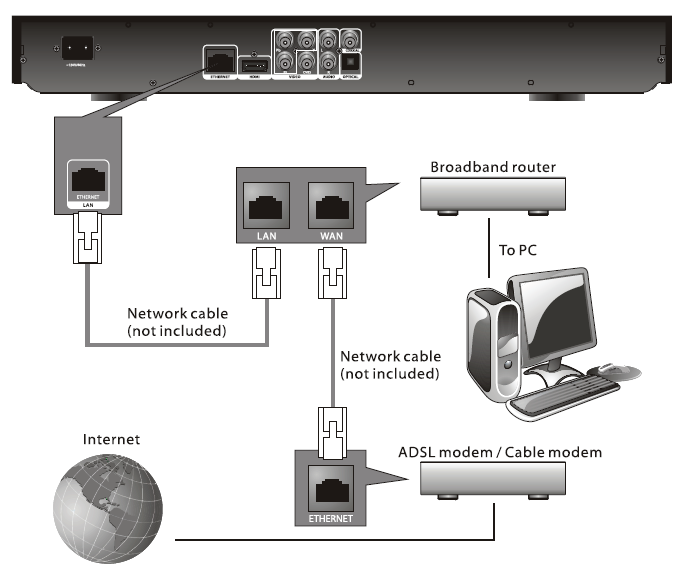
CONNECTING TO A LAN (To utilize BD-Live)
By connecting this unit to a broadband connection, this unit can support the BD-Live feature offered on some movie titles. BD-Live offers additional interactive media and games that are associated with the movie title.
- Connect the LAN (100) terminal of the player to your internet source from the broadband router directly. Refer to the instructions that came with the router.
- Make the appropriate setting; see the Network Setting section on page 27.
NOTES
- For details on the network (LAN), refer to the operating instructions supplied with the modem or router.
- See page 16 for FAQs and information on BD-Live.
BD-LIVE
ENJOYING Bonus View and BD-Live
Some BD-ROMS (labelled BD-Live) have bonus content and other data that can be downloaded to local storage for enjoyment as follows:
- Turn the player off.
- Connect the player to a network as described on the previous pages.
- Insert an SD card with a minimum of 1GB. (If the SD card is smaller than 2GB, it must be set to FAT only.)
- Turn the player on.
- Insert a BD-Rom with Bonus View/BD-Live.
- The operation will differ depending on the disc. Refer to the instructions that came with the disc. However, usually on the Title Menu screen, there is a BD-Live option. Simply select it using the Navigation (◀, ▶ ▲ ▼) buttons and then press the ENTER button to select it.
BD-Live FAQs
Q1: What is BD-Live?
A1: BD-Live is a new Blu-ray feature that utilizes the internet to extend your movie viewing experience through downloaded content and advanced interactivity. When using this player with BD-Live enabled Blu-ray Discs, you can download a variety of up-to-date content, such as previews, trivia games, exclusive special features, and more. The content will vary from disc to disc.
Q2: Do all Blu-ray Discs have this feature?
A2: BD Live is still relatively new, so make sure that the disc has the BD-Live marking on the disc packaging.
Q3: How do I access BD-Live?
A3: With a BD-Live enabled disc inserted and this unit connected to the internet, simply select the BD-Live option at the Main Title screen of the disc.
Q4: Will all discs have the same BD-Live content?
A4: No, they will differ from disc to disc.
Q5: How do I navigate through the BD-Live screen?
A5: Using the Navigation buttons on the remote.
Q6: Do I need to have an external SD card inserted to use this content?
A6: Yes, the SD card must be inserted as the BD-Live content will be downloaded onto this inserted media.
Q7: How do I delete something I downloaded?
A7: See page 42 to delete an item from the SD Card.
Q8: Where can I find a list of all of the downloads on my player?
A8: The BD-Live homepage (shown when you activate Blu-ray) provides a list of downloads that can be played with the currently inserted disc. The list on display may be different from disc to disc. Also, the Blu-ray Disc player may have a function to show the list of files on local storage, but those downloads can only be played with the specific disc that enabled the content download.
ABOUT DISCS
The region/BD-ROM codes for this player are listed on the back of the player. See the following page for information regarding region/BD-ROM codes.
PLAYABLE DISCS
The following discs can be played back on this player:
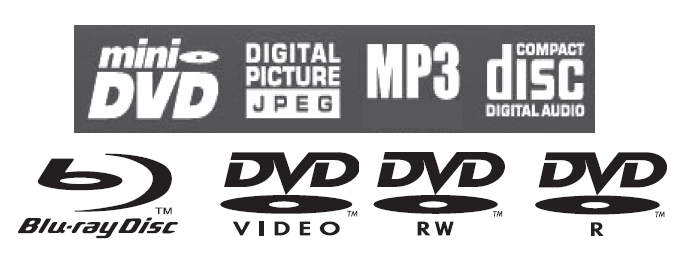
MP3
When playing an MP3, the total number of files will appear in the display, and the TV screen will list the folders/tracks. MP3 is the abbreviation of “MPEG-1 Audio Layer 3”. MPEG Audio is a format that compresses the audio portion only.
IMPORTANT NOTE:
Due to many variables, including recording condition, type of disc, writing software, etc., this unit does not guarantee playback of all MP3 discs.
DISC TYPES
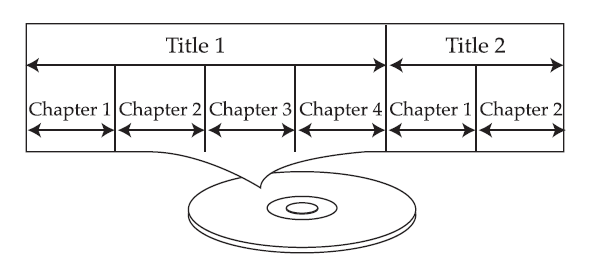
DVD/BD
Data on most discs is divided into sections called “titles” and then into subsections called “chapters”, each of which is given a title or chapter number. Some features of this player will not operate with some discs as they are preset. If a function you selected does not run as desired, refer to the manual accompanying the disc.
BLU-RAY NOTE: Blu-ray is a new and exciting format. Accordingly, disc compatibility issues with new and existing format discs are possible. Not all discs are compatible, le and not every disc will play back.
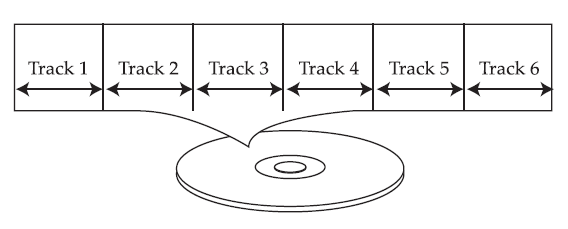
AUDIO CD
Data on an audio CD is divided into sections called “tracks”, each of which is given a track number.
KODAK PICTURE CD
Data on a Kodak picture CD is usually not divided into separate folders and should appear in the root directory.
DVD-R/RW
This disc can be played in this player once it has been finalized by the recording unit.
IMPORTANT:
It is important that you read the manual that accompanies the disc, as there are features that are on the player that cannot be used with certain discs. There are also extra features on the disc that are different for each disc, so they are not explained in this owner’s manual.
This player conforms to the NTSC and PAL color systems. However, if you are in the USA, leave this setting on NTSC. If incorrectly set to PAL, the TV picture will roll vertically. In this case, simply turn the Player off and then back on.
Notes on Copyright
It is forbidden by law to copy, broadcast, show, broadcast on cable, play in public, or rent copyrighted material without permission. Video discs are copy-protected, and any recordings made from these discs will be distorted. This product incorporates copyright protection technology that is protected by method claims of certain U.S. patents and other intellectual property rights owned by Macrovision Corporation and other rights owners. Use of this copyright protection technology must be authorized by Macrovision Corporation, and is intended for home and other limited viewing uses only, unless otherwise authorized by Macrovision Corporation. Reverse engineering or disassembly is prohibited.
Region Management Information
This Player is designed and manufactured to respond to the Region Management Information that is recorded on a disc. If the Region number described on the disc does not correspond to the Region number of this player, this player cannot play that disc. You may not be able to play back some video discs on this player if they were purchased from outside your geographic area or made for business purposes.
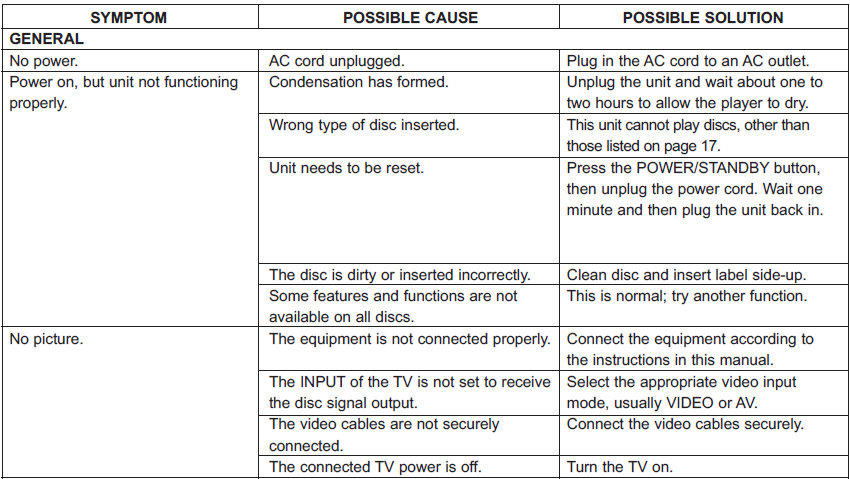
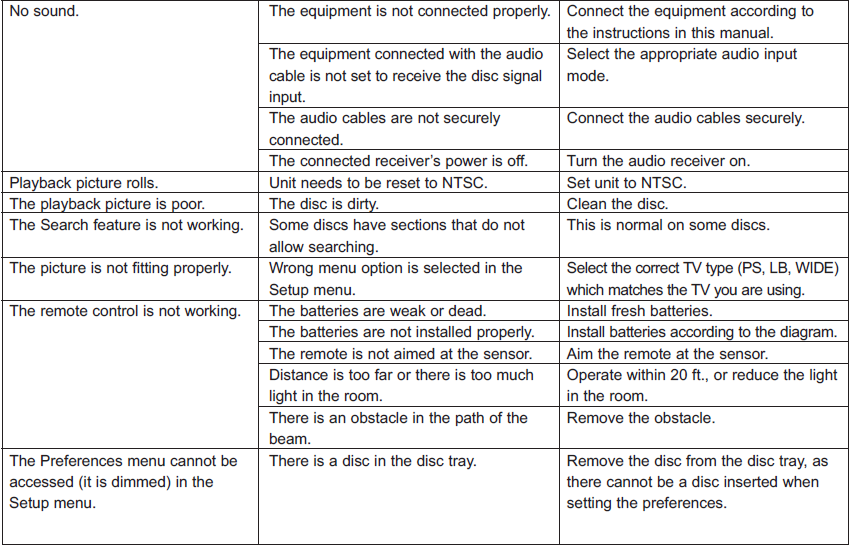
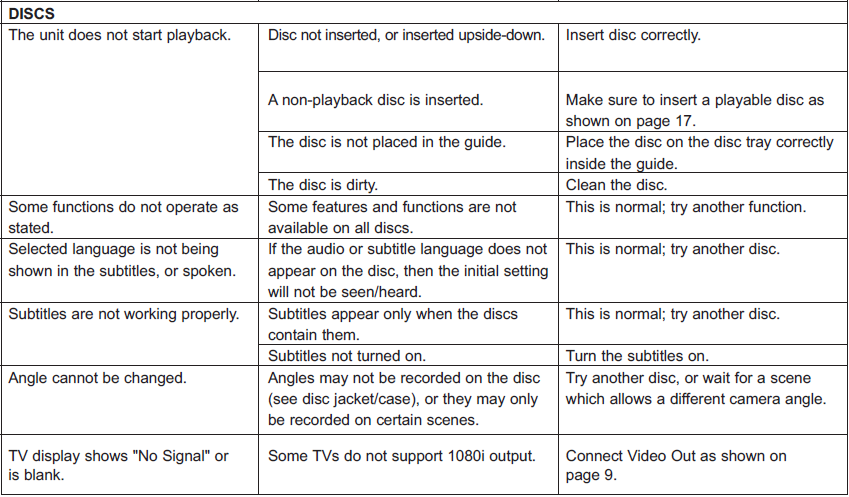
TROUBLESHOOTING GUIDE
Check the following before requesting service:
TROUBLESHOOTING FOR BD-LIVE
If you receive an error stating you do not have enough storage space for a download, connect the media to your computer and remove some of the files, completely erase the media (see page 42), or insert different media with enough storage.
If you receive an error while downloading, try the following:
The BD-Live server may be busy or may not be in service. Please try downloading your content again at another time.
To update the Firmware, please visit our website at: www.memorex.com
FOR ADDITIONAL SET-UP OR OPERATING ASSISTANCE, PLEASE VISIT OUR WEBSITE AT: WWW.MEMOREX.COM
FOR CONSUMER REPLACEABLE PART(S), SEE PART NUMBER(S) ON PAGE 7, AND THEN CONTACT FOX INTERNATIONAL AT: 1-800-321-6993.
CARE AND MAINTENANCE
Caring for Discs
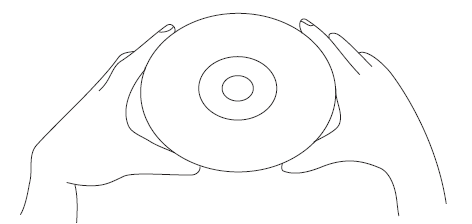
- Treat the disc carefully. Handle the disc only by its edges. Never allow your fingers to come in contact with the shiny, unprinted side of the disc.

- Do not attach adhesive tape, stickers, etc. to the disc label.
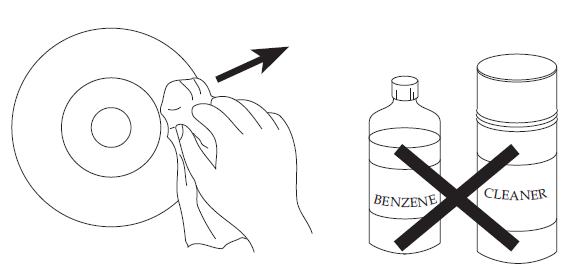
- Clean the disc periodically with a soft, lint-free, dry cloth. Never use detergents or abrasive cleaners to clean the disc. If necessary, use a CD cleaning kit.
- If a disc skips or gets stuck on a section of the disc, it is probably dirty or damaged (scratched).
- When cleaning the disc, wipe in straight lines from the center of the disc to the outer edge of the disc. Never wipe in circular motions.

- Discs should be stored in their cases after each use to avoid damage.
- Do not expose discs to direct sunlight, high humidity, high temperature, or dust etc. Prolonged exposure or extreme temperatures can warp the disc.
- Do not stick or write anything on either side of the disc. Sharp writing instruments or the ink may damage the surface.
Cleaning the Unit
- To prevent fire or shock hazard, disconnect your unit from the AC power source when cleaning.
- The finish on your unit may be cleaned with a dust cloth and cared for as other furniture. Use caution when cleaning and wiping the plastic parts.
- Mild soap and a damp cloth may be used on the front panel.
SPECIFICATIONS
- Power Requirements…………………………………………………………………………………………….AC120V, 60Hz
- Power Consumption……………………………………………….<25W (approx. 1W when set to Standby mode)
- Weight…………………………………………………………………………………………………………………………..9.3 Lbs
- Dimensions …………………………………………………………………………….16.9 (W) x 9.8 (D) x 2.1 (H) inches
- Weight and dimensions are approximate.
- Operating Temperature …………………………………………………………………………………………….5°C to 35°C
- Operating Humidity Range……………………………………………………………..10% to 75% (no condensation)
Format
- Disc Support…………………………………………………………………..BD (405nm), DVD (650nm), CD (780nm)
- Video Format…………………………………………………………………………………..AVC (H.264), VC-1, MPEG-2
- Audio Format ………………DTS, DTS-HD, Dolby Digital, Dolby Digital Plus, Dolby True HD, Linear PCM
Video Output
- Composite…………………………………………………………………………………..(75Ω Load) 1 channel: 1.0 Vp-p
- Blu-ray: 480i
- DVD: 480i
- Component …………………………………………………… (75Ω Load) Y: 1.0Vp-p, Pr: 0.70Vp-p, Pb: 0.70Vp-p
- Blu-ray: 1080i
- DVD: 1080i
Audio/Video Output
- HDMI ……………………………………………………………………………1080p, 1080p24, 1080i, 720p, 480p, 480i PCM Multichannel Audio, Bitstream Audio, PCM Audio
Audio Output
- Digital Audio Output……………………………………………………………………………………………..Optical/Coaxial
- Frequency Response…………………….48kHz Sampling: 4Hz to 22kHz / 96kHz Sampling: 4Hz to 22kHz
- S/N Ratio………………………………………………………………………………………………………………………….95dB
- Dynamic Range…………………………………………………………………………………………………………………85dB
- Total Harmonic Distortion ………………………………………………………………………………………………….0.01%
Specifications are subject to change without notice.
For more manuals by Memorex, visit ManualsLibraryy
Memorex MVBD2520 Blu-Ray Disc Player- FAQs
How do I operate a Blu-ray player?
Insert a Blu-ray disc into the tray, wait for it to load, and use the remote to play, pause, or navigate the menu.
How do I connect a Blu-ray player to my TV?
Use an HDMI cable: one end goes into the player and the other into your TV’s HDMI port. Select the correct input on your TV.
Why is my Blu-ray player not reading discs?
The disc may be scratched, dirty, or incompatible due to region codes. Clean the disc or check your player’s settings.
Can a Blu-ray player play regular DVDs or CDs?
Yes, Blu-ray players support DVDs and CDs, but DVD players cannot play Blu-ray discs.
Does a Blu-ray player need the internet?
No, internet is not required for disc playback. It’s only needed for updates or streaming apps on supported models.
How do I reset my Blu-ray player?
Go to Settings > Reset > Factory Defaults on the player’s menu. Restart the device after reset.
Can I connect Bluetooth headphones to a Blu-ray player?
Some newer models support Bluetooth. Check your player’s manual before pairing.
How long does a Blu-ray disc last?
With proper storage, Blu-ray discs can last 5–20 years, sometimes longer depending on quality and handling.

