Orbit 27894 Indoor Outdoor Sprinkler Timer
Section 1: Get to know your timer
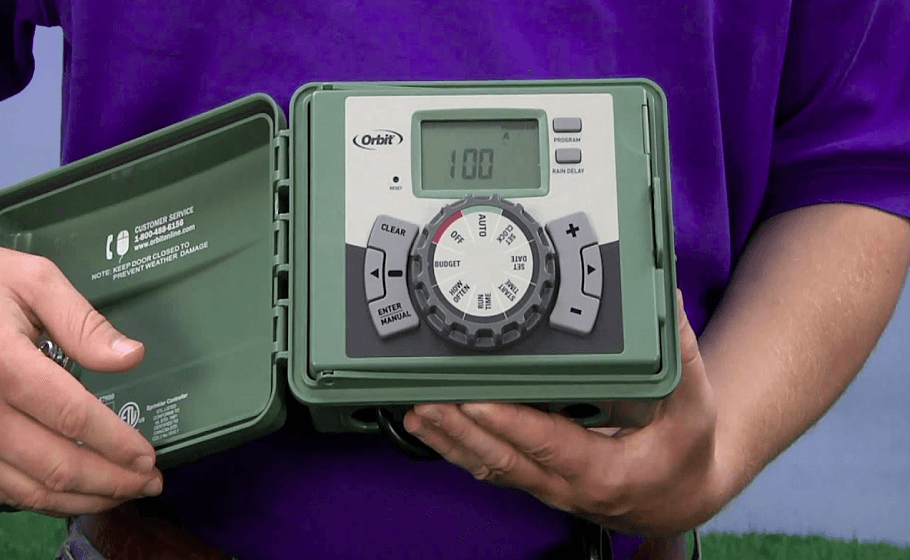
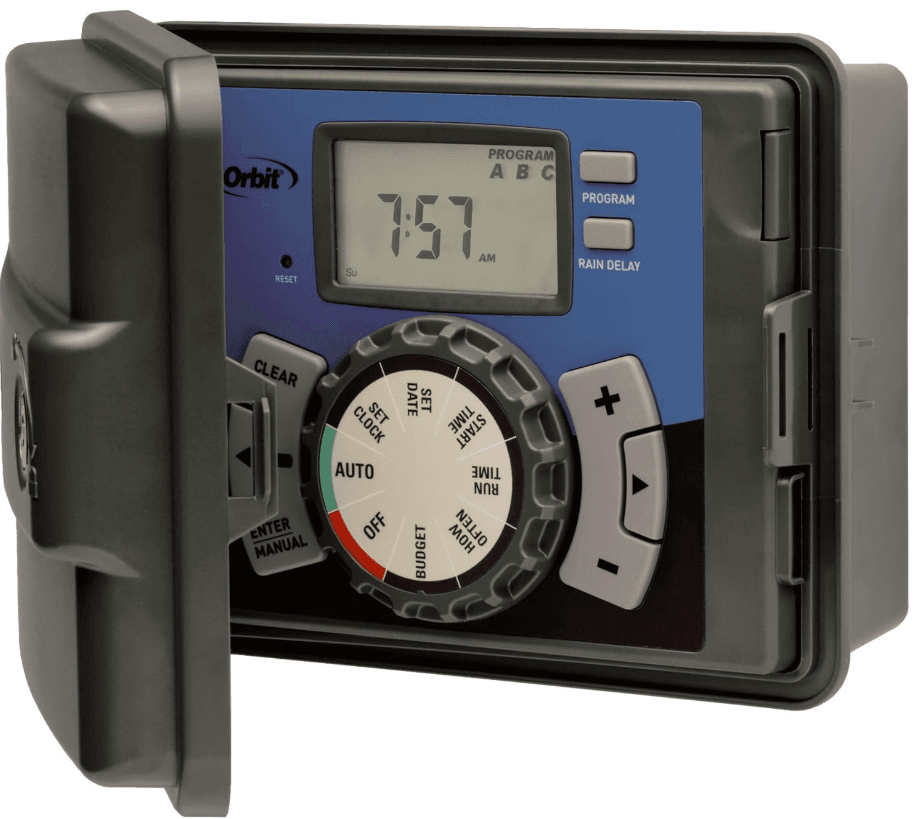
- A. Lock and latch
- B. Weather Resistant Cover
- C. Dial
- D. Digital Display
- E. Battery Compartment
F. Swing Door panel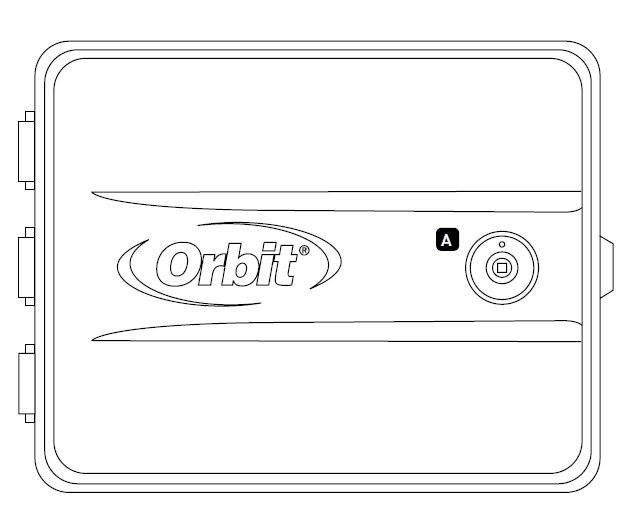
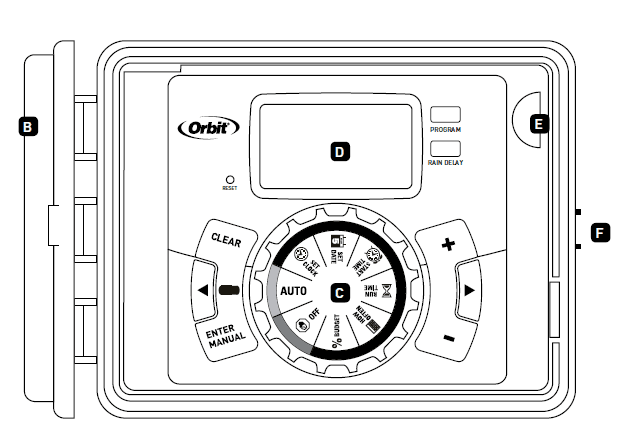
| Buttons | Function |
| Enter MANUAl | To confirm a new setting To water manually |
| Clear | To clear a setting |
| PROGRAM | To move to different programs: A, B, and C |
| Arrow [ ] | To skip to the next set/watering station or move to other programs/settings |
| ARRoW [ ] | To go back to the previous setting/watering station or move to other programs/settings |
| RAiN delAY | To pause the operation for 24-72 hours due to rain or other factors |
| [ + ] | To increase a numeric setting |
| [ – ] | To decrease a numeric setting |
Section 2: Installation
Required Tools
- Phillips Screwdriver
- Wire Strippers
Installation Steps
- Select a Location
- Mount the Timer
- Connect Valve Wires to Timer
- Connect Electrical Power
- Activate Battery
| Dial Position | Function |
| Auto | set Program is running |
| set clock time | |
| Year, Month, and Day | |
| | set time to begin watering Year, Month & day |
| | set watering duration for each station |
| How often | set frequency of watering days |
| Adjust overall watering as a percentage | |
| Turn all stations/functions off |
1. Select a Location
When choosing a location for your timer, consider the following:
- Choose a location near a power source (if hard wiring) or electrical outlet (applicable only to U.S. retail timers)
- Ensure operating temperatures are not below 32° or above 158° Fahrenheit (below 0° Celsius or above 70° Celsius)
- Place it away from direct sunlight if possible
- Ensure at least 9” of space to the left of the sprinkler timer box for the door to swing open after installation
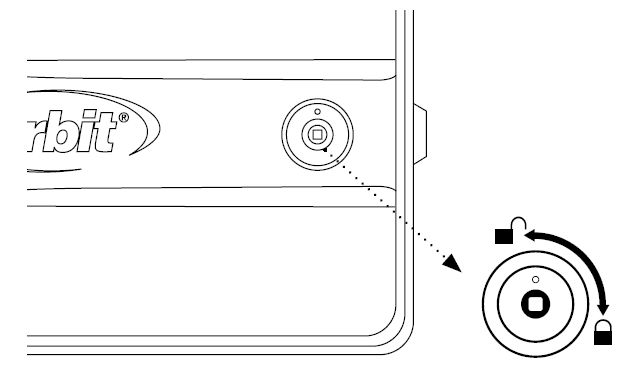
- Locate the timer where there is easy access to the sprinkler wire (from valves). If mounted in an outdoor location, shut the compartment door to keep the timer safe from weather damage. To lock: insert the key and turn clockwise to the locked position

2. Mount the Timer
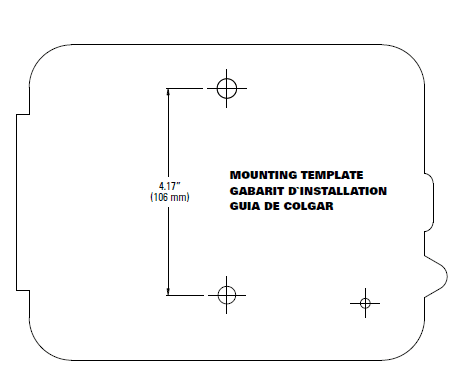
- Use the mounting template (included) to mark the mounting screw location on the wall. See figure 1
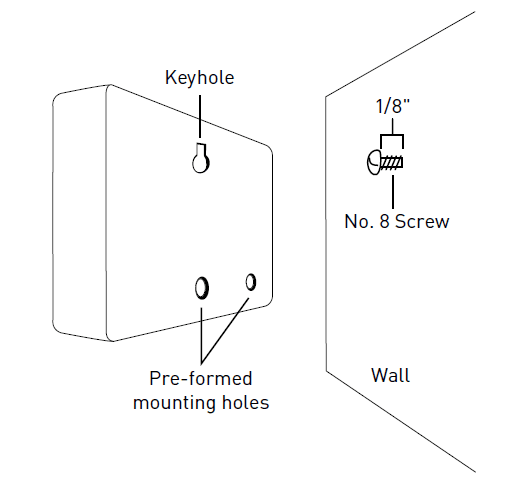
- Install a No. 8 screw (included) into a wall in the upper template location. Leave the screw head protruding 1/8” (3mm) from the wall. Use expanding anchors (included) in plaster or masonry, if necessary, for a secure hold
- Slip the timer over protruding screw (using the keyhole slot in the back of the timer). See figure 2
- Drive a No. 8 screw through one of the two pre-formed holes located in the lower back cabinet. See figure 2


3. Connect Valve Wires to Timer
- Strip 1/2” (12 mm) of the plastic insulation off the end of each wire for both the timer wires and the valve wires
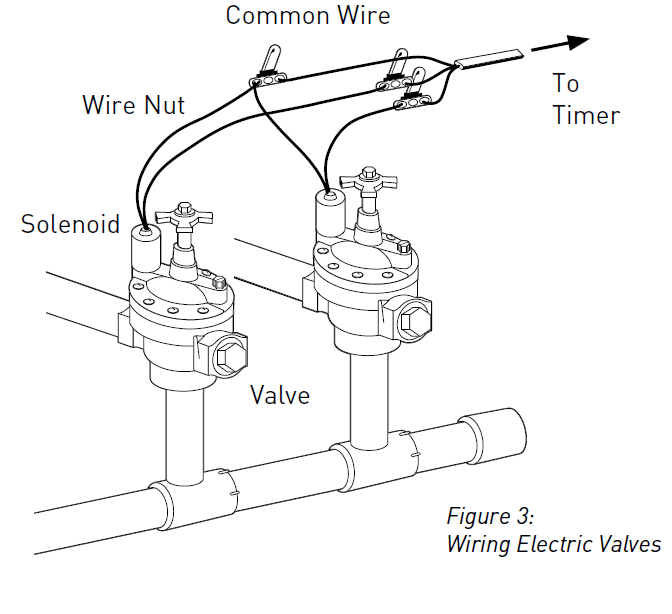
- Connect one wire from each valve (it doesn’t matter which wire) to a single “Common” sprinkler wire (usually white)
- Connect the remaining wire from each valve to a separate colored sprinkler wire. See figure 3
- Note: The maximum loading for each station/pump is 250mA, the maximum loading for the timer is 500mA. If the distance between the sprinkler timer and valves is under 700’ (210 m), use Orbit® sprinkler wire or 20 gauge (AWG) plastic jacketed thermostat wire to connect the sprinkler timer to the valves. If the distance is over 700’ (210 m), use 16 gauge (AWG) wire

- Note: The maximum loading for each station/pump is 250mA, the maximum loading for the timer is 500mA. If the distance between the sprinkler timer and valves is under 700’ (210 m), use Orbit® sprinkler wire or 20 gauge (AWG) plastic jacketed thermostat wire to connect the sprinkler timer to the valves. If the distance is over 700’ (210 m), use 16 gauge (AWG) wire
Wiring Electric Valves
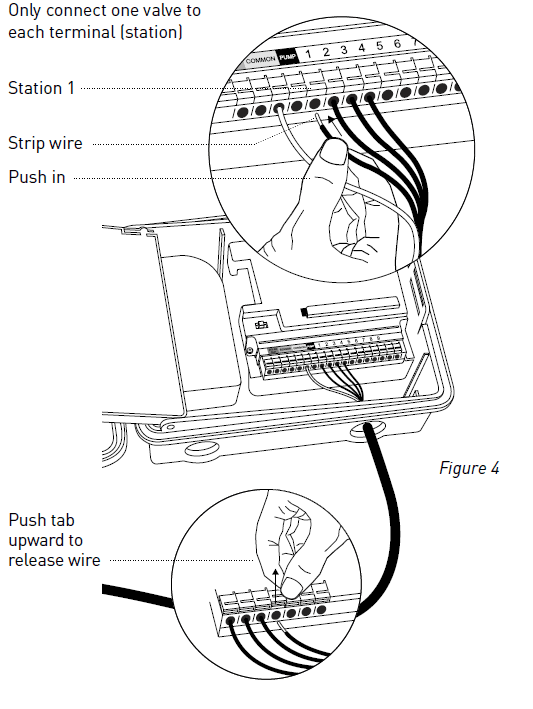
- Strip 1/2” (12 mm) of plastic insulation off the end of each individual wire. Each valve has two wires. One wire (it doesn’t matter which one) is to be connected as the common. The other valve wire is to be connected to the specific station wire that will control that valve. The common wires for all the valves can be connected together to one common wire going to the controller. To avoid electrical hazards, only one valve should be connected to each station. See figure 4

Connect Electrical Power
- Indoor Locations – Insert the power cord into a 110V electrical outlet.
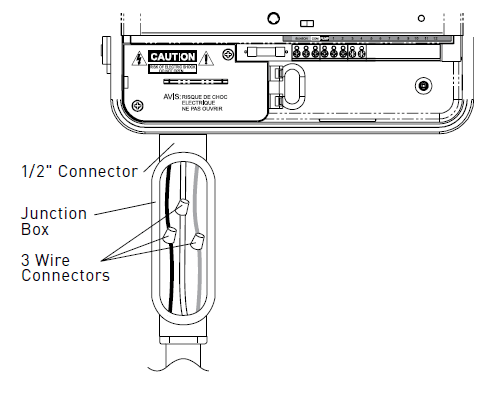
- Outdoor Locations – If a covered Ground Fault Interrupter (GFI) outlet is available, insert the power cord into the 110-volt outlet. If no outlet is available, the timer must have the wiring permanently installed (*see Figure 5)
- Turn off the AC power at the AC circuit breaker and apply an appropriate safety lockout. Verify that the power has been turned off to the installation site using an AC voltmeter set for the correct measurement range.
- Use a power feed wire of 14 gauge (AWG) minimum with a temperature rating of 155 degrees Fahrenheit (68 degrees Celsius) or higher.
- Install the conduit and associated fittings. Connect the AC electrical power wiring to the source by following all the right codes and local standards.
- Connect the junction box to the Timer using a ½” nipple (Junction box and nipple not included). [See Figure 5] Connect the source power conduit to the entrance of the junction box, following all the appropriate codes.
- Take the cord (running from the timer to the junction box) from the junction box and cut it to length. Remove the outer insulation (from the cord) to expose the three wires

Section 3: Programming with Easy-Set Logic™
A note about multiple programs
- Your sprinkler timer provides the flexibility of using 3 independent programs (A, B,C). A program is where you store all of your sprinkler settings. It consists of a group of stations set to specific start times and run times. Multiple programs allow you to run different valves on different days with different run times.
- While many applications only require one program (A), using multiple programs can be useful for drip areas, newly planted lawns, or rotary sprinkler stations.
- Using programs to group stations with similar water needs will maximize irrigation efficiency. Primary programming can be accomplished in just a few basic
steps.
Primary Programming
Press the [RESET] to clear any previous factory programming
- Set Clock
- Turn dial to [SET CLOCK]
- Press the [+/–] buttons to set the current time of day
- Tip: To increase or decrease more rapidly, hold down either the [+] or [-] buttons until the display goes into rapid advance mode.
Section 4: Additional Features
Rain Delay
[Rain delay] allows you to delay your sprinkler timer from watering for a set period of time. Delay settings are 24, 48, and 72 hours.
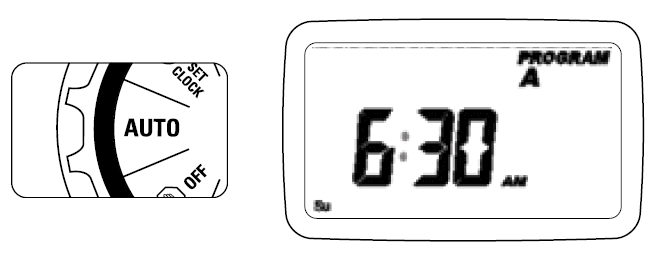
- Turn dial to [AUTO]

- Press the [Rain Delay] button to automatically delay watering for 24 hours
- If a longer Rain Delay is desired, press the [+/–] buttons to increase or decrease the setting.
- Press [ENTER] or wait 10 seconds and the selected rain delay will begin.The
- [CLEAR] button stops the rain delay and scheduled watering will resume.
- At the end of the selected rain delay amount of time, automatic watering resumes.
- While in rain delay mode, the timer display will switch between the actual time and the remaining hours of the delay, every 2 seconds
Connecting a Rain Sensor
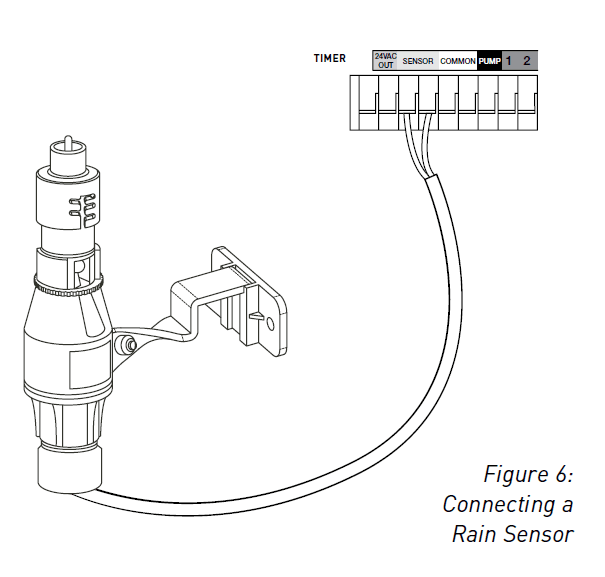
- Connect the rain sensor wires to the wiring terminal ports (yellow in color) labeled “Sensor”
Note: Refer to your rain sensor manual for specific wiring instructions. - Place the sensor on/off switch to the “on” position to begin operation (see Figure 6)
Rain Sensor Bypass
- This sprinkler timer is equipped with a sensor override “on/off” switch. This switch is for use during maintenance and repairs, so the sprinkler timer can be operated even if the rain sensor is in active mode.
- Important: If the rain sensor switch is in the “on” position and no sensor is connected, the sprinkler timer will not operate. To resume sprinkler timer operation place the switch in the off position

- Important: If the rain sensor switch is in the “on” position and no sensor is connected, the sprinkler timer will not operate. To resume sprinkler timer operation place the switch in the off position
Pump Start & Master Valve
- This sprinkler timer allows a master valve or pump to start the relay to operate whenever a station is on.
- Note: If you are activating a pump from this timer, you must purchase a Pump Start Relay. From the pump start relay (or master valve); connect one wire to the “Pump” terminal and the other wire to the “Common” terminal.
Replacing the Battery
The timer requires a CR2032 Lithium battery
- The battery will maintain your program in case of an AC power loss
- Battery should last approximately one year
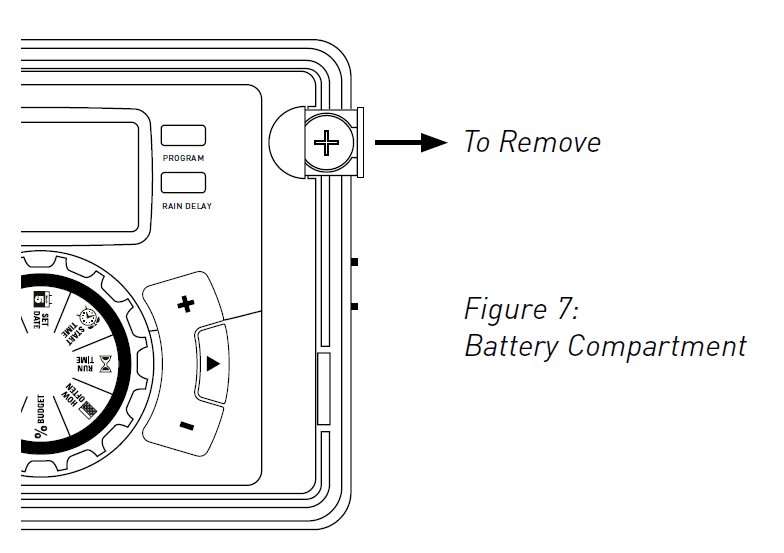
- Open by sliding the battery tray out to the right
- Insert one CR2032 battery into the compartment with the + side up
- Slide back into place.

Section 5: Reference
| TERM | DEFINITION |
| START TIME | The time the program begins watering the first programmed station. |
| VALVE | supplies water to a specific station or area. The opening and closing of the valve is accomplished through electrical current supplied by the sprinkler timer. |
| Master Valve | Typically located at the main water source. Turns on and off water for the entire irrigation system when not in use. |
| MULTIPLE START TIMES | A controller feature that allows a program to be operated multiple times on the same watering day. |
| OVERLAPPING PROGRAMS | When a “Start Time” is set for a program before the previous program has been completed. |
| Program (A, B, oR C) | individual programs as set by the user. each program operates independently. if one program overlaps the other the programs will be “stacked .” After the first program finishes the next program will begin. |
| RAIN DELAY | A feature that postpones the running of a scheduled watering program for a specific duration. |
| Solenoid | The electrical part on an irrigation valve that opens and closes the valve. |
| SPRINKLER TIMER | A device that instructs the station valves to operate. |
| STATION | A grouping of sprinklers operated by a single valve which is controlled by the timer. |
| WATERING BUDGETING | Adjusts your overall watering program as a percentage of total watering duration. |
Troubleshooting
| PROBLEM | POSSIBLE CAUSE |
|
one or more valves do not turn on | 1 . Faulty solenoid connection |
| 2 . Wire damaged or severed | |
| 3 . Flow control stem screwed down, shutting the valve off | |
| 4 . Programming is incorrect | |
|
stations turn on when they are not supposed to | 1 . Water pressure is too high |
| 2 . More than one start time is programmed | |
| 3 . AM/PM is incorrect | |
|
one station is stuck on and will not shut off | 1 . Faulty valve |
| 2 . Particles of dirt or debris stuck in the valve | |
| 3 . Valve diaphragm faulty | |
| All valves do not turn on | 1 . Transformer defective or not connected |
| 2 . Programming is incorrect | |
| The timer will not power up | 1 . The transformer is not plugged into a working outlet |
| Valves continue to turn on and off when they are not programmed | 1 . More than one start time is programmed with overlapping schedules |
| 2 . excessive pressure |
For more manuals by Orbit visit, ManualsLibraryy
Orbit 27894 Indoor Outdoor Sprinkler Timer-FAQs
How does a sprinkler timer work?
A sprinkler timer controls the water flow by sending signals to the valve. When the timer reaches the set start time, it opens the valve, allowing water to flow through the irrigation system and activate the sprinklers.
How does Orbit Smart Watering function?
Orbit Smart Watering waters in short cycles rather than one long session, helping soil absorb moisture efficiently while reducing water waste. This optimizes watering for your yard’s specific soil type.
Why is my sprinkler timer not working properly?
Possible reasons include loose, corroded, or crossed wires, a malfunctioning valve (such as a faulty solenoid or diaphragm), or an issue with the water supply.
What is the ideal sprinkler setting?
Sprinklers should run 30–35 minutes twice a week, ensuring your lawn receives at least 1 inch of water per week. Increase watering during hot and dry weather while maintaining a 2–3 day schedule.
What is the seasonal adjustment on a sprinkler system?
The seasonal adjustment feature modifies watering times based on seasonal needs by adjusting run times by a percentage, making it easier to manage watering throughout the year.
How do I reset my Orbit sprinkler timer?
To reset the timer:
1. Locate the reset button (usually a small pinhole button).
2. Press and hold it for a few seconds until the display clears or resets.
Why is my outdoor timer not working?
Check for incorrect timer settings, low or dead batteries, and faulty wiring connections between the timer and the irrigation system.
Why is my Orbit sprinkler timer not responding?
Ensure terminal screws are tight and wiring is properly connected. If only one zone is affected, try moving the sprinkler wire to a different terminal and test if it operates normally.
How do I adjust automatic sprinklers?
Use a flathead screwdriver to turn the small screw on top of the nozzle, adjusting the spray radius. Rotate the sprinkler stem to set the desired arc coverage.
Why does my sprinkler timer keep running?
If the system continues running after the controller shuts off, a stuck solenoid valve may be the issue. Check the underground valve box in your yard to inspect for malfunctions before contacting an irrigation specialist.

