
Petwant PF-1211 Robot Automatic Smart Pet Feeder

Features of the Robot Automatic Pet Feeder
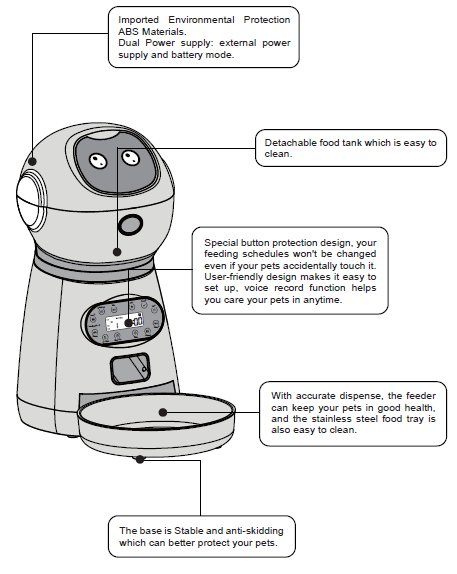
Assemble and Use
- Insert the food tank into the two holes at the bottom.
- Plug in and switch on (If you do not want to use the power adapter, please refer to the instructions for battery mode)

- Plug in and switch on (If you do not want to use the power adapter, please refer to the instructions for battery mode)
- Install D D-size battery*3.
- Please switch on and press the black button to open the lid.
- Fill in the appropriate amount of pet food and close the lid.

- Set meal time and meal portions.

Setting Guide
- Initial Setting:
- Please confirm that you have switched on.
- Long-press the “Manual” button, and the feeder would rotate by one grid.
- Repeat the instruction above 3 times; the feeder is normal if it rotates by one grid each time.
- Set Current Time:
- Press and hold the “Time” button; meanwhile, press the “Hour” button to set the hour.
- Press and hold the “Time” button; meanwhile, press the “Minute” button to set the minute time.
- Set Meal Time and Meal Portion:
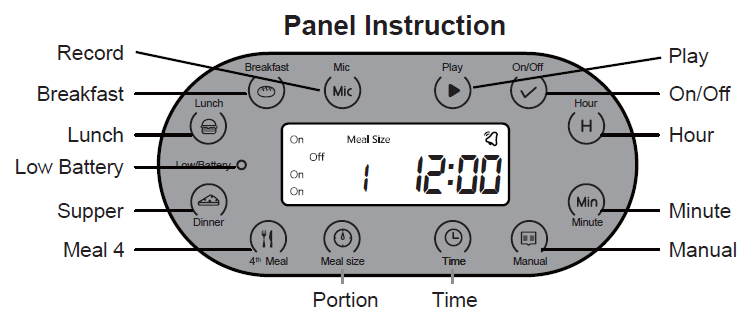
- Press and hold the “Breakfast” button; meanwhile, press the “On/Off” button twice to set whether to feed breakfast. The “On” beside the “ breakfast” button indicates to feed, and the “Off” indicates not to feed.
- Press the “Breakfast” button. Meanwhile, press the “Meal Size” button to set the breakfast feeding quantity. “1” means to rotate one grid (about 5g), and you can set at most 20 portions (about 100g).
- Press the “Breakfast” button. Meanwhile, press the “Hour” button to set the hour of breakfast. Press the “Breakfast” button, meanwhile, press the “Minute” button to set the minute of breakfast.
- Set Lunch, Supper, and the Fourth Meal Time: Please refer to the above instructions, press the “Lunch/Supper/Meal 4th” button, and meanwhile, press the corresponding button to set lunch, supper, and the fourth meal.
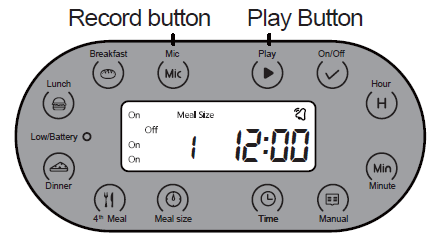
- Record and Play: Long-press and hold the “Mic” button until you have finished recording. The indicator light will turn red, which indicates to start voice recording. A
 signal will show on the screen when the voice recording is completed. You can record about 10 seconds and press the “Play” button to play what you recorded.
Detailed Settings and Descriptions
- Set Current Time:
The factory time when first powered on is 12:00 AM.
For example, the current time is 21:51.- Long-press the “time” button; meanwhile, press the “Hour” button until 21 is displayed on the hour position.
- Long-press the “time” button; meanwhile, press the “Minute” button until 51 is displayed on the minute position.

- Check and set breakfast time and portions:
To check the breakfast time and portions: Please long-press the “Breakfast” button. The time on the screen will shift from the current time to the breakfast time and portions. The product’s default breakfast time is 8:00 am, as shown below. The “Meal Size” indicates the breakfast portions; “1” means dispense one portion. The accurate volume of one portion is based on the different sizes of your pet’s food(You can set at most 20 portions with 5g per portion). Breakfast Time and Portions Setting :
No change is required if the preset value of breakfast matches your pet well. To make any setting changes, the operations are as follows: (For example, to change the portions “Meal Size” to 3, “Meal Time” to 07:21)- Long-press and hold the “Breakfast” button; meanwhile, press the “On/Off” button twice to set whether to set breakfast. The “On” beside the breakfast button indicates to feed, and the “Off” indicates not to feed.
- Press the “Breakfast” button. Meanwhile, press the “Meal Size” button to set the breakfast portions to 3.
- Press the “Breakfast” button. Meanwhile, press the “Hour” button to set the hour of breakfast time to 7:00; Press the “Breakfast” button, meanwhile, press the “Minute” button to set the minute of breakfast time to 21.

- Check and Set Lunch Time and Portions:
Long-press and hold the “Lunch” button. The time on the screen will shift from the current time to the lunch time and portions.
Product default value: No lunch setting, namely, “Off ” is on the lunch position. Check and set lunch time and portions:
In case of any changes, such as changing to activate the lunch setting, please press the “Lunch” button. Meanwhile, press the “On/Off ” button to shift from “Off” to “On.” The preset value of “Meal Size” is 1. You could press the “Lunch” button, and meanwhile, press the “Meal Size” button to make the changes.
The preset value of “Meal Time” is 12:00; you could press the “Lunch” button, meanwhile, press the “Hour” button or “Minute” button to make changes to the feeding time. - Check and Set Time and Portions for Dinner and the Fourth Meal:
Press and hold the “Dinner” button. The time on the screen will shift from the current time to the dinner time and portion.
Product default value: Feeding portion is 1; Feeding time: 18:30, as shown below. The setting method follows the instructions above. Check the time and portions of the 4th Meal:
Press and hold the “4th Meal” button. The time on the screen will shift from the current time to the 4th Meal time and portions.
Product default value: Feeding time: 22:00, as shown below.w The setting method follows the instructions above.
- Record and Play Setting: To record a voice to remind your pet of a meal, you could record your voice for less than 10 seconds. For example, to record“Time for a meal, Poppy,” the instruction is as follows:
 Start Recording:
- Long-press and hold the “Mic” button until the indicator is on. (about 2 seconds)
- Speak loudly into the microphone, “ Time for a meal, Poppy.”
- Let go when you complete the recording, the record signal shows on the top right corner of the screen.
The feeder will play your voice recording three times for each meal to remind your pet.
Cancel the recording: Long-press the “Play” button until the record signal is gone.
Play: Press the “Play button to check what you have recorded.
- Instant Feeding: To activate the instant feeding function, you may long-press the “Manual” button, and the feeder will rotate by one grid.
- There is a Low Battery indicator on the right side of the control panel. When you plan to go out for a business trip, please make sure to check whether the Low Battery indicator is on. In case of lighting or flashing during discharging or sounding, please replace the battery in time to prevent starvation.
- Do not put your fingers into the feeder at any time.
- Turn on/off the feeder. The switch is located at the bottom of the product. It takes 30 seconds to power off after switching “Off.”
- This feeder uses D-size battery *3 (Alkaline batteries work for more than one year under regular use).
Note: Please dispose of the used batteries according to national regulations (pay attention to environmental protection). If you do not use the feeder for a long time, please remove the battery to prevent the electrolyte from flowing out. - Please do not fill semi-dry or wet pet food into the feeder; this product is only applicable for dry pet food.
- Please contact the distributor or manufacturer for any questions.
Frequently Asked Questions and Answers
What’s the problem if my feeder dispenses inaccurately or the display screen is unclear, or my feeder stops working?
Such problems occurring after a period of usage are mostly caused by low battery power. Please replace the new alkaline D-size battery.
How to clean the feeder?
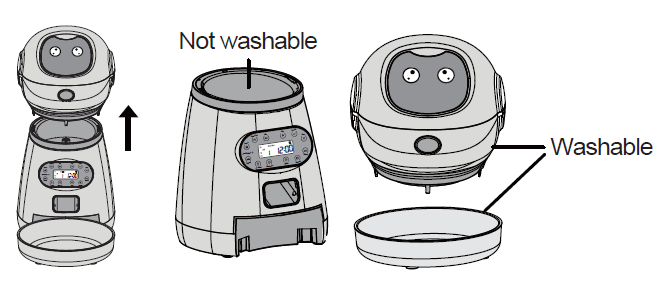
This product cannot be placed outdoors or exposed to the rain. Please use a wet cloth to clean it and prevent water from entering the feeder. If you need to open the food tank, please pull out the head of the robot with strength. The food tank and food bowl can be washed with water.
How do I check the portions I set?
Press the Breakfast/Lunch/Supper/Meal 4th button to check the portions you have set.
Warm Tip: This feeder is mainly aimed at the following pets.
The Meal Size is about 5g per portion. You may set the Meal Size to 1-20 portions according to your pet. This feeder is suitable for small and medium-sized pets. For example, poodle, Pomeranian, Shepherd, Bichon Frise, Cats, etc
For more manuals by Petwant, visit ManualsLibraryy
Petwant PF-1211 Robot Automatic Smart Pet Feeder- FAQs
Q1. How do I use the Petwant PF-1211 feeder?
Simply plug in the feeder, download the compatible app, and follow the on-screen setup instructions. You can schedule feeding times, portion sizes, and monitor your pet’s meals directly from your smartphone.
Q2. How do I connect the feeder to Wi-Fi?
Plug in the power supply, switch it on, then hold the reset button until the Wi-Fi indicator blinks. Open the app, select “Add Device,” choose your Wi-Fi network, enter the password, and connect. Make sure your phone is also connected to the same Wi-Fi during setup.
Q3. What should I do if my feeder is not connecting to Wi-Fi?
Unlink the feeder from the app, unplug it for 30–45 seconds, then reconnect. Press and hold the reset button until you hear a beep and see the Wi-Fi light flashing. Re-add the feeder in the app to restore connection.
Q4. How do I reset the Petwant feeder?
Press and hold the Feed or Reset button for about 5 seconds until you hear a beep. This will restore the feeder to factory settings and remove all stored schedules.
Q5. How does the Petwant PF-1211 feeder work?
It uses a timer and motorized system to release pre-set meal portions at scheduled times. The app lets you control and monitor feeding, ensuring your pet gets meals on time even when you’re away.
Q6. Can I connect the feeder to a new Wi-Fi network?
Yes. Scan the QR code on the bottom of the feeder or follow the app’s instructions. Enter your new Wi-Fi name and password, then confirm. Ensure you are using a 2.4GHz Wi-Fi connection, as 5GHz is not supported.
Q7. What are common problems with automatic feeders?
Weak Wi-Fi signals may interrupt connectivity.
Low or drained batteries can cause missed meals.
Some pets may be startled by the dispensing sound.
Cleaning requires careful handling to avoid damaging the feeder.
Q8. Can I put wet food in the Petwant PF-1211 feeder?
No, this feeder is designed for dry pet food only. Using wet food can clog the dispenser and damage the device.




 Breakfast Time and Portions Setting :
 Check and set lunch time and portions:
 Check the time and portions of the 4th Meal:
 Start Recording: