Samsung RS261MDBP Free-Standing Refrigerator
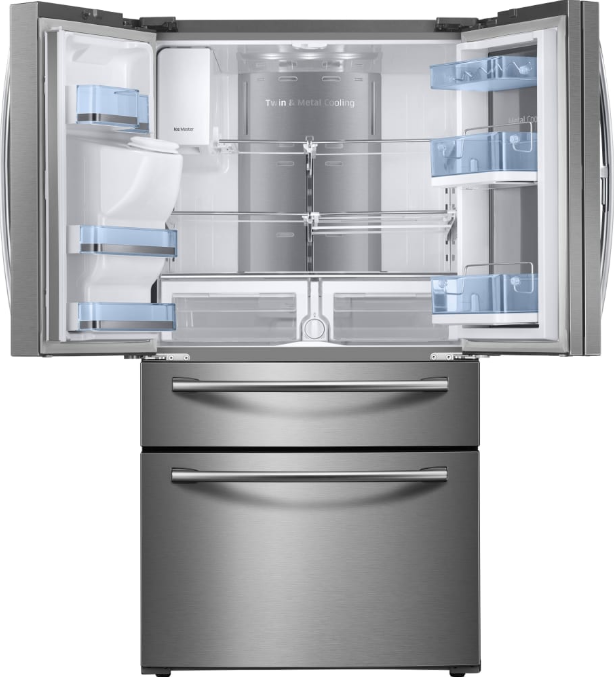
Setting up your side-by-side refrigerator
Getting ready to install the refrigerator
Congratulations on the purchase of your Samsung Side-By-Side Refrigerator. We hope you will enjoy the many state-of-the-art features and efficiencies that this new appliance has to offer.
Selecting the best location for the refrigerator
- Select a location with easy access to the water supply.
- Select a location without direct exposure to sunlight.
- Select a location with level (or nearly level) flooring.
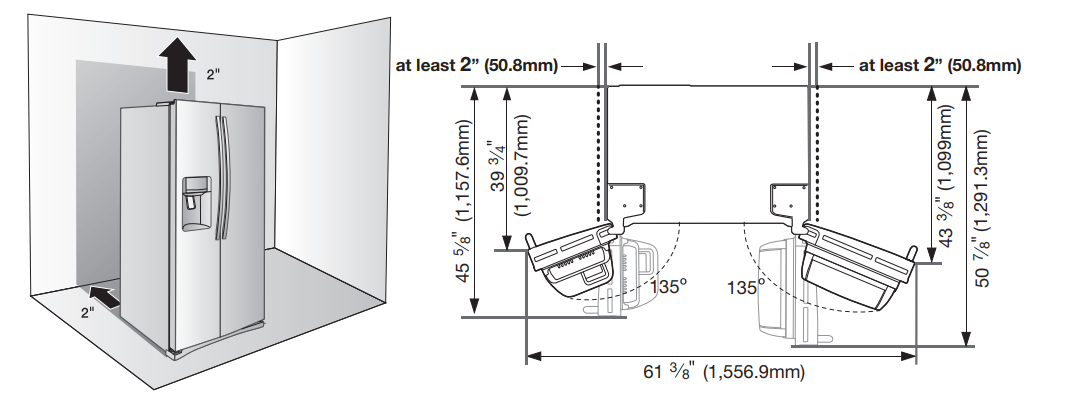
- Select a location with enough space for the refrigerator doors to open easily.
- Allow sufficient space to install the refrigerator on a flat surface.
- If your refrigerator is not level, the internal cooling system may not work correctly.
- Refer to the drawing and dimensions below for the overall space required for use.

When moving your refrigerator
To prevent floor damage, be sure the front leveling legs are in the up position (above the floor). Refer to ‘Leveling the refrigerator’ in the manual (page 15). To protect the finish of the flooring, place a protective sheet, such as a packing carton, under the refrigerator.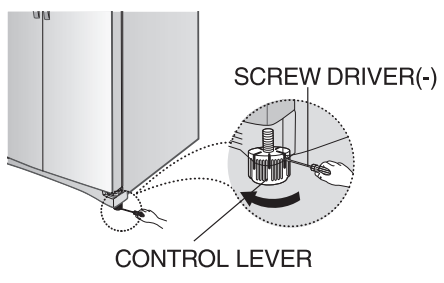
Caution: When installing, servicing, or cleaning behind the refrigerator, be sure to pull the unit straight out and push it back in straight after finishing.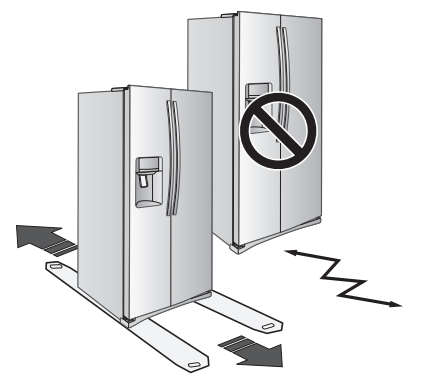
First things first! Make sure that you can easily move your refrigerator to its final location by measuring doorways (both width and height), thresholds, ceilings, stairways, etc. The following chart details the exact height and depth.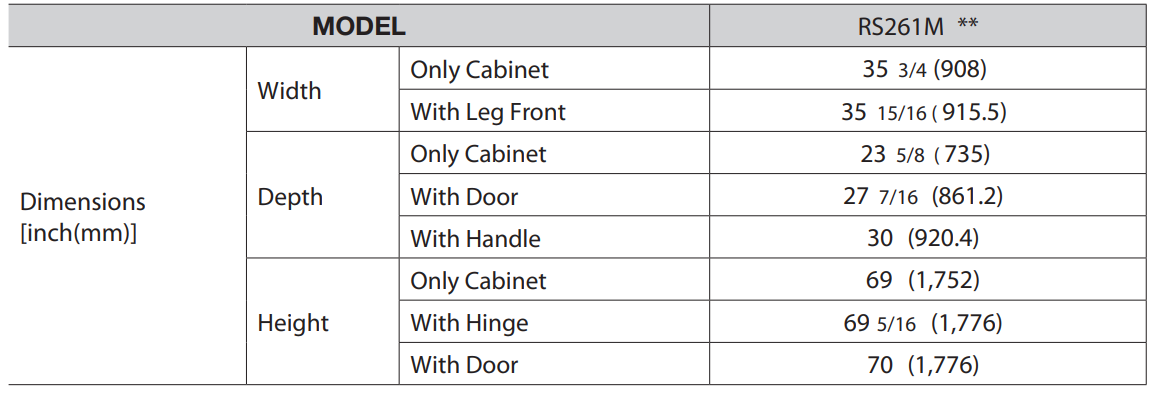
 Allow clearance to the right, left, back, and top when installing. This will help reduce power consumption and keep your energy bills lower.
- Make sure you disconnect the water supply line BEFORE removing the freezer door. To avoid damage, refer to ‘Separating the water line’ in the manual (page 12).
SETTING UP the refrigerator
Now that you have your new Refrigerator installed in place, you are ready to set up and enjoy the features and functions of the appliance. By completing the following steps, your Refrigerator should be fully operational. If not, first check the power supply and electricity source, or try the troubleshooting section at the back of this user’s guide. If you have any further questions, contact your Samsung Electronics service center.
- Place the Refrigerator in an appropriate location with reasonable clearance between the wall and the Refrigerator. Refer to the installation instructions in this manual.
- Once the Refrigerator is plugged in, make sure the interior light comes on when you open the doors.
- Set the Temperature control to the coldest temperature and wait for an hour. The Freezer will get slightly chilled, and the motor will run smoothly.
- After powering the Refrigerator, it will take a few hours to reach the appropriate temperature. You can store food and drinks in the Refrigerator after the temperature is sufficiently cool.
Check the accessory list below
Installing the handles
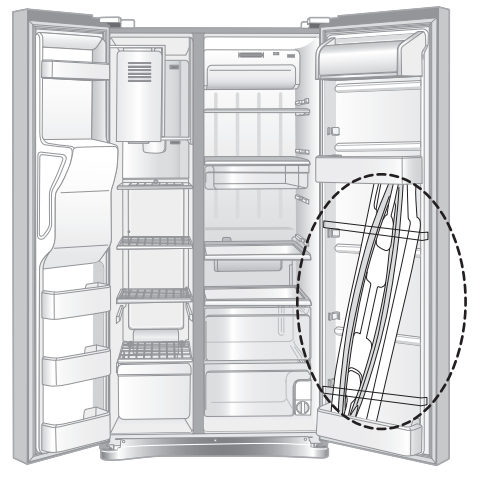
- Take the handles out from the right side door.
 The handles are included in the package.
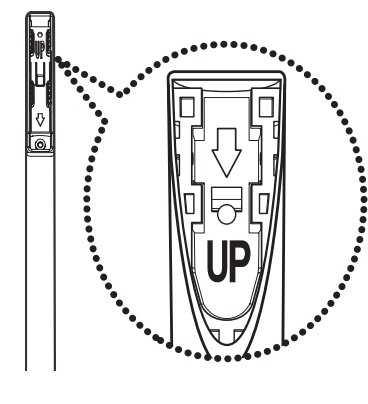
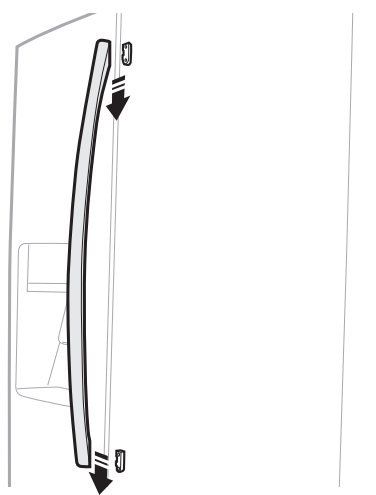
- Check if the word “UP” on the rear of the handle is facing right side up.

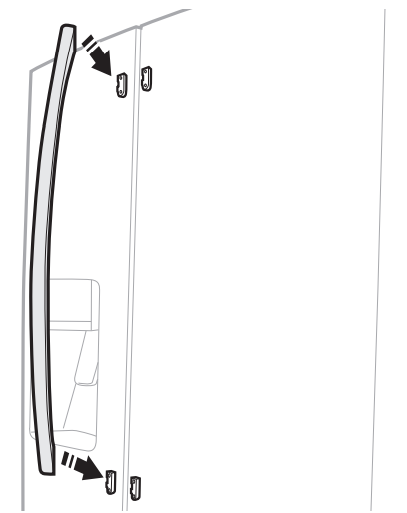
- Match the upper and lower handle locking tabs on the doors to the handles.

- Fix the handles to the doors by sliding them down firmly until you hear a click sound.

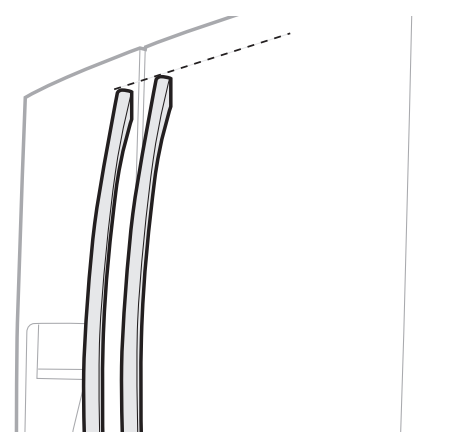
- Check the installation of the handles by pulling on them. If the handles have been inserted correctly, they should not move. Ensure the 2 handles are horizontally aligned.

![]() If the handles are not aligned, repeat steps 2 and 3. To align the doors, refer to ‘Leveling the refrigerator’ in the manual (page 15).
If the handles are not aligned, repeat steps 2 and 3. To align the doors, refer to ‘Leveling the refrigerator’ in the manual (page 15).
SETTING UP the refrigerator (CONT’D)
If your entrance won’t allow the refrigerator to pass easily through it, you can remove the doors.
Removing the Front Leg Cover
First, open both the freezer and refrigerator doors, and then take off the front leg cover by turning the three screws counter-clockwise.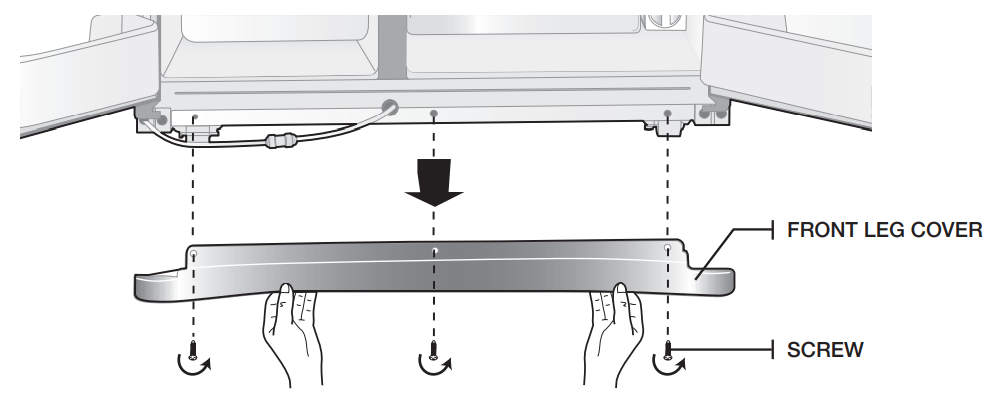
Separating the water supply line from the refrigerator
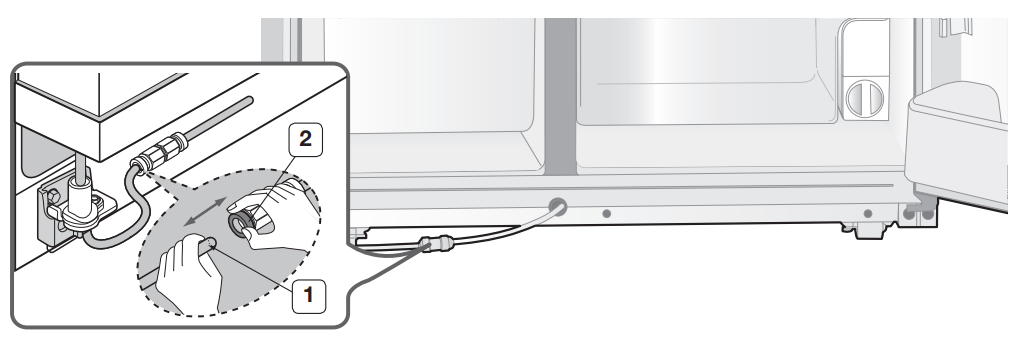
- Remove the water tube by pressing the coupler 2 and pulling the water tube 1 away.

Reattaching the water supply line
- While pressing the front face of the coupler 2, insert the water line 1 in the coupler. Carefully place the front cover and push to snap it into position.

Removing the freezer door
A few things to mention first.
- Make sure that you lift the door straight up so the hinges are not bent or broken.
- Be careful not to pinch the water tubing and wire harness on the door.
- Place doors on a protected surface to prevent scratching or damage.
- Are two people needed for disassembling doors?
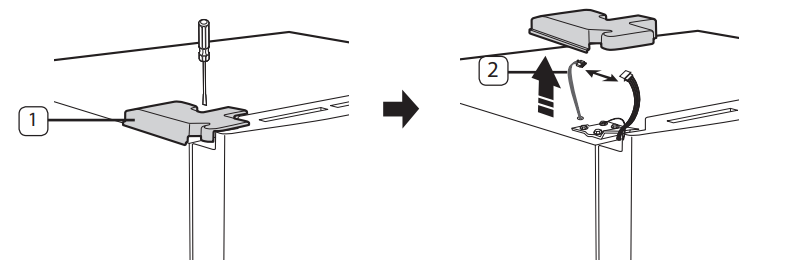
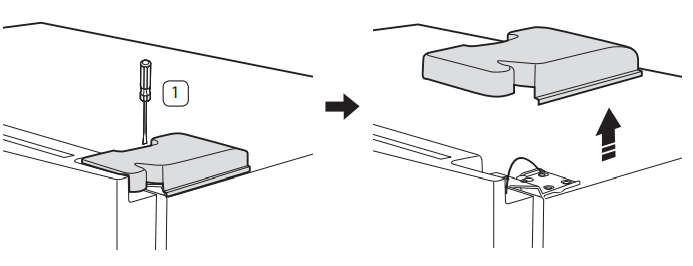
- With the Freezer door closed, remove the upper hinge cover 1 using a screwdriver, and then disconnect the wires 2.
 Be careful when removing the door to ensure that it does not fall on you.
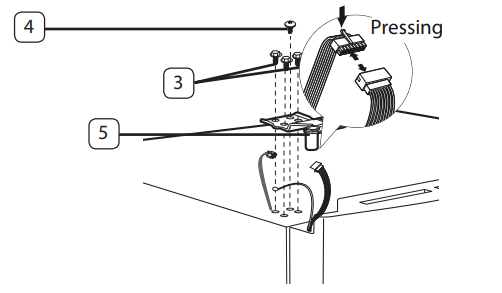
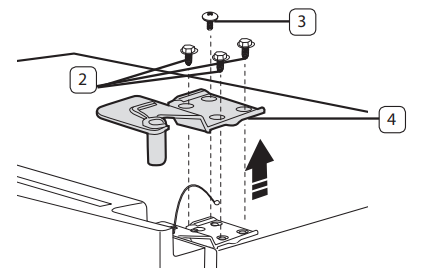
- Remove hinge bolts 3 and a ground screw 4 counter-clockwise, and take off the upper hinge 5 in the direction of the arrow.

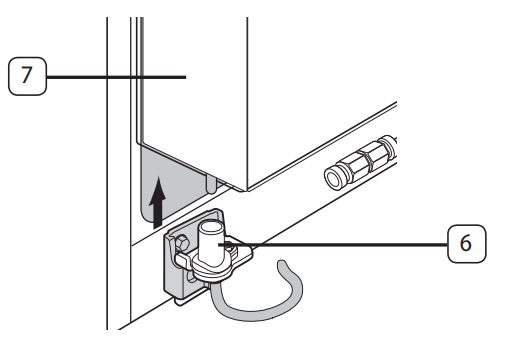
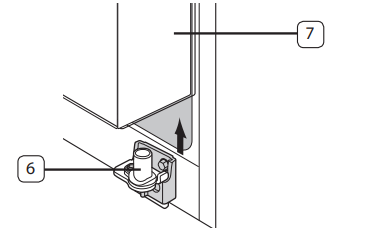
- Before removing the bolts, disassemble the Cover Leg front and hoses. Remove the door from the lower hinge 6 by carefully lifting the door 7.

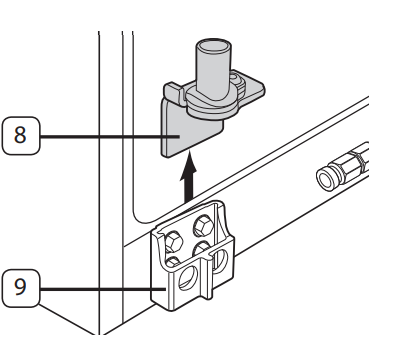
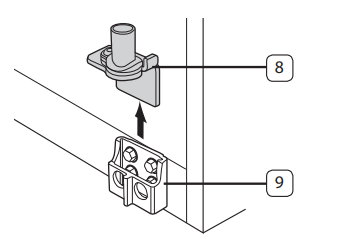
- Remove the lower hinge 8 from the lower hinge bracket 9 by lifting the lower hinge in the direction of the arrow.

Removing the fridge door
- With the door closed, remove the upper hinge cover 1 using a screwdriver.

- Remove hinge bolts 2 and ground screw 3, counter the upper hinge 4 in the direction of the arrow. Be careful when removing the door to ensure that it does not fall on you.

- Before removing the bolts, disassemble the Cover Leg Front and hoses. Remove the door from the lower hinge 6 by lifting the door 7.

- Remove the lower hinge 8 from the lower hinge bracket 9 by lifting the lower hinge in the direction of the arrow.

LEVELING the refrigerator
Now that the doors are back on the refrigerator, you want to make sure the refrigerator is level so that you can make final adjustments. If the refrigerator is not level, it will not be possible to get the doors perfectly even.![]() The front of the refrigerator is also adjustable.
The front of the refrigerator is also adjustable.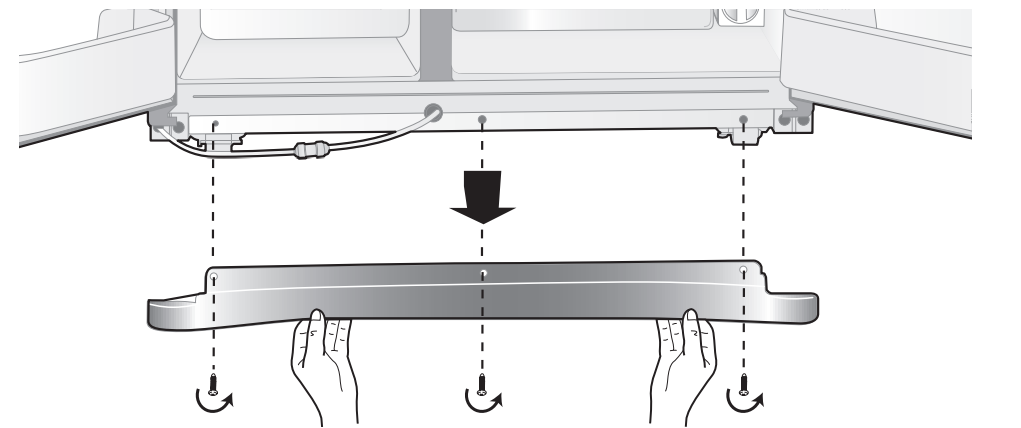
Before leveling the refrigerator, remove the front leg cover
Open both the freezer and fridge doors, and then take off the front leg cover by turning the three screws counter-clockwise.
When the Freezer part is lower than the Fridge part.
Insert a flat-blade screwdriver into a slot on the Freezer Leg, then turn it clockwise.
When the Fridge part is lower than the Freezer part,
Insert a flat-blade screwdriver into a slot on the Fridge Leg, then turn it clockwise.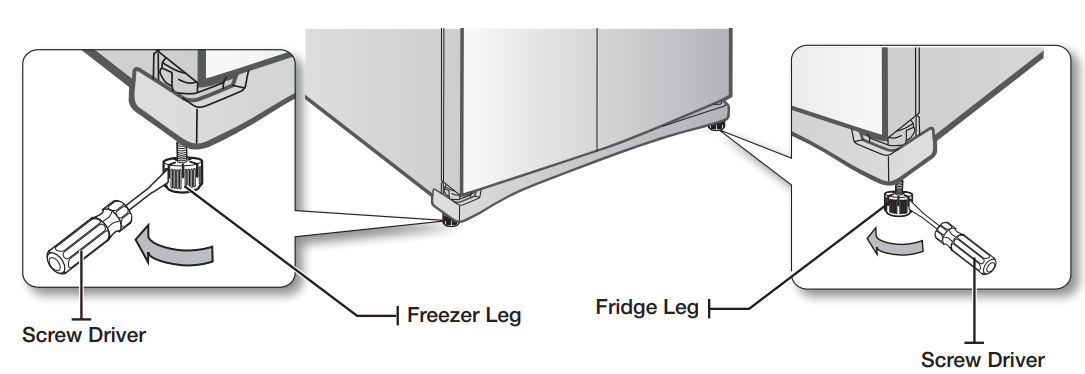
operating your side-by-side refrigerator
CHECKING THE CONTROL PANEL
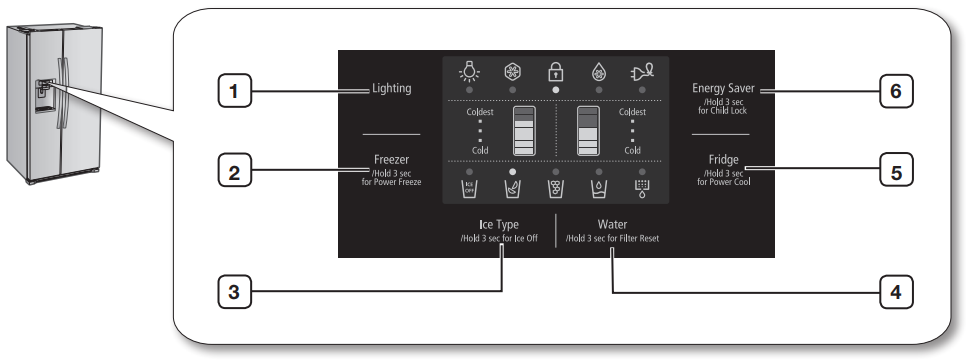
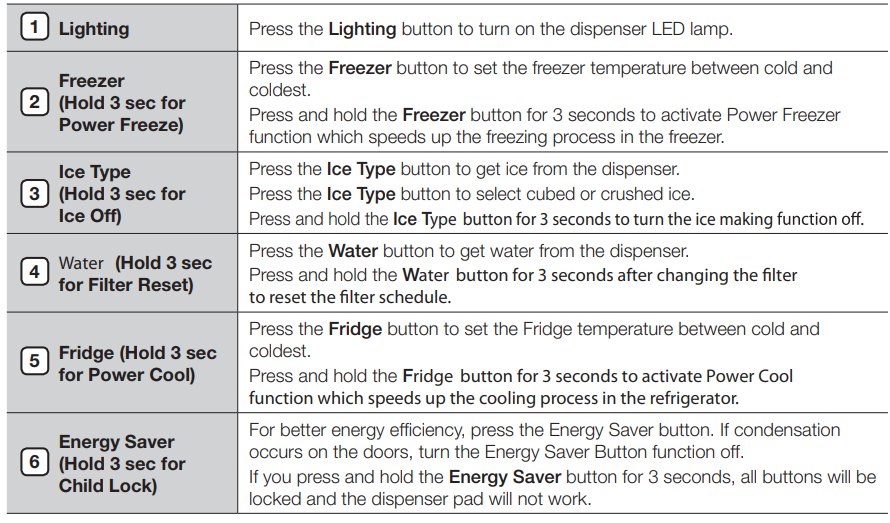
USING THE CONTROL PANEL
Freezer/Fridge (Temperature adjustment)
Press the Freezer or Fridge button until the desired temperature is set. For a lower temperature, press the Freezer or Fridge button until more LED lights (coldest). For a higher temperature, press the Freezer or Fridge button until fewer LED lights (cold). Each time you press the Freezer or Fridge button, the temperature indicator will change in below order.
Lighting![]()
This icon will light up when you activate the Lighting function. In this case, the dispenser light (under the display) will be on constantly. If you would like the dispenser light to come on only when using the dispenser, turn by pressing the Lighting button.
Power Freeze![]()
This icon will light up when you activate the Power Freeze function. The Power Freeze function generates cool air for 72 hours continuously, and it makes the inside of the refrigerator cool faster. This function is useful when you make ice more quickly. When you have enough, just press and hold the Freeze (Hold 3 sec for Power Freeze) button again for 3 seconds to cancel the Power Freeze function. When you use this function, the energy consumption of the refrigerator may increase. Remember to turn when you do not need it and return the freezer to your original temperature setting.
Child Lock ![]()
This icon will light up when you activate the Lock function. In this case, you will not be able to use the control panel. If you press and hold the Energy Saver (Hold 3 sec for Child Lock) button again for 3 seconds, you will be able to use the control panel again.
Power Cool ![]()
This icon will light up when you activate the Power Cool function. The Power Cool function is great for a quick fridge cool-down. If you activate the Power Cool function, the inside temperature of the Fridge will decrease for about two and a half hours.
Energy Saver ![]()
In some places, a water drop may be generated on the door part. In this case, it is recommended to turn on the Energy Saver function.
Filter Indicator ![]()
When the filter indicator light changes to red, it is time to change the filter. Typically, this happens about every 6 months. The filter indicator will be Blue when you initially insert the water filter. The filter indicator will be Purple when you have used your water filter for 5 months. The filter indicator will be Red when you have used your water filter for 6 months.
Water ![]()
This icon will light up when you activate the Water function.
Cubed Ice ![]() , Crushed Ice
, Crushed Ice ![]()
Enjoy cubed or crushed ice by selecting your preference from the digital control panel. The ice type light indicates the type of ice that is currently chosen.
Ice Off ![]()
This icon will light up when you activate the Ice Off function. In this case, the ice will not be produced. Canceling cooling mode (Freezer/Fridge Temperature Indicator moving)
Using the water dispenser
Press the Water button on the control panel. Place your cup on the water outlet and push against the dispenser pad until you hear the “click” sound. Make sure the glass is in line with the dispenser to prevent the water from splashing out.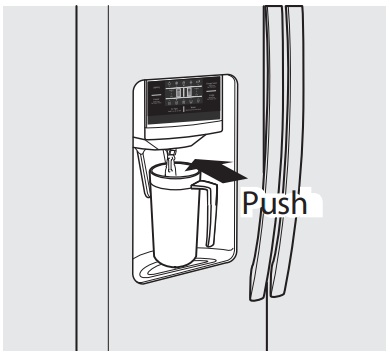
To get colder water
- The dispensed water is cool, not icy cold.
- When you want colder water with ice, dispense ice to your glass first before filling it with water to prevent water from splashing out.
Using the ice dispenser
Press the Ice Type button to select the type of ice you want. Place your cup under the ice outlet and push gently against the dispenser pad. Make sure the glass is in line with the dispenser to prevent the ice from bouncing out. When cubed ice is selected after using the crushed ice, a small amount of residual crushed ice might be produced.
STORING FOOD
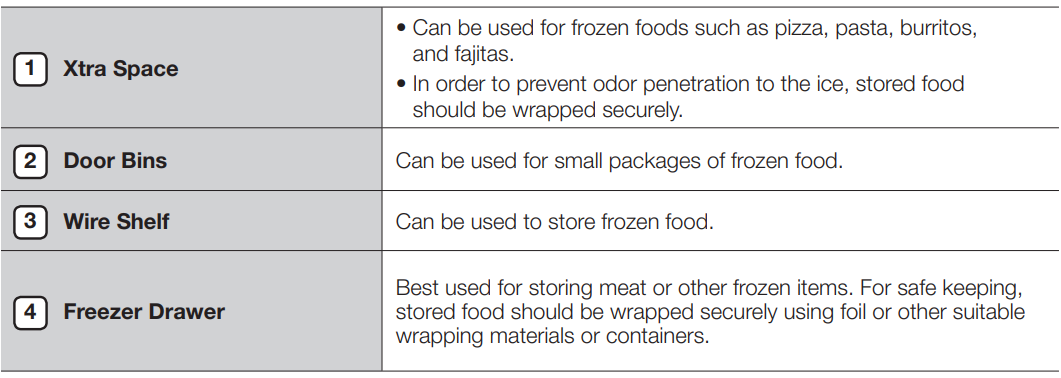
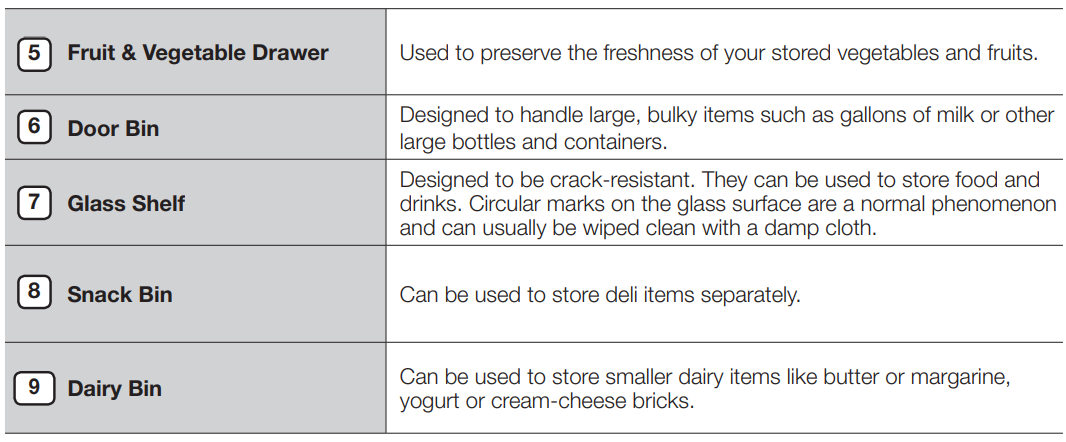
The Samsung Side-By-Side Refrigerator has been designed to provide you with maximum space-saving features and functions. Here are some of the customized compartments we have created to keep your food fresher, longer. Remember, in order to prevent odor penetration into the ice, stored food should be wrapped securely and as airtight as possible.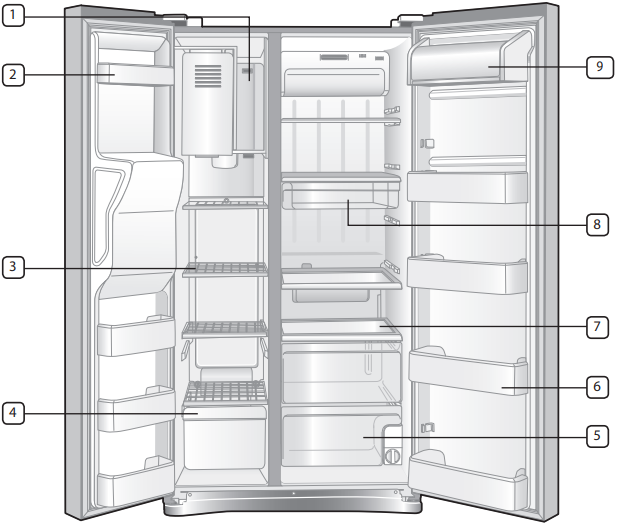
Storing Food in the Freezer
Storing Food in the Fridge
Cleaning and maintaining your side-by-side refrigerator
REMOVING THE FREEZER/FRIDGE ACCESSORIES
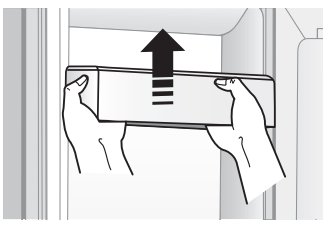
- Door Bin/Dairy Bin: Firmly grab the door bin with both hands and lift it up gently to remove the door bin.

- Shelves: Pull the shelf out as far as it goes. Then lift it up and remove it. (Wire Shelf/Glass Shelf)

- Drawer: Pull the drawers out fully, then slightly lift them up to remove the. (Drawer/Fruit & Vegetable Drawer)

- Snack Bin: Remove the drawer by holding the handle, pulling the drawer out, and then lifting up the back side of the drawer bottom smoothly with the other hand.

CLEANING THE REFRIGERATOR
Caring for your Samsung Side-By-Side Refrigerator prolongs the life of your appliance and helps keep it odor and germ-free.
Cleaning the Interior
Clean the inside walls and accessories with a mild detergent and then wipe dry with a soft cloth. You can remove the drawers and shelves for a more thorough cleaning. Just make sure to dry them before putting them back into place.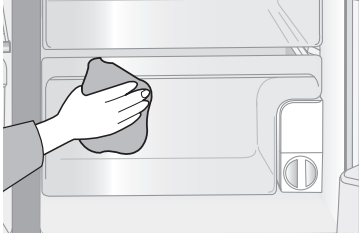
Cleaning the Exterior
Wipe the digital panel and display panel with a clean, soft cloth. Spray water onto the cleaning cloth instead of spraying directly on the surface of the refrigerator. This helps ensure an even distribution of moisture to the surface. The doors, handles, and cabinet surfaces should be cleaned with a mild detergent and then wiped dry with a soft cloth. To keep your appliance looking its best, the exterior should be polished once or twice a year.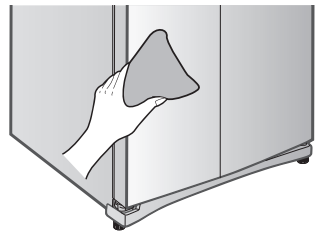
Warning: Do not use Benzene, Thinner, or Clorox™ for cleaning. They may damage the surface of the appliance and create a risk of fire.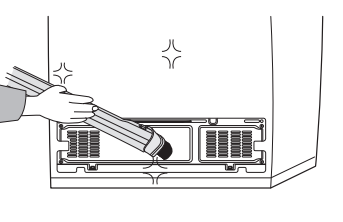
Cleaning the rubber door seals
If the rubber door seals are dirty, the doors may not close properly, and the refrigerator will not operate efficiently. Keep the door seals free of grit or grime by cleaning the doors with a mild detergent and a damp cloth. Wipe dry with a clean, soft cloth. Caution: Do not spray the refrigerator with water while it is plugged in, as it may cause an electric shock. Do not clean the refrigerator with benzene, thinner, or car detergent, as there is a risk of fire.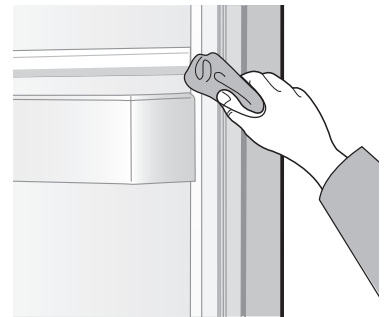
Changing the type of LED lighting
Caution: Do not disassemble or replace the LED-type lighting. To change the LED type lighting, contact a Samsung service center.
CHANGING THE WATER FILTER
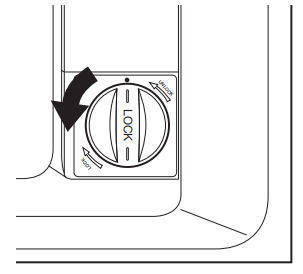
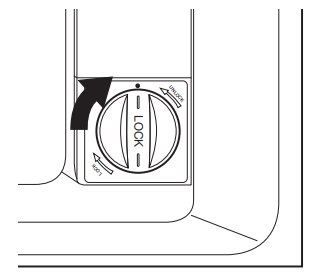
If the water filter indicator turns red, the filtering ability may decrease. Then you need to change the water filter. The water filter is located on the bottom right side of the refrigerator.
- Turn the water filter 90˚ counter-clockwise.

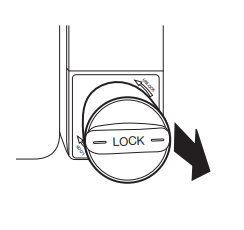
- Pull the water filter from the filter housing.

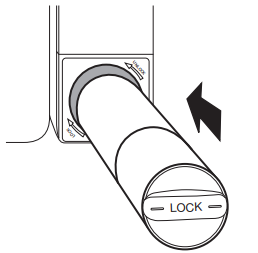
- Insert the new water filter inside the filter housing.

- Turn the new water filter 90˚ clockwise.

- After changing the water filter, press the Water button on the display part for 3 seconds and check if it turns blue.
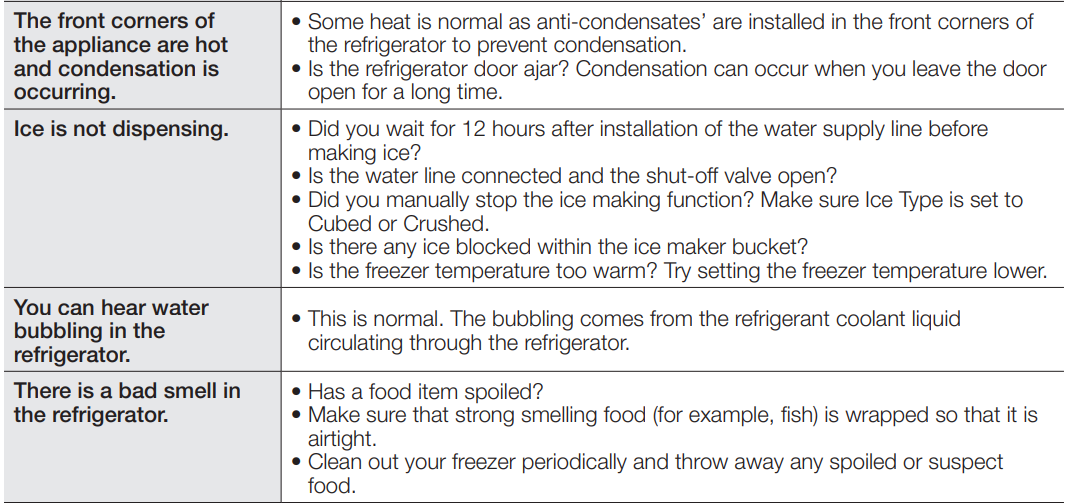
TROUBLESHOOTING


Warranty
SAMSUNG REFRIGERATOR (26 CUBIC FEET AND LARGER CAPACITY)
LIMITED WARRANTY TO ORIGINAL PURCHASER
This Samsung brand product, as supplied and distributed by Samsung Electronics America, Inc. (Samsung) and delivered new, in the original carton to the original consumer purchaser, is warranted by Samsung against manufacturing defects in materials and workmanship for a limited warranty period of:
One (1) Year Parts and Labor on Refrigerator
Five (5) Years Parts and Labor on Sealed Refrigeration System Only
(Compressor, evaporator, condenser, drier, connecting tubing)
This limited warranty begins on the original date of purchase, and is valid only on products purchased and used in the United States. To receive warranty service, the purchaser must contact Samsung for problem determination and service procedures. Warranty service can only be performed by a Samsung authorized service center. The original dated bill of sale must be presented upon request as proof of purchase to Samsung or a Samsung authorized service center.
Samsung will repair or replace any part found to be defective, at our option and at no charge as stipulated herein, with new or reconditioned parts during the limited warranty period specified above. All replaced parts and products become the property of Samsung and must be returned to Samsung. Replacement parts and products assume the remaining original warranty, or ninety (90) days, whichever is longer.
In-home service will be provided during the warranty labor period, subject to availability within the contiguous United States. In-home service is not available in all areas. To receive in-home service, the product must be unobstructed and accessible from floor level to service personnel. If during in-home service, repair cannot be completed, it may be necessary to remove, repair, and return the product. If in-home service is unavailable, Samsung may elect, at our option, to provide for transportation of our choice to and from a Samsung authorized service center. Otherwise, transportation to and from the Samsung authorized service center is the responsibility of the purchaser.
This limited warranty covers manufacturing defects in materials and workmanship encountered in normal, noncommercial use of this product, and shall not apply to the following, including, but not limited to: damage which occurs in shipment; delivery and installation; applications and uses for which this product was not intended; altered product or serial numbers; cosmetic damage or exterior finish; accidents, abuse, neglect, fire, water, lightning or
other acts of nature; use of products, equipment, systems, utilities, services, parts, supplies, accessories, applications, installations, repairs, external plumbing and leaks, external wiring, circuit breakers, fuses, or connectors not supplied and authorized by Samsung, or which damage this product or result in service problems; incorrect electrical line voltage, fluctuations and surges; customer adjustments and failure to follow operating instructions, cleaning, maintenance and environmental instructions that are covered and prescribed in the instruction book; loss of food due to spoilage; consumable items including filters and light bulbs.
THERE ARE NO EXPRESS WARRANTIES OTHER THAN THOSE LISTED AND DESCRIBED ABOVE, AND NO WARRANTIES WHETHER EXPRESS OR IMPLIED, INCLUDING, BUT NOT LIMITED TO, ANY IMPLIED WARRANTIES OF MERCHANTABILITY OR FITNESS FOR A PARTICULAR PURPOSE, SHALL APPLY AFTER THE EXPRESS WARRANTY PERIODS STATED ABOVE, AND NO OTHER EXPRESS WARRANTY OR GUARANTY GIVEN BY ANY PERSON, FIRM OR CORPORATION WITH RESPECT TO THIS PRODUCT SHALL BE BINDING ON SAMSUNG. SAMSUNG SHALL NOT BE LIABLE FOR LOSS OF REVENUE OR PROFITS, FAILURE TO REALIZE SAVINGS OR OTHER BENEFITS,
OR ANY OTHER SPECIAL, INCIDENTAL, OR CONSEQUENTIAL DAMAGES CAUSED BY THE USE, MISUSE, OR INABILITY TO USE THIS PRODUCT, REGARDLESS OF THE LEGAL THEORY ON WHICH THE CLAIM IS BASED, AND EVEN IF SAMSUNG HAS BEEN ADVISED OF THE POSSIBILITY OF SUCH DAMAGES. NOR SHALL RECOVERY OF ANY KIND AGAINST SAMSUNG BE GREATER IN AMOUNT THAN THE PURCHASE PRICE OF THE PRODUCT SOLD BY SAMSUNG AND CAUSING THE ALLEGED DAMAGE. WITHOUT LIMITING THE FOREGOING,
PURCHASER ASSUMES ALL RISK AND LIABILITY FOR LOSS, DAMAGE, OR INJURY TO PURCHASER AND PURCHASER’S PROPERTY AND TO OTHERS AND THEIR PROPERTY ARISING OUT OF THE USE, MISUSE, OR INABILITY TO USE THIS PRODUCT SOLD BY SAMSUNG NOT CAUSED DIRECTLY BY THE NEGLIGENCE OF SAMSUNG. THIS LIMITED WARRANTY SHALL NOT EXTEND TO ANYONE OTHER THAN THE ORIGINAL PURCHASER OF THIS PRODUCT, IS NONTRANSFERABLE, AND STATES YOUR EXCLUSIVE REMEDY.
Some states do not allow limitations on how long an implied warranty lasts, or the exclusion or limitation of incidental or consequential damages, so the above limitations or exclusions may not apply to you. This warranty gives you specific legal rights, and you may also have other rights, which vary from state to state.
To obtain warranty service, please contact Samsung at:
SAMSUNG CUSTOMER CARE CENTER
Samsung Electronics America, Inc. 400 Valley Road, Suite 201, Mt. Arlington, NJ 07956
1-800-SAMSUNG (1-800-726-7864) and www.samsung.com/us
For More Manuals By Samsung, Visit ManualsLibraryy.
Samsung RS261MDBP Free-Standing Refrigerator-FAQs
What are the most common problems with Samsung refrigerators?
Typical issues include cooling failure, water leakage, noisy operation, ice maker not working, defrosting problems, and uneven temperatures causing food spoilage.
What should my Samsung refrigerator be set to?
The ideal temperature is 37°F (3°C) for the refrigerator and 0°F (-18°C) for the freezer to keep food fresh and safe.
What is Samsung’s Digital Inverter Compressor?
It’s an advanced compressor that automatically adjusts speed based on cooling needs. This saves energy, reduces noise, and extends the fridge’s lifespan.
What are the dimensions of the Samsung RS261MDBP?
It has a 25.6 cu. ft. capacity (refrigerator: 16.2 cu. ft., freezer: 9.4 cu. ft.), weighs about 295–322 lbs, and measures 38¼” W x 75¾” H x 36¼” D.
Why is water leaking from my Samsung refrigerator?
Leaks often come from trapped air in the water line after filter replacement, ice buildup in the chute, or a poor seal in the ice dispenser.
How can I test or reset the Samsung ice maker?
Remove the ice bucket, locate the test button on the ice maker, then press and hold it until you hear a chime. This starts a test cycle.
What does the Power Freeze function do?
It speeds up the freezing process by running the fan at a higher speed, allowing food to freeze quickly. After about 50 hours, it resets to normal settings.
How do I maintain my Samsung refrigerator?
Clean the interior every 6 months, replace the water filter regularly, wipe down door seals, and clean condenser coils to ensure efficient cooling.
How long does it take the ice maker to produce ice?
A newly installed Samsung refrigerator takes about 6 to 12 hours to make ice. After that, production depends on usage and freezer settings.


