![]()
Sony STR-KS360 Home Theater AV Receiver

GENERAL
Description and location of parts
Front panel
- On/standby: Press to turn the receiver on or off.
- ACTIVE STANDBY lamp: Lights up in amber when the Control for HDMI and/or S-AIR standby mode is set to on and the receiver is in standby mode.
- Display: The current status of the selected component or a list of selectable items appears here.
- White lamp: Lights up when the receiver is on and DSPL is set to on in the DISPLAY function. Lights off when the receiver is in standby mode or DSPL is set to off in the DISPLAY function.
- Remote sensor: Receives signals from the remote commander.
- MASTER VOLUME: Turn to adjust the volume level of all speakers at the same time.
- INPUT SELECTOR: Press to select the input source to playback.
Indicators on the display
- LFE: Lights up when the disc being played back contains an LFE (Low Frequency Effect) channel and the LFE channel signal is actually being reproduced.
- SLEEP: Lights up when the sleep timer is activated.
- Playback channel indicators: The letters (L, C, R, etc.) indicate the channels being played back. The boxes around the letters vary to show how the receiver downmixes the source sound. L, Front Left, R, Front Right, C, Center (monaural), SL, Surround Left, SR, Surround Right, S, Surround (monaural or the surround components obtained by Pro Logic processing). Example: Recording format (Front/Surround): 3/2.1 Sound Field: A.F.D. AUTO
- D: Lights up when the receiver is decoding Dolby Digital signals. Note: When playing a Dolby Digital format disc, be sure that you have made digital connections.
- S-AIR (KS360S only): Lights up when the S-AIR transmitter (not supplied) is connected.
- HDMI: Lights up when a playback component is connected to this receiver using an HDMI jack.
- Preset station indicators: Light up when using the receiver to tune in to radio stations you have preset.
- Tuner indicators: Light up when using the receiver to tune in radio stations, etc.
- COAX: Lights up when the source signal is a digital signal being input through the COAX IN jack.
- OPT: Lights up when the source signal is a digital signal being input through the OPT IN jack.
- PL/PLII: PL lights up when the receiver applies Pro Logic processing to 2-channel signals in order to output the center and surround channel signals. PLII lights up when the Pro Logic II Movie/Music decoder is activated.
- DTS: Lights up when the receiver is decoding DTS signals. Note: When playing a DTS format disc, be sure that you have made digital connections.
- SW: Lights up when the audio signal is output from the SUBWOOFER jack.
Rear panel (KS360S)
SPEAKERS section
Connects to the supplied speakers and subwoofer.
S-AIR (EZW-T100)
CAUTION: Please do not remove the slot cover until you want to install the wireless transmitter.
Connects to a wireless transmitter (not supplied).
DMPORT
DMPORT jack: Connects to a DIGITAL MEDIA PORT adapter.
AUTO CALIBRATION section
AUTO CAL MIC jack: Connects to the supplied optimizer microphone for the Auto Calibration function.
AUDIO INPUT section
AUDIO IN jacks: Connects to a Super Audio CD player, CD player, etc.
DIGITAL INPUT/OUTPUT section
- OPT IN jacks: Connects to a DVD player, etc.
- COAX IN jack: The COAX IN jack provides a better sound quality.
- HDMI IN/OUT jacks: Connects to a DVD player, satellite tuner, or Blu-ray disc player. The image is output to a TV or a projector, while the sound can be output from a TV or speakers connected to this receiver.
ANTENNA section
FM ANTENNA jack: Connects to the supplied FM wire antenna.
AM ANTENNA terminals: Connects to the supplied AM loop antenna.
Rear panel (KS360)
SPEAKERS section
Connects to the supplied speakers and subwoofer.
DMPORT
DMPORT jack: Connects to a DIGITAL MEDIA PORT adapter.
AUTO CALIBRATION section
AUTO CAL MIC jack: Connects to the supplied optimizer microphone for the Auto Calibration function.
AUDIO INPUT section
AUDIO IN jacks: Connects to a Super Audio CD player, CD player, etc.
DIGITAL INPUT/OUTPUT section
- OPT IN jacks: Connects to a DVD player, etc.
- COAX IN jack: The COAX IN jack provides a better sound quality.
- HDMI IN/OUT jacks: Connects to a DVD player, satellite tuner, or Blu-ray disc player. The image is output to a TV or a projector, while the sound can be output from a TV or speakers connected to this receiver.
ANTENNA section
FM ANTENNA jack: Connects to the supplied FM wire antenna.
AM ANTENNA terminals: Connects to the supplied AM loop antenna.
Remote Commander
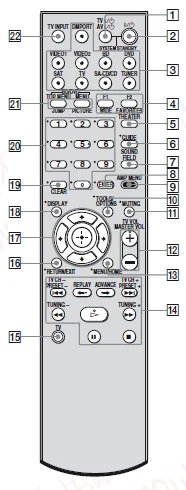
US/Canadian models
You can use the supplied remote RM-AAU057 to operate the receiver and to control the Sony audio/video components that the remote is assigned to operate.
RM-AAU057
- TV, AV (on/standby): Press to turn on or off the Sony audio/video components that the remote is assigned to operate. Press (on/standby) and TV/AV (on/standby) at the same time to turn off the receiver and all other components that the remote is assigned to operate (SYSTEM STANDBY).
- On/standby: Press to turn the receiver on or off. To turn off all Sony components, press (on/standby) and AV (on/standby) (1) at the same time (SYSTEM STANDBY). Saving the power in standby mode: When “CONTROL FOR HDMI” is set to “CTRL ON” and “P.SAVE” is set to “SAVE ON”. When S-AIR standby “STBY” is set to “STBY OFF”.
- Input buttons: Press one of the buttons to select the component you want to use. The buttons are factory assigned to control Sony components.
- FAVORITES: To display the stored favorites. WIDE: To select the wide picture mode.
- THEATER: Press to set the optimal picture settings automatically for watching movies when you connect a Sony TV that is compatible with the THEATER button. Also, the audio is automatically switched to the audio output of this receiver when you connect the TV and the receiver with an HDMI connection, and the Control for HDMI function is set to on.
- GUIDE: Press to display the guide when you are watching analog and digital channels.
- SOUND FIELD: Press to select a sound field.
- ENTER: Press to enter the selection.
- AMP MENU: Press to display the menu of the receiver.
- TOOLS/OPTIONS: Press to enable you to access various viewing options and change/make adjustments according to the source and screen format.
- MUTING: Press to turn off the sound temporarily. Press MUTING again to restore the sound.
- MASTER VOL: Press to adjust the volume.
- MENU/HOME: Press to display the menu.
- PRESET +/–: Press to select a preset station. TUNING +/–: Press to scan the station. (For Tuner Operation).
 : Press to skip the track. Fast forward/reverse: Press to fast reverse or fast forward (For DM Port).
 - Press and hold (15) the TV (yellow) button while pressing the buttons with a yellow dot or yellow printing to control the TV.
- RETURN/EXIT: Press to return to the previous screen of any displayed menu.
 :Sony STR-KS360 Home Theater AV Receiver-6
- DISPLAY: Press to display the information during the Tuner function.
- CLEAR: Press to clear a mistake when you input a wrong character.
- Numeric buttons (number 5*): Press to select channels and tracks directly.
- BD/DVD TOP MENU, MENU: Press to display the top menu or disc menu.
- TV INPUT: Press to select input.
To control the component
- Press one of the input buttons (3) (TV, BD, DVD, or SAT) to select the component you want to operate. The component assigned to the selected input button becomes operable.
- Referring to the following table, press the corresponding button for the operation.
Note:
- Some functions explained in this section may not work depending on the model.
- The above explanation is intended to serve as an example only. Therefore, depending on the component, the above operation may not be possible or may operate differently than described.
Remote Commander
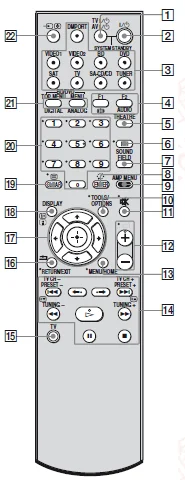
(AEP, UK, AUSTRALIAN Model)
You can use the supplied remote RM-AAU058 to operate the receiver and to control the Sony audio/video components that the remote is assigned to operate.
RM-AAU058
- TV, AV (on/standby): Press to turn on or off the Sony audio/video components that the remote is assigned to operate. Press (on/standby) and TV/AV (on/standby) at the same time to turn off the receiver and all other components that the remote is assigned to operate (SYSTEM STANDBY).
- On/standby: Press to turn the receiver on or off. To turn off all Sony components, press (on/standby) and AV (on/standby) (1) at the same time (SYSTEM STANDBY). Saving the power in standby mode: When “CONTROL FOR HDMI” is set to “CTRL ON” and “P.SAVE” is set to “SAVE ON”. When S-AIR standby “STBY” is set to “STBY OFF”.
- Input buttons: Press one of the buttons to select the component you want to use. The buttons are factory assigned to control Sony components.
- AUDIO: Select the desired audio signal. Screen mode: To change the screen format manually to suit the broadcast.
- THEATER: Press to set the optimal picture settings automatically for watching movies when you connect a Sony TV that is compatible with the THEATER button. Also, the audio is automatically switched to the audio output of this receiver when you connect the TV and the receiver with an HDMI connection, and the Control for HDMI function is set to on.
- GUIDE: Press to display the guide when you are watching analog and digital channels.
- SOUND FIELD: Press to select a sound field.
- ENTER: Press to enter the selection.
- AMP MENU: Press to display the menu of the receiver.
- TOOLS/OPTIONS: Press to enable you to access various viewing options and change/make adjustments according to the source and screen format.
- Muting: Press to turn off the sound temporarily.
 : Press again to restore the sound.
- MENU/HOME: Press to allow you to select channels or input sources and change the settings for your TV.
 : Press to skip the track. Fast forward/reverse: Press to fast reverse or fast forward (For DM Port).
- Press and hold (15) the TV (yellow) button while pressing the buttons with a yellow dot or yellow printing to control the TV.
- RETURN/EXIT: Press to return to the previous screen of any displayed menu.
 :Sony STR-KS360 Home Theater AV Receiver-6
- DISPLAY: Press to display the information during the Tuner function.
- CLEAR: Press to clear a mistake when you input a wrong character.
- Numeric buttons (number 5*): Press to select channels. Press ENTER (8) to change channels immediately.
- ANALOG: Press to change to analog mode. DIGITAL: Press to change to digital mode.
- Input select/Text hold: In TV mode, Press to select input. In Analogue Text mode: Press to hold the current page.
Notes
- Some functions explained in this section may not work depending on the model.
- The above explanation is intended to serve as an example only. Therefore, depending on the component, the above operation may not be possible or may operate differently than described.
DISASSEMBLY
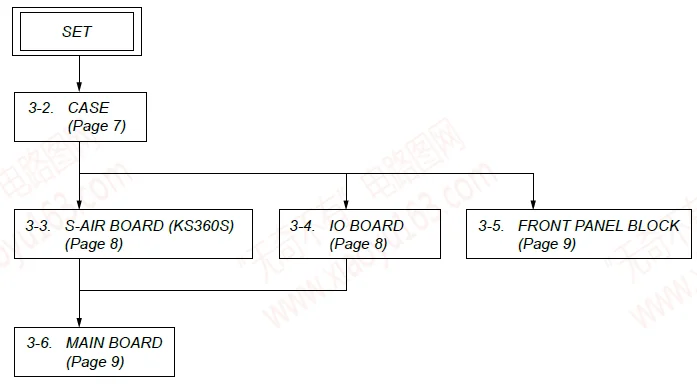
Disassembly flow
Note: Follow the disassembly procedure in the numerical order given.
CASE
S-AIR BOARD (KS360S)
TEST MODE
COLD RESET
All preset contents are cleared when this mode is activated. Use this mode before returning the product to clients upon completion of repair.
Procedure:
- Press the [on/standby] button on the set to turn the power on.
- Keeps pressing the on/standby button on the set for about five seconds.
- The message “CLEARED” appears, then the set turns off.
HOW TO ENTER THE TEST MODE
Note: The operation of the button of the following test modes is only the remote commander.
Procedure:
- Press the [on/standby] button to turn the power on.
- Press the buttons in order of [DMPORT]→[RETURN]→[ENTER]→[0]→[1]→[0]→[SOUND FIELD]
- The message “TEST” appears, then enter the test menu.
- Press the [on/standby] button to exit from the test mode.
PANEL TEST
Pattern check
Procedure:
- Enter the test mode menu.
- Press the [↑]/[↓] buttons to select “PANEL”, and press the [ENTER] button.
- All segments and all LEDs turn on. Change as follows: all on, test pattern 1, test pattern 2, all on in this order.
Key check
Procedure:
- Press the [VOLUME –] button while executing the pattern check.
- The message “K0 V0” appears. “K0” value increases whenever a button on the set is pressed. However, once a button has been pressed, it is no longer taken into account. All buttons on the set are pressed, “OK” and “K2” are alternately displayed.
- “V” value increases in the manner of 0, 1, 2, 3 … [MASTER VOLUME] knob is turned clockwise, or it decreases in the manner of 0, 9, 8, 7 … [MASTER VOLUME] knob is turned counterclockwise.
- Press the [on/standby] button to exit from the test mode.
Software version and destination display
Procedure:
- Press the [VOLUME +] button while executing the pattern check.
- The display of model name, destination, and software version changes whenever the [VOLUME +] button is pressed.
- Press the [on/standby] button to exit from the test mode.
AMP TEST
Not used for the servicing.
Press the [on/standby] button if having entered this mode.
TUNER FACTORY PRESET
Not used for the servicing.
Press the [on/standby] button if having entered this mode.
VACS DISPLAY
Not used for the servicing.
Press the [on/standby] button if having entered this mode.
VACS ON/OFF
Procedure:
- Enter the test mode menu.
- Press the [↑]/[↓] buttons to select “VCS CTRL”, and press the [ENTER] button.
- VACS ON/OFF changes whenever this mode is decided. (There is no change in the display)
DSP HALT MODE
Not used for the servicing.
Press the [on/standby] button if having entered this mode.
DSP STATUS DISPLAY
Not used for the servicing.
Press the [on/standby] button if having entered this mode.
HDMI UCOM UPDATE
Procedure:
- Enter the test mode menu.
- Press the [↑]/[↓] buttons to select “HDMI VER”, and press the [ENTER] button.
- HDMI microprocessor software version is displayed.
- Press the [on/standby] button to exit from the test mode.
ELECTRICAL CHECK
FM AUTO STOP CHECK
Procedure:
- Turn on the set.
- Input the following signal from the signal generator to the FM antenna input directly.
- Carrier frequency : A = 87.5 MHz, B = 98 MHz, C = 108 MHz
- Deviation: 75 kHz
- Modulation: 1 kHz
- ANT input: 35 dBu (EMF)
Note: Use a 75-ohm coaxial cable to connect the signal generator and the set. You cannot use a video cable for checking. Use a signal generator whose output impedance is 75 ohms.
- Set to FM tuner function and scan the input FM signal with automatic scanning.
- Confirm that the input frequency of A, B, and C is detected, and automatic scanning stops.
When the station signal is received in good condition, automatic scanning stops.
For more Manuals by Sony, visit ManualsLibraryy
Sony STR-KS360 Home Theater AV Receiver-FAQs
How do I set up my Sony STR-KS360 AV receiver?
Connect your TV and external devices to the receiver using HDMI cables. Then press HOME > Settings > Display & Sound > Audio Output > eARC Mode > Auto, and select Speakers → Audio System. Enable the receiver’s eARC option if available for optimal sound.
How do I connect my Sony home theater to my TV?
Use an HDMI cable to connect the TV’s HDMI ARC or eARC port to the receiver’s HDMI OUT (ARC/eARC) port. Turn on both devices and set your TV’s speaker option to Audio System.
How do I reset my Sony STR-KS360 receiver to factory settings?
Turn off the receiver.
Press and hold the I/O (Power) button until “PUSH ENTER” flashes on the display.
Release the power button, then press ENTER.
All settings will reset to factory defaults.
How do I perform a hard reset on my Sony home theater system?
Press the MENU button on the remote.
Select RESET, then choose ALL RESET when it appears on the screen.
Press ENTER to confirm. The system will restart with default settings.
How do I manually tune FM stations on my receiver?
Go to Listen > FM from the Home menu.
Press the Tuning button and enter the desired frequency.
Use ▲/▼ to adjust the digits, then confirm when the correct frequency is displayed.
How do I calibrate my Sony AV receiver for the best sound?
Select Settings → Speaker Settings → Auto Calibration.
Follow the on-screen prompts and press Start to begin.
The receiver will automatically measure and adjust speaker levels and distances for balanced audio.
What cables should I use for the best audio quality?
Use HDMI eARC connections whenever possible for uncompressed 5.1 or 7.1 surround sound.
If HDMI isn’t available, use an optical digital audio cable for high-quality sound transmission.
Why is there no sound coming from my Sony receiver?
Check that the correct input source is selected and the speakers are enabled.
Ensure all cables are firmly connected.
If the issue continues, perform a factory reset or check your audio output settings on the TV.
How do I improve the sound quality of my receiver?
Adjust the bass and treble in the audio settings.
Run auto calibration and make sure your speakers are placed properly for surround sound.
Use quality HDMI cables and select the correct sound mode (like Dolby Digital or DTS).
How do I set up a 5.1 surround sound system with the STR-KS360?
Position the front, rear, and center speakers according to the manual.


