ThermoPro TP16 Large LCD Digital Cooking Thermometer

Key Definition
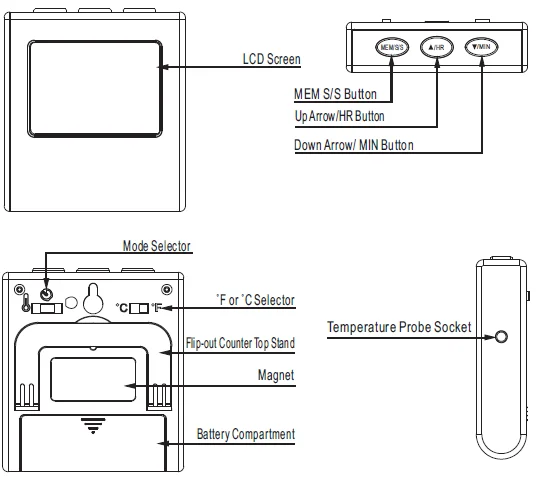
- Temperature Probe Socket: Insert the temperature probe into this socket to measure meat temperature.
- LCD Screen: Displays meat temperature and set temperature while in cook mode. Displays a countdown when in timer mode.
- MEM|S/S Button: In Cook mode, press the MEM button to enable the option to adjust quick temperature settings. Press again to save the selection. In Timer mode, press the S/S button to begin the count-down or count-up timer. Press the S/S button to pause or restart the timer. When the countdown timer hits 0:00, press the S/S button to silence the unit.
- Up Arrow/HR Button: Press the up arrow to select food types while in quick temperature setting. Press the up arrow to set your desired cooking temperature while in manual temperature setting. Press the HR button to set hours while in timer mode. To clear the time, press the HR and MIN buttons at the same time.
- Down Arrow/ MIN Button: Press the down arrow to select food types while in quick temperature setting. Press the down arrow to set your desired cooking temperature while in the manual temperature setting. Press the MIN button to set minutes while in timer mode. To clear the time, press the HR and MIN buttons at the same time.
- °F or ˚C Selector: Move the switch towards ˚F or ˚C, depending on how you would like your temperature displayed.
- Mode Selector: Move the position of the selector to select cook mode, timer mode, or power off the device.
- Flip-out Counter Top Stand: Allows the user to place the device on the counter for easy viewing.
- Magnet: Allows the user to stick the device to a metal surface. For example, a refrigerator.
- Battery Compartment: Remove the battery cover to insert 1 AAA battery.
Note: This unit is designed to remotely monitor cooking progress. Do not remove the probe during cooking. The internal temperature will be displayed on the remote unit outside of the oven.
FEATURES AND SPECIFICATIONS
- Programmable alert with preset temperatures for specific foods.
- 99-hour, 59-minute countdown timer and countup timer.
- Stainless steel temperature probe with steel mesh cable.
- Temperature range of probe*: 32˚F to 572˚F (0˚C to 300˚C).
- Temperature tolerance of internal food reading**: +/-1.8˚F (+/-1.0˚C).
- Temperature readings in ˚F or ˚C.
- Flip-out countertop stand and magnet.
- Uses one AAA battery (included).
The probe is not designed to perform as an oven thermometer. If the probe is not inserted into the food, the temperature reading of oven heat above 200˚F (93˚C) will be accurate to within 1˚F to 5˚F (0.5˚C to 2.7˚C). The internal food reading temperature range is: 0˚F to 185˚F (63˚C to 85˚C).
BATTERY INSTALLATION/SET UP
- Slide open the battery compartment door at the back of the unit.
- Insert one (1) AAA battery according to the polarity markings.
- Replace the battery compartment door.
- Remove the printed vinyl label from the LCD screen.
IMPORTANT NOTES/WARNING
- This product is not for use in microwave ovens.
- Keep out of reach of children.
- Do not touch the hot probe or wire with your bare hands, or just after cooking. Always wear a heat-resistant glove.
- Do not expose the probe directly to flame. Doing so will cause the wire to deteriorate.
- When not in use, slide the mode selector switch to the off position O to conserve the battery.
- Be sure to use a good quality alkaline battery and replace it often. A weak battery will cause the unit to lose accuracy.
- Always dispose of exhausted batteries safely.
- A food thermometer can assist in the proper preparation of food. However, the use of this electronic device does not guard against unsafe food handling practices. Always follow proper food preparation techniques to limit the risk of foodborne illness.
- The stainless steel wire probe should not be exposed to oven temperatures exceeding 716˚F (380˚C).
- Do not let the probe or cable come into direct contact with the oven elements, as this will result in faulty readings and/or damage.
- If the temperature exceeds or falls below the measurable ranges, the LCD screen will display the following letters: HHH for temperatures above range and LLL for temperatures below range.
OPERATING INSTRUCTIONS
Using the Cooking Thermometer
- Clean the stainless steel temperature probe with hot water and soap, and rinse it clean. Do not submerge the probe and cable in water. The probe /cable connection is not waterproof.
- Plug the temperature probe into the socket on the right side of the main unit.
- Make sure the probe cable is free of knots. Make sure the sensor plug on the end of the cord is plugged into the base unit. (Note: if the probe is not plugged in properly or is crimped, the display will show LLL.) Slide the switch on the back of the base unit to display the temperature in ˚F or ˚C.
- Slide the mode selector switch to the cook position.
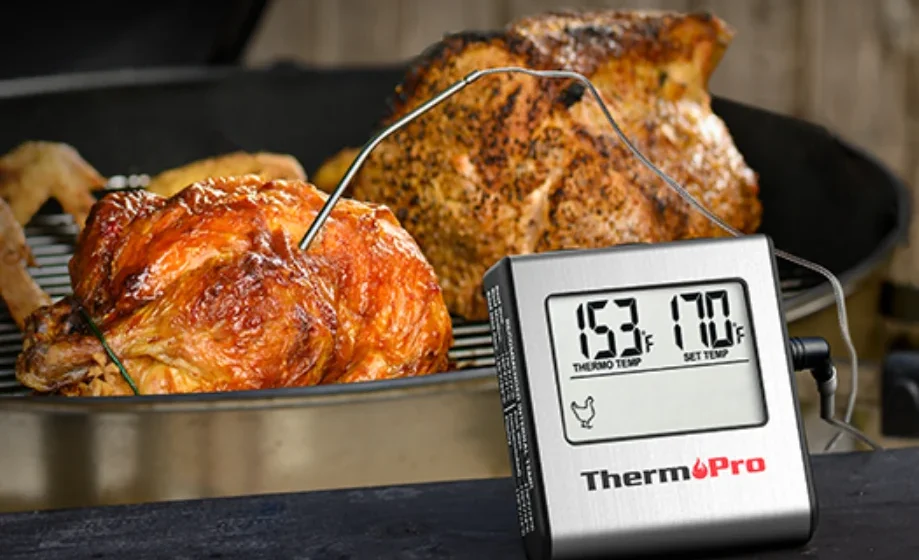
- You will see two temperatures on the LCD display. On the left is the actual temperature reading as measured by the temperature probe, and on the right is the set temperature. The default reading is 212˚F
- Set your desired cooking temperature by choosing Quick Temperature Setting or Manual Temperature Setting. (see Section Quick Temperature Setting and Manual Temperature Setting)
- Insert the tip of the temperature probe at least 5 cm/2” into the thickest part of the meat, but not near bone or gristle.
- Place food into the oven. Before closing the oven door, make sure there is enough slack in the steel mesh cable to prevent the probe from being pulled out of the food when the oven door is closed. The base unit must be positioned outside of the oven on a stable surface and must be firmly connected to the temperature probe.
- To prevent damage to the base unit, it should not be placed on a hot surface.
- When the internal temperature of your food reaches the temperature you have set, an audible alert will sound. To stop the alert, either slide the mode selector switch to O or disconnect the temperature probe from the base unit, and the alarm will stop within 30 seconds.
- Before removing the food from the oven, disconnect the steel mesh cable from the base unit. Do not touch the hot probe or wire with your bare hands during or just after cooking. Always wear a heat-resistant glove.
Quick Temperature Setting
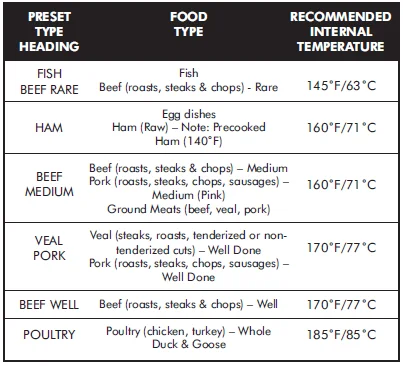
Your digital cooking thermometer is programmed with preset temperatures for various cooking levels: poultry (185˚F), beef well (170˚F), veal/pork (170˚F), beef medium (160˚F), ham (160˚F), and beef rare/fish (145˚F). Follow these steps:
- Press the MEM button.
- Press “∧” or “∨” to select your food type.
- Press MEM to confirm and lock in the setting.
NOTE: You can make manual adjustments to the preset temperatures by pressing “∧” or “∨”. Press and hold the button for fast setting.
PRESET TEMPERATURE COOKING CHART:
Manual Temperature Setting
- For manual setting, press “∧” or “∨” to set your desired cooking temperature.
- Refer to the ‘Preset Temperature Cooking Chart’ for recommended internal temperatures.
COUNTDOWN TIMER
Your countdown timer can be used whether the thermometer is in operation or not.
- Slide the mode selector switch on the back of the base unit to the timer position.
- Press HR to set the hours and MIN to set the minutes.
- Press S/S (start/stop) to start the countdown timer. The colon between hours and minutes will flash.
- When the timer gets to 0:00, the alarm will sound. Press S/S to silence the alarm. This unit has a timing memory and will automatically display he original timer setting when S/S is pressed to silence the alarm.
- To clear the time, press the HR and MIN buttons at the same time. You can pause the timer while it is running by pressing S/S. Press S/S again to restart the timer.
- If you are using the timer and thermometer at the same time, you may slide the selector switch back to the cook position during the timing session to view the cooking temperatures. The timer will continue the countdown.
COUNTUP TIMER
In Timer mode, when it displays 00:00, press MEM/S/S button to start the count-up timer. Press it again to pause the timer. The timer will stop when it reaches 99 hours: 59 minutes.
CLEANING AND CARE
- The unit is not waterproof. Do not expose the plug of the probe or the plug-in hole to any liquid, which will result in a bad connection and faulty readings.
- The probe and cable are not dishwasher safe. They must be hand-washed using hot water and soap. Make sure to rinse and dry the probe thoroughly before storing.
- Do not submerge the base unit in water or expose it to any corrosive cleaning materials. Wipe with a damp cloth.
LIMITED 90 DAYS WARRANTY
Thermopro warrants this product to be free of defects in parts, materials, and workmanship for a period of 90 days from the date of purchase. Should any repairs or servicing under this warranty be required, contact Customer Service by phone or email for instructions on how to pack and ship the product to Thermopro. This warranty gives you specific legal rights, and you may also have other rights which vary from state to state.
CUSTOMER SERVICE
- Telephone: 1-877-515-7797 (USA & Canada only)
- Email: [email protected]
- Hours: Weekdays 9:00 AM- 5:00 PM EST
For more Manuals by ThermoPro, visit ManualsLibraryy
ThermoPro TP16 Large LCD Digital Cooking Thermometer-FAQs
How do I use the ThermoPro TP16 thermometer?
Insert the stainless-steel probe into the thickest part of the food, select your desired temperature or preset mode, and let the unit alert you when your food reaches the target temperature.
How do I turn on the ThermoPro TP16?
Insert the required batteries and press the Power button. The screen will light up and display the current probe temperature.
How do I reset my ThermoPro TP16?
Press and hold the CLEAR button for about 2 seconds to erase max/min readings and reset the unit. If the issue continues, remove and reinsert the batteries.
How do I manually reset a digital thermometer?
Remove the batteries for a few seconds, reinsert them, and power the thermometer back on. This often restores normal function.
How do I sync or pair a ThermoPro thermometer?
For wireless-compatible models, turn on Bluetooth, open the ThermoPro app, and follow the in-app instructions to connect. Keep the thermometer close to your phone during pairing.
How do I connect my ThermoPro to my phone?
Download the ThermoPro app, enable Bluetooth, turn on the thermometer, and select the device from the app’s pairing menu.
Why does my ThermoPro show “Sensor Not Responding”?
This warning usually indicates a weak probe connection or low battery. Ensure the probe plug is firmly inserted and replace the batteries if needed.
Why is my thermometer not working after replacing batteries?
Check that the batteries are installed with the correct polarity and firmly seated. Loose or reversed batteries can prevent the unit from turning on.
How do I fix a ThermoPro thermometer that isn’t working?
Make sure the probe is fully inserted, replace the batteries, and reset the device. If readings remain erratic, try a calibration test.


