Troy-Bilt 30331 3550-Watts Portable Generator
Features and Controls
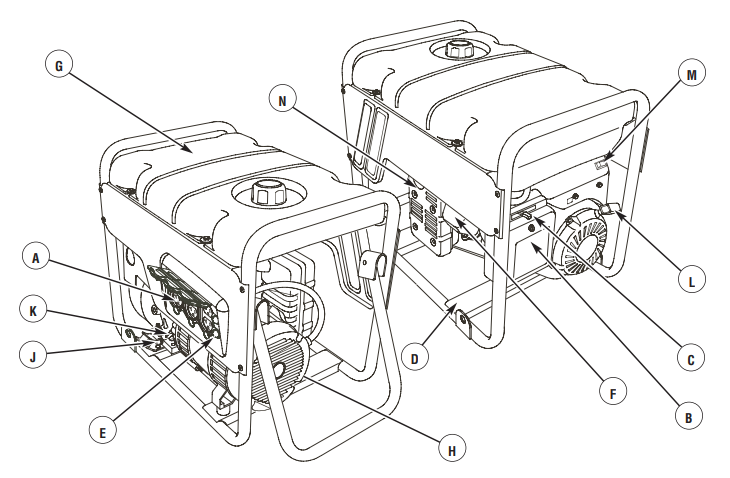
Read this operator’s manual and safety rules before operating your generator. Compare the illustrations with your generator to familiarize yourself with the locations of various controls and adjustments. Save this manual for future reference.
- A – 120 Volt AC, 20 Amp, Duplex Receptacles — May be used to supply electrical power for the operation of 120 Volt AC, 20 Amp, single-phase, 60 Hz electrical, lighting, appliance, tool, and motor loads.
- B – Air Cleaner — Protects the engine by filtering dust and debris out of the intake air.
- C – Choke Lever — Used when starting a cold engine.
- D – Data Tag — Provides model, revision, and serial number of generator. Please have these readily available when calling for assistance.
- E – Circuit Breakers (AC) — Push-to-reset circuit breakers are provided to protect the generator against electrical overload.
- F – Engine Identification — Provides model, type, and code of engine. Please have these readily available if calling for assistance.
- G – Fuel Tank — Capacity of four (4) U.S. gallons (15 L).
- H – Grounding Fastener — Consult your local agency having jurisdiction for grounding requirements in your area.
- J – Oil Drain Plug — Drain engine oil here.
- K – Oil Fill Cap — Check and fill the engine with oil here.
- L – Recoil Starter — Used to start the engine.
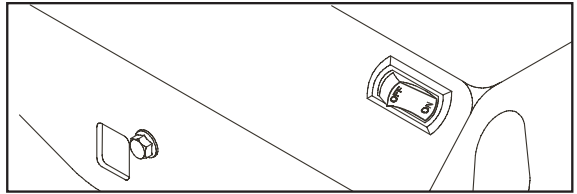
- M – Rocker Switch — Set this switch to “On” before using the recoil starter. Set the switch to “Off” to stop the engine.
- N – Spark Arrester Muffler — Exhaust muffler lowers engine noise and is equipped with a spark arrester screen.

Operation
Starting the Engine
Disconnect all electrical loads from the generator. Use the following start instructions:
- Make sure the unit is on a level surface. IMPORTANT: Failure to start and operate the unit on a level surface will cause the unit not to start or shut down during operation.
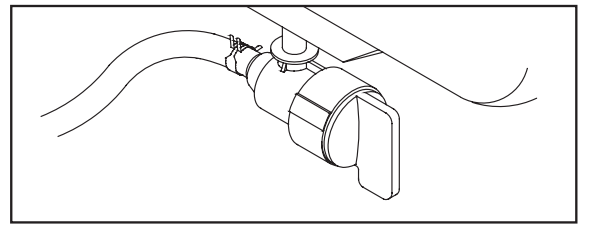
- Turn the fuel valve to the “On” position. The fuel valve handle should be vertical (pointing toward the ground) for fuel to flow.

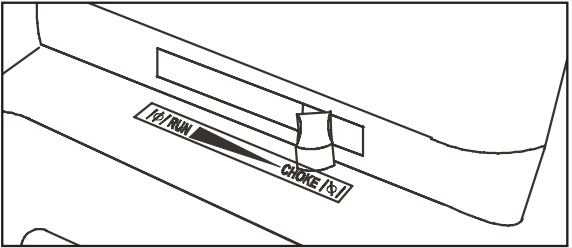
- Push the choke lever to the “Choke” position.

- Push the engine rocker switch to “On”.

- Grasp the recoil handle and pull slowly until slight resistance is felt. Then pull the handle rapidly to overcome compression, prevent kickback, and start the engine. IMPORTANT: If excessive fuel is present in the air/fuel mixture, causing a “flooded” condition, move the choke lever to the “Run”
 position and pull the handle repeatedly until the engine starts.
 - Move the choke lever to the “Run”
 position a short distance at a time over several seconds in warm weather or minutes in cold weather. Let the engine run smoothly before each change. Operate with the choke in “Run” position.
Connecting Electrical Loads
- Let the engine stabilize and warm up for a few minutes after starting.
- Plug in and turn on the desired 120 Volt AC, single-phase, 60 Hz electrical loads.
NOTE:
- DO NOT connect 240 Volt loads to the 120 Volt duplex receptacles.
- DO NOT connect 3-phase loads to the generator.
- DO NOT connect 50 Hz loads to the generator.
- DO NOT OVERLOAD THE GENERATOR. See Don’t Overload Generator.
Stopping the Engine
- Turn OFF and unplug all electrical loads from the generator panel receptacles. NEVER start or stop the engine with electrical devices plugged in and turned ON.
- Let the engine run at no-load for several minutes to stabilize the internal temperatures of the engine and the generator.
- Push the engine rocker switch to the “Off” position.
- Move fuel valve to “Off” position.
Don’t Overload Generator
Capacity
You must make sure your generator can supply enough rated (running) and surge (starting) watts for the items you will power at the same time. Follow these simple steps:
- Select the items you will power at the same time.
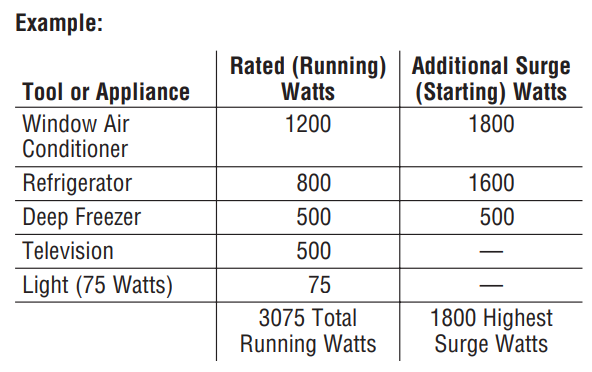
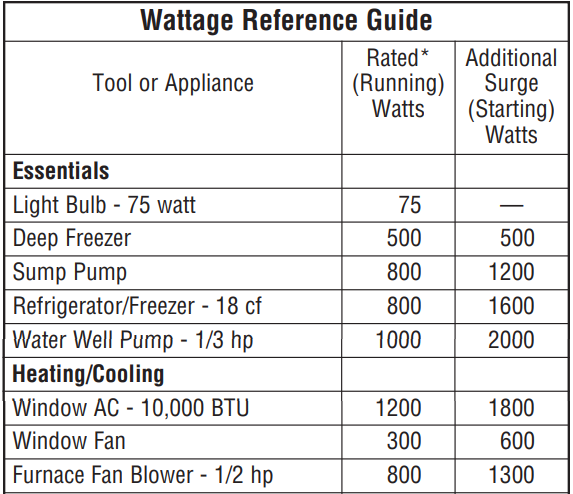
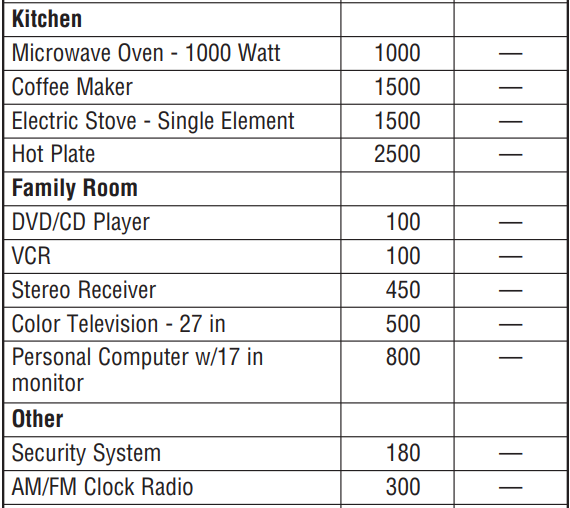
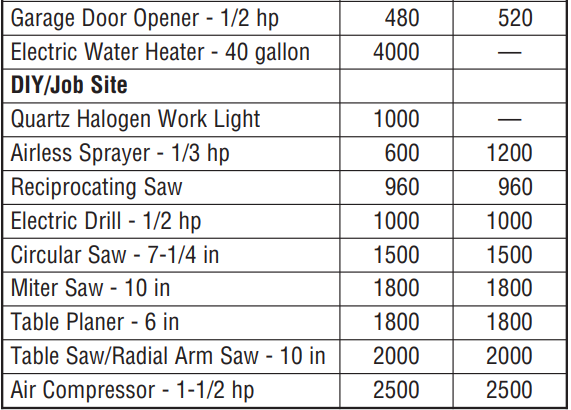
- Total the rated (running) watts of these items. This is the amount of power your generator must produce to keep your items running. See Wattage Reference Guide.
- Estimate how many surge (starting) watts you will need. Surge wattage is the short burst of power needed to start electric motor-driven tools or appliances, such as a circular saw or refrigerator. Because not all motors start at the same time, total surge watts can be estimated by adding only the item(s) with the highest additional surge watts to the total rated watts from step 2.

- Total Rated (Running) Watts = 3075
- Highest Additional Surge Watts = 1800
- Total Generator Output Required = 4875
Power Management
To prolong the life of your generator and attached devices, it is important to take care when adding electrical loads to your generator. There should be nothing connected to the generator outlets before starting its engine. The correct and safe way to manage generator power is to sequentially add loads as follows:
- With nothing connected to the generator, start the engine as described in this manual.
- Plug in and turn on the first load, preferably the largest load you have.
- Permit the generator output to stabilize (engine runs smoothly and the attached device operates properly).
- Plug in and turn on the next load.
- Again, permit the generator to stabilize.
- Repeat steps 4 and 5 for each additional load.


Maintenance
Maintenance Schedule
Follow the hourly or calendar intervals, whichever occurs first. More frequent service is required when operating in adverse conditions noted below.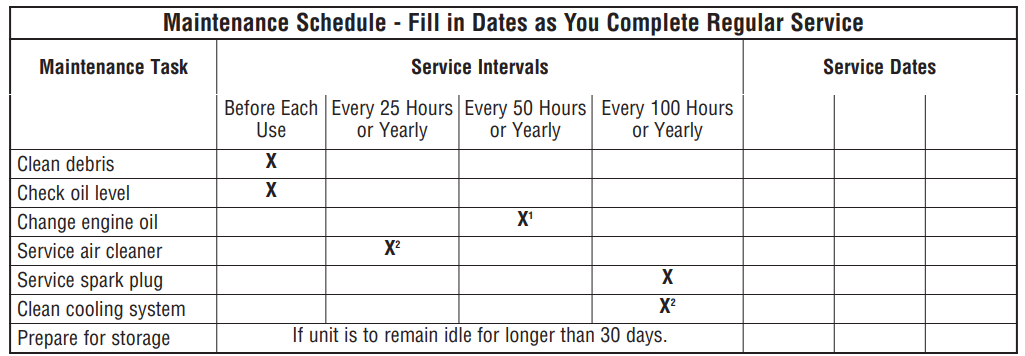
- Change oil after the first 5 operating hours and every 50 hours or every year, whichever occurs first, thereafter. Change oil sooner when operating under dirty or dusty conditions.
- Replace more often under dirty or dusty conditions.
General Recommendations
Regular maintenance will improve the performance and extend the life of the generator. See any authorized dealer for service. The generator’s warranty does not cover items that have been subjected to operator abuse or negligence. To receive full value from the warranty, the operator must maintain the generator as instructed in this manual. Some adjustments will need to be made periodically to properly maintain your generator. All service and adjustments should be made at least once each season. Follow the requirements in the Maintenance Schedule chart above.
NOTE: Once a year, you should clean or replace the spark plug and replace the air filter. A new spark plug and clean air filter assure proper fuel-air mixture and help your engine run better and last longer.
Emissions Control
Maintenance, replacement, or repair of the emissions control devices and systems may be performed by any non-road engine repair establishment or individual. See Emissions Control System Warranty in the Warranty section.
Generator Maintenance
Generator maintenance consists of keeping the unit clean and dry. Operate and store the unit in a clean, dry environment where it will not be exposed to excessive dust, dirt, moisture, or any corrosive vapors. Cooling air slots in the generator must not become clogged with snow, leaves, or any other foreign material.
NOTE: DO NOT use water or other liquids to clean the generator. Liquids can enter the engine fuel system, causing poor performance and/or failure to occur. In addition, if liquid enters the generator through cooling air slots, some of the liquid will be retained in the voids and cracks of the rotor and stator winding insulation. Liquid and dirt buildup on the generator’s internal windings will eventually decrease the insulation resistance of these windings.
Cleaning
Daily or before use, look around and underneath the generator for signs of oil or fuel leaks. Clean accumulated debris from inside and outside the generator. Keep the linkage, spring, and other engine controls clean. Inspect cooling air slots and openings on the generator. These openings must be kept clean and unobstructed. Engine parts should be kept clean to reduce the risk of overheating and ignition of accumulated debris:
- Use a damp cloth to wipe exterior surfaces clean.
- Use a soft-bristle brush to loosen caked-on dirt or oil.
- Use a vacuum cleaner to pick up loose dirt and debris.
Engine Maintenance
Oil
Oil Recommendations
NOTE: Use a high-quality detergent oil classified “For Service SF, SG, SH, SJ” or higher. DO NOT use special additives.
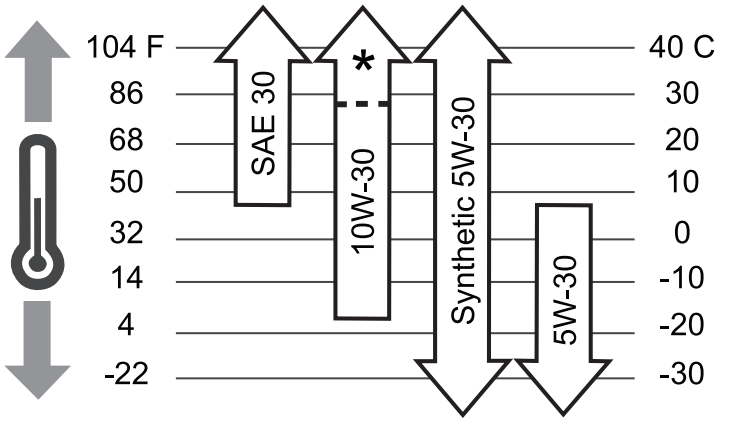
- Choose a viscosity according to the table below:

NOTE: Synthetic oil meeting ILSAC GF-2, API certification mark, and API service symbol with “SJ/CF ENERGY CONSERVING” or higher, is an acceptable oil at all temperatures. Use of synthetic oil does not alter required oil change intervals.
SAE 30: 40°F and higher (5°C and higher) is good for all-purpose use above 40°F. Using temperatures below 40°F will cause hard starting.
10W-30: 0 to 100°F (-18 to 38°C) is better for varying temperature conditions. This viscosity improves cold-weather starting, but may increase oil consumption above 80°F (27°C). Check oil level frequently at higher temperatures.
Synthetic 5W-30: -20 to 120°F (-30 to 40°C) provides the best protection at all temperatures as well as improved starting with less oil consumption.
5W-30: 40°F and below (5°C and below) is recommended for winter use and works best in cold conditions.
Checking Oil Level
Oil level should be checked prior to each use or at least every 5 hours of operation. Keep the oil level maintained.
- Make sure the generator is on a level surface.
- Clean the area around the oil fill and remove the oil fill cap.
- Verify oil is at the point of overflowing at the oil fill opening.
- Replace and tighten the oil fill cap.
Adding Engine Oil
- Make sure the generator is on a level surface.
- Check oil level as described in Checking Oil Level.
- If needed, slowly pour oil into the oil fill opening to the point of overflowing at the oil fill.
- Replace and tighten the oil fill cap.
Changing Engine Oil
Change the oil after the first 5 hours of operation. Change oil every 50 hours thereafter. If you are using your generator under extremely dirty or dusty conditions, or in extremely hot weather, change the oil more often. Change the oil while the engine is still warm from running, as follows:
- Make sure the unit is on a level surface.
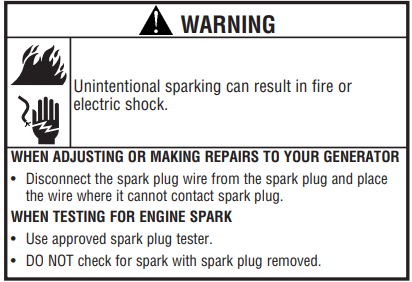
- Disconnect the spark plug wire from the spark plug and place the wire where it cannot contact the spark plug.
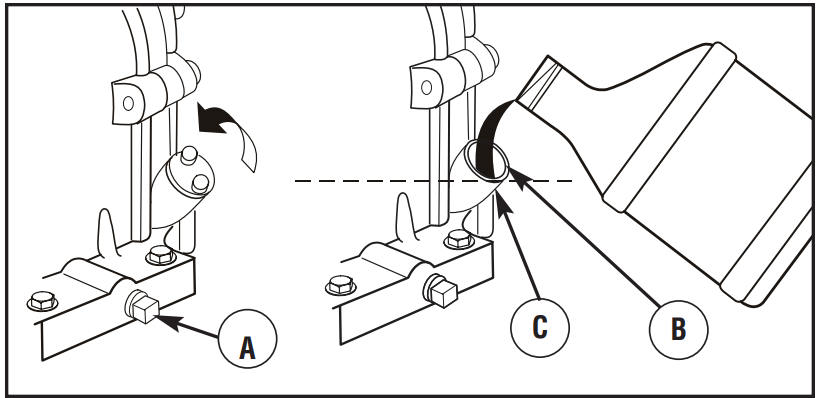
- Clean area around oil drain plug (A). The oil drain plug is located at the base of the engine, opposite the carburetor.

- Remove the oil drain plug and drain oil completely into a suitable container.
- Reinstall the oil drain plug and tighten securely. Remove oil fill cap.
- Slowly pour oil (about 20 oz.) into the oil fill opening (B) to the point of overflowing (C) at the oil fill cap. DO NOT overfill.
- Reinstall the oil fill cap. Finger tighten cap securely.
- Wipe up any spilled oil.
Service Air Cleaner
Your engine will not run properly and may be damaged if you run it with a dirty air cleaner. Replace the air cleaner every 25 hours of operation or once each year, whichever comes first. Replace more often if operating under dirty or dusty conditions. To service the air cleaner, follow these steps:
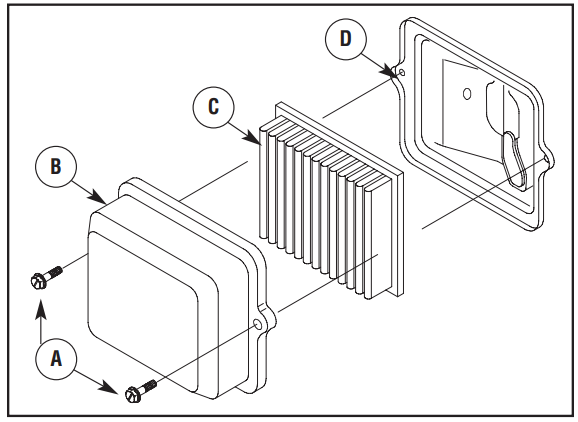
- Loosen screws (A) and remove the air cleaner cover (B).

- Carefully remove cartridge (C) from base (D).
- Install a clean (or new) air cleaner assembly inside the cover. Dispose of the old filter properly.
- Assemble the air cleaner cover onto the base and tighten the screws.
Service Spark Plug
Change the spark plug every 100 hours of operation or once each year, whichever comes first. This will help your engine to start more easily and run better.
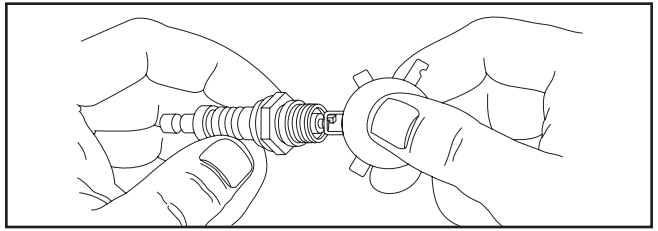
- Clean the area around the spark plug.
- Remove and inspect the spark plug.
- Check electrode gap with wire feeler gauge and reset spark plug gap to recommended gap if necessary (see Specifications).

- Replace the spark plug if the electrodes are pitted, burned, or the porcelain is cracked. Use the recommended replacement spark plug. See Specifications.
- Install the spark plug and tighten firmly.
Service Spark Arrester
The engine exhaust muffler has a spark arrester screen. Inspect and clean the screen every 100 hours of operation or once each year, whichever comes first. If you use your generator on any forest-covered, brush-covered, or grass-covered unimproved land, it must have a spark arrester. The spark arrester must be maintained in good condition by the owner/operator.
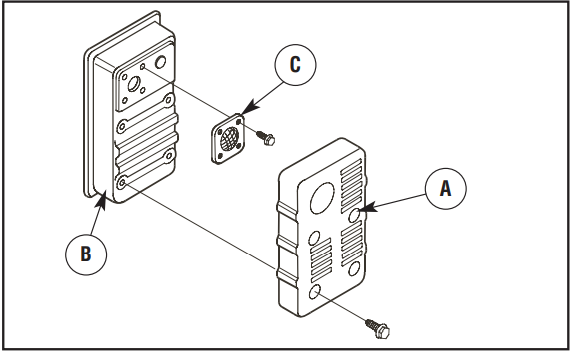
- To remove the muffler heat shield (A) from the muffler (B), remove four screws that connect the guard to the muffler bracket.

- Remove four screws that attach the spark arrester screen (C).
- Inspect the screen and obtain a replacement if torn, perforated, or otherwise damaged. DO NOT use a defective screen. If the screen is not damaged, clean it with commercial solvent.
- Reattach the screen and muffler guard.
Air Cooling System
Over time, debris may accumulate in cylinder cooling fins and cannot be observed without partial engine disassembly. For this reason, we recommend you have an authorized Briggs & Stratton service dealer clean the cooling system per recommended intervals (see Maintenance Schedule at the beginning of the Maintenance section). Equally important is to keep the top of the engine free from debris. See Clean Debris.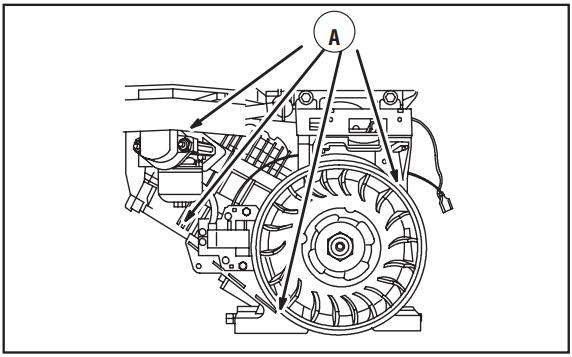
Storage
The generator should be started at least once every seven days and allowed to run for at least 30 minutes. If this cannot be done and you must store the unit for more than 30 days, use the following guidelines to prepare it for storage.
Generator Storage
- Clean the generator as outlined in Cleaning.
- Check that cooling air slots and openings on the generator are open and unobstructed.
Long Term Storage Instructions
Fuel will become stale when stored for over 30 days. Stale fuel causes acids and gum deposits to form in the fuel system or on essential carburetor parts. Prior to storage, if gasoline has not been treated with a fuel stabilizer, it must be drained from the engine into an approved container. Then run the engine until it stops from a lack of fuel.
When fuel stabilizers are used according to their instructions, there is no need to drain the gasoline from the engine prior to storage. Use Briggs & Stratton FRESH START™ fuel stabilizer, available as a liquid additive or a concentrated liquid cartridge. Run the engine for a short time to circulate the stabilizer throughout the fuel system. Engine and fuel can then be stored up to 24 months. If gasoline is drained, the use of a fuel stabilizer in the storage container is still recommended to maintain freshness.
Troubleshooting

LIMITED WARRANTY
Troy-Bilt® is a registered trademark of MTD Products Inc. and is used under license to Briggs & Stratton Power Products. Briggs & Stratton Power Products Group, LLC will repair or replace, free of charge, any part(s) of the portable generator that are defective in material or workmanship or both.
Transportation charges on the product submitted for repair or replacement under this warranty must be borne by the purchaser. This warranty is effective for the time periods and subject to the conditions stated below. For warranty service, find the nearest Authorized Service Dealer in our dealer locator map at BRIGGSandSTRATTON.COM.
THERE IS NO OTHER EXPRESS WARRANTY. IMPLIED WARRANTIES, INCLUDING THOSE OF MERCHANTABILITY AND FITNESS FOR A PARTICULAR PURPOSE, ARE LIMITED TO ONE YEAR FROM PURCHASE, OR TO THE EXTENT PERMITTED BY LAW. ANY AND ALL IMPLIED WARRANTIES ARE EXCLUDED. LIABILITY FOR INCIDENTAL OR CONSEQUENTIAL DAMAGES IS EXCLUDED TO THE EXTENT EXCLUSION IS PERMITTED BY LAW.
Some states or countries do not allow limitations on how long an implied warranty lasts, and some states or countries do not allow the exclusion or limitation of incidental or consequential damages, so the above limitation and exclusion may not apply to you. This warranty gives you specific legal rights, and you may also have other rights which vary from state to state or country to country.
WARRANTY PERIOD
- Consumer Use 2 years
- Commercial Use 1 year
The warranty period begins on the date of purchase by the first retail end user, and continues for the period of time stated above. “Consumer Use” means personal residential household use by a retail consumer. “Commercial Use” means all other uses, including use for commercial, income-producing, or rental purposes. Once equipment has experienced commercial use, it shall thereafter be considered as commercial use for purposes of this warranty.
NO WARRANTY REGISTRATION IS NECESSARY TO OBTAIN A WARRANTY ON BRIGGS & STRATTON PRODUCTS. SAVE YOUR PROOF OF PURCHASE RECEIPT. IF YOU DO NOT PROVIDE PROOF OF THE INITIAL PURCHASE DATE AT THE TIME WARRANTY SERVICE IS REQUESTED, THE MANUFACTURING DATE OF THE PRODUCT WILL BE USED TO DETERMINE THE WARRANTY PERIOD.
ABOUT YOUR WARRANTY
We welcome warranty repair and apologize to you for being inconvenienced. Any Authorized Service Dealer may perform warranty repairs. Most warranty repairs are handled routinely, but sometimes requests for warranty service may not be appropriate. For example, warranty service would not apply if equipment damage occurred because of misuse, lack of routine maintenance, shipping, handling, warehousing, or improper installation.
Similarly, the warranty is void if the manufacturing date or the serial number on the portable generator has been removed or the equipment has been altered or modified. During the warranty period, the Authorized Service Dealer, at its option, will repair or replace any part that, upon examination, is found to be defective under normal use and service. This warranty will not cover the following repairs and equipment:
- Normal Wear: Outdoor Power Equipment, like all mechanical devices, needs periodic parts and service to perform well. This warranty does not cover repair when normal use has exhausted the life of a part or the equipment.
- Installation and Maintenance: This warranty does not apply to equipment or parts that have been subjected to improper or unauthorized installation or alteration and modification, misuse, negligence, accident, overloading, over speeding, improper maintenance, repair, or storage so as, in our judgment, to adversely affect its performance and reliability. This warranty also does not cover normal maintenance such as air filters, adjustments, fuel system cleaning, and obstruction (due to chemical, dirt, carbon, lime, and so forth).
- Other Exclusions: This warranty excludes wear items such as O-rings, filters, etc., or malfunctions resulting from accidents, abuse, modifications, alterations, improper servicing or freezing, or chemical deterioration. Accessory parts such as starting batteries, generator adapter cord sets, and storage covers are excluded from the product warranty. This warranty excludes used, reconditioned, and demonstration equipment, equipment used for prime power in place of utility power, equipment used in life support applications, and failures due to acts of God and other force majeure events beyond the manufacturer’s control.
For More Manuals By Troy-Bilt, Visit ManualsLibraryy.
Troy-Bilt 30331 3550-Watts Portable Generator-FAQs
How long will the Troy-Bilt 3550-watt generator run on a full tank?
On a full tank of fuel, the Troy-Bilt 3550-watt generator can operate for about 4–5 hours, depending on the load.
Why does my Troy-Bilt generator keep shutting off?
The generator may shut off due to low oil levels, a dirty air filter, clogged fuel lines, or faulty spark plugs. Check and service these parts regularly.
What type of oil should I use in this generator?
Troy-Bilt recommends SAE 5W-30 engine oil for best performance. However, 10W-30 oil can also be used in moderate climates.
How do I check the oil level on my Troy-Bilt generator?
Make sure the generator is on level ground. Remove the dipstick, wipe it clean, reinsert it fully, then check the oil level mark.
Can I run my Troy-Bilt generator overnight?
Yes, it can run overnight if the tank has enough fuel. However, always ensure proper ventilation, avoid running indoors, and follow safety guidelines.
What is the average lifespan of a portable generator?
With proper maintenance, a portable generator can last 10–15 years or around 10,000–30,000 hours of use, depending on workload and care.
What should I do if my generator starts but won’t stay running?
This could be due to dirty spark plugs, stale fuel, a clogged carburetor, or a faulty oil sensor. Inspect and clean or replace the faulty parts as needed.
Where is the air filter located on the generator?
The air filter is usually housed in a small compartment on the side of the engine. Open the cover, remove the filter, and clean or replace it regularly.
Can I refuel the generator while it’s running?
No, never refuel while the generator is running or hot. Always turn it off and let it cool down before adding fuel to avoid fire hazards.

