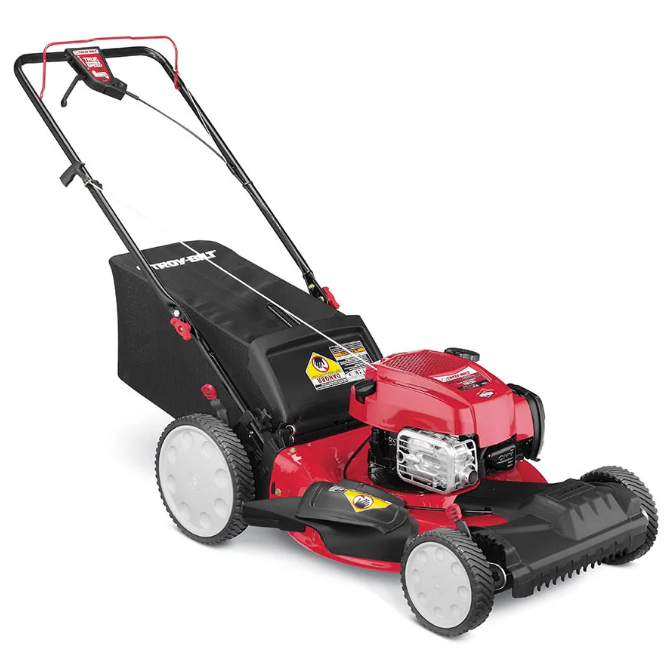
Troy-Bilt TB230 Self Propelled Lawn Tractor
General Operation
- Read this operator’s manual carefully in its entirety before attempting to assemble this machine. Read, understand, and follow all instructions on the machine and in the manual(s) before operation. Keep this manual in a safe place for future and regular reference and for ordering replacement parts.
- Be completely familiar with the controls and their proper use of this machine before operating it.
- This machine is a precision piece of power equipment, not a plaything. Therefore, exercise extreme caution at all times. This machine has been designed to perform one job: to mow grass. Do not use it for any other purpose.
- Never allow children under 14 years of age to operate this machine. Children 14 and over should read and understand the instructions and safe operation practices in this manual and on the machine, and should be trained and supervised by an adult.
- Only responsible individuals who are familiar with these rules of safe operation should be allowed to use this machine.
- Thoroughly inspect the area where the equipment is to be used. Remove all stones, sticks, wire, bones, toys, and other foreign objects that could be tripped over or picked up and thrown by the blade. Thrown objects can cause serious personal injury.
- Plan your mowing pattern to avoid the discharge of material toward roads, sidewalks, bystanders, and the like. Also, avoid discharging material against a wall or obstruction, which may cause discharged material to ricochet back toward the operator.
- To help avoid blade contact or a thrown object injury, stay in the operator zone behind the handles and keep children, bystanders, helpers, and pets at least 75 feet from the mower while it is in operation. Stop the machine if anyone enters the area.
- Always wear safety glasses or safety goggles during operation and while performing an adjustment or repair to protect your eyes. Thrown objects that ricochet can cause serious injury to the eyes.
- Wear sturdy, rough-soled work shoes and close-fitting slacks and shirts. Shirts and pants that cover the arms and legs, and steel-toed shoes are recommended. Never operate this machine in bare feet, sandals, slippery, or lightweight (e.g., canvas) shoes.
- Do not put hands or feet near rotating parts or under the cutting deck. Contact with the blade can amputate fingers, hands, toes, and feet.
- A missing or damaged discharge cover can cause blade contact or thrown object injuries.
- Many injuries occur as a result of the mower being pulled over the foot during a fall caused by slipping or tripping. Do not hold on to the mower if you are falling; release the handle immediately.
- Never pull the mower back toward you while you are walking. If you must back the mower away from a wall or obstruction, first look down and behind to avoid tripping, and then follow these steps:
- Step back from the mower to fully extend your arms.
- Be sure you are well-balanced with sure footing.
- Pull the mower back slowly, no more than halfway toward you.
- Repeat these steps as needed.
- Do not operate the mower while under the influence of alcohol or drugs.
- Do not engage the self-propelled mechanism on machines so equipped while starting the engine.
- The blade control is a safety device. Never attempt to bypass its operation. Doing so makes the safety device inoperative and may result in personal injury through contact with the rotating blade. The blade control must operate easily in both directions and automatically return to the disengaged position when released.
- Never operate the mower in wet grass. Always be sure of your footing. A slip and fall can cause serious personal injury. If you feel you are losing your footing, release the blade control handle immediately, and the blade will stop rotating within three seconds.
- Mow only in daylight or good artificial light. Walk, never run.
- Stop the blade when crossing gravel drives, walks, or roads.
- If the equipment should start to vibrate abnormally, stop the engine and check immediately for the cause. Vibration is generally a warning of trouble.
- Shut the engine off and wait until the blade comes to a complete stop before removing the grass catcher or unclogging the chute. The cutting blade continues to rotate for a few seconds after the blade control is released. Never place any part of the body in the blade area until you are sure the blade has stopped rotating.
- Never operate a mower without a proper trail shield, discharge cover, grass catcher, blade control, or other safety protective devices in place and working. Never operate a mower with damaged safety devices. Failure to do so can result in personal injury.
- The muffler and engine become hot and can cause a burn. Do not touch.
- Never attempt to make a wheel or cutting height adjustment while the engine is running.
- Only use parts and accessories made for this machine by the manufacturer. Failure to do so can result in personal injury.
- When starting the engine, pull the cord slowly until resistance is felt, then pull rapidly. Rapid retraction of the starter cord (kickback) will pull your hand and arm toward the engine faster than you can let go. Broken bones, fractures, bruises, or sprains could result.
- If situations occur that are not covered in this manual, use care and good judgment. Contact Customer Support for assistance or the name of the nearest service dealer.
Slope Gauge

Assembly & Set-Up
Contents of Carton
- One Lawn Mower
- One Grass Catcher
- One Bottle of Oil
- One Lawn Mower Operator’s Manual
- One Engine Operator’s Manual
- One-Side Discharge Chute
- One Fuse†
- † If Equipped
Assembly
NOTE: This unit is shipped without gasoline or oil in the engine. Fill up with gasoline and oil as instructed in the accompanying engine manual BEFORE operating your mower.
Handle
- Remove any packing material that may be between the upper and lower handles.
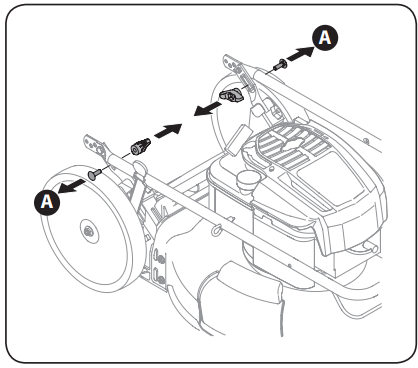
- Remove wing nuts and carriage bolts from the handle as shown in Figure 3-1. Do not loosen or remove adjacent hex head screws.

- While stabilizing the mower so it doesn’t move, pivot the upper handle up as shown in Figure 3-2. Do not crimp the cable while lifting the handle up.

- Remove the T-bolts from the handle brackets as shown in Figure 3-3.

- Follow the steps below to complete the handle assembly:
- Pull upward on the handle until the holes in the lower handle (shown in Figure 3-3 deck cutaway) line up with the holes in the handle bracket. See Figure 3-4. NOTE: When pulling upward on the handle, make sure not to pull the handle all the way out.

- Insert the T-bolts removed earlier through the handle brackets and lower handle and tighten securely to secure the handle in place. See Figure 3-4.
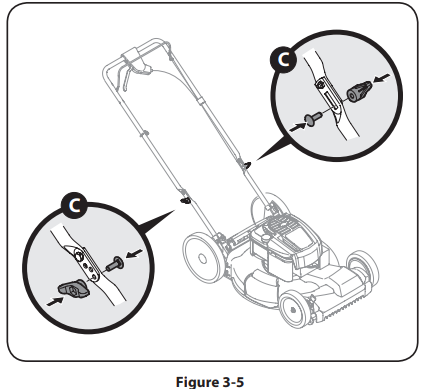
- Reattach wing nuts and carriage bolts removed earlier into the lower holes of the handle as shown in Figure 3-5.

- The rope guide is attached to the right side of the upper handle. Loosen the wing knob, which secures the rope guide. See Figure 3-6.

- Hold the blade control against the upper handle.
- Slowly pull the starter rope handle from the engine and slip the starter rope into the rope guide. See Figure 3-6.
- Tighten the rope guide wing knob.
- Use cable tie(s) to secure cable(s) to the lower handle.
Grass Catcher
- Follow the steps below to assemble the grass catcher (if needed). Make certain the bag is turned right side out before assembling (the warning label will be on the outside).
- Place the bag over the frame so that its black plastic side is at the bottom.
- Slip the plastic channel of the grass bag over the hooks on the frame. See Figure 3-7.

- Follow the steps below to attach the grass catcher:
- Lift the rear discharge door.
- Place the grass catcher into the slots in the handle brackets as shown in Figure 3-8. Let go of the discharge door so that it rests on the grass catcher.

To remove the grass catcher, lift the rear discharge door on the mower. Lift the grass catcher up and off the slots in the handle brackets. Release the rear discharge door to allow it to close the rear opening of the mower.
Side Discharge Chute
Your mower is shipped as a mulcher. To convert to side discharge, make sure the grass catcher is off the unit and the rear discharge door is closed.
- On the side of the mower, lift the side mulching plug. See Figure 3-9.

- Slide two hooks of the side discharge chute under the hinge pin on the mulching plug assembly. Lower the mulching plug. Do not remove the side mulching plug at any time, even when you are not mulching.
Adjustments
Cutting Height
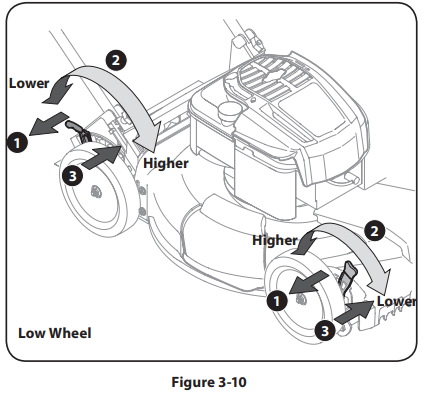
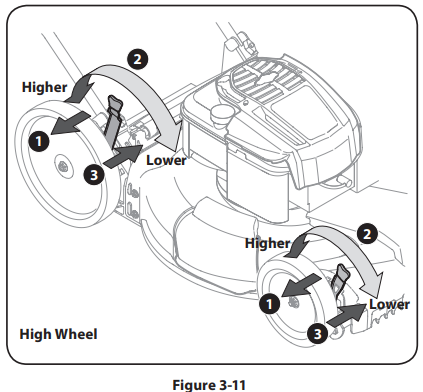
There is a cutting height adjustment lever located above the front and rear right wheel.
- Pull the height adjustment lever towards the wheel (the unit will tend to fall when the lever is moved outward).
- Move the lever to the desired position for a change in cutting height. See Figure 3-10 and Figure 3-11.

- NOTE: For mowers with low wheels, the height adjustment levers move in the opposite direction to adjust; for those with high wheels, the levers move in the same direction.

- Release the lever towards the deck.
IMPORTANT: Both the front and rear wheels must be placed in the same relative position. For rough or uneven lawns, move the height adjustment levers to a higher position. This will stop the scalping of the grass.
Handle Pitch
For convenience of operation, you may adjust the pitch of the handle as follows:
- Remove wing nuts and carriage bolts from the handle. See Figure 3-12.

- Position the handle in one of the three positions that is most comfortable. See Figure 3-12 inset.
- Secure into position with wing nuts and carriage bolts removed earlier.
Drive Control
The adjustment wheel is located in the drive control handle housing and is used to tighten or loosen the drive belt. You will need to adjust the drive control if the mower does not propel itself with the drive control engaged or if the mower’s wheels hesitate with the drive control engaged. If either of these conditions occurs, rotate the adjustment wheel clockwise to tighten the cable or counterclockwise to loosen the cable. See Figure 3-13.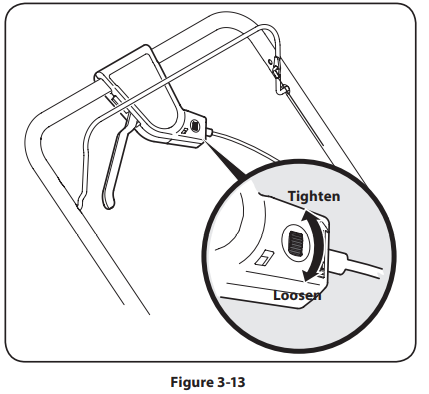
Set-Up
Gas and Oil Fill-Up
Refer to the separate engine owner’s manual for additional engine information.
- Add the oil provided before starting the unit for the first time out of the box.
- Service the engine with gasoline as instructed in the separate engine owner’s manual.
![]() WARNING: Use extreme care when handling gasoline. Gasoline is extremely flammable, and the vapors are explosive. Never fuel the machine indoors or while the engine is hot or running. Extinguish cigarettes, cigars, pipes, and other sources of ignition.
WARNING: Use extreme care when handling gasoline. Gasoline is extremely flammable, and the vapors are explosive. Never fuel the machine indoors or while the engine is hot or running. Extinguish cigarettes, cigars, pipes, and other sources of ignition.
Controls and Features
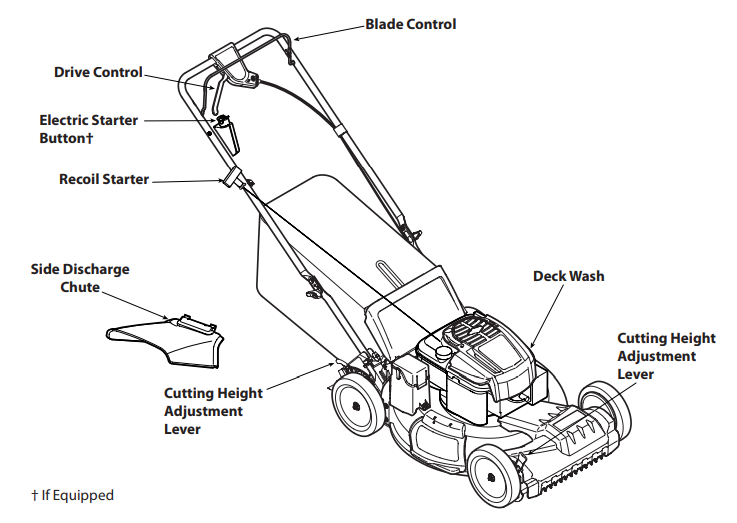
Blade Control
The blade control is attached to the upper handle of the mower. Depress and squeeze it against the upper handle to operate the unit. Release it to stop the engine and blade. ![]() WARNING: This blade control is a safety device. Never attempt to bypass its operations.
WARNING: This blade control is a safety device. Never attempt to bypass its operations.
Drive Control
The drive control is located on top of the upper handle and is used to engage the drive. Squeeze it against the upper handle to engage the drive; release it to slow down or stop the mower from propelling.
Cutting Height Adjustment Lever
One adjustment lever is located on the right rear wheel, and one is located on the right front wheel. Both levers have to be at the same relative position to ensure a uniform cut. To adjust the cutting height, refer to the “Assembly & Set-Up” section.
Deck Wash
Your mower’s deck is equipped with a water port on its surface as part of its deck wash system. Use the deck wash to rinse grass clippings from the deck’s underside.
Side Discharge Chute
Your mower is shipped as a mulcher. To discharge the grass clippings to the side instead, follow the instructions in the “Assembly & Set-Up” section to attach the side discharge chute. ![]() WARNING: Keep hands and feet away from the chute area on the cutting deck. Refer to the warning label on the unit.
WARNING: Keep hands and feet away from the chute area on the cutting deck. Refer to the warning label on the unit.
Recoil Starter
The recoil starter is attached to the right upper handle. Stand behind the unit and pull the recoil starter rope to start the unit.
Electric Starter Button (If Equipped)
The electric starter button is located on the right side of the upper handle. It is used only for the electric starter.
Operation
Starting Engine
![]() WARNING: Be sure no one other than the operator is standing near the lawn mower while starting the engine or operating the mower. Never run the engine indoors or in enclosed, poorly ventilated areas. Engine exhaust contains carbon monoxide, an odorless and deadly gas. Keep hands, feet, hair, and loose clothing away from any moving parts on the engine and lawn mower. Follow the set of instructions pertaining to your unit. Refer to the engine manual for help with the engine.
WARNING: Be sure no one other than the operator is standing near the lawn mower while starting the engine or operating the mower. Never run the engine indoors or in enclosed, poorly ventilated areas. Engine exhaust contains carbon monoxide, an odorless and deadly gas. Keep hands, feet, hair, and loose clothing away from any moving parts on the engine and lawn mower. Follow the set of instructions pertaining to your unit. Refer to the engine manual for help with the engine.
Briggs & Stratton Engine
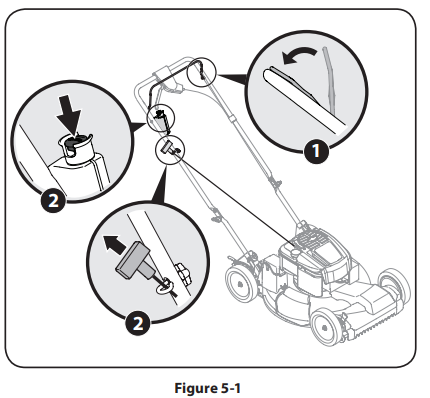
- Standing behind the mower, squeeze the blade control against the upper handle. See Figure 5-1.

- Recoil Start: Holding these two handles together firmly, grasp the recoil starter handle and pull the rope out with a rapid, continuous, full arm stroke. See Figure 5-1. Keeping a firm grip on the starter handle, let the rope rewind slowly. Repeat until the engine cranks. Let the rope rewind slowly each time.
- Electric Start (If Equipped): Insert the plastic push key into the starter button until it snaps in. Push the electric starter button to start the engine.
MTD Engine
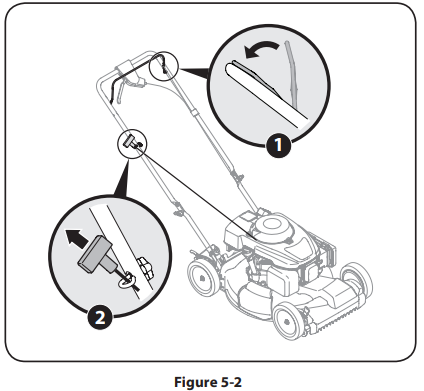
- Standing behind the mower, squeeze the blade control against the upper handle. See Figure 5-2.

- Pull the starter grip lightly until resistance is felt, then pull rapidly to overcome compression, prevent kickback, and start the engine. Repeat if necessary.
IMPORTANT: Do not allow the starter grip to snap back against the engine. Return it gently to prevent damage to the starter.
Stopping Engine
- Release the blade control to stop the engine and blade.
![]() WARNING: Wait for the blade to stop completely before performing any work on the mower or removing the grass catcher.
WARNING: Wait for the blade to stop completely before performing any work on the mower or removing the grass catcher.
Using Your Lawn Mower
Be sure the lawn is clear of stones, sticks, wire, or other objects that could damage the lawn mower or engine. Such objects could be accidentally thrown by the mower in any direction and cause serious personal injury to the operator and others.
- Once the engine is running, squeeze the drive control against the upper handle to propel the mower.
![]() WARNING: The operation of any lawnmower can result in foreign objects being thrown into the eyes, which can damage your eyes severely. Always wear safety glasses while operating the mower or while performing any adjustments or repairs on it.
WARNING: The operation of any lawnmower can result in foreign objects being thrown into the eyes, which can damage your eyes severely. Always wear safety glasses while operating the mower or while performing any adjustments or repairs on it.
Using as Mulcher
For mulching grass, remove the grass catcher and allow the rear discharge door to close the rear opening of the mower. For effective mulching, do not cut wet grass. If the grass has been allowed to grow in excess of four inches, mulching is not recommended. Use the grass catcher to bag clippings instead.
Using Grass Catcher
You can use the grass catcher to collect clippings while you are operating the mower.
- Attach the grass catcher following the instructions in the “Assembly & Set-Up” section. Grass clippings will automatically collect in the bag as you run the mower. Operate the mower till the grass bag is full.
- Stop the engine completely by releasing the blade control. Make sure that the unit has come to a complete stop.
- Lift the discharge door and pull the grass bag up and away from the mower to remove the bag. Dispose of the grass clippings and reinstall the bag when complete.
![]() WARNING: If you strike a foreign object, stop the engine. Remove the wire from the spark plug, thoroughly inspect the mower for any damage, and repair damage before restarting and operating. Extensive vibration of the mower during operation is an indication of damage. The unit should be promptly inspected and repaired.
WARNING: If you strike a foreign object, stop the engine. Remove the wire from the spark plug, thoroughly inspect the mower for any damage, and repair damage before restarting and operating. Extensive vibration of the mower during operation is an indication of damage. The unit should be promptly inspected and repaired.
Maintenance General Recommendations
- Always observe safety rules when performing any maintenance.
- The warranty on this lawn mower does not cover items that have been subjected to operator abuse or negligence. To receive full value from the warranty, the operator must maintain the lawn mower as instructed here.
- Changing of engine-governed speed will void the engine warranty.
- All adjustments should be checked at least once each season.
- Periodically check all fasteners and make sure these are tight.
![]() WARNING: Always stop the engine, allow the engine to cool, disconnect the spark plug, and ground against the engine before performing any type of maintenance on your machine.
WARNING: Always stop the engine, allow the engine to cool, disconnect the spark plug, and ground against the engine before performing any type of maintenance on your machine.
Lubrication
- Lubricate pivot points on the blade control at least once a season with light oil. This control must operate freely in both directions. See Figure 6-1. Figure 6-1
- The transmission is pre-lubricated and sealed at the factory and does not require lubrication.
- Follow the accompanying engine manual for the lubrication schedule and instructions for engine lubrication.

Deck Care
Clean the underside of the mower deck after each use to prevent the build-up of grass clippings or other debris. Follow the steps below for this job.
- Disconnect the spark plug wire. Drain gasoline from the lawn mower or place a piece of plastic under the gas cap.
- Tip the mower so that it rests on the housing. Keep the side with the air cleaner facing up. Hold the mower firmly.
 WARNING: Never tip the mower more than 90º in any direction, and do not leave the mower tipped for any length of time. Oil can drain into the upper part of the engine, causing a starting problem.
 - Scrape and clean the underside of the deck with a suitable tool.
- Put the mower back on its wheels on the ground. If you had put plastic under the gas cap earlier, make sure to remove it now
Customer Support
Please do NOT return the machine to the retailer or dealer without first contacting the Customer Support Department. If you have difficulty assembling this product or have any questions regarding the controls, operation, or maintenance of this machine, you can seek help from the experts. Choose from the options below:
- Visit us on the web at www.troybilt.com.
 See How-to Maintenance and Parts Installation Videos at www.troybilt.com/tutorials
 - Call a Customer Support Representative at (800) 828-5500 or (330) 558-7220
- Write to Troy-Bilt LLC
- P.O. Box 361131
- Cleveland, OH
- 44136-0019
For More Manuals By Troy-Bilt, Visit ManualsLibraryy.
Troy-Bilt TB230 Self Propelled Lawn Tractor-FAQs
What engine does the Troy-Bilt TB230 use?
The TB230 is powered by a 163cc Briggs & Stratton engine, designed for reliable performance and smooth operation.
What are common problems with Troy-Bilt mowers?
Frequent issues include unbalanced blades, faulty belts, worn idler pulleys, bent spindle shafts, and damaged bearings.
How do I start a Troy-Bilt TB230?
Check the fuel, set the choke, adjust the throttle, and pull the starter cord firmly. Ensure the oil level is correct before starting.
What kind of oil does the TB230 need?
Troy-Bilt recommends SAE 5W-30 for most conditions. In hotter climates, 10W-30 may also be used.
How much oil does the Troy-Bilt TB230 hold?
The engine capacity is about 1.3 quarts (1.23 liters) of oil.
Why won’t my Troy-Bilt mower start?
Common reasons include a clogged fuel filter, dirty air filter, bad spark plug, or low oil level.
What is the cutting height range of the TB230?
The mower offers adjustable cutting heights from 1.25 inches to 3.75 inches.
Where are Troy-Bilt products made?
Most Troy-Bilt equipment, including the TB230, is assembled in the United States.

