
Venom Pro 2 Dual Lipo Battery Charger
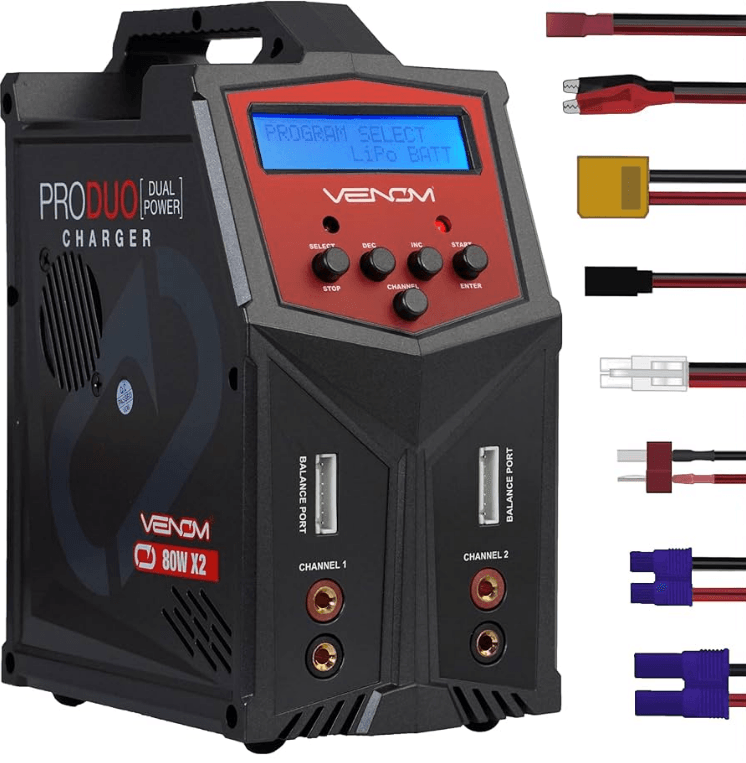
FEATURES
High Power Charging Circuit
The Venom Pro2 charger features a powerful 50-Watt charging circuit. The charger can safely charge or discharge up to 15 cells of NiMH or NiCd batteries and up to 6S LiPO batteries.
Optimized Operating Software
When charging or discharging, the Venom Pro2 charger features an “AUTO” function that will set the output charging current automatically. This feature is especially useful for Lithium Polymer ( LiPO ) batteries to reduce the possibility of overcharging or discharging your batteries.
Integrated Inputs
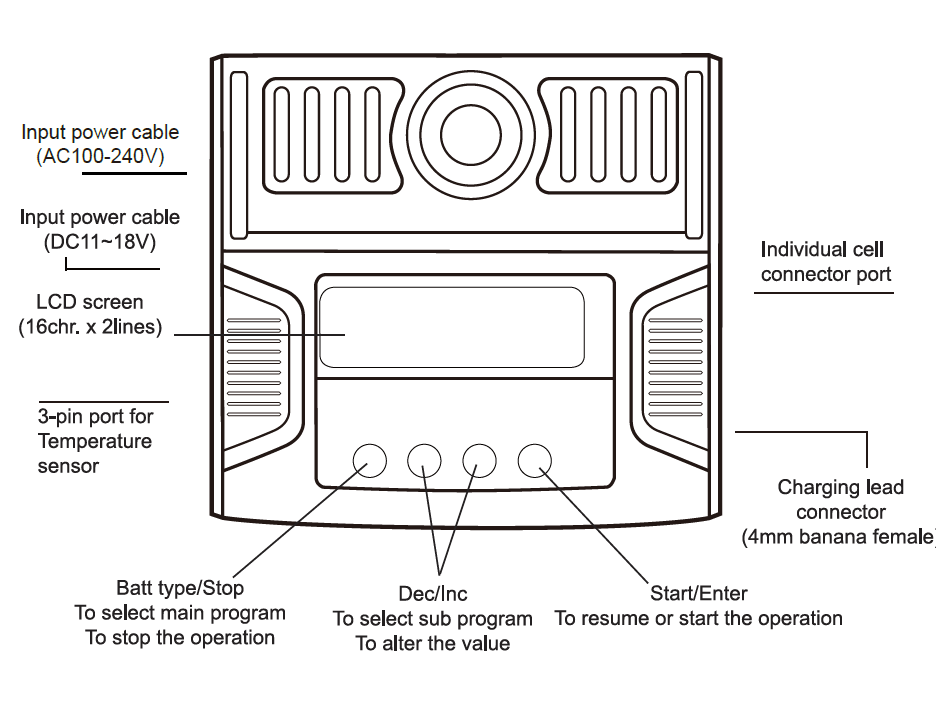
The charger features easily accessible inputs on the sides of the charger for receiver, transmitter, and igniter outputs, and balance blocks.
Multiple Balance Cycles
The Venom Pro2 Charger can monitor and balance individual cells within a LiPO battery in either charge or discharge mode.
Multiple Chemistry Charging
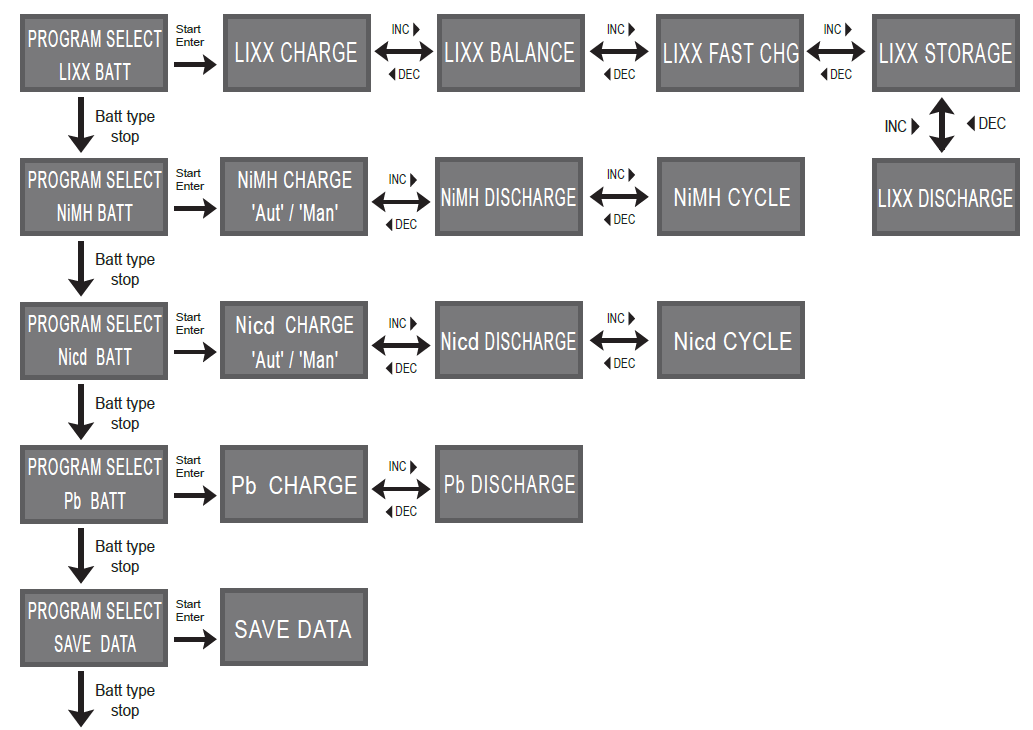
The Venom Pro2 charger will charge NiMH / NiCd, LiLo, LiPO, LiFe, and Pb battery types.
Multiple Charging Leads Included
The charger comes with the following charging leads to cover the most common connection types.
EXTERIOR OF THE UNIT
WARNINGS AND SAFETY NOTES
- Never leave the charger unsupervised when it is connected to its power supply. If any malfunction is observed, immediately terminate the process and refer to the operation manual.
- Keep the charger away from dust, dampness or rain, heat, or direct sunshine and vibration.
- The circuit of the unit is designed to be powered by a 10- 18V DC only.
- This unit and the battery to be charged or discharged should only be set upon a heat-resistant, non-flammable, and non-conductive surface. Never charge on a car seat, carpet, or similar surface. Keep all flammable or volatile materials well away from the operating area.
- Be sure to understand the specifications of the battery to be charged or discharged. If the program is set up incorrectly, the battery can be severely damaged. Lithium batteries, when improperly charged, can cause permanent damage or fire.
- To avoid short-circuits between the charge lead, always connect the charge cable to the unit first and only then to the battery to be charged or discharged. Reverse the sequence when disconnecting.
- Do not attempt to disassemble battery packs.
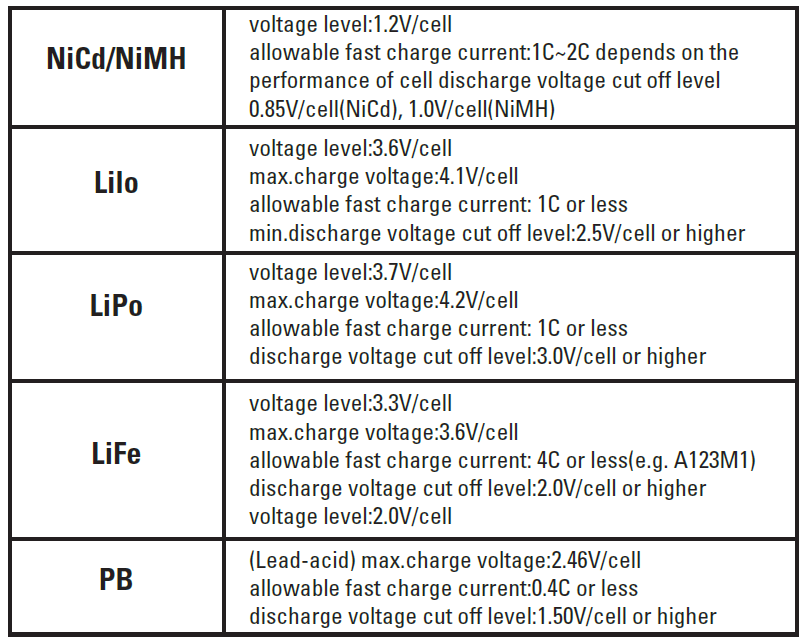
 Pay close attention and verify the capacity and the voltage of the Lithium battery pack to be charged or discharged. It may be composed of parallel and series connections, or mixed. In parallel link the capacity of the battery pack is multiplied by the number of cells, but the voltage remains the same. Extreme voltage imbalance can cause a fire or explosion during the charge process. We recommend you configure the Lithium battery pack in series only.
Discharge
- The typical purpose of discharge is to determine the residual capacity of the battery or to lower the voltage of the battery to a defined level. Much like the process of charging, when you discharge batteries, you must not leave the battery unattended. To avoid the battery becoming deeply discharged, set the final discharge voltage correctly. Lithium batteries should not be deep-discharged to lower than the minimum voltage, as this leads to a rapid loss of capacity or a total failure. Generally, you do not need to discharge a Lithium battery.
- Some rechargeable batteries are said to have a memory effect. If they are partly used and recharged before the whole charge is drawn out, they ‘remember’ this and next time will only use that part of their capacity. NiCd and NiMH batteries are said to suffer from memory effect. They prefer complete cycles; fully charge, then use until empty, do not recharge before storage- allow them to self-discharge during storage. NiMH batteries have less memory effect than NiCd.
- Lithium batteries prefer a partial rather than a full discharge. Frequent full discharges should be avoided if possible. Instead, charge the battery more often or use a larger capacity pack.
- A brand-new NiCd battery pack will not reach peak performance until the pack has been cycled approximately 10 times. The cyclic process of charge and discharge will optimize the capacity of the battery pack. These warnings and safety notes are VERY important. Please follow the instructions for maximum safety; misuse can result in damage to the charger and battery. In extreme cases, improper use can result in bodily injury or property damage.
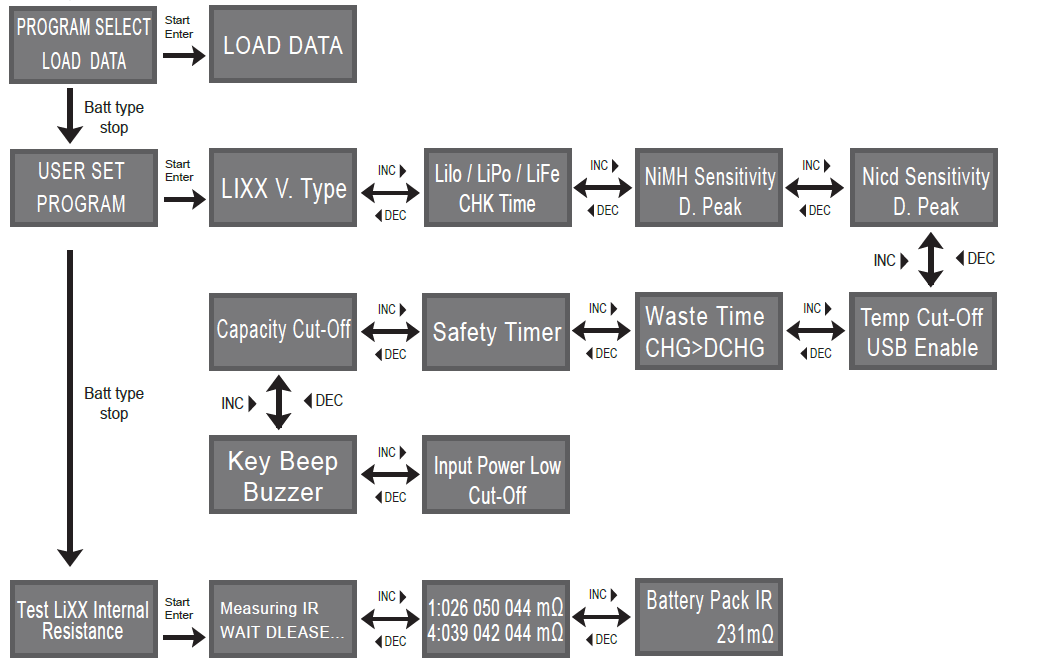
PROGRAM FLOW CHART
INITIAL USER PARAMETER SET UP
The Charger will use the default values upon being powered up for the first time. The Screen displays the following information in sequence and the user can change the values of each parameter. To change the default values, press the Start/Enter key once. The value to be adjusted will blink, indicating it can be edited. Use the Inc/Dec keys to adjust the
value to the desired setting, then press the Start/Enter key once to save your changes for that value.
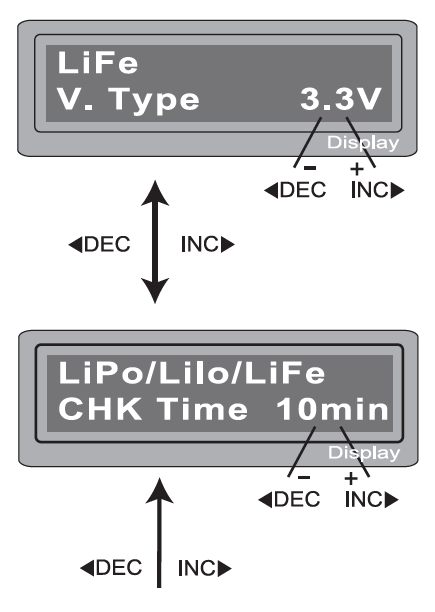 The screen will show the nominal voltage of the three types of Lithium batteries: LiFe (3.3V), Lilo (3.6V), and LiPo (3.7V). It is very important to make sure you choose the correct type of battery during setup. Refer to the battery’s owner’s manual for reference if needed. Failure to choose the correct battery type can cause damage to the battery, charger, and will void all
warranties. The charger will recognize the cell count of Lithium batteries automatically at the beginning of the charge or discharge cycle and compare it to the settings selected. If a voltage has been selected that is different from the voltage it
detects, an alarm will sound.
WARNING: Over-discharged batteries MAY be detected as a lower cell count pack. Always confirm your settings before starting a charge sequence. Using the “CHK TIME” parameter in your LiPo/Lilo/LiFe settings can allow you to delay detection in an attempt to bring a dead battery back to life. YOU MUST USE EXTREME CAUTION WHEN DELAYING CELL DETECTION. A 10-minute delay is suggested for larger mAh packs, but small capacity batteries may finish charging/discharging before the 10-minute mark, which could result in catastrophic failure of the battery. If there are any
doubts on how to use this feature, please contact Venom directly.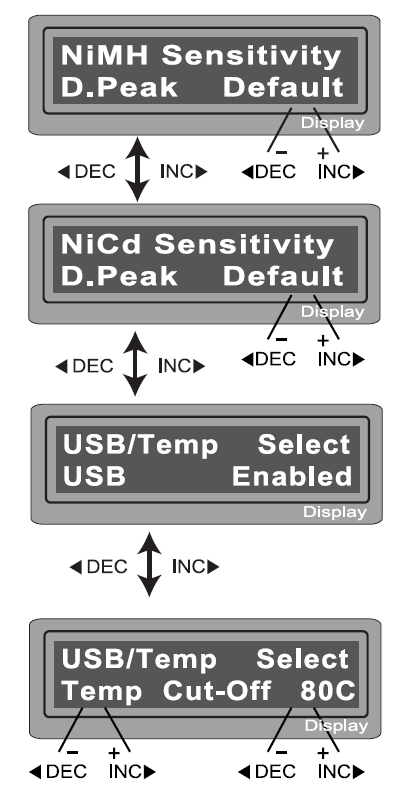
This shows the trigger voltage for automatic peak detection of NiMH and NiCd batteries. The effective value ranges from 5 to 20 mV per cell. If the trigger voltage is set higher, there is a danger of overcharging the battery; if it is set lower, there is a possibility of premature termination. Please refer to the technical specification of the battery.(NiCd default:12mV, NiMH
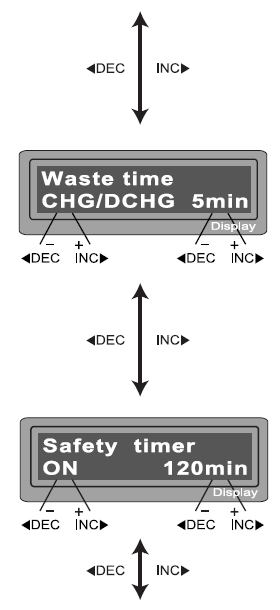
default:7mV) You can select the function of the 3-pin port on the left side of the unit. It can be used as a temperature sensor port, selected on this screen. If the port is assigned as a temp. port, an optional temperature probe contacting the surface of the battery can be used. You can set the maximum temperature at which the charger should allow the battery to reach during charge. Once a battery reaches this temperature during charge, the process will be terminated to protect the battery. This charger does not connect to your PC. When performing a charge/discharge or discharge/charge cycle, your battery can often become warm after the charge or discharge period. The “waste time” setting will insert a time delay to occur after each charge and discharge process to allow the battery adequate time to cool down before starting the next process. The value ranges from 1 to 60 minutes. Every charge is monitored by a safety timer. The default setting is 120 minutes or 2 hours. Once this time limit is reached, the charger will stop charging regardless if the charge is complete. This is programmed to prevent overcharging of the battery if it proves to be faulty, or if the termination circuit cannot detect that the battery is full. The value for the safety timer should be long enough to allow a full charge of the battery. When your charge completes, if the charger says “TIME” in the upper right corner of the screen, your charge was terminated due to the safety timer.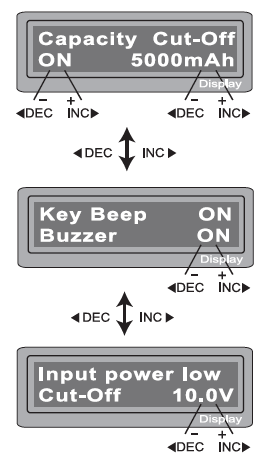
This setting allows you to change the maximum capacity that will be supplied to the battery during charge. If the nominal pack voltage is not detected and the safety timer does not expire for any reason, this feature will automatically stop the process at the selected capacity value. The Key beep/buzzer settings allow you to turn off the individual button “beep” as well as the musical tone that is used to alert to different mode changes. When connecting the charger to a 12-volt power source
(lead acid battery) in the field, this setting will allow you to monitor the incoming voltage. Should the voltage drop below the value selected, the charger will terminate operation to protect the input battery.
CHARGING A LITHIUM BATTERY
(LILO/LIPO/LIFE) PROGRAM
Use these programs only when charging a lithium battery (Lilo/LiPo/LiFe) with a nominal voltage of 3.3V, 3.6V or 3.7V per cell, respectively. The charge current going into the battery will vary depending on the chemistry type so you must select the correct type for your battery. The ending voltage of the charge is also important as it varies for all three types: 4.2V for LiPo, 4.1V for Lilo, and 3.6V for LiFe. The charge current (how many Amps you are putting into the pack) and nominal voltage (Proper voltage for the cell count of the battery you are charging) must be correct for the battery to be charged. To change these settings, press the START/ENTER key to make the selected value blink. Using the increase and decrease buttons, set your desired amperage, then press START/ENTER to save the setting. You will then be asked to select your nominal voltage/cell count. Again, use the increase/decrease buttons to reach your desired setting and press the START/ENTER button to confirm and save.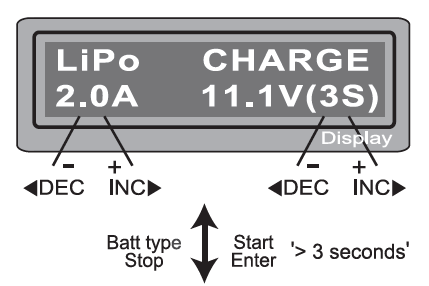
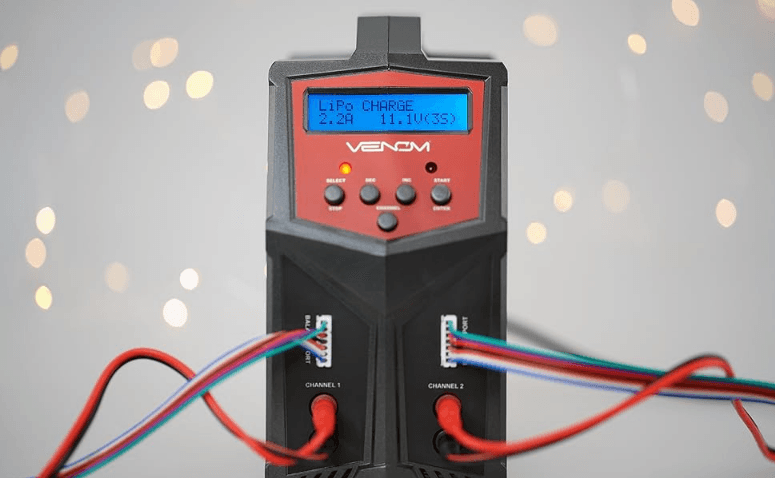
Now, double-check the charge settings. The upper left corner of the screen should read the specific battery chemistry you are trying to charge. In the case of the example, LiPo. The value underneath the chemistry type is the charge current. Check your battery specifications for proper charge rating, but with all Venom batteries, we recommend a 1C charge rate. If your battery is a 5000mAh, your charge current should be 5.0. If using a 2200mAh pack, the charge rate would be 2.2. Simply placing a decimal point after the first number in your capacity rating will give the correct 1C charge rating. To further elaborate, a 2C charge rate on a 5000mAh pack would be 10.0. The information on the right side of the screen will tell you which type of charge you are using and the voltage and cell count you are attempting to charge. Remember, THIS VALUE MUST BE SET TO PROPERLY CHARGE YOUR BATTERY. When you are ready to charge, press and HOLD the START/ENTER button for 3 seconds.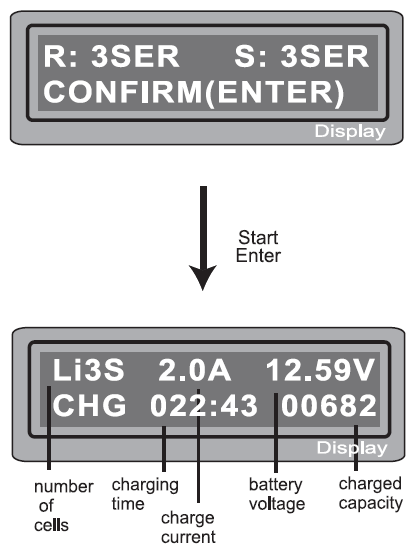
The next screen will ask to confirm the settings after the charger examines the battery, giving a cell count. The “R:” value shows the number of cells detected by the charger. The “S:” value shows the number of cells you selected in the previous menu screen. If the “R:” value does not match the “S:” value, the charger is seeing a different cell count than you have selected. If this happens, press the Batt Type/Stop button to check the number of cells you have selected. If this is correct compared to the battery, you may have a problem with your battery. If the values are the same, it is safe to charge at this point. Press and hold START/ENTER to start the Charge sequence. When charging, the screen provides useful information like the charge rate, number of cells being charged, battery voltage and the amount of mAh, or capacity, that the charger has put into the pack being currently charged. Press the Batt type/Stop to stop the charging process at any time.
CHARGING LITHIUM BATTERIES IN BALANCE MODE.
Lithium batteries comprised of more than one cell will need to be balanced occasionally to ensure the best possible performance. When balancing, you MUST connect the supplied balance board to the charger and then connect the balance lead from the battery to the board. The red and black positive and negative charge leads will still need to be connected to the battery. The “balance” lead simply allows the charger to monitor each cell. When “balance” charging, the charger will monitor each cell, attempting to bring them all to the same nominal voltage. Like a standard charge sequence, the value in the lower left corner of the screen is the selected charge current, and in the lower right, the voltage of the pack that will be charged. To change these values, press the START/ENTER key to cycle through the adjustable settings. Use the increase/decrease buttons to change the values, and use the START/ENTER button to confirm the values set. When
Ready to BALANCE charge, press and hold the START/ENTER button for 3 seconds to start the process.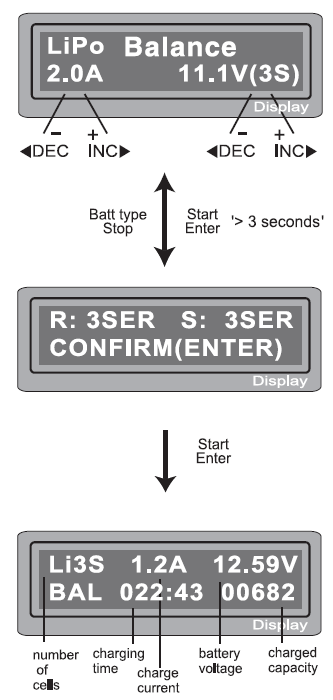
The next screen will ask to confirm the settings after the charger examines the battery, giving a cell count. The “R:” value shows the number of cells detected by the charger. The “S:” value shows the number of cells selected in the previous menu screen. If the “R:” value does not match the “S:” value, the charger is seeing a different cell count than what has been selected. If this happens, press the Batt Type/Stop button to check the number of cells selected. If this is correct compared to the battery, there may be a problem with the battery. If the values are the same, it is safe to charge at this point. Press and hold START/ENTER to start the charge sequence. When charging, the screen provides useful information like the charge rate, number of cells being charged, battery voltage, and the amount of mAh, or capacity, that the charger has put into the pack being currently charged. When the balance plug is connected to the charger, you can press the “increase” button to view the individual cell voltages. Pressing the “increase button” a second time will return you to the previous screen. Press the Batt type/ Stop to stop the charging process at any time.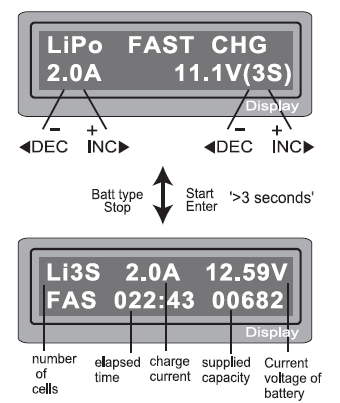
When charging a Lithium battery, the charging current will begin to drop as the battery reaches nominal voltage. By using the FAST charge option, the reduction of power will not be as great as it is with a standard charge. The benefit of this is a reduced charge time. The drawback is that the pack will most likely not charge to its full capacity. Like a standard charge sequence, the value in the lower left corner of the screen is the selected charge current, and in the lower right, the voltage of the pack that will be charged. To change these values, press the START/ENTER key to cycle through the adjustable settings. Use the increase/decrease buttons to change the values, and use the START/ENTER button to confirm the values set. When ready to fast-charge, press and hold the START/ENTER button for 3 seconds to start the process. Note, when FAST charging, the lower left corner of the screen will show “FAS” and not the selected charge current.
“STORAGE” CHARGING A LITHIUM BATTERY
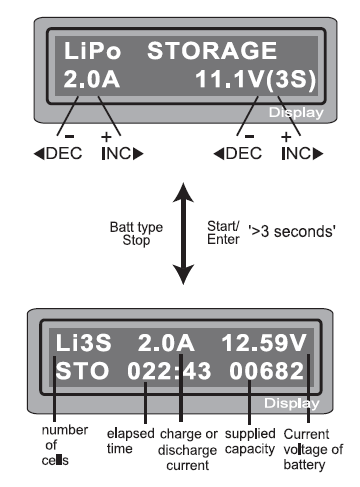
When a lithium battery sits unused for long periods of time, it is best to give that pack a STORAGE charge. This will charge the battery to a nominal storage voltage (3.85V for LiPo, 3.75V for Lilo, and 3.3V for LiFe per cell). Storage mode will automatically determine if the battery needs to be charged or discharged to reach this level. The balance plug of the battery must be plugged into the charger for a proper storage charge to take place. Set the charge current and the battery voltage/cell count as you would any other charge mode by pressing the START/ENTER button to select the parameter you wish to change, and use the INCREASE/DECREASE buttons to adjust the value. When you wish to confirm your setting, press the START/ENTER button. To initiate the storage charge, press and hold START/ENTER for 3 seconds, and confirm the cell count selected is the same as the charger is indicating, and press and hold START/ENTER for 3 seconds to begin charging.
When charging, the screen provides useful information like the charge rate, number of cells being charged, battery voltage, and the amount of mAh, or capacity, that the charger has put into the pack being currently charged. Press the Batt type/Stop to stop the charging process at any time.
DISCHARGING A LITHIUM BATTERY
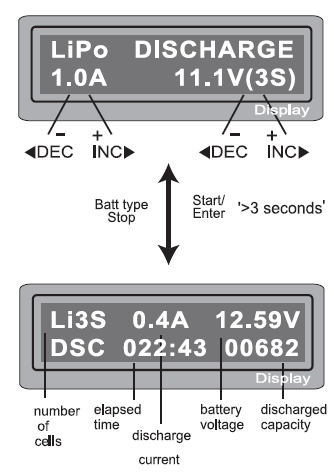
Use this setting to discharge a Lithium pack. The charge current and pack voltage are adjustable using the methods shown previously in the charge and balance instructions. Never exceed 1C for the discharge rate, and never use a final voltage lower than what is recommended by the battery manufacturer. The balance plug of the battery must be plugged into the charger for a proper discharge to take place. Press and hold the START/ENTER button to confirm cell count, then hold the button again a second time to start the discharge process. When discharging, the screen provides useful information like the discharge rate, number of cells being discharged, battery voltage, and the amount of mAh, or capacity, that the charger has removed from the pack being currently discharged. Press the Batt type/Stop to stop the discharging process at any time.
VOLTAGE BALANCING AND MONITORING DURING THE DISCHARGE
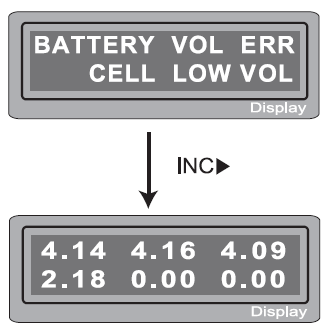
The processor monitors the voltage of individual cells during ‘storage-mode’ and ‘discharge’ of a Lithium battery pack. It tries to regulate the voltages to be equal. For this feature, the balance plug of the battery pack must be connected to the balance board of the charger. If the voltage of any one or more cells varies abnormally during the procedure, It terminates the process with an error message. If this happens, the battery pack contains a bad cell, or there is a bad connection at the balance plug. You can easily know which one cell is bad by pressing the increase button with the error message on screen to show you the individual cell voltages. This method of viewing cell voltages can be used during any lithium battery charge or discharge process, provided the balance lead from the battery is plugged into the charger. In this example, the charger found that the voltage of one of the cells in this 4S pack is too low. By pressing the “increase” button when the error message is displayed, we can see that cell #4 is reading 2.18, which is below the minimum recommended 3.0 per cell. If all cells read 0.00, the balance lead from the battery may have come disconnected. Also, check your balance board connection at the charger.
For more manuals by Venom, visit ManualsLibraryy
Venom Pro 2 Dual Lipo Battery Charger-FAQs
How do I charge a LiPo battery using the Venom Pro 2 charger?
Connect the charge cable to the front of the charger, matching red to red (positive) and black to black (negative). Then, plug your battery into the charger.
How does a LiPo battery charger work?
A LiPo charger manages the charging process automatically. When 5V power is supplied, it starts charging and stops once the battery is full or if the power is removed.
What steps should I follow to charge a LiPo battery properly?
Select “LiPo” and “Balance Charge” mode. Set the current (e.g., 3.5A for a 2S 7.4V battery). Connect the balance lead (white connector) to the charger. Press and hold the enter button until it beeps, then press once more to begin charging.
Can I charge a 3.7V LiPo battery without a charger?
Yes, you can use a USB cable and a phone charger rated at 500mA or higher. Monitor the battery’s voltage with a multimeter and disconnect it once it reaches 4.1V for safety.
How do I know when my Venom battery pack is fully charged?
Connect the charging cable and plug the USB into a computer. The LED stays on while charging and turns off when the battery is fully charged.
How can I tell if a LiPo battery is fully charged?
Each cell in the battery should reach 4.2V when fully charged. For example, a 2S battery will reach 8.4V. The charger or an LED indicator usually confirms when it’s full.
Will my LiPo charger stop charging automatically when full?
Yes, most LiPo chargers, including the Venom Pro 2, stop charging once each cell reaches its maximum voltage.
What is a safe charging rate for LiPo batteries?
The standard safe charging rate is 1C (1 x battery capacity in Amps). High-quality batteries may support up to 3C–5C, but always follow the manufacturer’s guidelines.

 Pay close attention and verify the capacity and the voltage of the Lithium battery pack to be charged or discharged. It may be composed of parallel and series connections, or mixed. In parallel link the capacity of the battery pack is multiplied by the number of cells, but the voltage remains the same. Extreme voltage imbalance can cause a fire or explosion during the charge process. We recommend you configure the Lithium battery pack in series only.