Waterpik WP-400 Series Water Flosser
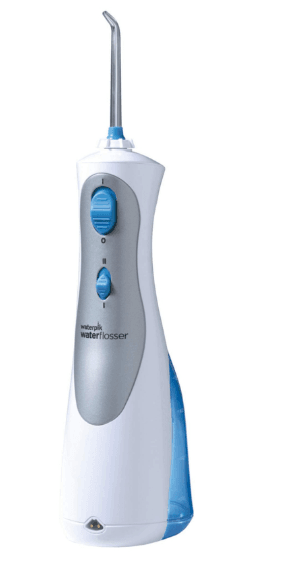
PRODUCT DESCRIPTION
- Tip rotator
- Power switch
- Pressure control
- Power handle
- Charger inlet
- Tip
- Tip eject button
- Flip top water inlet
- Reservoir
- USB Charger*
- USB Charging Cable
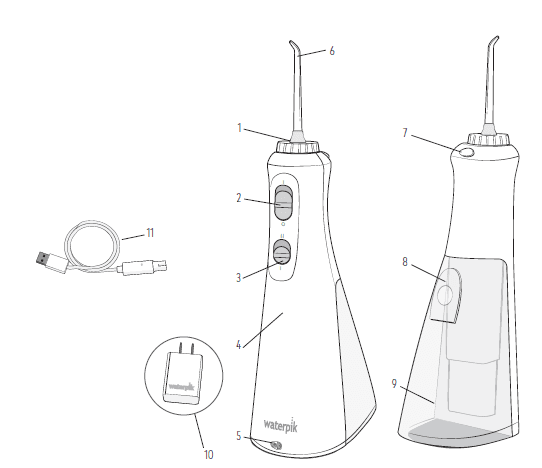
USB Charging Cable
- 20031307-1 White
- 20031307-2 Black
USB Charger*
- 20024470-36 White
- 20024470-4 Black
TIPS
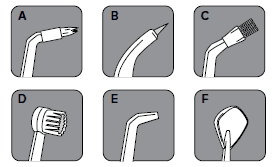
- A. Orthodontic Tip*
- Braces/General use
- B. Pick Pocket™ Tip*
- Periodontal pockets/ Furcation’s
- C. Plaque Seeker™ Tip*
- Implants/Crowns/Bridges/ Retainers/General use
- D. Toothbrush Tip*
- General use
- E. Classic Jet Tip**
- General use
- F. Tongue Cleaner**
- Fresher breath
NOT ALL TIPS INCLUDED IN ALL MODELS
GETTING STARTED
Charging Unit Prior to First Use
Charge Unit For 24 Hours Prior To First Use. Use only the USB charger provided. If a USB charger is not provided, a user supplied USB charger with the following specifications is required to charge this product: USB Type-A, Rated Output: 5.0 VDC, 1.0 A. Plug the USB charger into a wall outlet and connect the charging cord to the unit. Make sure you slide the switch into the OFF (0) position before charging. The unit will not charge if the switch is in the ON (I) position. See “Cleaning and Troubleshooting Your Waterpik® Water Flosser” for guidance on how to look after your battery. The Waterpik® Water Flosser will stay charged for up to 2 weeks depending on use.
Filling the Reservoir
Lift flip top on reservoir and fill the reservoir with lukewarm water.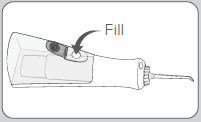
Inserting and Removing Tips
Insert tip into the center of the knob at the top of the Water Flosser handle. The colored ring will be flush with the end of the knob if the tip is correctly locked into place. To remove the tip from the handle, press the tip eject button and pull tip from the handle.
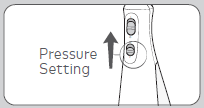
- Adjusting the Pressure Setting
You can adjust the pressure setting on your Water Flosser by simply sliding the pressure/power switch on the handle.
- Recommended Technique
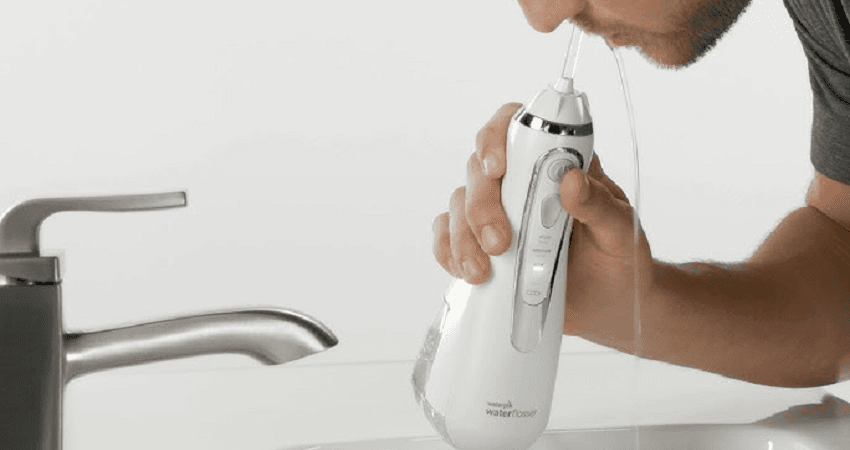
For best results, start with back teeth and work toward the front teeth. Direct the stream at a 90-degree angle to your gum line with tip in mouth. Glide tip along gum line and pause briefly between teeth. Continue until you have cleaned the inside and outside of both the upper and lower teeth.
- When Finished
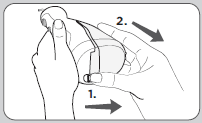
Turn the unit off. Empty any liquid left in the reservoir. If desired, the reservoir may be removed from the power handle by sliding the reservoir down towards the base of the unit. To replace the reservoir on the power handle, simply slide it up towards the top of the unit.

NOT ALL TIPS INCLUDED IN ALL MODELS
TIP USAGE
- Orthodontic Tip
To use the orthodontic tip, gently glide tip along gum line, pausing briefly to lightly brush area between teeth and all around orthodontic bracket, before proceeding to the next tooth.
- Tongue Cleaner Tip
Set to lowest pressure setting, place tip in the center/middle of your tongue about half way back. Pull forward with light pressure. Increase pressure as you prefer.
- Plaque Seeker™ Tip
To use the Plaque Seeker™ tip, place the tip close to the teeth so that the bristles are gently touching the teeth. Gently glide tip along gum line, pausing briefly between teeth to gently brush and allow the water to flow between the teeth.
- Toothbrush Tip
Place the toothbrush tip in mouth with the brush head on the tooth at the gum line. The toothbrush tip can be used with or without toothpaste. Using a light pressure (bristles should not bend) massage the brush back and forth with very short strokes much like you would with a manual toothbrush.
CLEANING AND TROUBLESHOOTING YOUR WATERPIK® WATER FLOSSER
Using Mouthwash and Other Solutions
Your Water pick® Water Flosser can be used to deliver mouthwash and antibacterial solutions. After using any special solution, rinse unit to prevent clogging by partially filling reservoir with warm water and running unit with tip pointed into sink until unit is empty.
Cleaning
Before cleaning, unplug from the electrical outlet. Clean the product when necessary by using a sof cloth and mild non-abrasive cleanser. The water reservoir is removable for easy cleaning and is top rack dishwasher safe.
Removing Hard Water Deposits/ General Cleaning
Hard water deposits may build up in your unit, depending on the mineral content of your water. If left unattended, it can hinder performance. Cleaning internal parts: add 2 tablespoons of white vinegar to a full reservoir of warm water. Point the handle and tip into sink. Turn unit ON and run until reservoir is empty. Rinse by repeating with a full reservoir of clean warm water. This process should be done every 1 to 3 months to ensure optimal performance.
Battery Care
The unit will not charge if the switch is in the ON (I) position. If you use your Water Flosser once a day or less, it is recommended you charge it overnight, once a week. If you use it twice a day or more, charge the unit more frequently. Do not run the batteries down completely as this may shorten the lifespan of the batteries and will require charging the unit for 24 hours to obtain a full charge.
If the Water Flosser is to be stored for an extended period of time (six months or more), be sure to fully charge it prior to storage. The unit contains a Nickel Metal Hydride battery.
Battery Removal
The product contains battery and/or recyclable electronic waste. In order to protect the environment, please do not dispose along with household waste. When battery life ends, please dispose or recycle according to local administrative regulations. Please contact local waste administrative department for any questions.
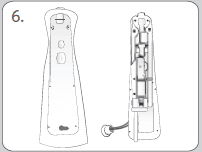
If you intend to dispose the Nickel Metal Hydride on your own, for example, for WP-400 models, please discharge battery fully before removal and follow below steps to remove battery:
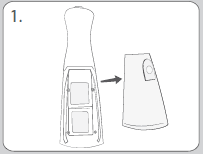
- Power off the device, pull the reservoir release latch and take out the reservoir.

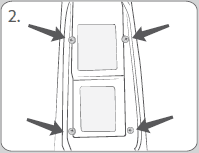
- Remove four screws.

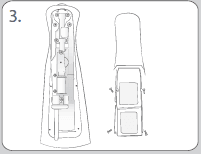
- Remove back handle .

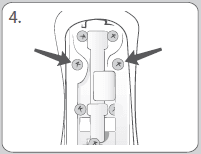
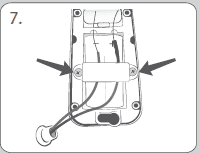
- Remove two screws.

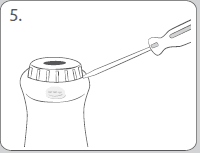
- Remove tip rotator by prying it off with a flat blade screwdriver.

- Remove chassis from Unit.

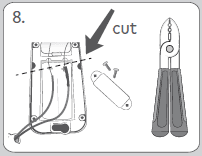
- Flip chassis over to expose battery. Remove two screws.

- Cut these two wires and pry battery out of chassis. The removed battery should be disposed safely by special recycling center.

Service Maintenance
Water pick® Water Flossers have no consumer serviceable electrical items and do not require routine service maintenance. For all parts and accessories go to www.waterpik.com. You may also call our toll-free customer service number at 1-800-525-2774 (USA). Refer to the serial and model numbers in all correspondence. These numbers are located on the bottom of your unit.
Limitation of Liability
This limited warranty is your sole remedy against Water Pik, Inc. and it shall not be liable for any damages, whether direct, indirect, incidental, special, consequential, exemplary or otherwise, including but not limited to property damage, arising out of any theory of recovery, including statutory, contract or tort.
Arbitration
BINDING ARBITRATION AND WAIVER OF RIGHT TO ASSERT MATTERS IN COURT AND RIGHT TO JURY TRIAL
By purchasing, installing, or using this product you agree that any controversy or claim arising out of or relating to your purchase, use, modification, installation, or removal of this product shall be settled by binding arbitration. The arbitrator’s decision will be final and binding.
Judgment on the award rendered by the arbitrator may be entered in any court having jurisdiction over the matter. Further, you agree that you will not have the right to litigate any claim arising out of or in relation to your purchase, use, modification, installation, or removal of this product in any court or to have a jury trial on that claim.
Arbitration of any matters shall be administered by the American Arbitration Association and conducted by one arbitrator in accordance with the consumer arbitration rules of the American Arbitration Association in effect at the time of filing of the demand. The venue for all such arbitrations shall be Colorado and any such arbitration shall be subject to the Federal Arbitration Act and Colorado law.
For more manuals by Waterpik visit, ManualsLibraryy
Waterpik WP-400 Series Water Flosser-FAQs
How do I charge the Waterpik WP-400?
To charge the Waterpik WP-400, turn off the power switch, plug the power cord into an outlet, and connect the charging cord to the unit. Before filling the reservoir with water and during use, unplug the charging cord. Fill the reservoir with lukewarm water and refill as needed.
What are the recommended settings for my Waterpik?
Start with setting 1 and gradually increase the pressure if needed, but it’s best not to go above setting 3 for most users. For the Pikpocket tip (rubber tip), use it only on the lowest setting, as it is designed for gentle gum treatment.
How do I know when my Waterpik is fully charged?
The charge indicator light on the handle will flash while charging. Once fully charged, the light will remain on continuously. A full charge lasts about 1 week with typical use.
How can I prevent my Waterpik from getting moldy?
To prevent mold growth, always empty the water reservoir after each use and dry any remaining water with a towel if possible. Regularly cleaning the unit will also help maintain its performance.
How long does a Waterpik stay charged?
The Waterpik Water Flosser can stay charged for up to 2 weeks, depending on usage.
How many watts does a Waterpik use?
The Waterpik Water Flosser models WP-650/655/660 use 12.5W with a voltage of 120V and a frequency of 60Hz.
Why did my Waterpik stop working?
If your Waterpik isn’t working, check for blockages, ensure the water reservoir is properly seated, and make sure the On/Off switch is in the “On” position. If the problem persists, refer to the user manual or contact customer service.
What voltage does the Waterpik use?
For cordless models like the WF-02, WF-03, and WF-03, the Waterpik uses 3 A batteries. Some countertop models are designed for use with 120VAC/60Hz outlets in North America.
What is the highest PSI setting for Waterpik?
Waterpik countertop models offer pressure settings ranging from 10-90 PSI to 10-100 PSI across 3, 6, or 10 settings. Cordless models have 2 or 3 pressure settings, with pressures ranging from 45 to 75 PSI.
How long should I use my Waterpik?
It is recommended to use the Waterpik for about 2 minutes to clean your entire mouth effectively.

