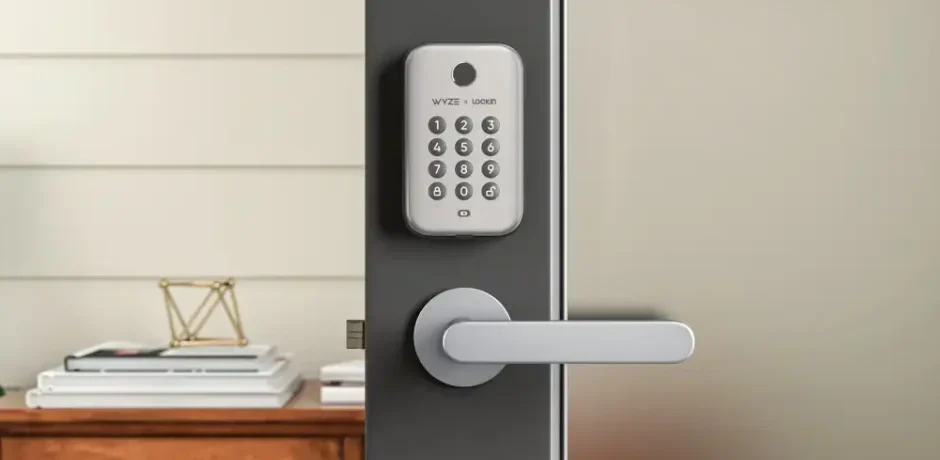
Wyze Smart Lock Bolt
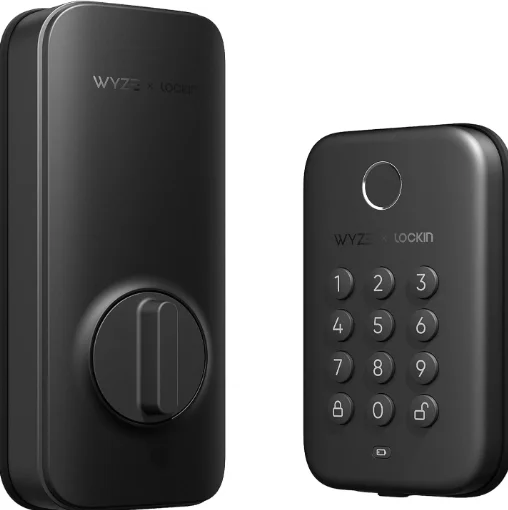
IN THE BOX
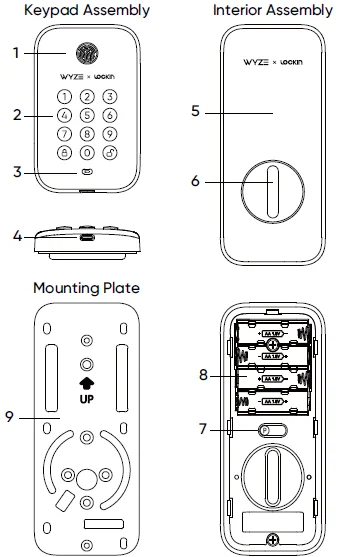
- Fingerprint Scanner
- Keypad
- Battery Indicator
- USB-C Charging Port
- Battery Cover
- Thumb Latch
- Pairing Button
- Battery Compartment
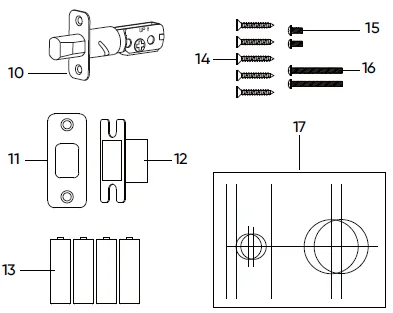
- Mounting Plate
- Deadbolt
- Strike Plate
- Dust Box
- AA Battery x 4
- Deadbolt Screws (M4*25) x 2, Strike Screws (M4*25) x 2, Mounting Plate Screw x 1
- Interior Assembly Screws (M4*38) x 2
- Mounting Plate Screws (M4*8) x 2
- Template
To avoid any injuries, be careful when installing the product. You are responsible for knowing local building codes and where it is appropriate to install the lock.
SETUP
- Download the Wyze app and sign in or create an account.
- In the Wyze app, tap the + plus sign, then Add Device > Home > Wyze Lock Bolt. Follow the in-app installation and setup instructions to complete Wyze Lock Bolt setup.
OVERVIEW
Here’s a look at the installation steps you’ll go through in this guide:
- Step 1: Remove the existing lock
- Step 2: Install the Dust Box and Strike Plate
- Step 3: Install the Deadbolt and Strike Plate
- Step 4: Install the Keypad Assembly
- Step 5: Install the Mounting Plate
- Step 6: Install the Interior Assembly
INSTALLATION GUIDE
Prepare the door for installation.
Remove the existing lock and check your door. If your door has holes like the one below, please skip step 2 (page 7). You can also use a measuring tape to check the lengths.
If needed, drill the following holes in your door (Standard US Doors are usually already compatible).
Step A: Determine Backset
- The backset is the distance from the door edge to the center of the hole on the door face.
- The adjustable latch fits both backsets of 2-3/8” (60 mm) and 2-3/4” (70 mm).
Step B: Use the Template to Mark the Door
Select the desired height and backset on the door face. Use the template to mark the center of the circle on the door face and the center of the door edge.
Step C: Drill Holes
Use your marks as a guide to drill a 2-1/8” (54 mm) hole through the door face. For the latch, drill a 1” (25.4 mm) hole through the door face’s edge.
Determine if the latch needs to be adjusted
- Determine if the latch needs to be adjusted to the 2-3/4” (70 mm) backset.
- Measure the backset using the instructions on the previous page. If it is 2-3/4″ (70 mm), you will need to adjust/extend the latch.
- To adjust, twist the latch until it stops.
- Reverse the direction to return to the 2-3/8” (60 mm) backset.
Install the Deadbolt and Dust Box
- Install the deadbolt using the screws provided (labeled “14”). Ensure the hub of the latch is centered with the hole on the door face.
- Optional: Install the dust box and strike plate using the screws provided (labeled “14”).
Install the Keypad Assembly
Install the keypad assembly by inserting the two prongs through the corresponding holes on the latch. Pass the cable on the keypad assembly under the deadbolt latch and through the door.
Install the Mounting Plate
- Separate the mounting plate from the interior assembly. Route the cable through the mounting plate hole. Then install the mounting plate on the indoor-facing side of the door.
- Using the screws provided (labeled “14” & “16”), tighten the mounting plate and ensure the mounting plate and keypad assembly are aligned properly.
Tip: Have a friend hold the keypad assembly against the door so it doesn’t move around during this step. You can also use a flashlight to make sure the screws (labeled “16”) are aligned with the corresponding holes on the keypad assembly.
- If the plate or assembly is lopsided, loosen the screws, adjust the position as needed, then re-tighten the screws.
Install the Interior Assembly
- Remove the battery cover from the interior assembly. You should see a sticker at the bottom of the battery cover. Place your thumb there to pop it out. You may remove the sticker when done.
- Connect the cable wire to the back of the interior assembly. The side with a mark on it faces up. You can also check if the red/orange wires are on the right.
IMPORTANT!
Make sure the connector is properly plugged in.
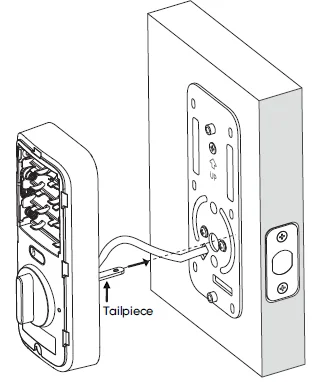
- Wrap the excess part of the cable over the tailpiece. Ensure the cable is fully inside, then insert the interior assembly by aligning the tailpiece through the center hole as shown.

- Rotate the thumb latch to make sure the latch retracts normally.
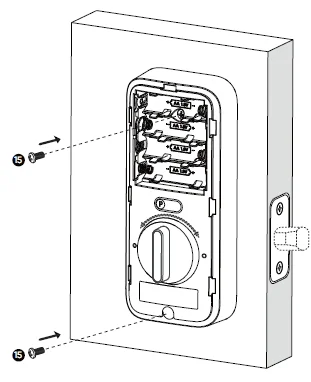
- Using the screws provided (labeled “15”), install the interior assembly to the mounting plate.

CHECK THE INSTALLATION
- Insert the batteries provided. Don’t put on the cover yet. We’ll do that once setup is done in the app!
- Check if the interior assembly is secure and aligned properly.
- Check if the keypad assembly is secure and aligned properly.
STATUS LIGHT GUIDE
Flashing white light
The lock is ready to connect
Flashing red and white lights
The lock is updating its firmware
Solid red light
The lock failed to lock or unlock
Solid white light
The lock was successfully locked or unlocked
Solid red low-battery light (labeled “3” in In The Box)
The lock has a low battery
TROUBLESHOOTING
How do I reset the device?
To reset the Wyze Lock Bolt, remove one of the batteries, then place it back in.
Why didn’t it beep after I pressed and held the Pairing button?
Check if the cable is connected properly to the interior assembly. Make sure that the batteries have a charge and are installed correctly. If that doesn’t work, contact support for a replacement.
Why didn’t the keypad scan my fingerprint?
Ensure the surface of the fingerprint scanner and your fingertip are free of debris, water, excessive oil, or other substances. Coarse or dry skin can also reduce readability.
CAUTION
- Do not attempt to remove, repair, modify, or perform maintenance on any part of the Wyze Lock Bolt except to change the batteries.
- Use only new batteries and do not mix different types of batteries.
- Do not install or operate Wyze Lock Bolt where the temperature is hotter than 122°F (50°C) or store Wyze Lock Bolt where the temperature is hotter than 158°F (70°C).
- Do not install or operate Wyze Lock Bolt at altitudes higher than 5000 m.
NEED HELP?
Contact our Support Team: https://wyze.com/support
Join the Community: https://wyze.com/community
For more Manuals by Wyze, visit ManualsLibraryy
Wyze Smart Lock Bolt-FAQs
What is the Wyze Smart Lock Bolt?
The Wyze Smart Lock Bolt is a Bluetooth-enabled deadbolt replacement that offers fast, secure entry using a fingerprint sensor or keypad. It unlocks in just 0.5 seconds and can store up to 50 fingerprints through the Wyze app.
How many fingerprints can the Wyze Lock Bolt store?
The Wyze Lock Bolt can store up to 50 unique fingerprints and supports access for up to 20 users, allowing every family member or trusted friend to have personalized entry.
Does the Wyze Lock Bolt connect to Wi-Fi?
No, the Wyze Lock Bolt is Bluetooth-only and doesn’t connect to Wi-Fi. However, you can manage settings and access logs through the Wyze app when within Bluetooth range.
Can I still use my physical key with the Wyze Lock Bolt?
No, the Wyze Lock Bolt replaces your existing deadbolt and doesn’t support traditional key use. If you need to keep a key option, consider the Wyze Lock (non-Bolt version).
What happens if the Wyze Lock Bolt’s battery dies?
When batteries run low, you’ll receive a notification in the Wyze app. If they die completely, you can still power the lock temporarily using an external USB-C power bank to regain access.
Can I control the Wyze Lock Bolt remotely?
You can lock or unlock your door via Bluetooth from up to 16 feet away using the Wyze app. For full remote control outside Bluetooth range, you’ll need an additional Wyze Lock Gateway.
How do I install the Wyze Lock Bolt?
Installation is simple and requires only a screwdriver. Remove your old deadbolt, align the Wyze Lock Bolt, secure it in place, and set up fingerprint or keypad access using the Wyze app.
How secure is the Wyze Smart Lock Bolt?
The Wyze Lock Bolt uses advanced 128-bit AES encryption and biometric fingerprint recognition for high security. It also includes an auto-lock feature that secures your door automatically after closing.

