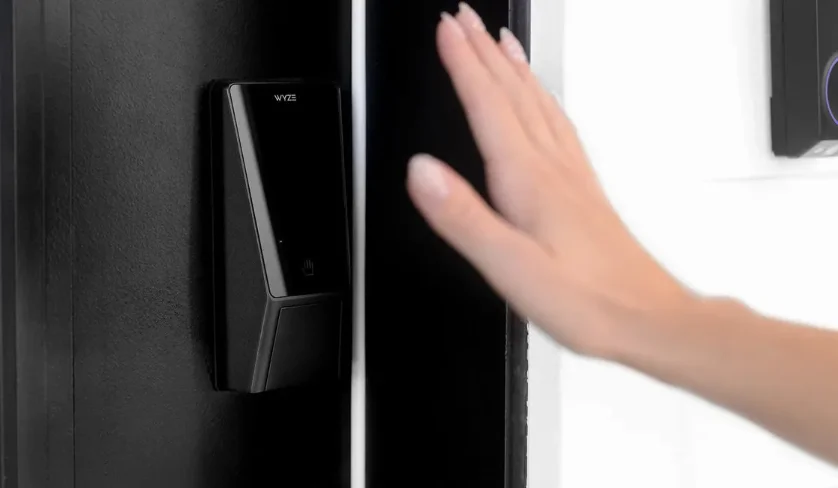
Wyze Palm Lock

IN THE BOX
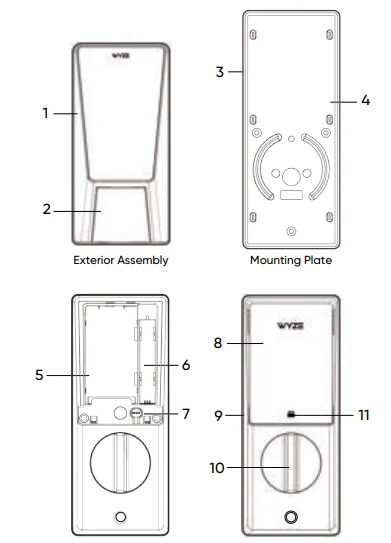
- Exterior Panel
- Key Hole Cover
- Silicone Pad
- Mounting Plate
- Main Battery Compartment
- Backup Battery Compartment
- Reset Button
- Battery Cover
- Interior Panel
- Interior Knob
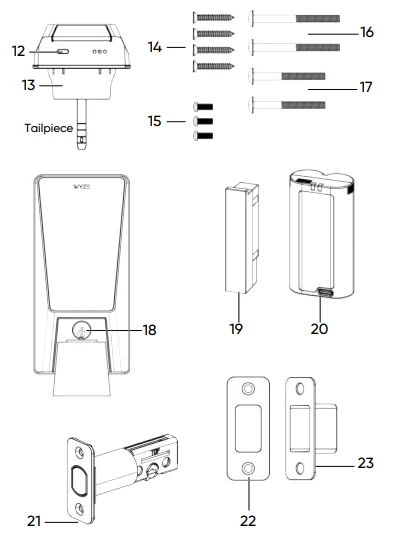
- Lock Indicator
- Emergency USB-C Power Input
- Lock Hole Adapter
- Wood Screw x 4
- Interior Panel Screws x 3
- 1-3/4″ to 2-3/16″ (45-55 mm) #16 Mounting Screws x 2
- 11-3/8″ to 1-15/16″ (35-50 mm) #17 Mounting Screws x 2
- Keyhole
- Backup Battery
- Main Battery
- Deadbolt
- Strike Plate
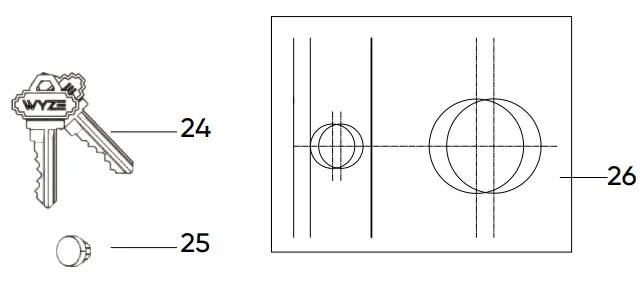
- Dust Box
- Keys x 2
- Silicone Plug
- Drilling Template
- Quick Start Guide


To avoid any injuries, be careful when installing the product. You are responsible for knowing local building codes and where it is appropriate to install.
SETUP
- Download the Wyze app and sign in or create an account.

- In the Wyze app, tap the + plus sign. On the Add menu, tap Device > Home > Wyze Palm Lock. Follow the in-app instructions to finish setup.
OVERVIEW
The steps you’ll go through in this guide:
- Step 1: Remove the existing lock
- Step 2: Install the Dust Box and Strike Plate
- Step 3: Install the Deadbolt
- Step 4: Install the Exterior Assembly
- Step 5: Install the Mounting Plate
- Step 6: Install the Interior Assembly
A Phillips head screwdriver is required for installation.
Tools necessary only for new doors or adjusting existing door holes: Drill, Hole Saw, Mortise Chisel, Pencil, Measuring Tape, Level.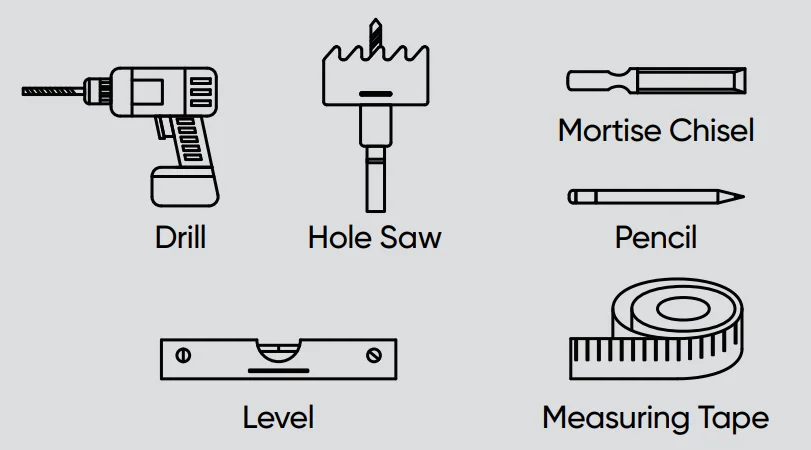
INSTALLATION GUIDE
Prepare the door for installation.
Remove the existing lock and check your door. If your door already has a hole like the one below, please skip step 2. You can also use a measuring tape to check the lengths.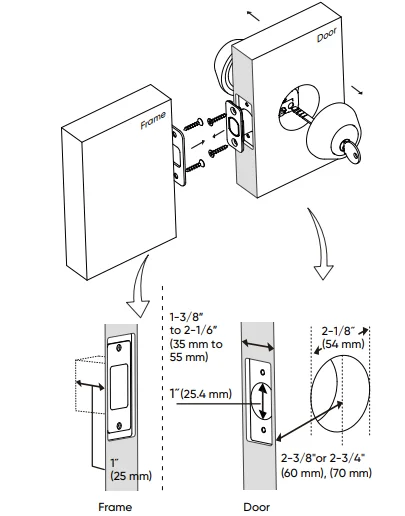
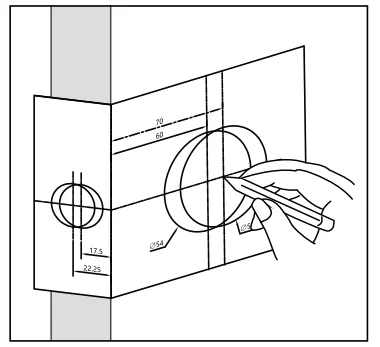
If needed, drill the following holes in your door (Standard US Doors are usually already compatible).
A: Use Template to Determine Backset
- The backset is the distance from the door edge to the center of the hole in the door face.
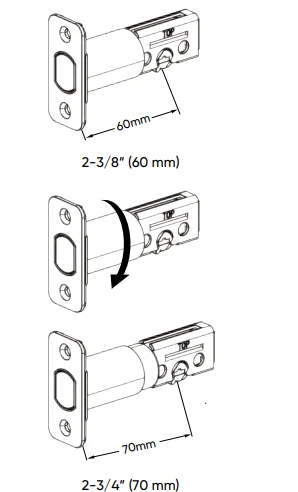
- The adjustable latch fits both backsets of 2-3/8″ (60 mm) and 2-3/4″ (70 mm).

B: Mark the Door
- Select the desired height and backset on the door face. Use the template to mark the center of the circle on the door face and the center of the door edge.

C: Drill Holes
- Use your marks as a guide to drill a 2-1/8” (54 mm) hole through the door face. For the latch, drill a 1” (25.4 mm) hole through the door face’s edge.

Determine if the latch needs to be adjusted.
- Measure the backset using the instructions on the previous page. If it is 2-3/4″ (70 mm), you will need to adjust/extend the latch.
- To adjust, twist the latch until it stops.
- Reverse the direction to return to the 2-3/8” (60 mm) backset.

Install the Deadbolt and Dust Box.
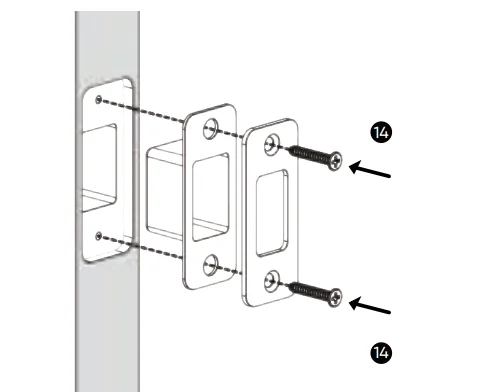
- Optional: Install the Dust Box and Strike Plate using the provided screws (#14).

- Install the Deadbolt with the provided screws (#14). Ensure the latch hub is centered on the door face hole.

Install the Exterior Assembly.
Use the drilling template to measure the diameter of the cross bore (door hole).
- If you have a 2-1/8” (54 mm) cross bore, install the exterior assembly.

- If you have a 1-1/2” (38 mm) cross bore, remove the Lock Hole Adapter and install the exterior assembly.

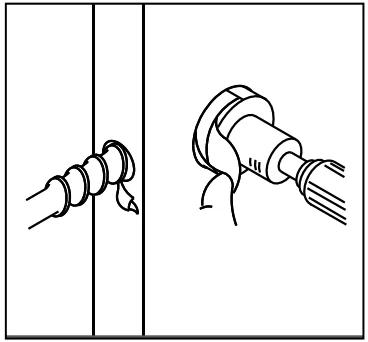
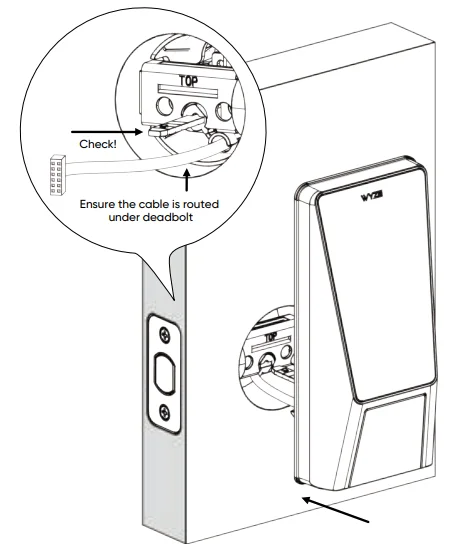
- Pass the cable on the exterior assembly under the Deadbolt (shown below) and through the door. Align the tailpiece with the center hole of the Deadbolt and insert it into the center hole.

Install the Mounting Plate.
- Separate the mounting plate from the interior assembly. Route the cable through the mounting plate.
- Place the mounting plate onto the indoor-facing side of the door.
- Choose from the screws provided (#17 & #16), according to the thickness of your door, and use them to tighten the mounting plate and exterior assembly.
Tip: Screws (#17) fit thickness 1-3/8’’ to 1-15/16” (35-50 mm). Screws (#16) fit thickness 1-3/4″ to 2-3/16″ (45-55 mm).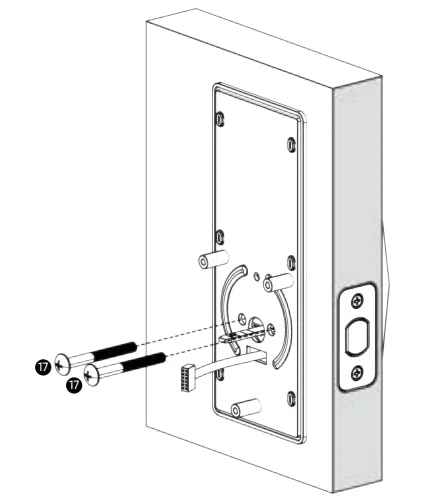
Install the Interior Assembly.
- Connect the cable to the back of the interior assembly as shown below.

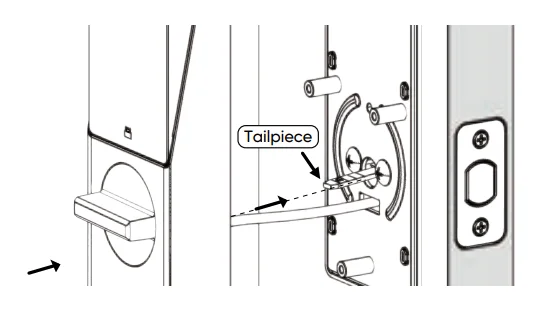
- Check the position between your interior assembly and the deadbolt latch. If the deadbolt is facing right, position the knob horizontally as shown below. Then insert the tailpiece into the interior assembly.

- If the deadbolt is facing left, position the knob vertically as shown below. Then insert the tailpiece into the interior assembly.

- Route the cables to ensure they are fully tucked inside the device.
- Turn the knob to make the deadbolt extend out. If it works, go to the next step! If it fails and doesn’t move the deadbolt, return to the previous step and re-check your interior assembly. Check the diagrams and your original knob position (Horizontal or Vertical).

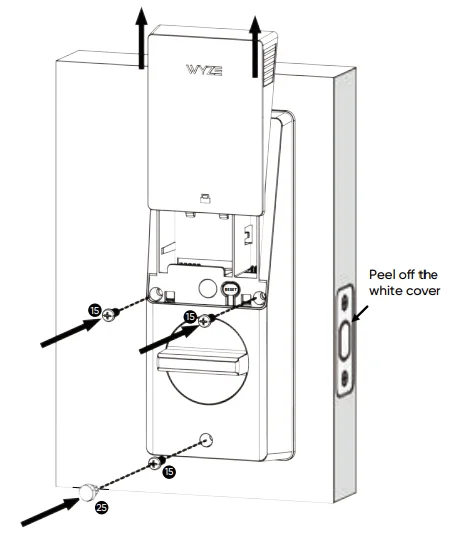
- Remove the battery cover.
- Verify that the interior and exterior assembly is properly aligned.
- Using the provided screws (#15), install the interior assembly to the mounting plate.

INSTALL THE BATTERIES
- Insert the Backup Battery and the Main Battery as shown.
- A “beep” will sound when the Main Battery is installed correctly.
- Verify that the interior and exterior assembly are mounted securely.


Note: To charge the Main Battery, a USB-C cable (not included) is required.
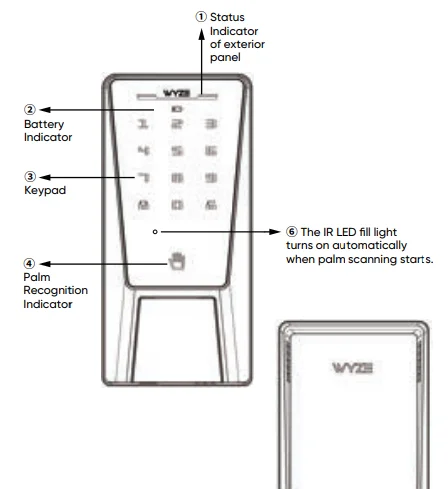
LIGHT INDICATORS AFTER SETUP
CAUTION
- Do not attempt to remove, repair, modify, or perform maintenance on any part of Wyze Palm Lock except to change the main battery.
- Do not install or operate Wyze Palm Lock where the temperature is above 122°F (50°C) or store Wyze Palm Lock where the temperature is above 158°F (70°C).
- Do not install or operate Wyze Palm Lock at altitudes higher than 16,404 ft (5000 m).
- This device complies with Part 15 of the FCC Rules. Operation is subject to the following two conditions: (1) This device may not cause harmful interference, and (2) This device must accept any interference received, including interference that may cause undesired operation.
FCC COMPLIANCE STATEMENTS
Caution: Changes or modifications not expressly approved by the party responsible for compliance could void the user’s authority to operate the equipment.
Note: This equipment has been tested and found to comply with the limits for a Class B digital device, pursuant to Part 15 of the FCC Rules. These limits are designed to provide reasonable protection against harmful interference in a residential installation. This equipment generates, uses, and can radiate radio frequency energy, and if not installed and used in accordance with the instructions, may cause harmful interference to radio communications. However, there is no guarantee that interference will not occur in a particular installation.
If this equipment does cause harmful interference to radio or television reception, which can be determined by turning the equipment off and on, the user is encouraged to try to correct the interference by one or more of the following measures:
- Reorient or relocate the receiving antenna.
- Increase the separation between the equipment and receiver.
- Connect the equipment into an outlet on a circuit different from that to which the receiver is connected.
- Consult the dealer or an experienced radio/TV technician for help.
ISED COMPLIANCE STATEMENTS
This device contains license-exempt transmitter(s)/receiver(s) that comply with Innovation, Science and Economic Development Canada’s license-exempt RSS(s). Operation is subject to the following two conditions:
- This device may not cause interference.
- This device must accept any interference, including interference that may cause undesired operation of the device.
RF EXPOSURE COMPLIANCE
This equipment complies with FCC/IC radiation exposure limits set forth for an uncontrolled environment. This equipment is installed and operated with a minimum distance of 20 cm between the radiator and the human body.
SPECIFICATIONS
- Name: Wyze Palm Lock
- Model: DX_LBP
- Operating Voltage: 3.6V
- Weather Resistance: IP53
- Bluetooth: BLE 5.3®
- FCC ID: 2AUIUDXLBP
- IC: 25466-DXLBP
WARRANTY
Your Wyze product is covered by a one-year limited warranty. You can view the limited warranty terms at https://wyze.com/return-warranty-policy or request a copy by contacting Wyze at +1 (206) 339-9646.
NEED HELP?
Contact our Support Team: https://wyze.com/support
Join the Community: https://wyze.com/community
Wyze and Wyze Palm Lock are trademarks of Wyze Labs, Inc.
For More Manuals By Wyze Labs, Visit ManualsLibraryy.
Wyze Palm Lock -FAQs
How do I set up the Wyze Palm Lock?
Download and open the Wyze app, tap the “+” icon to add a new device, and select Wyze Palm Lock. Follow the on-screen steps to connect via Wi-Fi and complete calibration.
Does the Wyze Palm Lock have a backup battery?
Yes. Wyze Palm Lock features a dual-battery system—the main battery lasts up to 6 months, while the backup keeps the lock working for up to 2 weeks during charging.
Will Wyze Palm Lock work without Wi-Fi?
Yes, it will. Even if your Wi-Fi goes offline, you can still use the Bluetooth connection or your physical key to lock and unlock your door.
How long does the Wyze Palm Lock battery last?
The main battery lasts up to 6 months under normal use, while the backup battery ensures continued operation for up to two weeks during recharging.
Can I still use a key with Wyze Palm Lock?
Absolutely. Wyze Palm Lock retains your existing keyhole, allowing you to use your physical key anytime you prefer or if the battery runs low.
How do I calibrate the Wyze Palm Lock?
In the Wyze app, open your lock’s settings and select Calibrate. Close your door, manually lock and unlock as guided, and wait for the lock to chime, confirming successful calibration.
Does Wyze Palm Lock have Auto-Unlock?
Yes. Using geofencing and Bluetooth, Wyze Palm Lock automatically unlocks when you return home and locks again when you leave, providing a seamless hands-free experience.
Is Wyze Palm Lock compatible with Alexa or Google Home?
Yes. You can connect Wyze Palm Lock with Amazon Alexa or Google Assistant for voice control, allowing you to lock or unlock your door hands-free.

