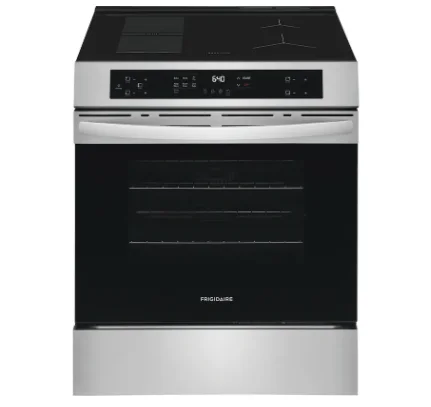
Frigidaire CGIH3047VF 30″ Front Control Induction Range
BEFORE SETTING SURFACE CONTROLS
What is Electromagnetic Induction?
An induction cooking zone uses an electromagnet to induce heat in iron or steel cookware. Below each cooking zone on an induction cooktop, there is a copper coil. When the cooking zone is turned on, the electricity turns the coil into a type of magnet that heats metal cookware on the cooktop.
Induction Features
Because heat starts in the cookware instead of the cooktop, induction offers several advantages.
- Fast Heating: Cookware will heat up faster than on a conventional electric cooktop. Pay close attention to avoid scorching food when starting to cook. You may need to use a lower setting for cooking food than you are used to.
- Precise Control: The heat going into the cookware will change immediately when you change the setting of the cooking zone.
- Even Heating: Cookware will typically heat more evenly on an induction cooktop, so you are less likely to have hot or cool spots in the cookware.
- Cooler Cooktop: An induction cooktop will be cooler when you remove the cookware than a conventional electric cooktop would be. Because the cooktop doesn’t get as hot, you are not as likely to get burned. Spills are also less likely to burn onto the surface, making clean-up easier.
- Energy Efficiency: Induction cooking wastes less energy than a conventional cooktop, so it uses less electricity.
Preparation
Before using your cooktop for the first time, apply a ceramic cooktop cleaning cream (available in most hardware, grocery, and department stores) to the ceramic surface. Clean and buff with a clean paper towel. Cooktop cleaning creams leave a protective finish on the glass that will make cleaning easier when the cooktop is soiled from cooking and help prevent scratches and abrasions.
Sounds
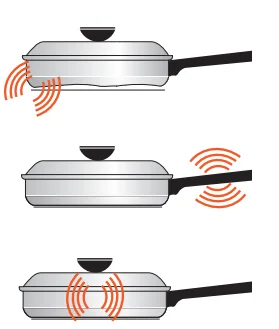
The magnetic field over the induction cooking zone may cause cookware to vibrate, creating a buzzing or humming noise. These sounds are not unusual, especially at high settings.
- Cookware that is not perfectly flat on the bottom may vibrate slightly against the cooktop.
- A loose handle may vibrate in its socket.
- Multi-material cookware may allow small vibrations in its structure.

Sounds are less likely to occur with heavier, higher-quality cookware. An induction cooktop may also produce faint clicking sounds from the electronic switches that maintain the desired cooking temperature.
Using Proper Cookware
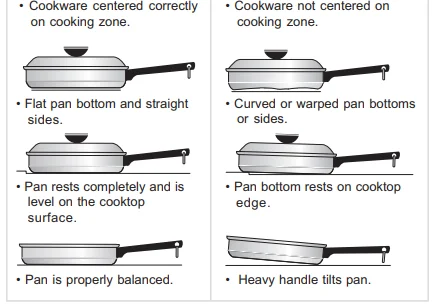
The size and type of cookware used will influence the heat setting needed for the best cooking results. Be sure to follow the recommendations for using proper cookware as illustrated in Figure 3 and Figure 3. Induction-ready cookware will often have a symbol printed on the bottom by the manufacturer.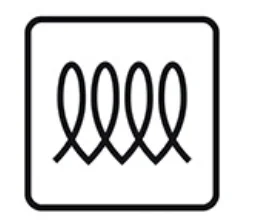
Check for flatness by rotating a ruler across the bottom of the cookware (see Figure 3). Cookware should have flat bottoms that make good contact with the entire surface of the cooking zone (see Figure 8 on page 14).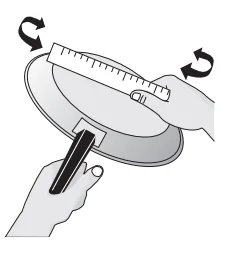
Cookware Selection
Cookware selection is especially important when using an induction cooktop. The cookware must contain magnetic iron or steel to work on an induction cooktop. Common materials for induction cookware include the following:
- Stainless Steel – Slow heat conductor with uneven cooking results. Durable, easy to clean, and resists staining. Some types of stainless steel will not work on an induction cooktop. Use the magnet test (Figure 4) to check stainless steel cookware.
- Cast Iron – A slow heat conductor that retains heat very well. Cooks evenly once the cooking temperature is reached.
- Porcelain-enamel on metal – Heating characteristics will vary depending on the base material. Porcelain-enamel on a magnetic metal will work on an induction cooktop. Use the magnet test (Figure 4) to check porcelain-enamel cookware.
The Magnet Test
To see if a piece of cookware will work on your induction cooktop, try to stick a magnet to it (see Figure 3).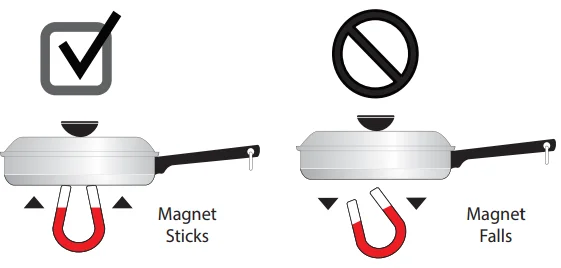
If the magnet clings firmly to the bottom of the cookware, it will work on your induction cooktop. If the magnet clings weakly or not at all, the cookware will not heat up on your induction cooktop.
Pan Sensing
Sensors beneath the cooktop surface require that certain cookware conditions be met before an induction cooking zone will operate. If a cooking zone is turned on and no cookware is detected, the zone display showing the power setting will flash (Figure 5).
The conditions that generate a flashing message are illustrated in Figure 8. If the situation is not corrected, the cooking zone will automatically turn off after three minutes. It’s a good idea to lower the power setting before correcting the pan sensing message.
Minimum and Maximum Pan Size
The cooktop graphics are guides to the minimum and maximum pan size for each cooking zone. Induction cooking zones require a minimum pan size to activate. The inner ring on each cooking zone indicates the smallest pan size (Figure 7). If a suitable piece of cookware is centered properly but is too small, the display will flash, and the pan will not heat. Select a larger pan or use a different cooking zone.
The outer ring on the cooktop graphic indicates the recommended maximum pan size for that zone (Figure 6). Do not use pans with bottoms that extend beyond the outer circle for a cooking zone. The cookware must make full contact with the ceramic glass surface. Cookware should not rest on or touch the metal edges of the cooktop.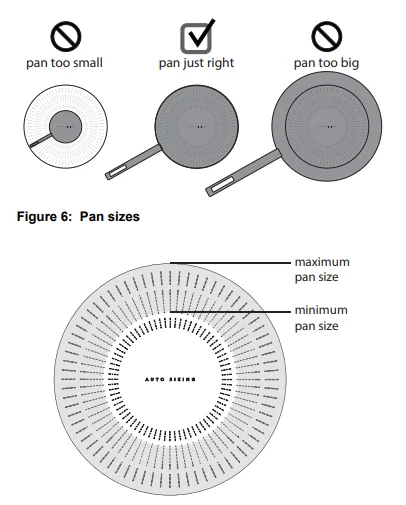
For even heating, use pans that fit the cooking zone markings. If the pan is not a perfect fit for the marking, using a larger pan is better than using a smaller pan.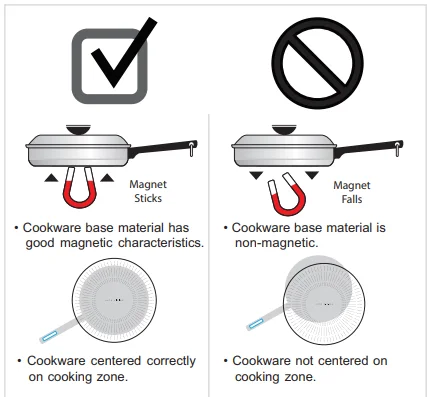
Induction Cooking
When turned on, an induction cooking zone will not get hot. The induction cooking zone creates heat in the cookware, not in the cooktop. Heat is not created unless there is an iron or steel object on the cooking zone.
Cook Zone Setting Display
The Setting Display will show the setting for the cook zone.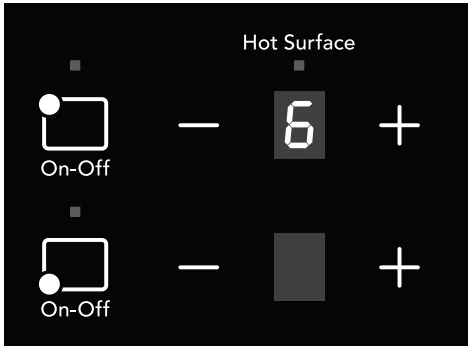
If there is no cookware in the cook zone, the setting indicator will blink, and the magnet will not turn on.
Hot Surface Indicator
The Hot Surface indicator light will turn on when heat is detected in the cooktop and will remain on until the surface has cooled to a safe temperature.
SETTING SURFACE CONTROLS
Cooktop Display Windows
The range backguard provides a digital window for each of the cooking zones located on the cooktop. Power levels and messages are easily monitored and controlled using the window displays in combination with the corresponding controls.
Available Power Level Settings
The cooktop control will display power levels ranging from P (Figure 10), Hi (Figure 13), to Lo (Figure 11). The settings between 9 (Figure 14) and 2 (Figure 15) decrease and increase in 1.0 increments. The lowest setting (Figure 11) will display just below the lowest digital setting of 2.
Power Boost Power Level (P)
When setting an induction cooking zone for the highest setting (to the POWER BOOST position), the display will initially show P (Power Boost) power level for up to 10 minutes. After 10 minutes, the cooking zone will automatically return to the Hi setting (Figure 15). The P setting is only available immediately after activating a cooking zone.
ESEC Error Indicator Message (E)
An error message will be displayed (flashing E) (Figure 12) at power-up (or after a power failure) if any of the surface settings were left in the ON positions. If a power failure should occur, set all four surface controls to the OFF position. This will reset the surface controls.
Be sure to reset the clock. Once the surface controls have been set to the OFF positions and the clock has been set with the correct time of day, the surface controls should return to normal operation. If the surface controls do not function and the E message remains in any display after following these procedures, contact an authorized servicer for assistance.
Lockout Window Message (-)
The (-) message will appear in all the surface control displays whenever the Lockout or Self-clean feature is active (Figure 16). Refer to the “Setting Oven Lockout” heading on page 21 for more details.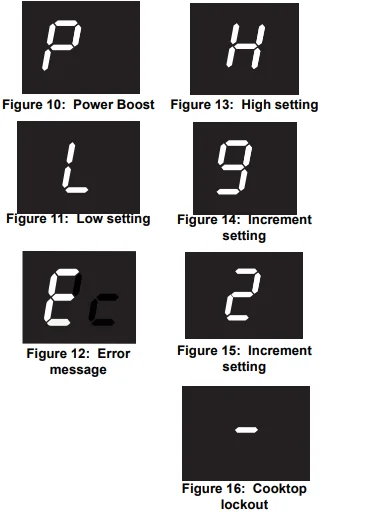
NOTE
- The Power Boost (P) setting is only available immediately after activating a cooking zone by pressing the + key. The cooktop will remain in Power Boost for up to 10 minutes. After 10 minutes, the cooking zone will automatically change to the High (H) setting.
- The size and type of utensil used and the amount and type of food being cooked will influence the setting needed for the best cooking results.
- The Hot Surface indicator light will turn on when heat is detected in a cook zone. The light will remain on until the heated surface area has cooled sufficiently.
Induction surface cooking zones
Important: When the surface controls are activated, a cooling fan will turn on and remain on until the control is turned off.
To operate an induction cooking zone:
- Place correctly sized cookware on the cooking zone.
- Press the On-Off key of the cooking zone until it beeps. A – (dash) will appear in the display.
- Press the + or – key for the cooking zone (Figure 17) until you reach the desired setting (refer to the Recommended Induction zone settings in the table on this page).
- When cooking is complete, turn the induction cooking zone OFF by pressing its on-off key before removing the cookware.
The cooktop has a sensor to detect cookware in the cooking zone. The cooking zone will not become active without proper cookware in position. See “Cooktop Display Windows” on page 16.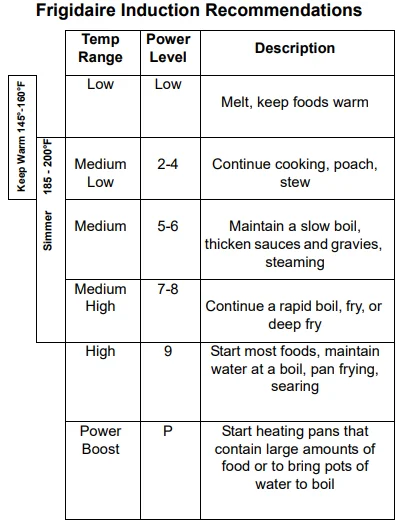
Moving Cookware on a Smooth Cooktop
Always lift cookware before moving on the ceramic glass smoothtop. Cookware that has a rough or dirty bottom can mark and scratch the ceramic glass surface. Always start with clean cookware.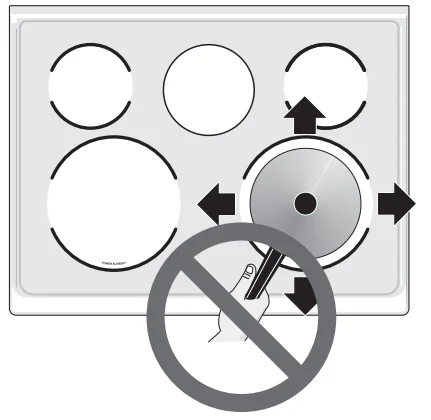
Pan Preheat Recommendations
Induction cooking may decrease the amount of time required to preheat a piece of cookware compared to cooking on a radiant or gas cooktop. Remember that induction surface cooking will initially heat the cookware very quickly.
- The Hot Surface indicator light will turn on when heat is detected in a cooking zone and will remain on until the cooktop surface has cooled sufficiently.

- If cookware is moved away from the center of an active cooking zone, the cooking zone will become inactive. The setting display will flash until proper cookware is placed in the center of the cooking zone. When cookware is centered on the cooking zone, the zone will resume heating. If the cooking zone has no cookware for three minutes, it will automatically shut off.
Home Canning
Be sure to read and observe all the following points when home canning with your appliance. Check with the USDA (United States Department of Agriculture) website and be sure to read all the information they have available, as well as follow their recommendations for home canning procedures.
- Use only a completely flat-bottom canner with no ridges that radiate from the bottom center when home canning. Heat is spread more evenly when the bottom surface is flat. Use a straight-edge to check the canner bottom.
- Make sure the diameter of the canner does not exceed 1 inch beyond the cooking zone markings or burner.
- It is recommended to use smaller diameter canners on electric coil and ceramic glass cooktops and to center canners on the burner grates.
- Start with hot tap water to bring the water to a boil more quickly.
- Use the highest heat setting when first bringing the water to a boil. Once boiling is achieved, reduce the heat to the lowest possible setting to maintain that boil.
- Use tested recipes and follow instructions carefully. Check with your local Cooperative Agricultural Extension Service or a manufacturer of glass jars for the latest canning information.
- It is best to carry small amounts and light loads.
- Do not leave water bath or pressure canners on high heat for an extended period of time.
BEFORE SETTING OVEN CONTROLS
Oven Vent Location
The oven is vented as shown below. When the oven is on, warm air is released through the vent. This venting is necessary for proper air circulation in the oven and good baking results. Do not block the oven vent. Never close off the openings with aluminum foil or any other material. Steam or moisture may appear near the oven vent. This is normal.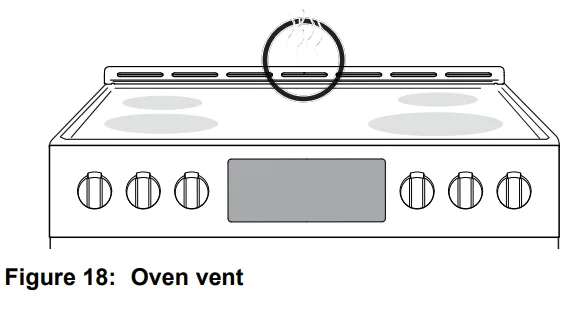
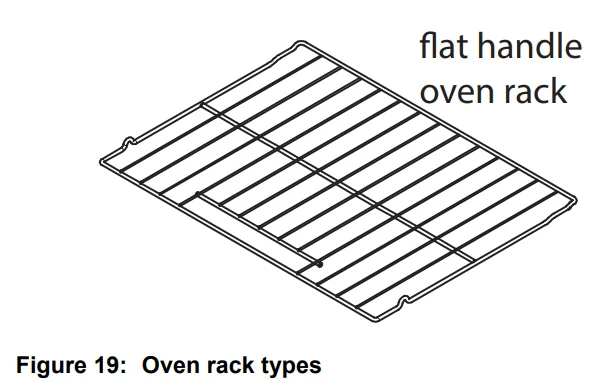
Type of oven racks
- Flat oven racks are used for most cooking needs and may be placed in most oven rack positions.

Removing, replacing, and arranging oven racks
Always arrange the oven racks when the oven is cool. To remove – Pull the oven rack straight forward until it reaches the stop position. Lift the front of the oven rack slightly and slide it out. To replace – Place the oven rack on the rack guides on both sides of the oven walls. Tilt the front of the oven rack upward slightly and slide the oven rack back into place. Be sure oven racks are level before using.
SETTING OVEN CONTROLS
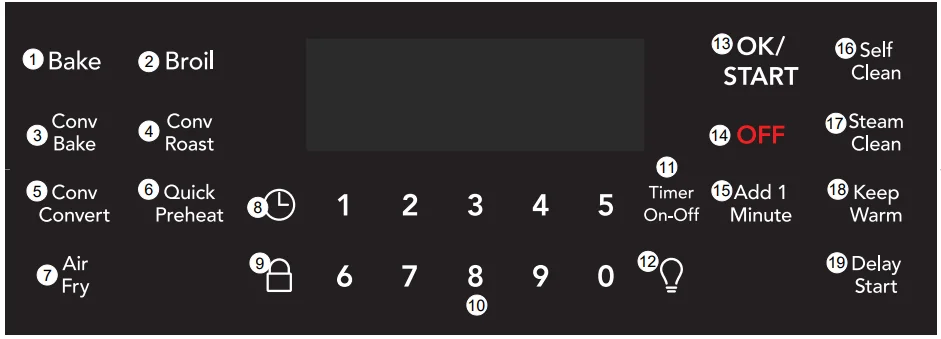
Oven Control Features
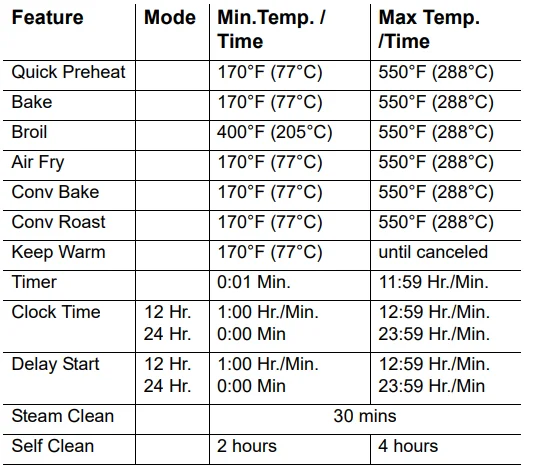
- Bake – Use to enter normal baking temperatures for recipes that call for regular baking.
- Broil – Use the broil function for direct heat cooking.
- Conv Bake – Circulates the oven heat evenly and continuously for faster cooking of some foods.
- Conv Roast – Uses a convection fan to gently brown meats and poultry and seal in the juices.
- Conv Convert – Converts standard bake temperatures to convection temperature in convection bake.
- Quick Preheat – Best used for single rack baking with packaged convenience foods, and foods made from scratch.
- Air Fry – Uses hot air for great tasting crispy results without all the oil.
- Set Clock – Use to set the time of day.
- Oven Lock – Use to lock out oven controls.
- 0 through 9 keys – Use to set temperature and time.
- Timer On-Off – Use to set or cancel the minute timer. The minute timer does not start or stop any cooking function.
- Oven Light – Use to turn on the internal light. It will turn on when the oven door is opened.
- OK/START – Use to set cooking functions and when setting the clock.
- OFF – Use to turn off all cooking functions.
- Add 1 Minute – Use to add additional minutes to the timer.
- Self Clean – Use to set selfclean cycle between 2 and 4 hrs.
- Steam Clean – Use as a time-saving method for cleaning light soils.
- Keep Warm – Use to keep cooked foods at serving temperature.
- Delay Start – Add to Quick Preheat, Bake, Conv Bake, Conv Roast, and Self Clean to program a Delay Start.

Setting the Clock
When the appliance is first powered up, 12:00 will flash in the display (Figure 20). The time of day must first be set before operating the oven.
To Set Clock to 1:30:
- Press
 .
. - Enter 1 3 0 using numeric keys.
- Press OK/START.
Important note: The clock cannot be changed when a Self Clean, Delay Start, or cooking feature is active.
Setting Timer
The minute timer allows you to track your cooking times without interfering with the cooking process. The timer may be set from a minimum time of 1 minute to a maximum of 11 hours and 59 minutes.
To set the timer for 5 minutes:
- Press Timer On-Off.
- Enter 5 using the numeric keypad.
- Press Timer On-Off to start the timer. When the set time ends, END will show in the display, and the control will sound a beep three times every 30 seconds until the Timer On-Off key is pressed. To cancel the timer when active, press Timer On-Off again.
Important note:
- The timer does not start or stop the cooking process. It serves as an extra minute timer that will beep when the set time has run out. The timer may be used alone or while using any of the other oven functions.
- When the timer is set for more than 1 hour, it will display hours and minutes until 1 hour remains. When less than 1 hour remains, the display counts down in minutes and seconds. With less than 1 minute remaining, only seconds will display.
- If the timer is active during a cooking process, the timer will show in the display. To view the status of any other active oven function, press the key of the cooking function once, and it will appear in the display for a few seconds.
Add 1 Min
Use the Add 1 Min feature to set additional minutes to the timer. Each press of the key will add 1 minute. If Add 1 Min is pressed when the timer is not active, the timer will activate and begin counting down from 1 minute.
To add 2 minutes to the timer:
Press Add 1 Min twice.
Setting 12 Hour or 24 Hour display mode
The clock display mode allows you to select 12 hr or 24 hr modes. The factory pre-set clock display mode is 12 hours.
To set 12 hr or 24 hr display mode:
- Press and hold
 for 6 seconds.
 - Press Self Clean to toggle between 12 Hr day or 24 Hr day display modes (Figure 21).
- Press OK/START to accept the choice.

Changing between the continuous bake setting and the 12-hour energy-saving setting
The oven control has a factory preset built-in 12 Hour Energy Saving feature that will turn off the oven if the oven is left on for more than 12 hours. The control may be programmed to override this feature to bake continuously.
To change between continuous bake and the 12-hour energy saving feature:
- Press and hold Timer On-Off for 6 seconds.
- Press Self Clean to toggle between 12 Hour OFF or Stay On feature (Figure 22).
- Press OK/START to accept the choice.

Changing the temperature display from Fahrenheit to Celsius
The electronic oven control is set to display °F when shipped from the factory. The display may be changed to show either °F or ºC oven temperatures.
To change temperature display mode from °F to °C or from °C to °F:
- Press and hold Broil for 6 seconds.
- Once F (or C) appears in the display, press Self Clean to toggle between Fahrenheit and Celsius temperature display modes (Figure 23).
- Press OK/START to accept the choice.

Important note: The oven temperature display cannot be changed during the cooking process or if a delayed start has been set, or if self-clean is active.
Setting Silent or Audible Control mode
Silent mode allows the oven control to operate without audible tones. The control may be programmed for silent operation and later reset to operate with all the normal audible tones.
To set for silent or audible mode:
- Press and hold Delay Start for 6 seconds.
- Press the Self Clean key to toggle between bEEP On or bEEP OFF (Figure 24).
- Press OK/START to accept the choice.

Need Help?
Visit the Frigidaire website at www.frigidaire.com.
For More Manuals By Frigidaire, Visit ManualsLibraryy.
Frigidaire CGIH3047VF 30″ Front Control Induction Range-FAQs
How do I use the induction cooktop on my Frigidaire range?
Select a cooking zone, choose the desired heat level, and place an induction-compatible pan on the burner. The cooktop will only heat when it detects a magnetic pan.
How do I start the self-clean cycle on my Frigidaire oven?
Open the oven, remove racks, choose Self Clean, and select a cleaning time (usually 3 hours). The door will lock automatically during the cycle.
How do I adjust the temperature on a Frigidaire oven?
Press and hold Bake until “CAL” appears. Use the arrows to increase or decrease temperature in 10°F increments.
How do I set the clock on my Frigidaire induction range?
Press Clock, enter the time with the keypad, and confirm by pressing Start.
How do I unlock my Frigidaire induction range?
Hold down the Lock or Control Lock button for 3–5 seconds until the “L” symbol disappears.
How do I reset my oven clock after a power outage?
Press Clock, enter the correct time, then press Start to save it.
How do I know when my Frigidaire oven is preheated?
The temperature display will rise gradually. A beep or indicator light turns on when the set temperature is reached.
How do I calibrate my Frigidaire oven temperature?
Access calibration mode by holding Bake until “CAL” appears. Adjust up or down in 10°F steps and save settings.
How long does a Frigidaire oven take to self-clean?
Most cycles take about 3 hours depending on the soil level selected.
Why is my Frigidaire oven not starting?
Check for a tripped breaker, loose power plug, or an active control lock. A faulty heating element may also prevent startup.

