![]()
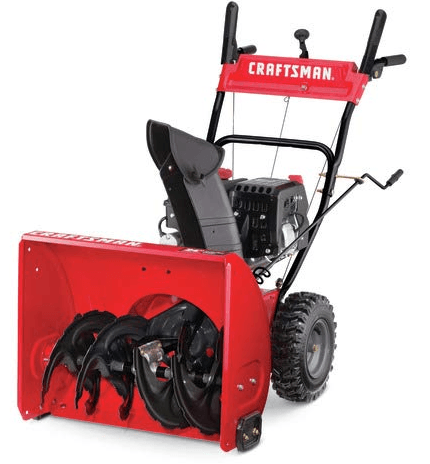
Craftsman 247881731 Snow Thrower
PRODUCT SPECIFICATIONS
Engine Oil: 5W-30
Fuel: Unleaded Gasoline
Engine: MTD
ASSEMBLY
Removing From Carton
- Cut the corners of the carton and lay the sides flat on the ground. Remove and discard all packing inserts.
- Move the snow thrower out of the carton.
- Make certain the carton has been completely emptied before discarding it.
Assembly
- Place the shift lever in the Forward-6 position.
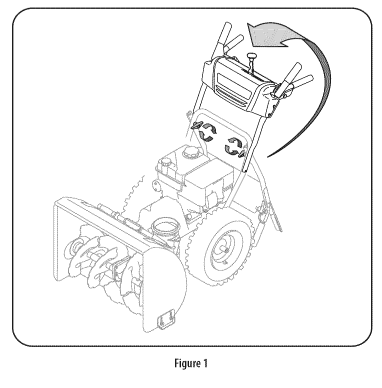
- Observe the lower rear area Of the snow thrower to be sure both cables are aligned with roller guides before pivoting the handle upward. See Figure 1.

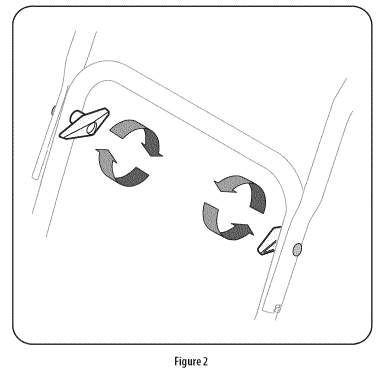
- Secure the hand e by tightening the plastic wing knob located on both the left and right sides of the handle. See Figure 2. Remove and discard any rubber bands, if present. They are for packaging purposes only.

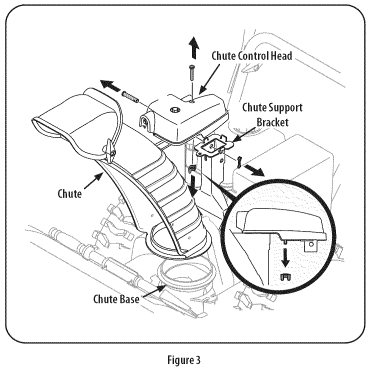
- Remove wing nut and hex screw from chute control head and clevis pin and cotter pin from chute support bracket. Position chute (forward-facing) over chute base. See Figure 3.

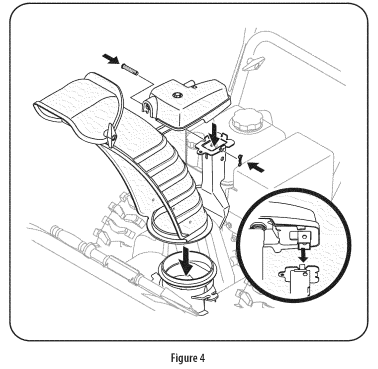
- Place chute onto chute base and secure chute control head to chute support bracket with clevis pin and cotter pin removed earlier. See Figure 4.

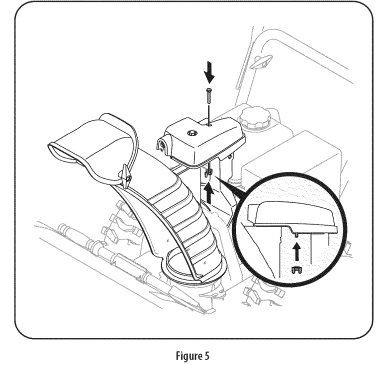
- Finish securing chute control head to chute support bracket with wing nut and hex screw removed earlier. See Figure 5.

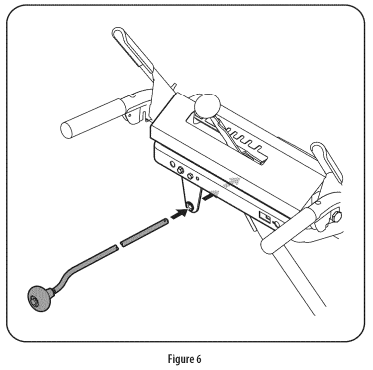
- Insert the chute directional control into the support bracket on the rear of the dash panel. See Figure 6.

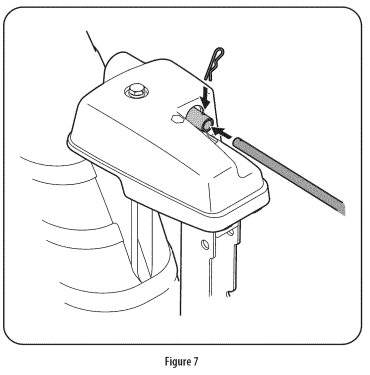
- Remove the hairpin clip from the rear of the chute control head.
- Insert chute directional control into rear of the chute control head. Secure the chute directional control to the chute control head with the hairpin clip removed earlier. See Figure 7.

OPERATION
Chute
The distance snow is thrown can be adjusted by changing the angle of the upper chute. To do so:
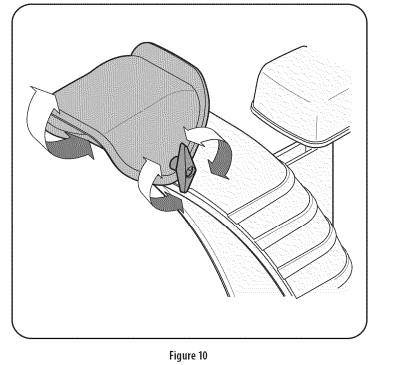
- Stop the engine by removing the ignition key and loosen the plastic wing knob found on the left side of the chute assembly.
- Pivot the chute upward or downward before retightening the wing knob. See Figure 10.

Auger Control
Check the adjustment of the auger control as follows:
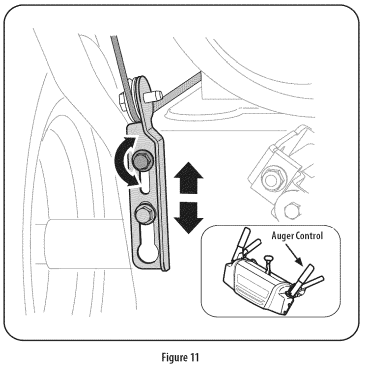
- The auger control is located on the left handle. See Figure 11 inset. When the auger control is released and in the disengaged “up” position, the cable should have very little slack. It should NOT be tight.
- In a well-ventilated area, start the snow thrower engine. Refer to Starting the Engine in the Operation section.
- While standing in the operator’s position (behind the snow thrower), engage the auger.
- Allow the auger to remain engaged for approximately ten (10) seconds before releasing the auger control. Repeat this several times.
- With the auger control in the disengaged “up” position, walk to the front of the machine.
- Confirm that the auger has completely stopped rotating and shows NO signs of motion. If the auger shows ANY signs of rotating, immediately return to the operator’s position and shut off the engine. Wait for ALL moving parts to stop before adjusting the auger control.
- To readjust the control cable, loosen the upper hex bolt on the auger cable bracket. See Figure 11.

- Position the bracket upward to provide more slack (or downward to increase cable tension).
- Retighten the upper hex bolt.
- Repeat steps 2-6 above to verify proper adjustment has been achieved.
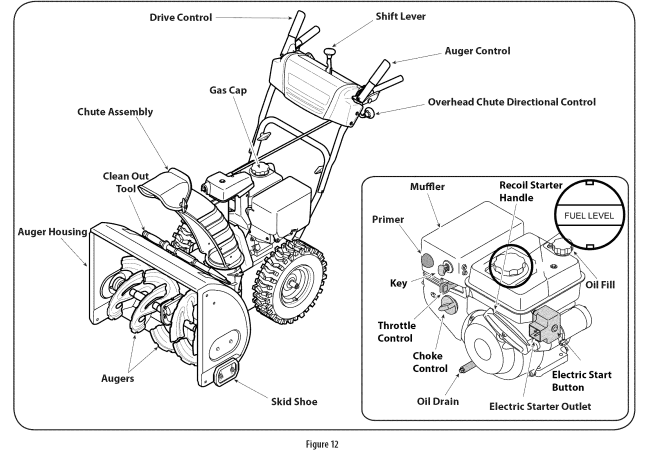
- Primer
Depressing the primer forces fuel directly into the engine’s carburetor to aid in cold-weather starting. - Recoil Starter Handle
This handle is used to manually start the engine. - Electric Starter Outlet
Requires the use of a three-prong outdoor extension cord and d 120V power source/ wall outlet. - Oil Fill
Engine oil level can be checked and oil added through the oil fill. - Gas Cap
Unthread the gas cap to add gasoline to the fuel tank. - Auger
When engaged, the auger blades rotate and draw snow into the auger housing. - Chute Assembly
Snow drawn into the auger housing is discharged out the chute assembly.
Auger Control
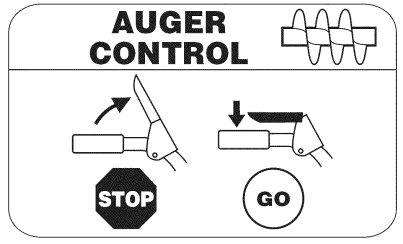
The auger control is located on the left handle. Squeeze the control grip against the handle to engage the auger and start snow throwing action. Release to stop.
Drive Control/ Auger Control Lock
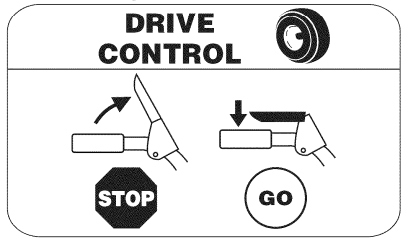
The drive control is located on the right handle. Squeeze the control grip against the handle to engage the wheel drive. Release to stop. The drive control also locks the auger control so you can operate the chute directional control without interrupting the snow throwing process. If the auger control engaged simultaneously with the drive control, the operator can release the auger control (on the left handle) and the augers will remain engaged. Release both controls to stop the augers and wheel drive.
Overhead Chute Directional Control
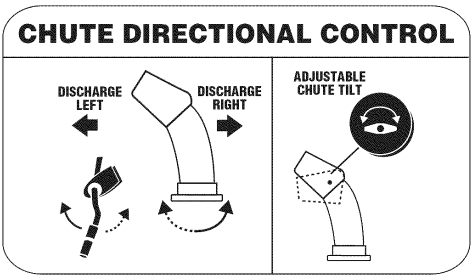
The overhead chute directional control is located in the center of the snow thrower between the handle panel and lower handle. To change the direction in which snow is thrown, rotate the chute directional control.
Skid Shoes
Position the skid shoes based on surface conditions. Adjust upward for hard-packed snow. Adjust downward when operating on gravel or crushed rock surfaces.
Stopping The Engine
After you have finished snow-throwing, run engine for a few minutes before stopping to help dry off any moisture on the engine.
- Move throttle control to OFF position.
- Remove the key. Removing the key will reduce the possibility of unauthorized starting of the engine while equipment is not in use. Keep the key in a safe place. The engine cannot start without the key.
- Wipe any moisture away from the controls on the engine.
Replacing Shear Pins
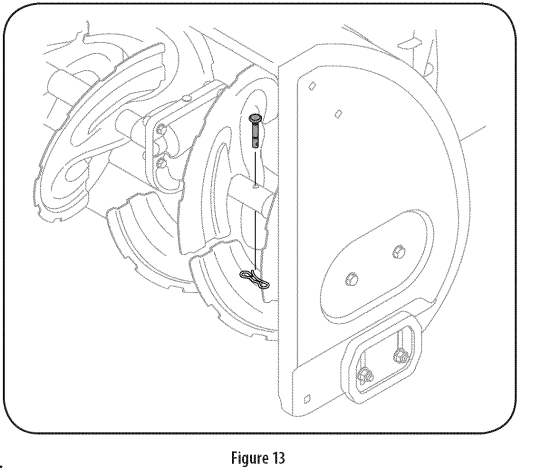
Each auger blade is secured to the spiral shaft with a shear pin and bow-tie clip. If an auger blade strikes a foreign objector ice jam, the pin will shear off to prevent damage to the blade. If an auger blade does not turn, check to see if its pin has sheared off. See Figure 13.
SERVICE AND MAINTENANCE
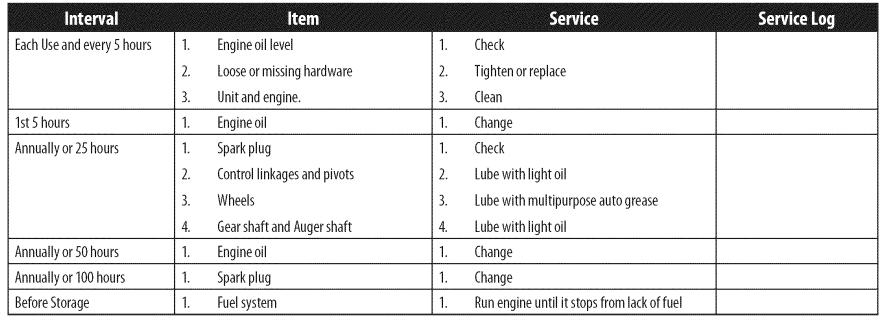
GENERAL RECOMMENDATIONS
Checking Engine Oil
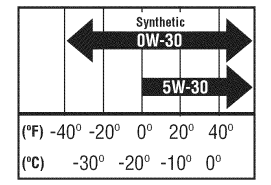
When adding oil to the engine, refer to viscosity chart below. Engine oil capacity is 600 ml (approx. 20 oz.). Do not over-fill. Use a 4-stroke, or an equivalent high detergent, premium quality motor oil certified to meet or exceed U automobile manufacturer’s requirements for service classification SG, SF. Motor oils classified SG, SF will show this designation on the container
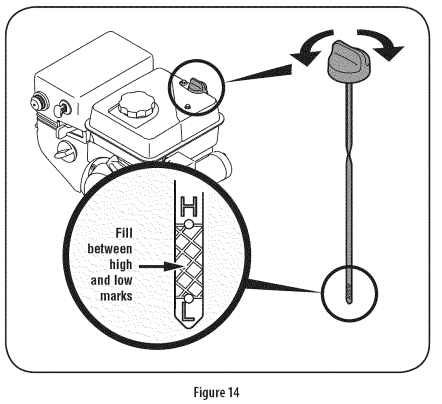
- Remove the oil filler cap/dipstick and wipe the dipstick clean.
- Insert the cap/dipstick into the oil filler neck, but do NOT screw it in.
- Remove the oil filler cap/dipstick. If level is low, slowly add oil until oil level registers between high (H) and low (L). See Figure 14.
- Replace and tighten cap/dipstick firmly before starting engine.
Changing Engine Oil
- Drain fuel from tank by running engine until the fuel tank is empty. Be sure fuel fill cap is secure.
- Place suitable oil collection container under oil drain plug.
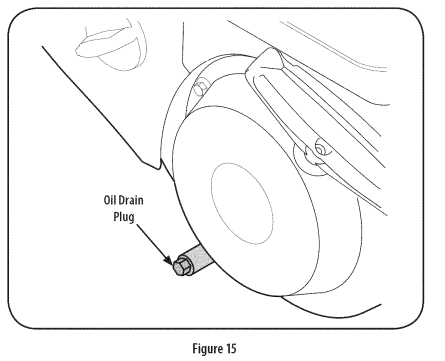
- Remove oil drain plug. See Figure 15 on next page.
- Tip unit to drain oil into the container. Used oil must be disposed of at a proper collection center.

- Reinstall the drain plug and tighten it securely.
- Refill with the recommended oil and check the oil level. See Recommended Oil Usage chart. The engine’s oil capacity is 20 ounces.

- Reinstall the oil filler cap/dipstick securely.
Checking Spark Plug
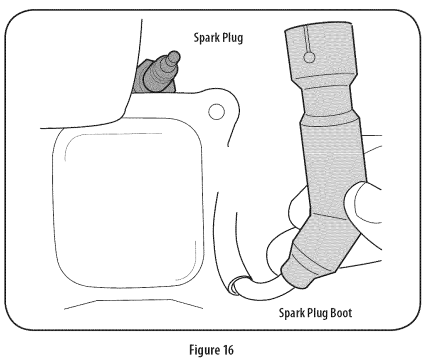
- Remove the spark plug boot and use a spark plug wrench to remove the plug. See Figure 16.
- Visually inspect the spark plug. Discard the spark plug if there is apparent wear, or if the insulator is cracked or chipped. Clean the spark plug with a wire brush if it is to be reused.
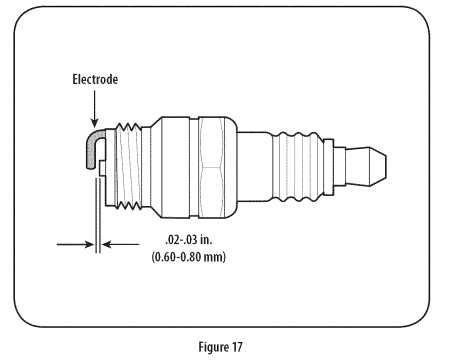
- Measure the plug gap with a feeler gauge. Correct as necessary by bending side electrode. See Figure 17. The gap should be set to .02-.03 inches (0.60 0.80 mm).
- Check that the spark plug washer is in good condition and thread the spark plug in by hand to prevent cross threading.
- After the spark plug is seated, tighten with a spark plug wrench to compress the washer.
Friction Wheel Removal
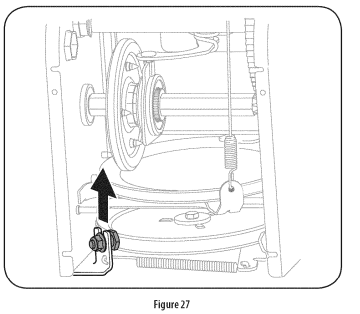
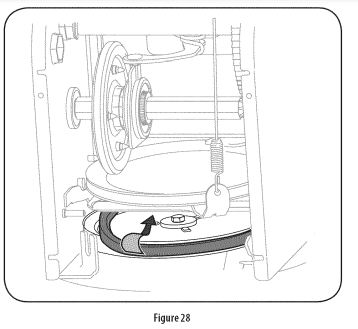
If the snow thrower fails to drive with the drive control engaged, and performing the drive control cable adjustment fails to correct the problem, the friction wheel may need to be replaced. Follow the instructions below. Examine the friction wheel rubber for signs of wear or cracking and replace wheel if necessary.
- To prevent spillage, remove all fuel from tank by running engine until it stops.
- Place the shift lever in first Forward (Fl) position.
- Carefully pivot the snow thrower up and forward so that it rests on the auger housing.
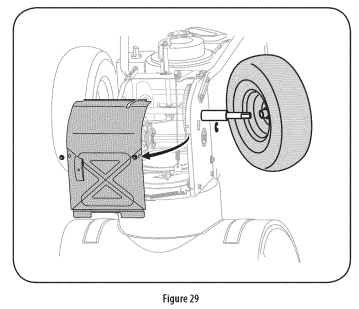
- Remove the frame cover from the underside of the snow thrower by removing the self-tapping screws which secure it.
- Remove the right-hand wheel by removing the screw and bell washer which secure it to the axle. See Figure 29.


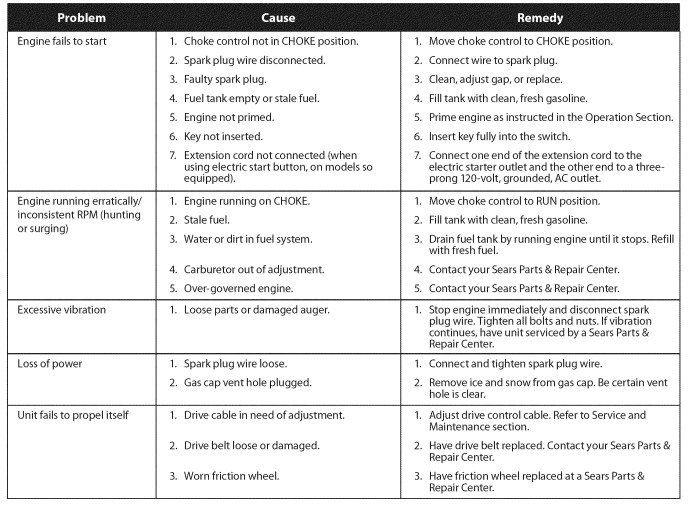
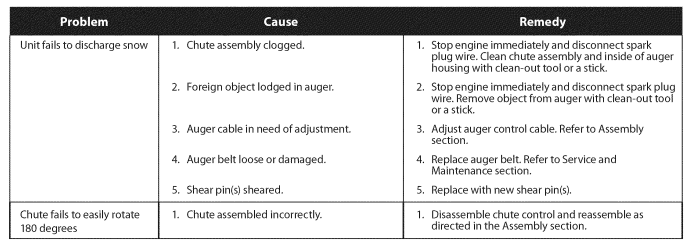
TROUBLESHOOTING
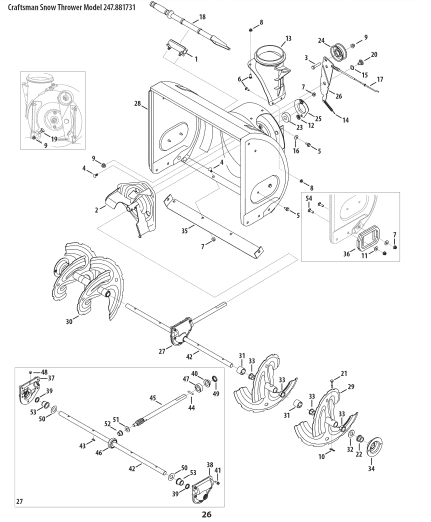
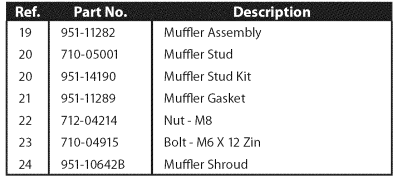
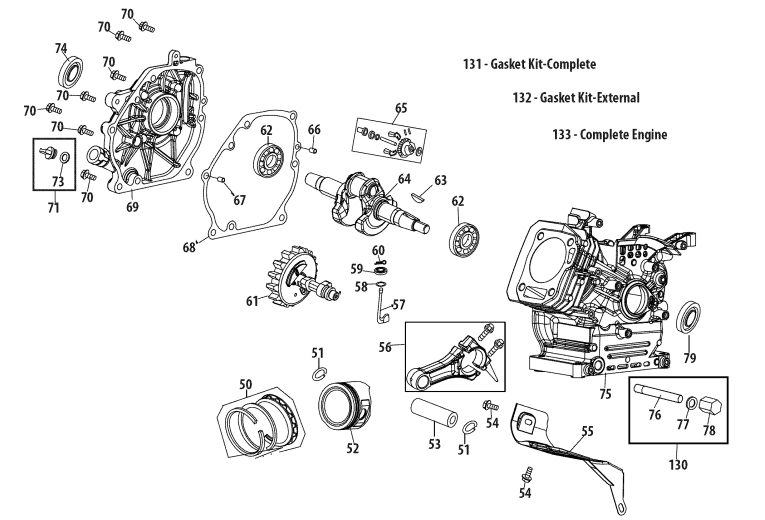
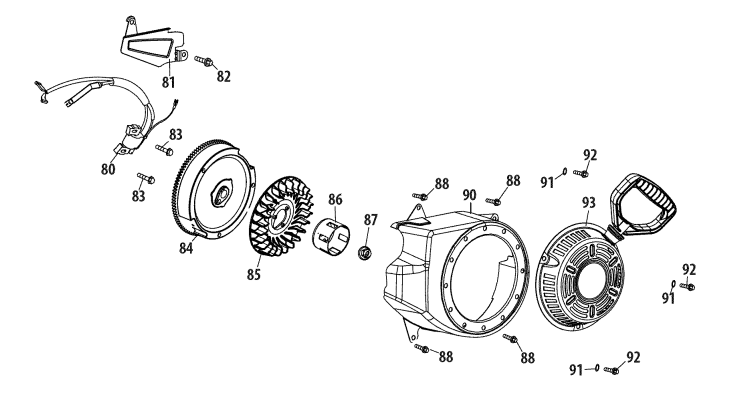
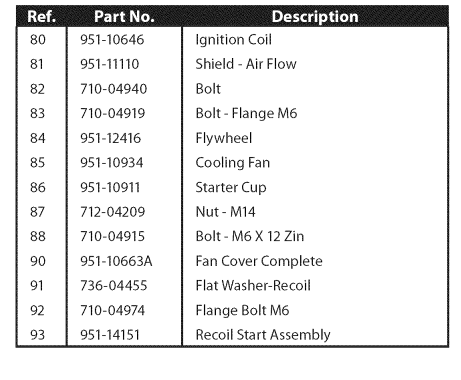
PARTS LIST
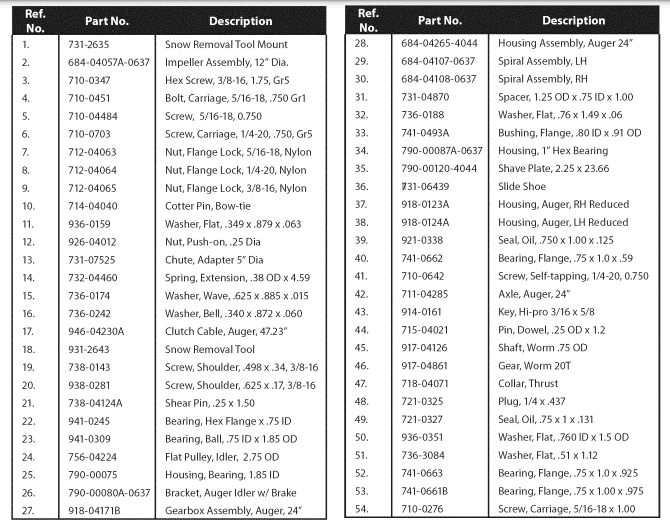
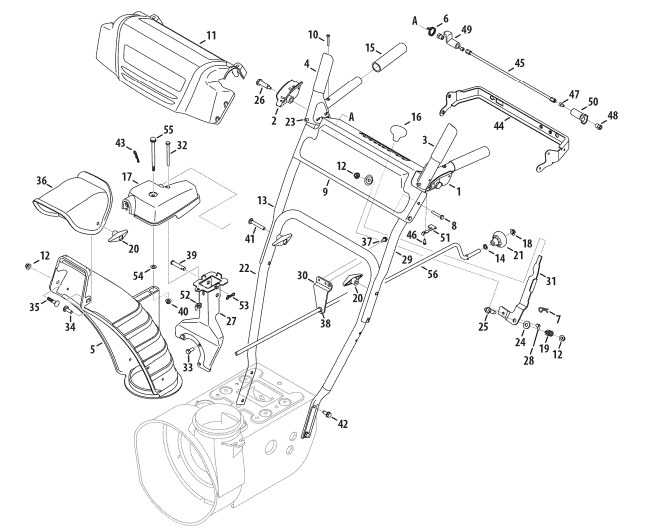
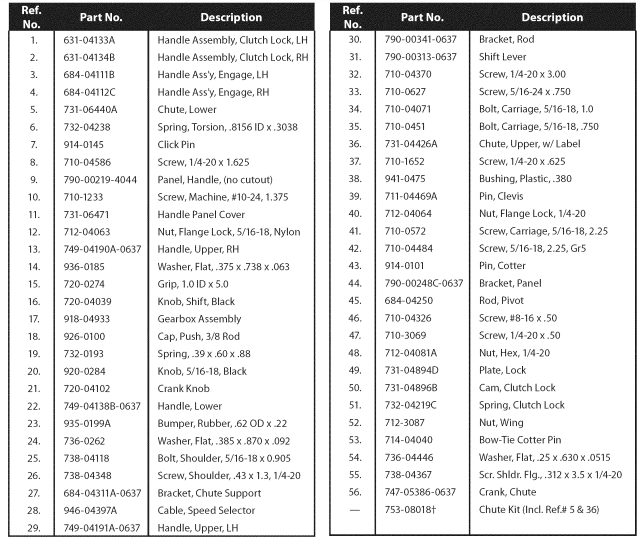
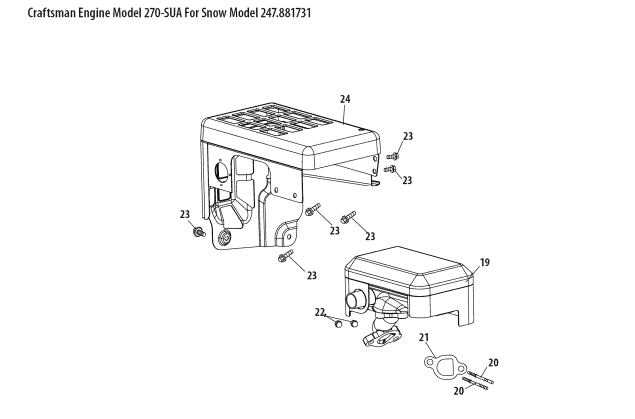
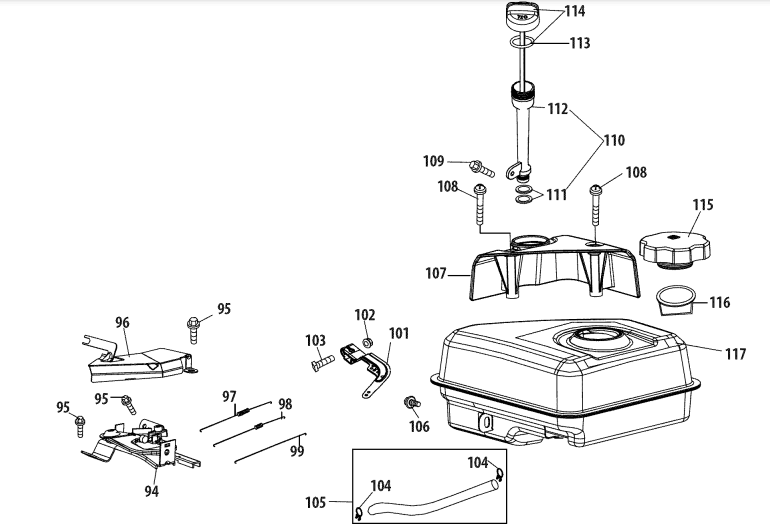
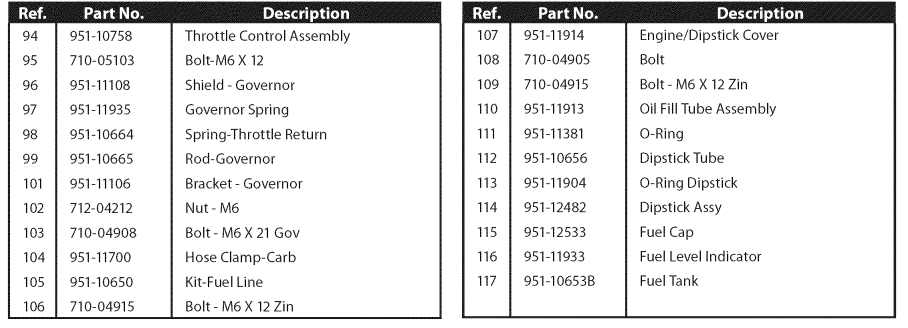
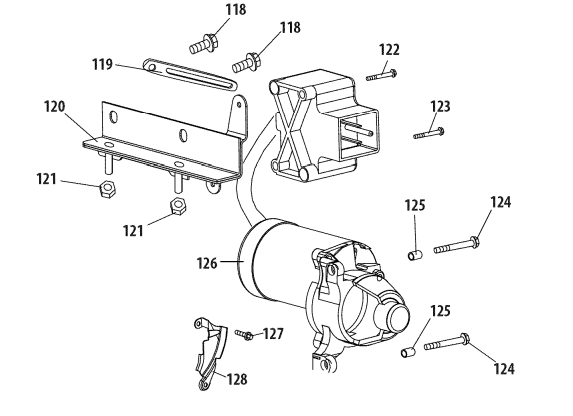
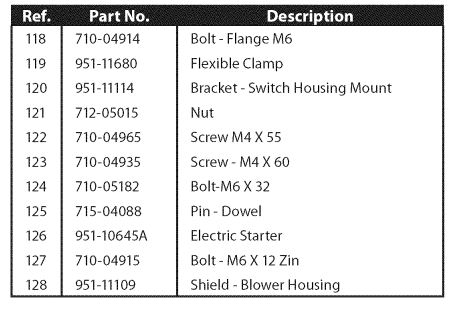
For more manuals by Craftsman visit, ManualsLibraryy
Craftsman 247881731 Snow Thrower-FAQs
When was my Craftsman snowblower made?
The date code on Murray-made machines helps identify the year and day of manufacture. The first digit indicates the year (mostly 1990s), and the last three digits represent the sequential day within the year.
How do I find the engine model number on my snowblower?
The engine model number is stamped into the metal on your engine. Common locations include:
1. The left side of the overhead valve cover
2. The metal shield below the muffler
3. The cylinder shield on the engine side
How does a blower system work?
A blower system uses a rotating impeller to create a vacuum. This vacuum pulls air into the blower, where the impeller divides the air with rotating blades.
How does a snow maker work?
Snowmaking uses fan guns or snow lances with nucleators. These create a mix of water and compressed air, which forms snow nuclei when exposed to the atmosphere, simulating snowfall.
How do I maintain my snowblower?
Follow these steps for regular maintenance:
1. Replace spark plugs when needed.
2. Check tire pressure.
3. Lubricate bearings.
4. Inspect the scraper blade and skid shoes.
5. Change oil regularly.
How does a snowblower key work?
Plastic keys disconnect the ignition coil’s ground circuit when inserted. Removing the key reconnects the ground circuit, preventing the engine from starting.
Should I start with the choke open or closed?
1. For a cold engine: Pull the choke lever outward to close it when starting. Gradually return it to the open position as the engine warms.
2. For a warm engine: Leave the choke in the open position.
Is my snowblower a 2-stroke or 4-stroke?
1. A 2-stroke engine has one fill port and uses an oil-fuel mixture. The cap may indicate the oil-to-fuel ratio.
2. A 4-stroke engine has separate fill ports for fuel and oil.
What is a stage snowblower?
1. Single-stage: The auger gathers and pushes snow directly through the chute.
2. Two-stage: The auger gathers snow, which is then accelerated by a high-speed impeller for better snow throwing.
Who makes Craftsman snowblowers?
Craftsman snowblowers are made by MTD, which also manufactures Cub Cadet and Troy-Bilt models.
Is a snowblower gas or diesel?
Craftsman snowblowers run on gas. Use fuel with the least ethanol content, such as E-10 gas (10% ethanol), to avoid engine damage.

