
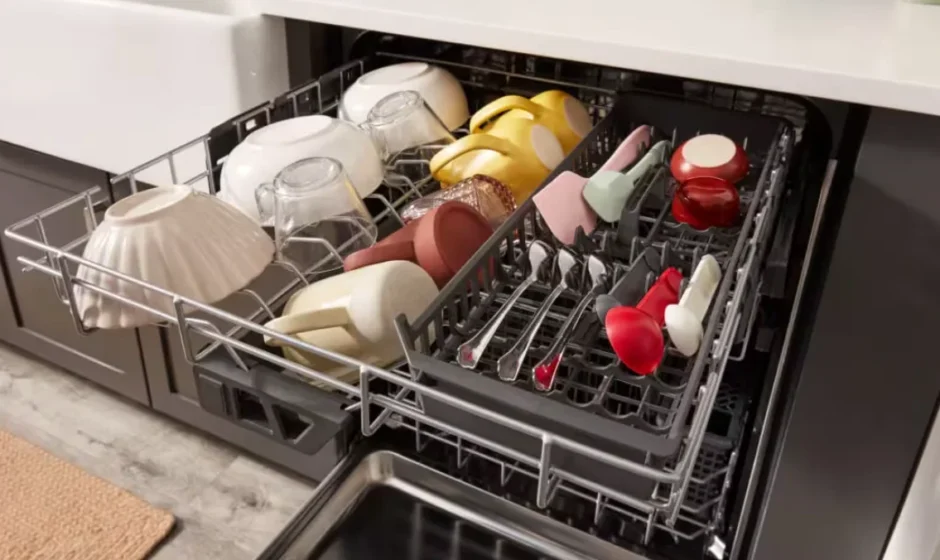

KitchenAid Max Jets Third Rack Dishwasher
IMPORTANT SAFETY INSTRUCTIONS
WARNING: When using the dishwasher, follow basic precautions, including the following:
- Read all instructions before using the dishwasher.
- Use the dishwasher only for its intended function.
- Use only detergents or rinse agents recommended for use in a dishwasher, and keep them out of the reach of children.
- When loading items to be washed:
- Locate sharp items so that they are not likely to damage the door seal; and
- Load sharp knives with the handles up to reduce the risk of cut-type injuries.
- Do not wash plastic items unless they are marked “dishwasher safe” or the equivalent. For plastic items not so marked, check the manufacturer’s recommendations.
- Do not touch the heating element during or immediately after use.
- Do not operate the dishwasher unless all enclosure panels are properly in place.
- Do not leave the dishwasher open when not loading or unloading dishes.
- Do not tamper with controls.
- Do not abuse, sit on, or stand on the door, lid, or dish racks of the dishwasher.
- Do not use replacement parts that have not been recommended by the manufacturer (e.g. parts made at home using a 3D printer).
- Under certain conditions, hydrogen gas may be produced in a hot water system that has not been used for two weeks or more. HYDROGEN GAS IS EXPLOSIVE. If the hot water system has not been used for such a period, before using the dishwasher, turn on all hot water faucets and let the water flow from each for several minutes. This will release any accumulated hydrogen gas. As the gas is flammable, do not smoke or use an open flame during this time.
- Remove the door or lid to the washing compartment when removing an old dishwasher from service or discarding it.
- This product is intended for residential use only.
- This product is not intended for use by persons (including children) whose physical, sensory, or mental capacities are different or reduced, or who lack experience or knowledge, unless such persons are supervised or trained in the operation of the apparatus by a person responsible for your safety.
SAVE THESE INSTRUCTIONS
DISHWASHER MAINTENANCE
Detergents
High-quality premeasured tablets and packs are recommended for improved performance. Quality tablets and packs have been proven better than powder,liquid, or gel detergents at reducing filming on dishes. Using tablets and packs over time will start to reduce or eliminate white film. They are suitable for all water hardness and soil levels. Also, by using a rinse aid, you can minimize repeat buildup of white film (not all packs and tablets contain rinse aid). Always place premeasured detergents in the main compartment and close the lid. The Pre-Wash indicator on the dispenser lid is for customers who use powder or gel detergent and wish to add an amount of detergent to the Pre-Wash cycle. The volume of detergent added here is approximately 8 cubic centimeters, if filled full and level. Any detergent added here would be immediately added to the wash when the cycle starts, versus detergent inside the dispenser, which is added during the main wash cycle.
NOTE: Follow instructions on the package when using other dishwasher detergent types.
- Use automatic dishwasher detergent only. Add detergent just before starting a cycle.
- Fresh automatic dishwasher detergent results in better cleaning. Store tightly closed detergent container in a cool, dry place.
- Extremely hard water mineral deposits (15 grains per U.S. gallon or more) can cause damage to your dishwasher and make it difficult to achieve good results. A water softener is recommended to avoid damage and achieve good results.
- For more details about powders, liquids, and gels and hard water conditions, consult the brand website.
Rinse aid
Using rinse aid will optimize your drying and wash performance. This dishwasher is specifically designed to be used with rinse aid for improved drying performance and to control the buildup of hard water deposits. Rinse aid needs to be added to the product every 1 to 3 months, depending on usage. Refer to the Quick Start Guide or brand website for information about filling the rinse aid dispenser.
Cycle Selection and Energy
Efficient dishwashers run longer to save water and energy, just as driving a car slower saves on gas. Typical cycle time is approximately 21/2 hours, but can take less or significantly more time depending on your selections and incoming water temperature, and the amount of food soils on the dishes. For optimum performance, the dishwasher should be connected to a 120°F (49°C) hot water supply. If you first press the Start button, the main sensor cycle with heated drying will be automatically selected. This cycle senses the soil amount and the toughness of the soil, to adjust the cycle for improved cleaning.
Sanitize or Sani
Sanitizes dishes and glassware in accordance with NSF International NSF/ANSI Standard 184 for Residential Dishwashers. Certified residential dishwashers are not intended for licensed food establishments. Only sanitizing cycles have been designed to meet the requirements of the NSF/ANSI 184 performance standard for soil removal and for sanitization efficacy. There is no intention, either directly or indirectly, that all cycles on an NSF/ANSI 184 certified dishwasher meet the NSF/ANSI 184 performance standard for soil removal and for sanitization efficacy. The Sani Rinse indicator glows at the end of the cycle if the Sani Rinse option was successfully completed. If the indicator does not activate, it is probably due to the cycle being interrupted.
DISHWASHER LOADING TIPS
NOTE: Features are model-specific. Your dishwasher may not have all the features described. See Quick Start Guides for possible dishwasher loading patterns for all dish racks.
Silverware Baskets
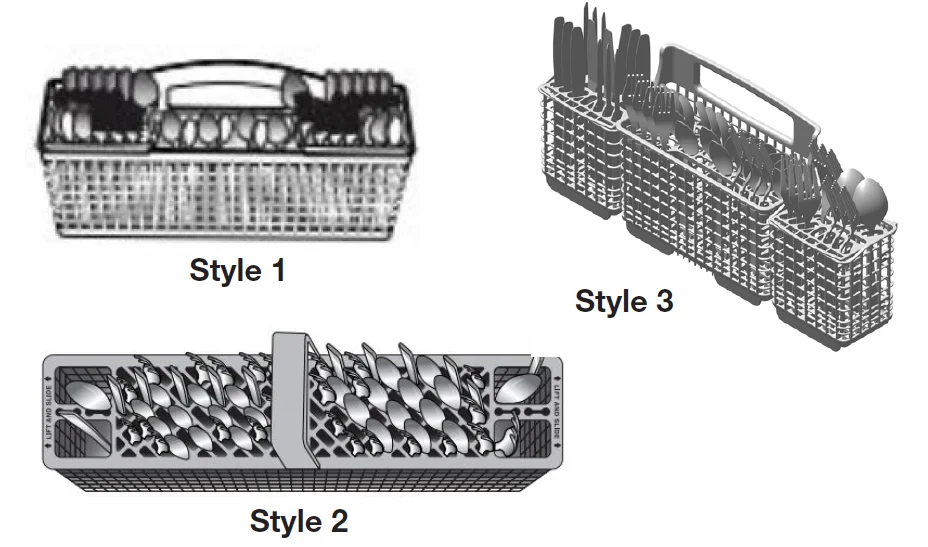
Use silverware basket lids to provide optimal spacing and best cleaning performance.
NOTE: If your silverware does not fit into the designated slots, open the lids (Style 1/3) or lift on the ends of the lids and pull to remove (Style 2). Mix silverware types to keep them separated. Load knives down, forks up, and alternate spoons for best cleaning results.
Removing Upper Racks
In order to make space for tall items, your upper racks are removable. The manner in which to remove will depend on whether the rack is mounted with Style 1 or Style 2. Remove dishes before removing any racks.
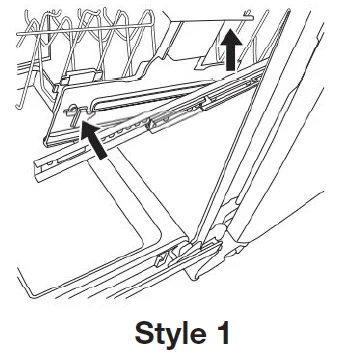
To remove the rack, pull the rack forward about halfway out of the tub. On one side, press the tab on the track in and pull up the front end of the rack, out of the track. Then repeat this step on the other side to completely remove the front end of the rack. Then, remove the rack by pulling the back end out using a forward and upward motion. To replace the rack, push the back of the rack into the rail first, and then push the front down.
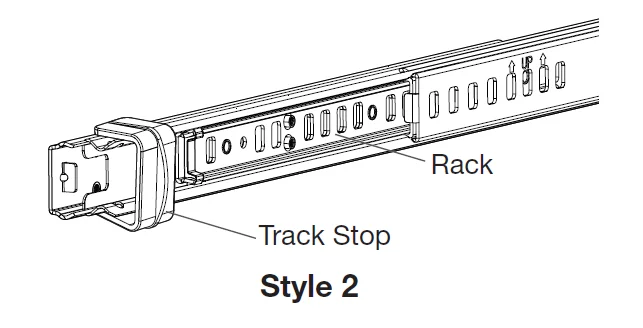
To remove the rack, pull the rack out until it stops. On the left and right sides of the rack, push the plastic track stops on the front of the rail sideways to open them. Pull out the rack. To replace the rack, push the rack back onto the rails. Push the track stops closed.
Sliding Bowl Tines
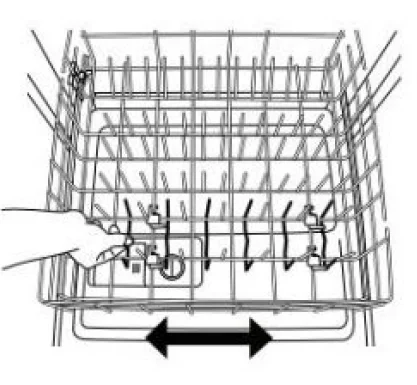
The sliding bowl tines allow you to easily load bowls of multiple sizes. Grab the movable tine row in the lower rack and slide it into the desired position.
Fold Down Tines
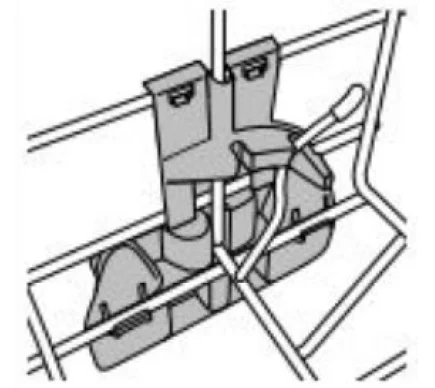
Fold-down tines allow you to optimize the spacing in the rack. Fold-down tines might be in the lower rack, the second level rack, and/or the third level rack, depending on your model. To fold or unfold the tine, hold the tine nearest the clip at the end of the tine row and gently push it past the stop on the clip and in the direction you want to fold it.
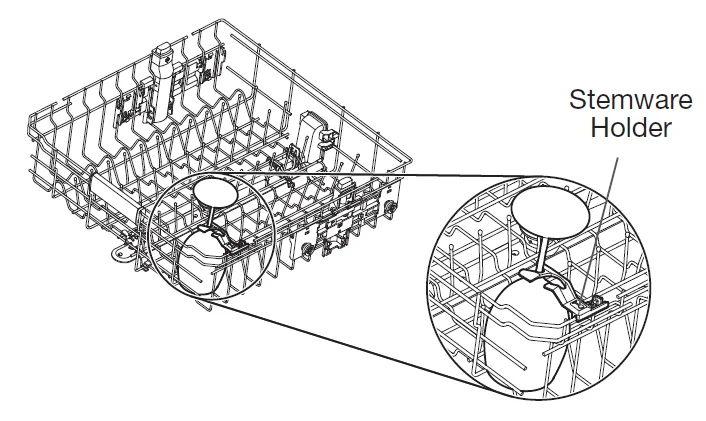
Stemware Holder
Use the stemware holders to support wine glasses and other stemware. Push them up to rotate them out of the way when not needed.
Cup Shelf
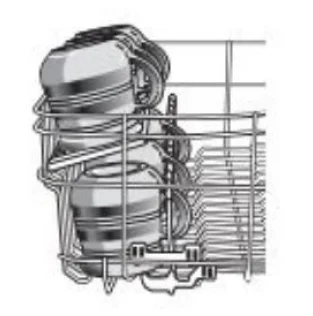
Use the cup shelf to hold additional cups or small items. Push up to fold out of the way when not needed.
DISHWASHER CARE
Interior Cleaning
Many detergents may leave white spots or a white residue on dishware and on the interior of the dishwasher. Over time, this residue can become unsightly and could affect dishwasher performance. Use of a dishwasher cleaning product, such as Affresh Dishwasher Cleaner, can help to remove the residue. Monthly use of Affresh Dishwasher Cleaner is recommended to help maintain the dishwasher. Follow package directions.
NOTE: We recommend the use of high-quality, premeasured detergent tablets or packs and the use of rinse aid for dishwasher cleaning and daily maintenance.
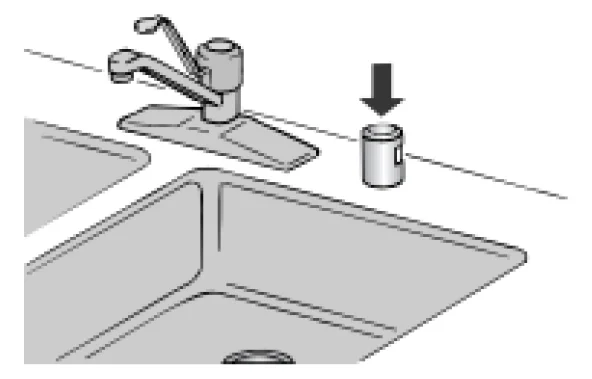
Countertop Air Gap
If you have a drain air gap, check and clean it if the dishwasher isn’t draining well.
Extended Time Without Use
To Reduce Risk of Property Damage During Vacation or Extended Time Without Use.
- When you will not be using the dishwasher during the summer months, turn off the water and power supply to the dishwasher.
- Make sure the water supply lines are protected against freezing conditions. Ice formations in the supply lines can increase water pressure and cause damage to your dishwasher or home.
- Damage from freezing is not covered by the warranty.
- When storing your dishwasher in the winter, avoid water damage by having your dishwasher winterized by authorized service personnel.
Exterior Cleaning
Clean the exterior of the dishwasher with a soft, damp cloth and mild detergent. Avoid using abrasive cleaning products on the exterior of the dishwasher. Abrasive cleaning products can damage the finish.
Troubleshooting
The brand website listed on the Quick Start Guide has detailed information to troubleshoot most problems customers encounter. This information may save you the cost of a service call.
Foreign Object Cup
If the Foreign Object Cup is full, the Quick Start Guide or the brand website listed on the Quick Start Guide has detailed information about how to empty it.
DISHWASHER SETTING MENU:
Follow the instructions below to enter the menu to change your current settings.
- Press and hold the “Hi Temp” button for 5 seconds until “Hi Temp” and “Dry” lights turn on.
- Press the “Start/Resume” button within 2 seconds. If you do not press Start within 2 seconds, then the display will turn off, and you will need to start over and go back to step 1.
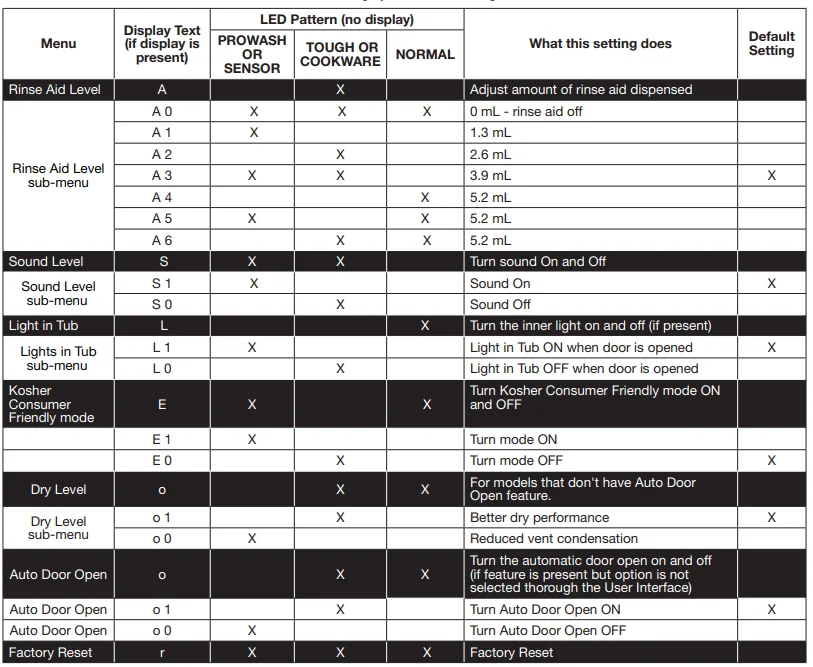
- For Models with a Display, an “A” will show in the display to indicate Rinse Aid Level.
- For Non-display models, the “Tough or Cookware” light will turn on to indicate Rinse Aid Level.
- To go to a feature other than Rinse Aid Level, press the “Cycle” button or “Normal” button (depending on model) to move to the feature you would like to change (Sound Level, Light in Tub, Kosher Friendly, Factory Reset, Rinse Aid Level). See the table for what is shown on the display to indicate these features.
- Press the “Start/Resume” button to select the feature and enter the sub-menu. The display will change to show the current setting of the feature. (For example, if you selected Sound Level and you haven’t changed it before, then S1 will show for display models, and the sensor will light for non-display models.)
- Press the “Cycle” button or the “Normal” button (depending on the model) to change the value of the feature setting. (For example, if you want to turn the sound off, then press the “Cycle” or “Normal” button and S0 shows on display models or “pots and pans” lights for non-display models.)
- Press the “Start/Resume” button to confirm the new selection. The feature setting will not be changed until the “Start/Resume” button is pressed. The dishwasher will return to the Off state when the Start button is pressed. To exit the customer settings menu at any time, press the “Cancel” button or wait 30 seconds without pressing any buttons.
NOTE: To see the current setting of a feature, follow steps 1-4. When the “Start/Resume” button is pressed in step 4, the dishwasher will show the current setting. Press the “Cancel” button to exit without making any changes.
NOTE: If you enter into a Feature Setting Page and need to go back to the Main Menu Press “Cancel” and proceed to step 1.
NOTE: To exit “Kosher Consumer Friendly Mode” at any time, press the “Cancel” button or you can wait 75 hours.
Kosher Consumer Friendly Mode: When turned on, it will disable all of the buttons on the dishwasher except for the cancel key, and disable the light inside the tub (if equipped) for a time period of 75 hours. If this mode is turned on during a cycle, then the status lights at the end of the cycle will not turn off when the door is opened and then re-closed. To exit this mode, press the “Cancel” button or wait 75 hours.
NOTE: The Auto Door Open feature name differs by model. It can also be referenced as Auto Open Dry, Door Open Dry, Natural Dry or Air Dry.
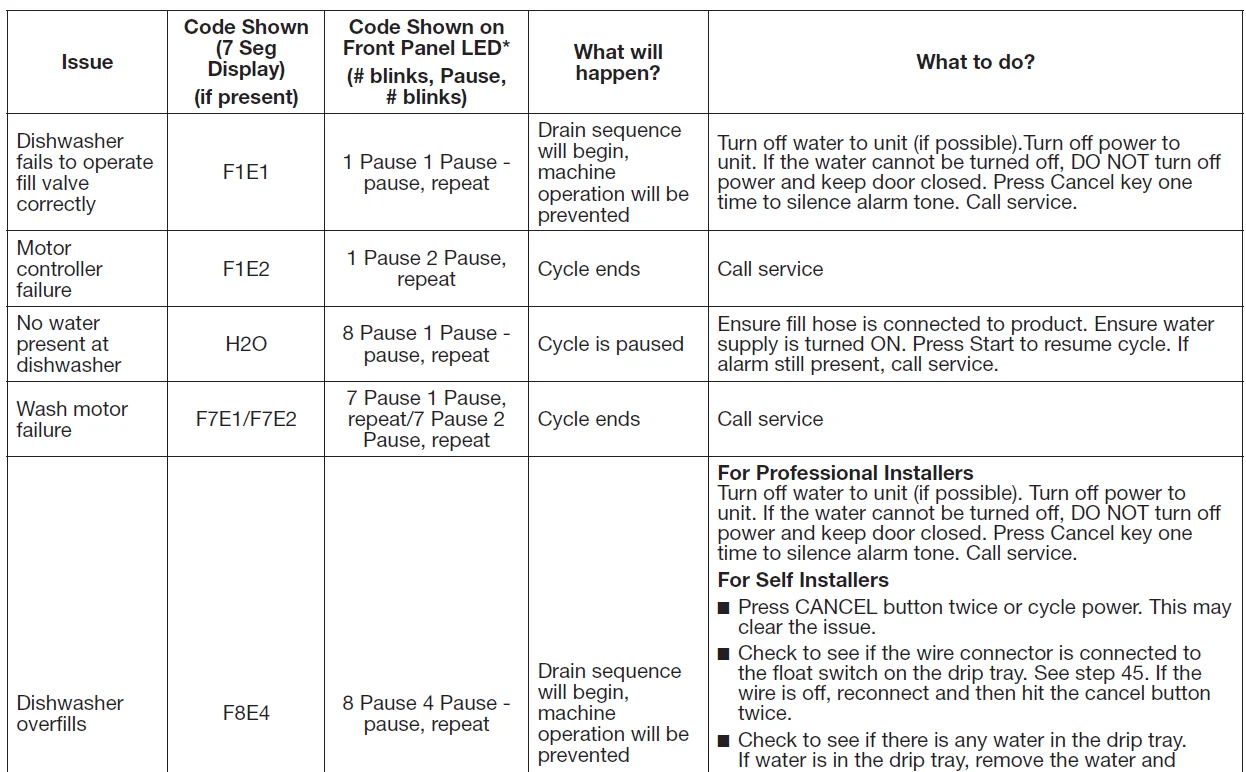
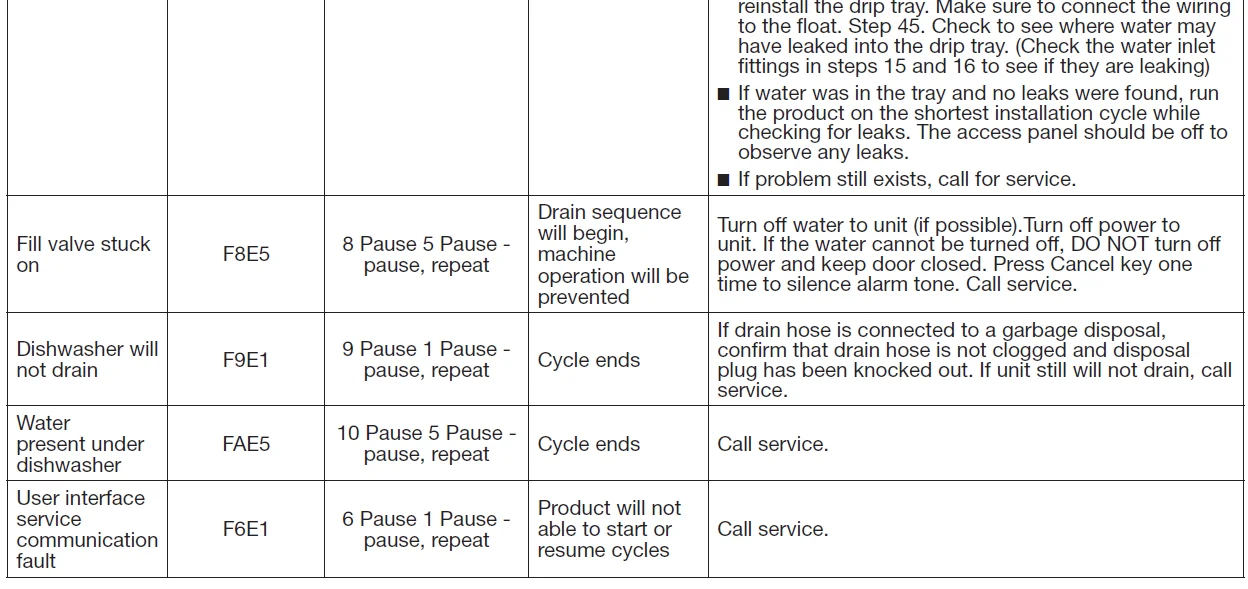
ERROR CODES
ERROR CODES/BLINKING LIGHTS
INSTALLATION REQUIREMENTS
TOOLS AND PARTS
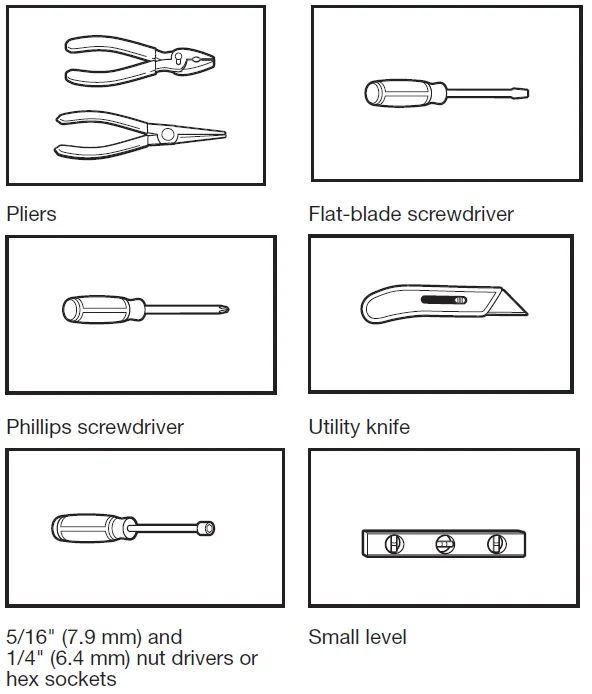
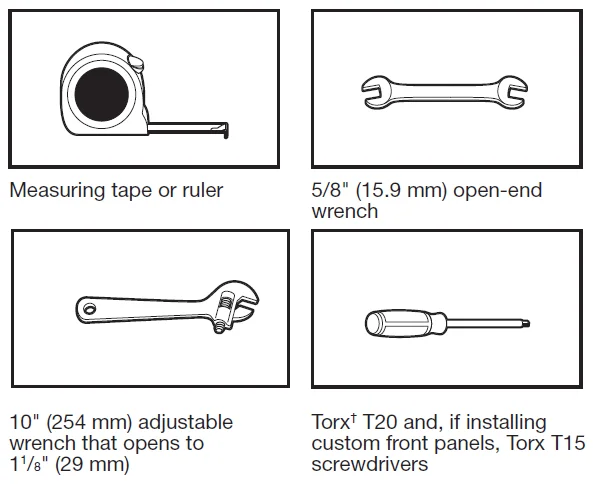
Gather the recommended tools and parts before starting installation. Read and follow the instructions provided with the tools listed here.
All Installations
Tools Needed:
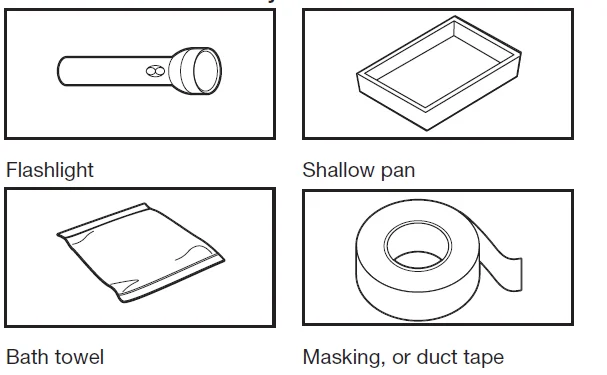
Other Useful Items You May Need:
Parts Supplied:
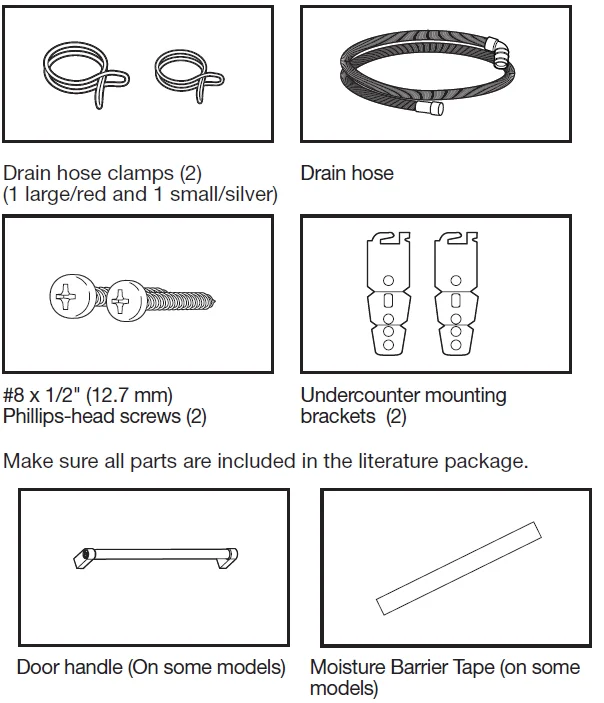
NOTE: Moisture Barrier tape is recommended if installing a dishwasher under a wooden countertop.
LOCATION REQUIREMENTS
Dishwasher must be fully enclosed (top, sides, back, and floor) upon installation. A side panel kit is available from your dealer for installing your dishwasher at the end of your cabinetry. An optional moisture barrier accessory is also available for installing underneath a wooden countertop. Check the location where the dishwasher will be installed. The location must provide:
- Convenient access for loading and unloading dishes. Corner locations require a 2″ (5.1 cm) minimum clearance between the side of the dishwasher door and the wall or cabinet.
- Easy access to water, electricity, and drainage:
- Grounded electrical supply is required.
- This dishwasher has a water heating feature and also requires a connection to a hot water supply line.
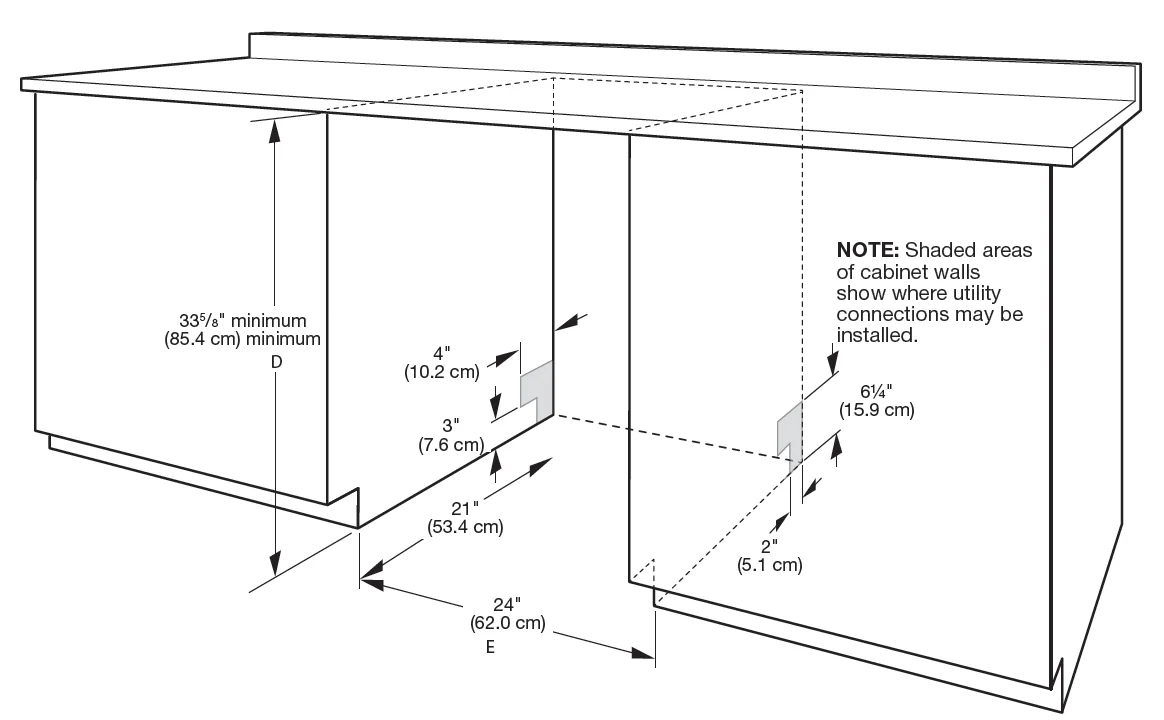
- Make sure pipes, wires, and drain hose are within the shaded area shown in the “Product and Cabinet Opening Dimensions” section.
- Do not run drain lines, water lines, or electrical wiring where they can interfere with or contact the dishwasher motor or legs.
- Shelter dishwasher and water lines leading to dishwasher against freezing. Damage from freezing is not covered by the warranty.
NOTE: If the dishwasher will be left unused for a period of time or in a location where it may be subject to freezing, have it winterized by authorized service personnel. - If installed in new construction, flush the water supply line of debris before connecting it to the fill valve. If it is not flushed, debris from the water supply could plug the fill valve screen.
- A square opening for proper operation and appearance.
- The cabinet front is perpendicular to the floor.
- Level floor.
Helpful Tip: If the floor at the front of the opening is not level with the floor at the rear of the opening, shims may be used to level the dishwasher.
NOTE: To avoid shifting during dishwasher operation, shims must be securely attached to the floor. - The location where the dishwasher will be installed must provide clearance between the motor and the flooring. The motor should not touch the floor.
- Do not install a dishwasher over carpeted flooring.
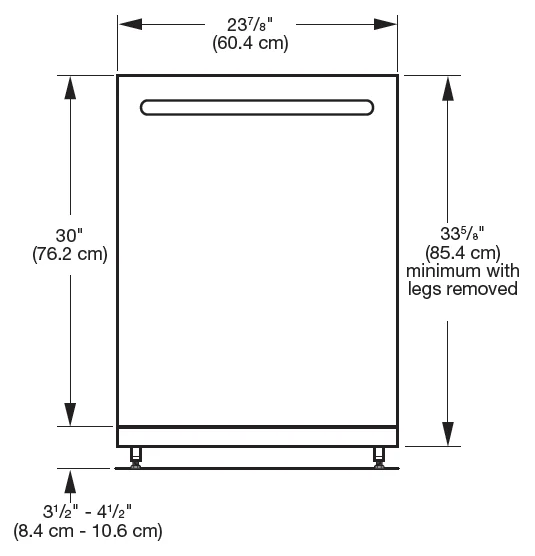
PRODUCT AND CABINET OPENING DIMENSIONS:
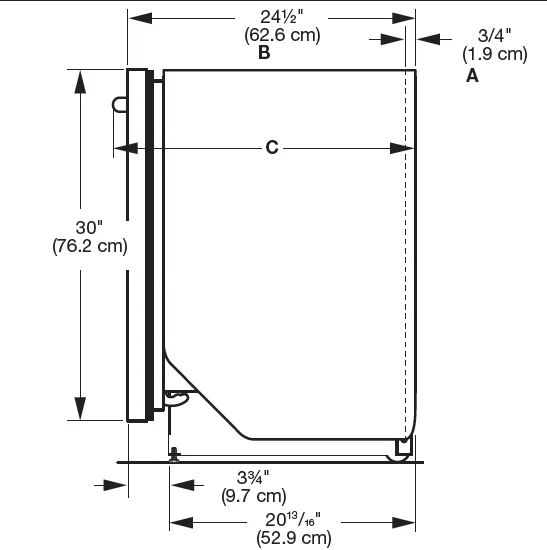
- A. Insulation may be compressed (not used on all models).
- B. For panel-ready models, dishwasher depth is 24″ (61.0 cm), not including the 3/4″ (1.9 cm) custom door panel.
- C. Door handles may protrude forward of the face of the dishwasher, varying by model.
Check that all surfaces have no protrusions that would prohibit dishwasher installation.
- D. Measured from the lowest point on the underside of the countertop. May be reduced to 335/8″ minimum (85.4 cm) by removing the feet and the perforated area of insulation (blanket) on the dishwasher.
- E. Minimum, measured from the narrowest point of opening.
DRAIN REQUIREMENTS
- A new drain hose is supplied with your dishwasher. If the drain hose is not long enough, use a new drain hose with a maximum length of 12 ft (3.7 m) that meets all current AHAM/IAPMO test standards, is resistant to heat and detergent, and fits the 1″ (2.5 cm) drain connector of the dishwasher.
NOTE: Do not connect multiple drain hoses. - Make sure to connect the drain hose to the waste tee or disposer inlet above the drain trap in the house plumbing and 20″ (50.8 cm) minimum above the floor. It is recommended that the drain hose either be looped up and securely fastened to the underside of the counter or be connected to an air gap.
- Make sure to use an air gap if the drain hose is connected to house plumbing lower than 20″ (50.8 cm) above the subfloor or floor.
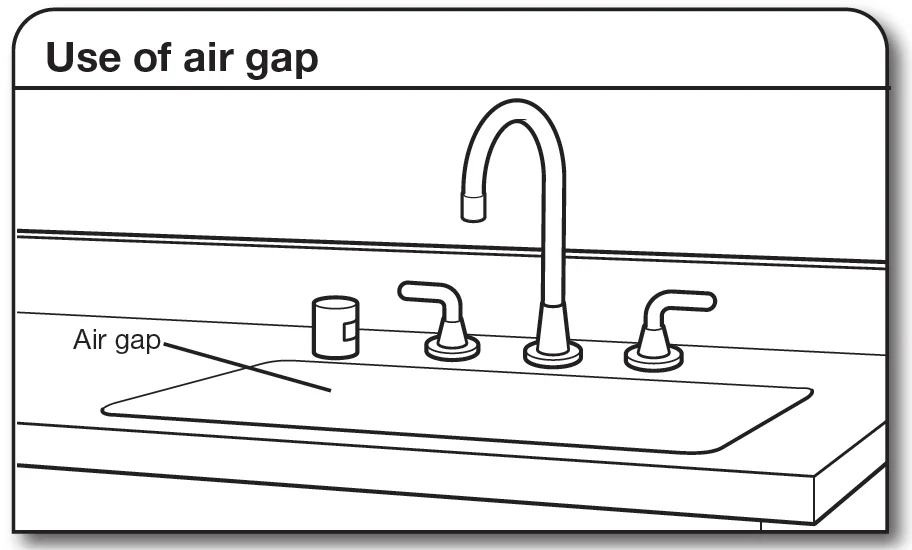
- If required, the air gap should be installed in accordance with the air gap installation instructions. When you are connecting the air gap, a rubber hose (not provided) will be needed to connect to the waste tee or disposer inlet.
- Use 1/2″ (1.3 cm) minimum I.D. drain line fittings.
WATER SUPPLY REQUIREMENTS
- This dishwasher has a water heating feature and also requires a connection to a hot water supply line.
- A hot water line with 20 psi to 120 psi (138 kPa to 862 kPa) water pressure can be verified by a licensed plumber.
- 120°F (49°C) water at dishwasher.
- 3/8″ (0.95 cm) O.D. copper tubing with compression fitting or flexible braided water supply line.
NOTE: 1/2″ (1.3 cm) minimum plastic tubing is not recommended. - A 90° elbow with 3/4″ (0.95 cm) hose connection with a rubber washer.
- Do not solder within 6″ (15.2 cm) of the water inlet valve.
- If installed in new construction, make sure the house water supply lines have been flushed prior to connecting the dishwasher to remove any debris that may exist in the supply
line.
NOTE: If replacing an existing dishwasher, it is recommended to install a new water line and drain hose (supplied) with the new dishwasher.
ELECTRICAL REQUIREMENTS
Be sure that the electrical connection and wire size are adequate and in conformance with the National Electrical Code, ANSI/NFPA 70 – latest edition, and all local codes and ordinances. A copy of the above code standards can be obtained from: National Fire Protection Association 1 Batterymarch Park Quincy, MA 02169-7471
You Must Have:
- 120 V, 60 Hz, AC only, 15 A or 20 A, fused electrical supply
- Copper wire only
- A maximum of 2 field wiring supply conductors (12 AWG largest size) plus 1 grounding conductor are permitted in the terminal box.
We Recommend:
- A time-delay fuse or circuit breaker.
Circuit Requirements:
- The dishwasher may be installed on the same circuit as a garbage disposal, provided that the branch circuit cannot exceed the rated circuit load and must comply with all governing codes and regulations, such as but not limited to the National Electrical Code, ANSI/NFPA 70 – latest edition.
- No electrical connections other than the dishwasher power and ground connections can be made inside of the dishwasher terminal box.
If connecting the dishwasher to a power supply cord:
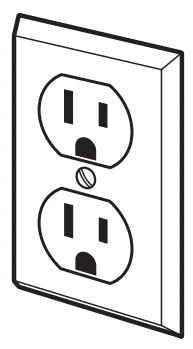
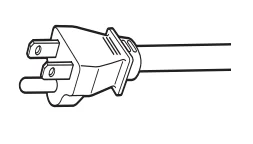
- Use a UL-listed power cord kit marked for use with a dishwasher.
- Plug into a grounded 3-prong outlet. The outlet must meet all local codes and ordinances.
If connecting the dishwasher with direct wiring:
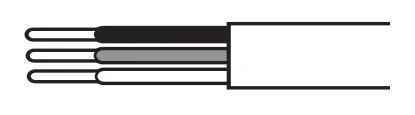
- Use flexible, armored, or nonmetallic sheathed copper wire with a grounding wire that meets the wiring requirements for your home and local codes and ordinances.
- Use a UL Listed/CSA Approved metallic strain relief.
For more manuals by KitchenAid, visit ManualsLibraryy
KitchenAid Max Jets Third Rack Dishwasher-FAQs
What is the most common issue with KitchenAid dishwashers?
A common issue with KitchenAid dishwashers is poor cleaning or draining performance. This can happen because of clogged spray arms, blocked filters, or drain line problems. Regular cleaning and proper loading help maintain strong washing results and prevent buildup inside the machine.
How much does a KitchenAid Max Jets Third Rack Dishwasher cost?
Pricing varies depending on the model, finish, and features included. Most KitchenAid Max Jets Third Rack Dishwashers are typically found in the mid-to-premium price range compared to standard residential dishwashers.
Are KitchenAid dishwashers considered premium appliances?
KitchenAid is generally viewed as a premium or affordable luxury appliance brand. The company is known for durable construction, stylish designs, and advanced cleaning technologies that offer a high-end kitchen experience.
Does the dishwasher dry plastic containers well?
The Advanced ProDry™ system improves drying performance for dishes and plastics. While lightweight plastics may still hold small water droplets occasionally, the system delivers better drying results compared to many standard dishwashers.
Is the KitchenAid Max Jets dishwasher good for large families?
Yes, it is designed for larger households and frequent cooking needs. The spacious interior, multiple wash jets, and adjustable racks make it easier to clean large amounts of dishes, pots, pans, and bakeware in one cycle.
Does the third rack really add more space?
Yes, the third rack increases loading flexibility and frees up room in the lower racks. It can hold silverware, cooking utensils, small bowls, cups, and other hard-to-place items, making it easier to wash large loads efficiently.
How long does a KitchenAid dishwasher usually last?
With regular maintenance and proper use, a KitchenAid dishwasher can last around 9 to 12 years or longer. Cleaning the filter, avoiding overloading, and using the correct detergent can help extend the appliance’s lifespan.
How quiet is the KitchenAid Max Jets Third Rack Dishwasher?
This dishwasher operates at around 44 dBA, making it very quiet during operation. It is suitable for open kitchens and allows conversations, watching TV, or working nearby without much noise disturbance.