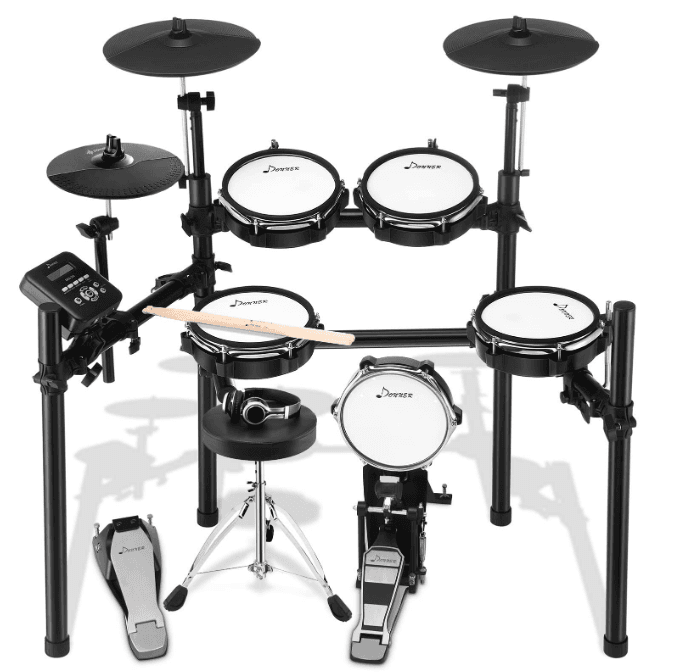
Donner DED-200 Electronic Drum
FUNCTION INTRODUCTION
- Six layers of force are adopted to make it closer to the original drum playing.
- Supports double triggers with edge-hit response.
- Fifteen sets of drum groups and one set of custom drum groups.
- Number of timbres 225 and GM standard timbre library. (song use)
- Thirty songs, adjustable GM volume, and drum volume. (for learning)
- Effect: reverberation type 0-5, two-band EQ equalization.
- Supporting the adjustment of sensitivity parameters of drum discs.
- Speed control: 30-250 beats/minute.
- Metronome: 9 kinds.
- Other functions: customize settings, store, and restore factory settings.
- Interpoles: USB MIDI, headphones, audio input, audio output, and adding a cymbal socket.
INSTALLATION GUIDE
- Please follow the instructions and read the “safety precautions” in the User Manual carefully before using it.
- When you have completed the connection, please turn on the power according to the instructions in the User’s Manual and check whether you can hear the sound.
- This product needs an adult to install; do not let the minor install it independently.
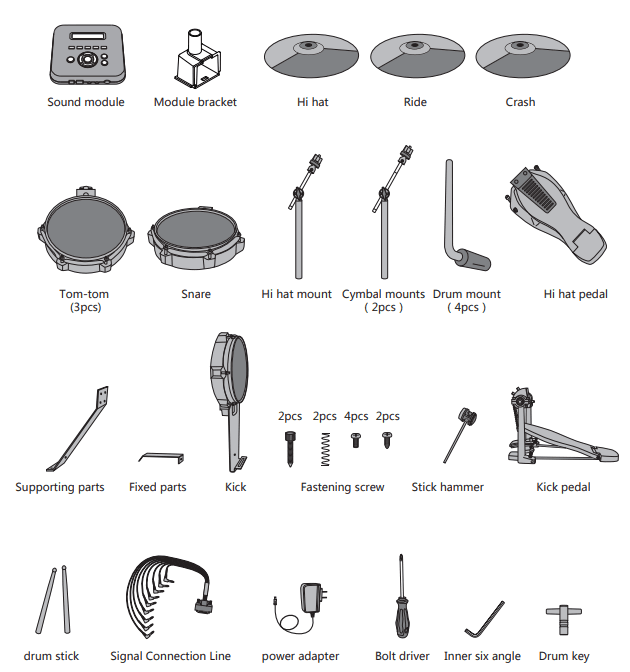
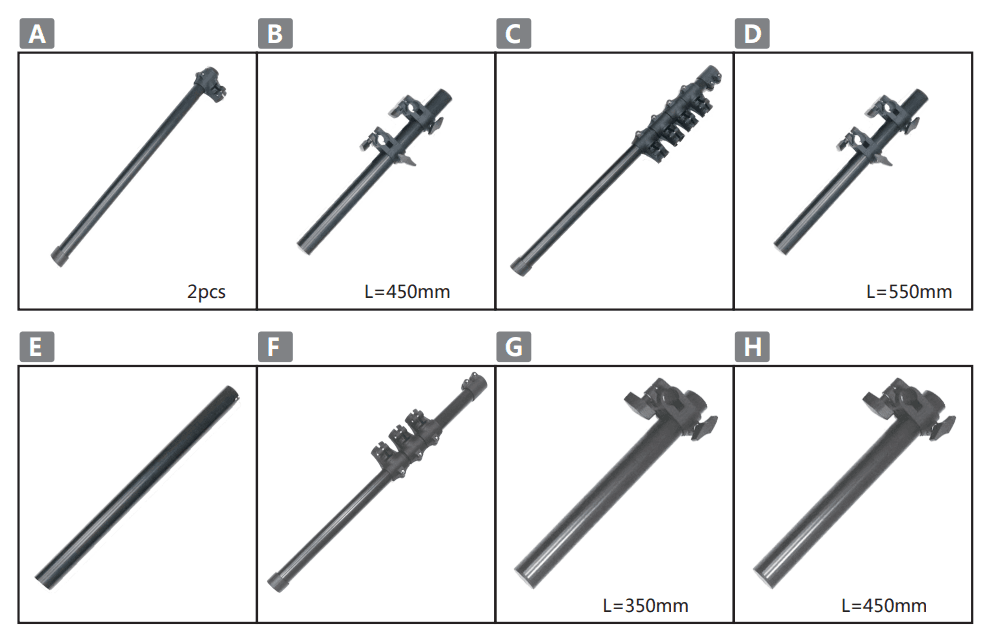
- Check the attached items
- After opening the package, please check whether it contains all the items immediately. If there are any omissions, please contact your dealer.

- After opening the package, please check whether it contains all the items immediately. If there are any omissions, please contact your dealer.
- Kick drum installation
- During installation, tighten the screws and be careful not to pinch your finger!

- During installation, tighten the screws and be careful not to pinch your finger!
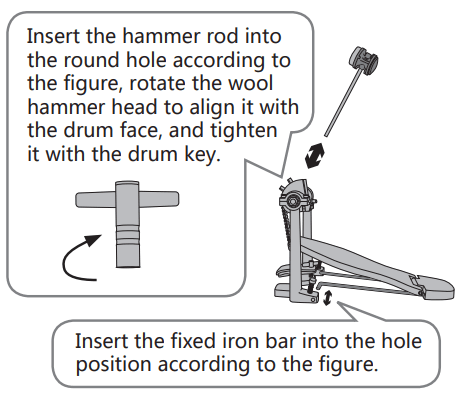
- Install a hammer stick
- Tighten the screw to avoid loosening.

- Tighten the screw to avoid loosening.
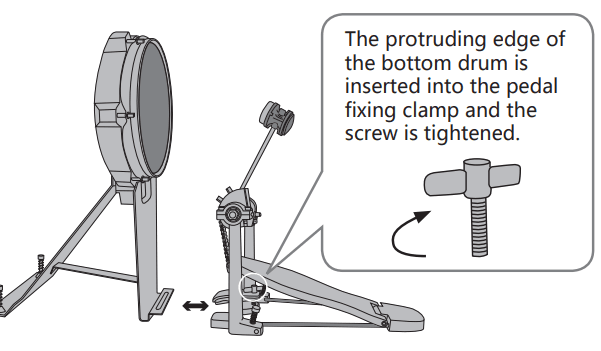
- Kick drum and pedal fixation
- The bottom drum and pedal should be fixed and tightened to avoid falling off.

- The bottom drum and pedal should be fixed and tightened to avoid falling off.
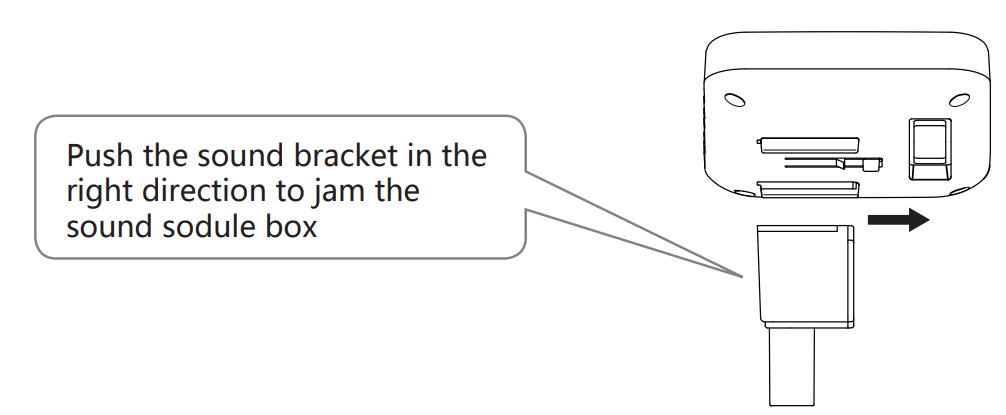
- Installation module bracket

- Drum stand
- After opening the package, please check whether it contains all the items immediately. If there are any omissions, please contact your dealer.

- After opening the package, please check whether it contains all the items immediately. If there are any omissions, please contact your dealer.
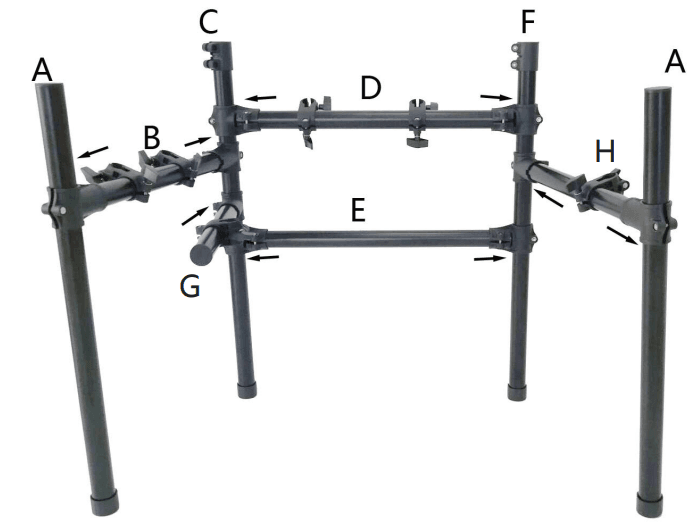
- Drum stand installation
- During installation, tighten the screws and be careful not to pinch your finger!
- Assemble the drum stand according to the directions indicated.

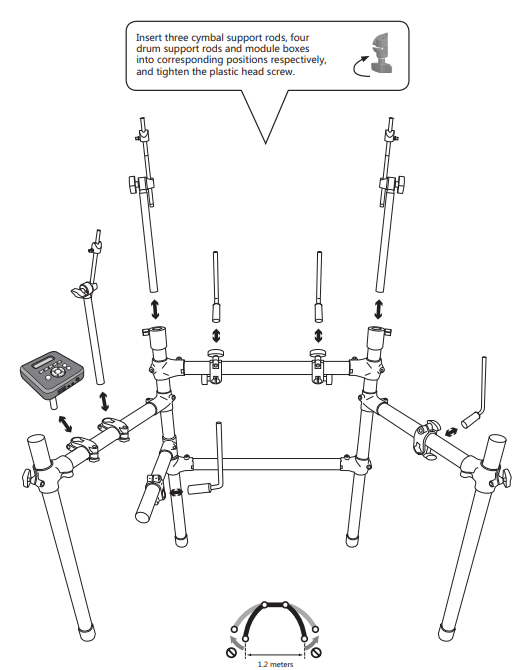
- Installation of the support rod and module box
- Support rods and module boxes need to be inserted in place, and tighten the plastic head screw to avoid falling.

- Support rods and module boxes need to be inserted in place, and tighten the plastic head screw to avoid falling.
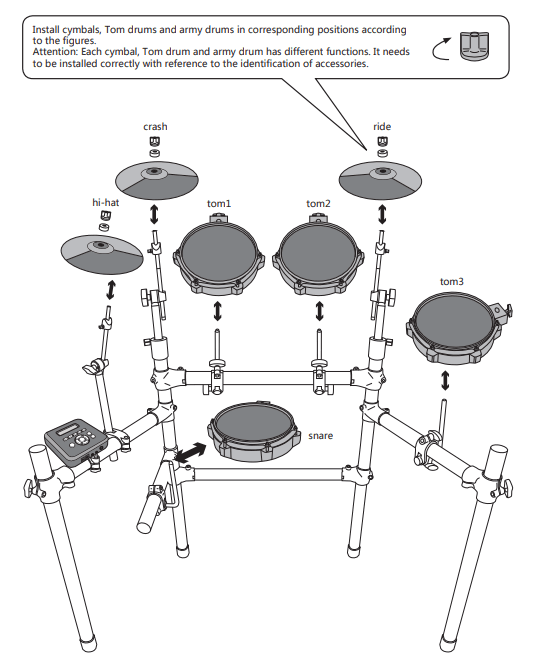
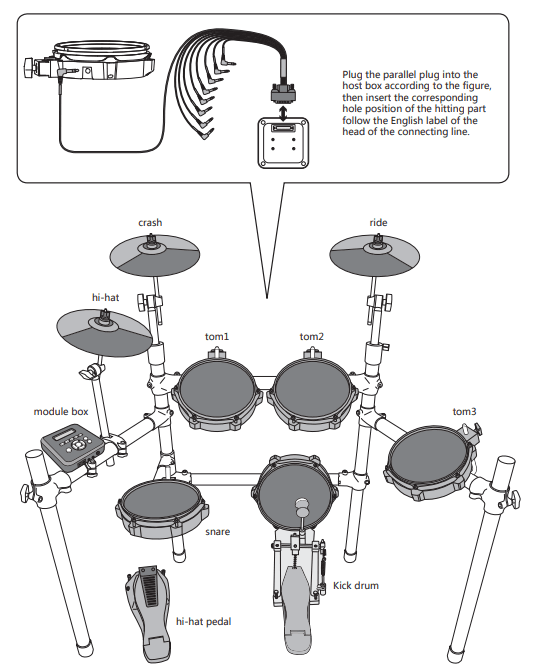
- Installation of strike components
- After inserting the drum disc, tighten the screw to avoid loosening.
- Do not screw the cymbals tightly, leave some space for them to sway up and down.

- Insert Connection Line
- Please insert the connecting wire in place to avoid bad contact and insert it correctly, following the diagram.

- Please insert the connecting wire in place to avoid bad contact and insert it correctly, following the diagram.
DIAGRAM OF MODULE BOX SOCKET
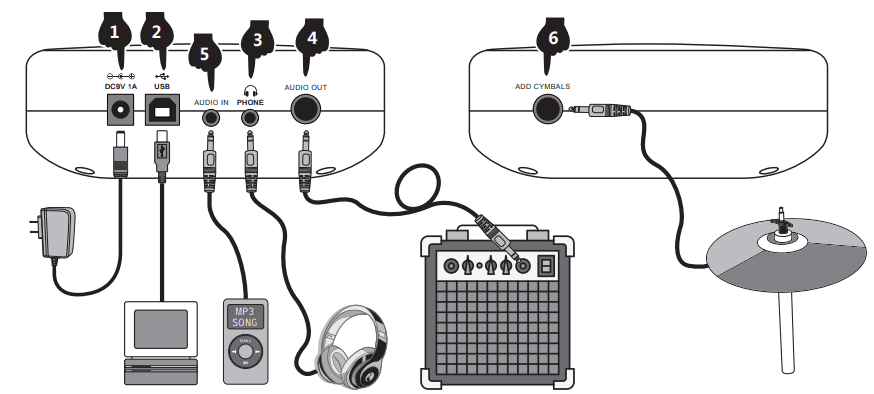
- POWER TERMINAL CONNECTION
- When in use, connect the power terminal according to the diagram, insert the power outlet of the module box at one end and a 100- 240V household power outlet at the other end. (Fig. 1)
- If you do not use this product for a long time, please unplug out the power plug and keep it properly.
- USB MIDI PORT
The use of an electronic drum MIDI USB interface can interact with music devices with MIDI.- Through the pre-installed Music software on computers and mobile phones, we can learn to play, compose music, store, and perform other functions. (Fig. 2)
- When connected to a computer or mobile phone, the audio output of the device needs to be connected to the audio input socket of the module box in order to synchronize the sound effects on the device. (Fig. 5)
- EARPHONE PORT
Connecting headphones monitors the details of percussion and does not disturb others when playing without connecting speakers. (Fig. 3) - AUDIO OUTPUT PORT
The audio output port can be connected to an active speaker (special electronic drum speaker) and large audio equipment. (Fig. 4) - AUDIO INPUT PORT
Audio input port can connect the sound source playback device to the module box for playback (such as MP3. mobile phone, and other audio signal input). (Fig. 5) - ADDING CYMBAL SOCKET
This socket can add a cymbal to facilitate expansion. (Fig. 6)
REMARK!
- To prevent damage to the equipment, make sure to turn down the volume and shut down all the equipment before making any connection.
- Additional cymbals, speakers, headphones and peripherals are all purchased separately. They are not in standard configuration.
OPERATION GUIDE
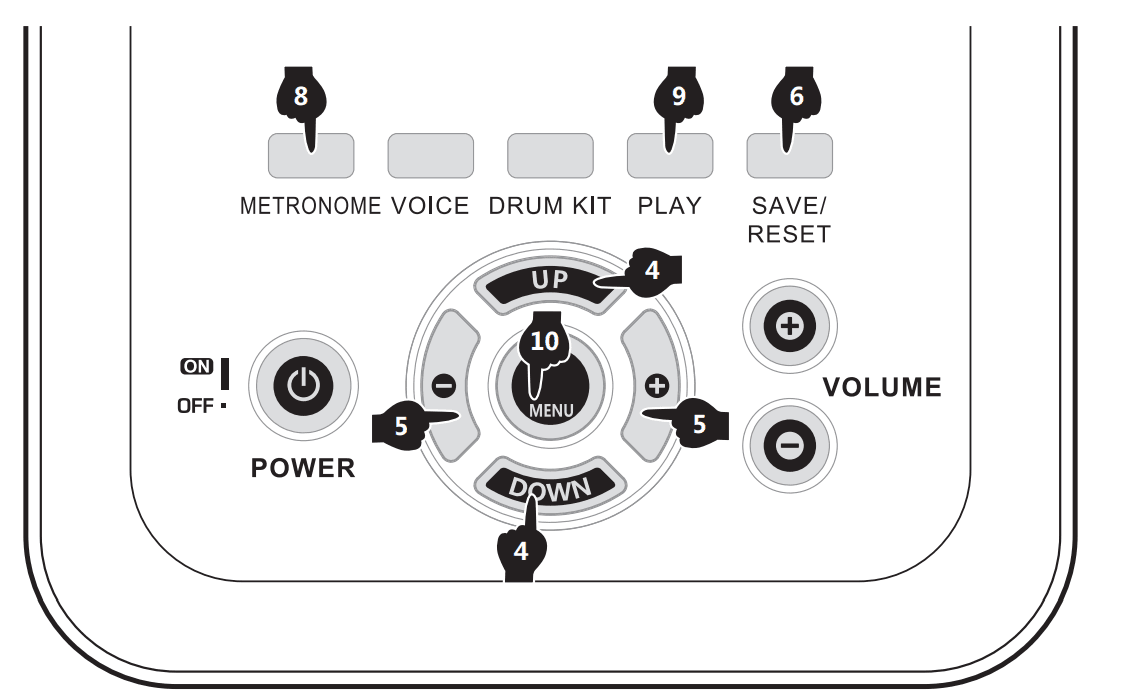
- POWER ON
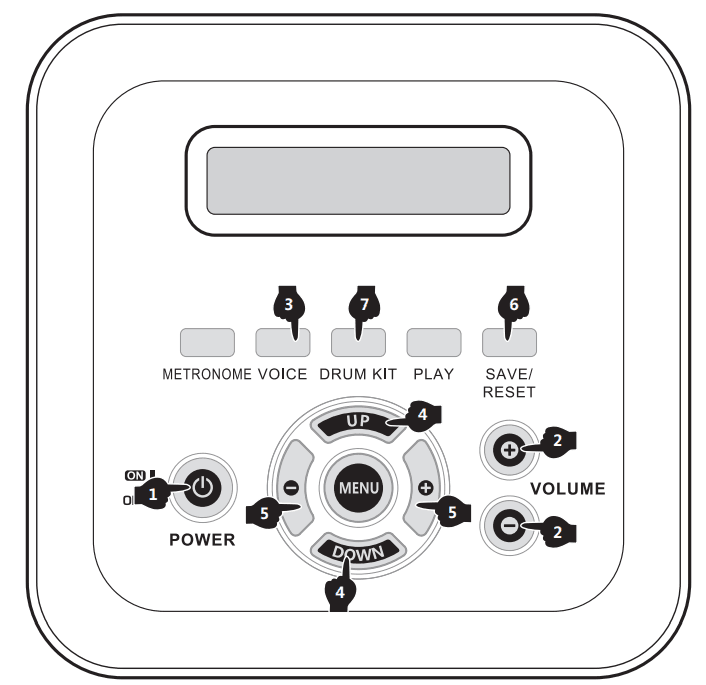
- Turn on the “POWER” switch, and you can enter the playing state. (Fig. 1)
- Please turn off the power when not in use.
- Processor chips of this product are complex, similar to computer systems. Sometimes they can not respond. Please turn off the power switch and then turn it on to work properly.
- MASTER VOLUME
Use the “VOLUME +-” button to increase or decrease the total volume. Please adjust the volume to a satisfactory position. (Fig. 2) - TIMBRE SELECTION OF DRUM GROUP
- Press the “VOICE” button, display the screen (Voice), and enter the drum group adjustment mode. (Fig. 3)
- Using the “UP/DOWN” button, you can choose the following options as an adjustment. (Fig. 4)
Display screen display:- KitNum 001-015): Drum combination timbre selection, a total of 15 sets of preset drum groups.
- KitVol 000-127): The volume of the drum combination can be adjusted at 128 levels.
- Kick 001-015): Kick drum timbre selection, a total of 15 timbres can be adjusted.
- Snare 001-015): Snare drum timbre selection, a total of 15 timbres can be adjusted.
- SnareRim 001-015): Snare drum edge-click timbre selection, a total of 15 timbres can be adjusted.
- Tom1 001-015): Tom-tom drum 1 timbre selection, a total of 15 timbres can be adjusted.
- Tom2 001-015): Tom-tom drum 2 timbre selection, a total of 15 timbres can be adjusted.
- Tom3 001-015): Tom-tom drum 3 timbre selection, a total of 15 timbres can be adjusted.
- Cras 001-015): Crash cymbal timbre selection, a total of 15 timbres can be adjusted.
- CrasRim 001-015): Crash cymbal edge-click timbre selection, a total of 15 timbres can be adjusted.
- Cras2 001-015): Crash cymbal 2 timbre selection, a total of 15 timbres can be adjusted.
- Cras2Rim 001-015): Crash cymbal 2 edge-click timbre selection, a total of 15 timbres can be adjusted.
- Ride 001-015): Ride cymbal timbre selection, a total of 15 timbres can be adjusted.
- RideRim 001-015): Ride cymbal edge-click timbre selection, a total of 15 timbres can be adjusted.
- OpenHat 001-015): Open hi-hat cymbal timbre selection, a total of 15 timbres can be adjusted.
- CloseHat 001-015): Close the high-hat cymbal timbre selection, a total of 15 timbres can be adjusted.
- Pedal 001-015): Hi-hat pedal timbre selection, a total of 15 timbres can be adjusted.
- Use the “+/-” button to adjust the parameters of the above options. (Fig. 5)
- Press the “SAVE/RESET” button to save the adjusted drum group for later invocation. (Fig. 6)
- Press the “DRUM KIT” button to call the previously customized, adjusted drum group. (Fig. 7)
- PLAY THE DRUM
This product has double trigger induction, making the hitting sound effect closer to the original drum sound effect.- “Snare drum” can tap the drum face and the drum edge.
- “Crash cymbal” and “Ride cymbal” can tap the cymbal face and edge, and hold the cymbal edge with a finger to stop the sound.
- Different combinations of “Hi-hat cymbal” and “Hi-hat pedal” will change the timbre.
- Open hi-hat cymbal timbre: Click on the surface of the cymbals.
- Close hi-hat cymbal timbre: Step on the pedal and keep it closed while tapping the cymbal surface.
- Hi-hat pedal timbre: Step on the pedal and don’t hit the cymbal surface.


- METRONOME
- Press the “METRONOME” button and display (Metro) on the screen. (FIG. 8)
- Using the “UP/DOWN” button, you can choose the following options as an adjustment. (Fig. 4)
Display screen display:- Time 002-016): Metrometer Speed – A total of 4 levels of standard speed can be adjusted.
- Beat 001-009): Metrometer type – 9 types can be adjusted.
- MetroVol 000-127): Metrometer volume – 128 levels adjustable.
- Use the “+/-” button to adjust the parameters of the above options. (Fig. 5)
- Press the “PLAY” button to start playing the metronome and press again to stop. (Fig. 9)
- DEMONSTRATION MUSIC PLAYING
- Press the “MENU” button several times until the display screen (Song) enters the sub-option music mode. (FIG. 10)
- Using the “UP/DOWN” button, you can choose the following options as an adjustment. (Fig. 4)
Display screen display:- Num 001-030): Music Selection – A total of 30 built-in pieces.
- GmVol 000-127): Chord accompaniment volume – 128 levels adjustable.
- DrmVol 000-127: Volume of drum group – 128 levels adjustable.
- Use the “+/-” button to adjust the parameters of the above options. (Fig. 5)
- Press the “PLAY” button to start playing the music and press it again to stop. (Fig. 9)
- PLAY SPEED
In the mode of demonstration music or metronome playing, adjusting speed can control the speed of demonstration music and metronome playing.- Press the “MENU” button several times until the display screen (Tempo) enters the sub-option playback speed mode. (FIG. 10)
Display screen display:- Speed 030-250): Play speed selection – 221 level speed adjustable.
- Use the “+/-” button to adjust the parameters. The adjustment range (Speed 030-250) is 221 levels. (Fig. 5)
- Press the “MENU” button several times until the display screen (Tempo) enters the sub-option playback speed mode. (FIG. 10)
- DRUM DISC SENSITIVITY ADJUSTMENT
- Press the “MENU” button several times until the display screen displays (Sensity) and enter the sensitivity adjustment mode of the sub-option components. (FIG. 10)
- Hit the drum tray you want to adjust with a drumstick.
- Using the “UP/DOWN” button, you can choose the following options as adjustments. (Fig. 4)
Display screen display:- PadSen 001-006): Strike surface sensitivity – 6 levels adjustable.
- RimSen 001-006): Strike Side Ring Sensitivity – 6 levels adjustable.
- HHC Level 001-003): Hi-hat cymbal sensitivity-three levels adjustable.
- HHCSen 001-003): Hi-hat cymbal closure speed-three levels adjustable.
- Threshold 001-032): Trigger threshold – 32 levels adjustable.
- XTalk 001-032): Crosstalk threshold – 32 levels adjustable.
- Retriger 001-032): Repeated trigger – 32 levels adjustable.
- Velocity 001-003): Force Curve – 3 levels adjustable.
- Volume 000-127): Drum disc volume – 128 levels adjustable.
- With the “+/-” button, the parameters of the above options can be adjusted according to the custom. (Fig. 5)
- Press the “SAVE/RESET” button to save the adjusted parameters for future use. (Fig. 6)
- REVERBERATION/EQUILIBRIUM OPTIMIZATION
- Press the “MENU” button several times until the display screen displays (Utility) and enter the sub-option reverberation/balancing optimization mode. (FIG. 10)
- Using the “UP/DOWN” button, you can choose the following options as an adjustment. (Fig. 4)
Display screen display:- RevType 000-005): Reverberation Category – altogether 6 levels adjustable.
- Revlevel 000-127): Reverberation size – 128 levels can be adjusted. When the value is “000”, the reverberation is closed.
- EQ_H 000-127): High Frequency Equilibrium – 128 levels adjustable.
- EQ_L 000-127): Low Frequency Equilibrium – 128 levels adjustable.
- Use the “+/-” button to adjust the parameters of the above options. (Fig. 5)
- Press the “SAVE/RESET” button to save the adjusted parameters for future use. (Fig. 6)
- FACTORY RESET
Press the “SAVE/RESET” button for more than 3 seconds to restore the factory settings. (Fig. 6)
PRODUCT MAINTENANCE
Careful maintenance and protection of the product, to extend the service life of the product, and reduce the faults, play a very important role.
- AVOID HEATING, DAMPNESS, OR DIRECT SUNLIGHT
Do not overexpose the product to direct sunlight or place it near air conditioning or an extremely hot place. - DO NOT USE NEAR THE TV OR RADIO
This product may cause video or audio interference to the reception of TV and radio. If this happens, the product should be removed from the TV or radio. - NO DILUENTS OR SIMILAR CHEMICALS SHOULD BE USED FOR CLEANING
Clean the product with a soft cloth wetted with a weak water solution and neutral detergent. Soak the cloth in a solution and wring it dry until it is almost dry. - DO NOT SHAKE, AVOID COLLISION
When moving, the product should be handled carefully and lightly. Violent vibration and collision are strictly prohibited in order to avoid damage to the shell or internal electronic components.
SAFETY PRECAUTIONS
POWER SUPPLY

This product can be powered by standard indoor wall sockets. Please only use the power cord specified in this product. When not in use, please turn off the power supply. When not in use for a long time, pull out the power cord and keep it properly.
SAFETY PRECAUTIONS
Smoke, odor, overheating
When the product smokes, smells or overheats, there is a danger of fire and electric shock when it is used continually. In case of the above situation, the following Operations should be performed immediately:
- Turn off the power supply.
- Pull the plug out of the power outlet.
- Contact your dealer.
Power cord
- The improper use of a power cord may cause fire and electric shock. The following precautions must be observed:
- The special power cord designated for this product must be used.
- The AC power supply with output voltage within the rated voltage range for household use must be used.
- Do not overload power sockets and extension lines.
- The improper treatment of power lines will lead to their damage or breakage, which will cause fire and electric shock hazards. The following precautions must be observed:
- Do not place or heat heavy objects on power lines.
- Do not attempt to alter or bend the power cord too much.
- Do not twist or pull the power cord.
- If the power cord or plug is damaged, please replace the same type of power cord.
- Do not touch the power cord and plug with wet hands, otherwise there is a danger of electric shock.
- Please use the power cord where the water will not splash. Water is in danger of causing fire and electric shock.
- Never place vases or any other container containing water on this product. Water is dangerous of causing fire and electric shock.
- Do not allow minors to unplug and touch power lines or connection boards. Minors have no common sense of electricity safety, which may cause an electric shock.
BE CAREFUL
The improper use of a power cord may cause fire and electric shock. The following precautions must be observed:
- Never put the power cord near the oven or other heat source.
- Do not pull the cable when pulling out of the power socket. The main body of the plug must be grasped.
- The power cord plug must be inserted in the socket to the end.
- Make sure the power supply is off before connecting or disconnecting it.
- When thunderstorms occur or before traveling or other long-term departures, disconnect the power cord from the wall outlet.
- At least once a year, remove the power cord from the wall outlet and clean the dust accumulated around the plug.
Do not burn this product
Do not put this product in the fire, otherwise it will lead to product combustion and explosion of internal electronic components, which will cause fire and personnel injury.
Water and foreign bodies
Water, other liquids, and (metal sheets, etc.) entering this product are in danger of causing fire and electric shock. In case of the above situation, the following operations shall be performed immediately:
- Turn off the power supply.
- If you are using a power cord for a power supply, unplug it from the wall outlet.
- Contact your distributor.
Disassembly and transformation
Do not disassemble or transform the product in any way, otherwise there is a risk of electric shock, scald or other personal injury. All internal inspection, adjustment, and maintenance operations should be entrusted to your distributor.
Falling or colliding
If the product falls or is damaged by a strong impact, it will be in danger of causing fire and electric shock. In case of the above
situation, the following operations shall be performed immediately:
- Turn off the power supply.
- If you are using a power cord for a power supply, you need to unplug it from the wall outlet.
- Contact your distributor.
Plastic bag
Do not let anyone put plastic bags for this product on their head or in their mouth. Otherwise, there is a risk of asphyxia. Families with young children should pay special attention to it.
Keep a distance from the product and the bracket
Climbing the ladder is dangerous of overturning or damage. Families with young children should pay special attention to it.
Put
Avoid placing the product on an uneven surface or any other unstable place. Otherwise, it will cause the product to fall, which will lead to the risk of injury.
Product Mobility
Before moving this product, you must unplug the power cord plug from the wall outlet and pull out all other cables and connecting wires. Otherwise, it will lead to damage of power or connection wires, resulting in fire and electric shock.
clean
Before cleaning this product, you must unplug the power cord plug from the wall outlet, otherwise, there is a risk of fire and
electric shock.
Jack
The socket of this product can only be connected to the designated equipment and devices. Connecting non-designated equipment or devices is dangerous of cause fire and electric shock.
Location selection
It should be avoided to place the product in the following places, otherwise there is a risk of fire and electric shock.
- High temperature or dusty places.
- Kitchen or other places with lampblack.
- Where the product is exposed to direct sunlight, or any other place where the product will produce high temperatures.
Volume
Don’t play music long and loud. Pay special attention when using headphones. Excessive volume can damage your hearing.
Heavy
Do not place heavy objects on this product. Otherwise, the top of the product will be overweight, causing the product to overturn or drop objects on it, which will lead to the risk of injury.
Correct assembly of scaffolds
The incorrect assembly of the bracket may overturn, causing the product to fall off and posing a risk of injury to personnel.
Therefore, it must be assembled according to the instructions in the attached installation guide to ensure that the product is properly mounted on its bracket.
For more manuals by Donner, visit ManualsLibraryy
Donner DED-200 Electronic Drum -FAQs
How do electronic drums work?
Each drum pad contains sensors that detect your hits and send an electronic signal to the drum module (also known as the “brain”), which then plays the corresponding sound.
Does the Donner DED-200 have Bluetooth?
While some Donner models like the DED-20(SE) have built-in Bluetooth speakers, check your specific model’s specs. The DED-200 may require a wired connection for audio or MIDI functions.
Can I connect the Donner DED-200 to a computer?
Yes. You can connect it via a USB cable or a MIDI interface. If using MIDI, connect from the MIDI OUT on the drum module to the MIDI IN on your interface.
Can I play electronic drums without headphones?
Not really. Without headphones or an amp, you’ll only hear soft tapping on the pads. To hear actual drum sounds, connect to headphones or an amplifier.
What audio interface works best with electronic drums?
The Focusrite Scarlett 18i20 (3rd Gen) is a popular and reliable choice for electronic drum recording, offering high-quality preamps and multiple inputs.
Is BFD Player free to use with my drums?
Yes! BFD Player is a free drum software that offers professional-quality kits, grooves, and mixing features—perfect for music producers and home recording.
What are the downsides of electronic drums?
Some downsides include a less natural feel compared to acoustic kits and inconsistencies in volume response (e.g., hitting hard but hearing soft). High-end kits minimize these issues.
Do I need microphones for electronic drums?
No mics needed! Electronic drums generate sound digitally. Just connect the drum module to an amp, mixer, or audio interface for live or recorded audio.


