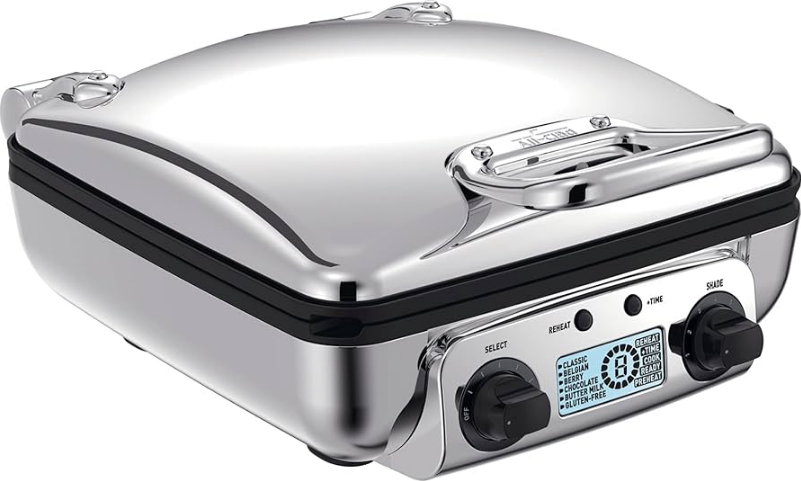
All-Clad WD824D51 4-Slice Waffle Maker
IMPORTANT SAFEGUARDS
- Read all instructions.
- Avoid touching hot surfaces. Use handles or knobs. Always use oven mittens.
- To protect against electrical shock, do not immerse the cord, plugs, or this appliance in water or any other liquid.
- Close supervision is necessary when any appliance is used by or near children.
- Unplug from the outlet when not in use and before cleaning. Allow the appliance to cool before adding or removing parts, and before cleaning it.
- Do not operate any appliance with a damaged cord or plug, or after the appliance malfunctions, or has been damaged in any other manner. Call 1-800-ALL-CLAD (255-2523) for repair or return information.
- The use of accessory attachments not recommended by the appliance manufacturer may cause injuries.
- Do not use outdoors.
- Do not let the cord hang over the edge of tables, counters, or touch hot surfaces.
- Do not place on or near a hot gas or electric burner, or in a heated oven.
- Extreme caution must be used when moving an appliance containing hot oil or other liquids.
- To disconnect, turn the control to the “OFF” position, then remove the plug from the wall outlet.
- Please do not use the appliance for anything other than its intended use.
DESCRIPTION
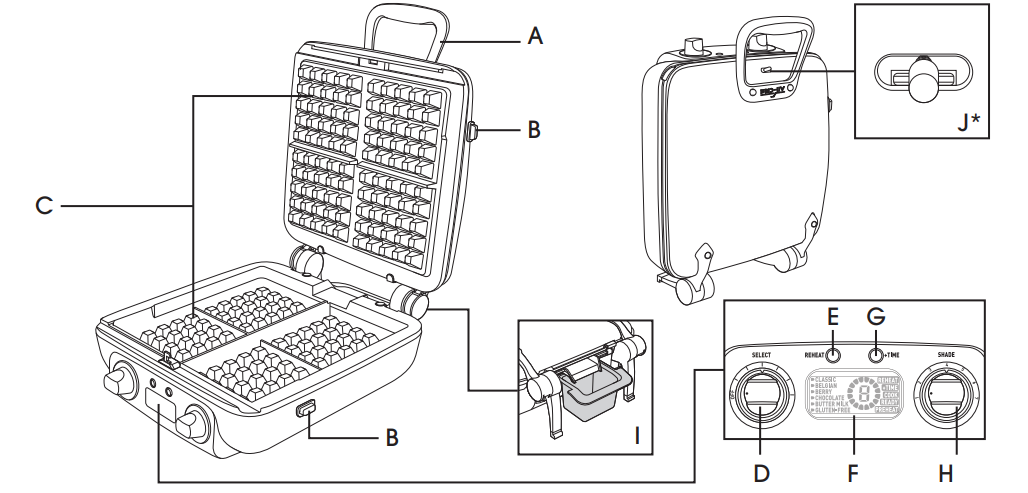
- A Cool-touch handle
- B. Release plate buttons
- C Removable waffle plates
- D 6-Custom Recipes Selector
- E Reheat button
- F LCD Display
- G +Time button
- H Shade Selector
- I Batter tray
- J Storage lock (This knob is for storage ONLY)

BEFORE USE
- Remove all packaging and stickers from your waffle maker and wipe the housing and plates with a damp cloth to remove any dust or residue remaining from manufacturing.
- We recommend seasoning the non-stick plates with cooking spray or oil before use. For best results, it is suggested to repeat this process at the start of each us..e
ASSEMBLY/DISASSEMBLY
- Open the lid of the waffle maker.
- To remove waffle plates
- Be sure plates are completely cool.
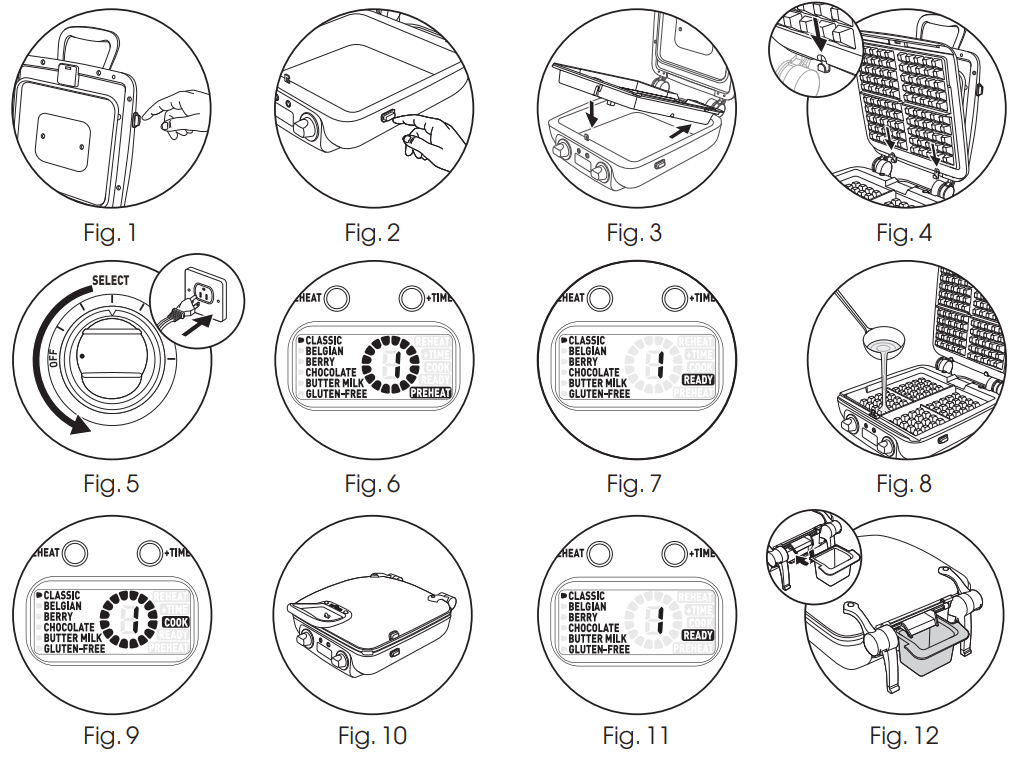
- b.Press the upper plate release button (located on the right side of the lid) with one hand, while removing the plate with the other hand. (Fig. 1,2)
- c.Repeat the process with the lower plates (release button located on the right bottom housing).
- To replace waffle plates, a. Insert the waffle plate tabs into the unit and press down. You will hear the plates click into place. (Fig. 3,4)
USING YOUR WAFFLE MAKER
- Make sure the plates are in place and the RECIPES SELECTOR is turned to the OFF position. Plug in the waffle maker (Fig. 3, 4, 5)

- While the LEFT KNOB is turned to the OFF setting, the unit will remain off and there will be no response while pressing the buttons & or turning the RIGHT KNOB.
- The LCD will not show while the unit is turned to the OFF position.
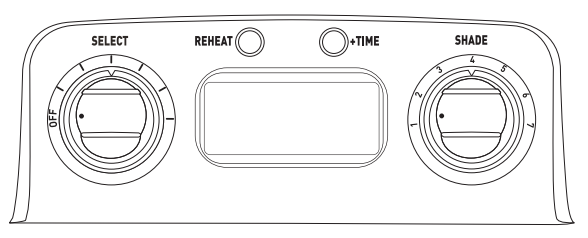
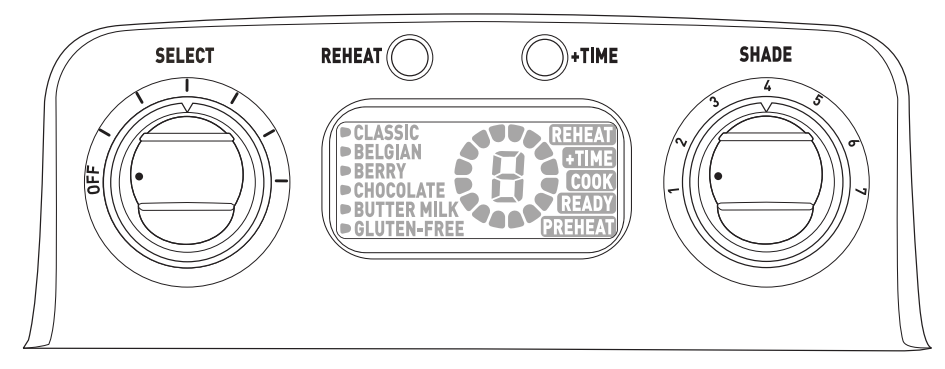
- Turn on the unit by RECIPES SELECTOR to the desired recipe with the desired SHADE level selected by turning SHADE SELECTOR (Setting 1 will result in the lightest waffle; setting 7 the darkest). Preheat the waffle
maker will start automatically once settings are confirmed (Fig. 6)
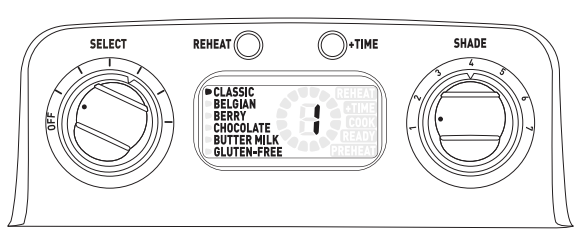
- Turn LEFT KNOB to select, CLASSIC; BELGIAN; BERRY; CHOCOLATE; BUTTER MILK; GLUTEN-FREE.
- An ARROW will turn ON next to the related recipe name to show it is selected currently.
- ARROW & DIGI will flash THREE times to confirm the selection if no more changes are needed. No preheating will start before confirmation, turn the LEFT KNOB again and it will move the ARROW and RECIPE name flash
again to confirm your selection. - Turn the RIGHT KNOB to change the SHADE LEVEL, the related shade level will be shown at the middle of the LCD, it will flash THREE times to confirm the selection. While no more changes are needed on RECIPE & SHADE LEVEL, preheating starts.
- During PREHEAT & COOK, turn either LEFT or RIGHT KNOB to adjust, the related indicator will flash THREE times to confirm.
- Baking time is determined by recipe and browning level. We recommend using Setting 3 for golden brown waffles. When preheating to the suitable temperature and is ready to bake, the READY indicator will light up, accompanied by a beep. (Fig. 7)
- a.Lift the lid and add batter. (Fig. 8) Then close the lid again to cook. (Fig. 9) Do not lock the safety catches on the sides of the waffle maker when cooking. (Fig. 10) NOTE: There will be some steam during cooking. This is normal.
- When your waffles are ready, the READY indicator will light up, accompanied by a beep again. (Fig. 11)
- a.Carefully remove your waffle and enjoy.
- b.If making more than one waffle, once your first waffle is removed, repeat the baking process by adding more batter (step 3a).
- At the back of the waffle maker, there is a batter tray. (Fig. 12) This tray catches any excess batter. We recommend emptying this tray when the waffle maker is cold. Use oven mittens if the tray must be emptied while the appliance is hot and in use
- To turn off your waffle maker at any time, turn the selector knob to the OFF position.
- Close the lid. The waffle maker will adjust the cooking time based on your selected recipe and shade level. The “COOK” will be displayed on the LCD, and the PROGRESS INDICATOR will automatically start counting down. (Fig.13) NOTE: The lock should only be used when the waffle maker is being stored away. DO NOT use the locking mechanism during the cooking process. NOTE: Do not use metal utensils as they can scratch the non-stick surface.
- To turn off your waffle maker at any time, turn the selector knob to the OFF position. + TIME If your waffle color is too light, one press of this button adds a little extra cooking time. The “+TIME” will be displayed on the LCD, keep flashing during cooking. (Fig.13)
REHEAT: If you would like to reheat your waffle, press the reheat button to begin the process. The “REHEAT” will be displayed on the LCD, and the PROGRESS INDICATOR will automatically start counting down. When your waffles are ready, the “READY” will be displayed on the LCD accompanied by a beep sound. (Fig.14)
COOKING FEATURES DESCRIPTION
All cooking functions with their default settings & limitations are listed in the table be.low
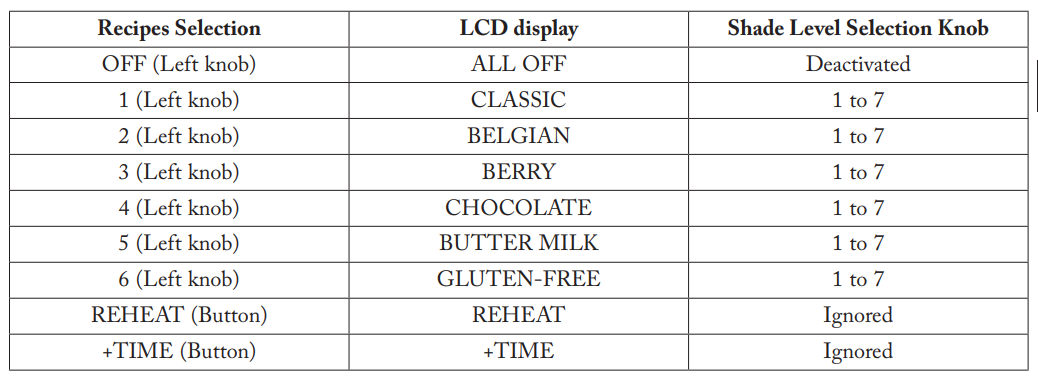
Two Knobs & Two Buttons:
- LEFT KNOB (Select functions, OFF mode; CLASSIC; BELGIAN; BERRY; CHOCOLATE; BUTTER MILK; GLUTEN-FREE)
- RIGHT KNOB (Select SHADE Level from 1 to 7)
- REHEAT BUTTON (override all functions at any time, cook with a fixed period of heating time)
- +TIME BUTTON (Plus additional time on top of any shade level, or provide a fixed period after cooking to improve performance)
FUNCTION EXECUTION PROCESSES
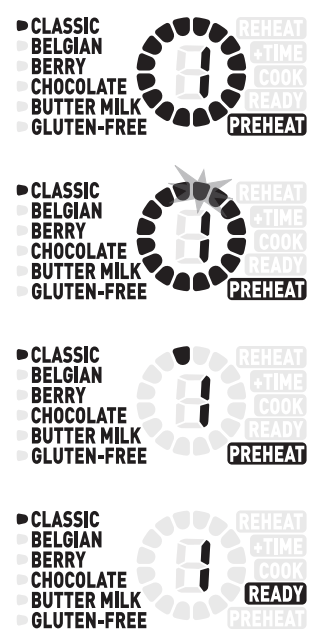
- While starting the preheating, the PREHEAT and FULL COUNTDOWN RING will appear and start to count down.
- As the whole ring represents the whole preheating time, it will disappear the segments one by one in a clockwise direction, the segments will firstly flash and
then finally disappear one by one. - The ring will count down until all segments disappear.
- When the countdown for PREHEAT is finished, the system will go into READY status and beep THREE times, waiting for the user to pour in the batter for coo.king
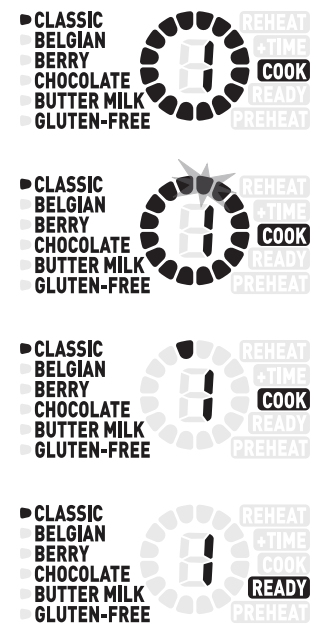
- When the system detects the OPEN & CLOSE signal correctly, the COOK & COUNTDOWN RING will appear to show that the cooking has started.
- As the whole ring represents the whole cooking time, it will disappear the
segments one by one in a clockwise direction. The segments will first flash and then finally disappear one by one. - The ring will count down until all segments disappear.
- When the cooking is finished, COOK will disappear, then READY will come back to notify the user that the cooking is finished and beep THREE times.
CHANGE RECIPE AFTER PREHEATING

REHEAT
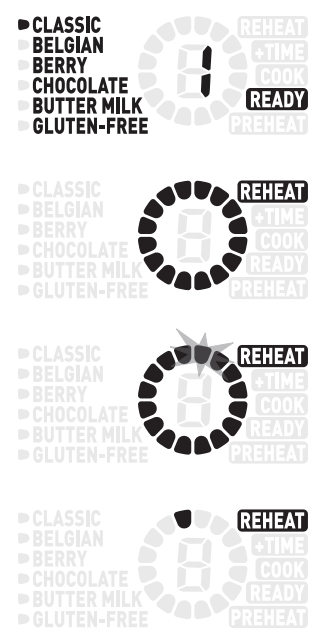
- REHEAT can be activated anytime the REHEAT BUTTON is pressed.
- While starting the REHEAT, the FULL COUNTDOWN RING will appear and start to count down.
- As the whole ring represents the whole reheating time, it will disappear the
segments one by one in a clockwise direction, the segments will firstly flash and
then disappear, and finally, one by one. - The ring will count down until all segments disappear. REHEAT can be triggered ON/OFF by pressing the REHEAT BUTTON
+TIME
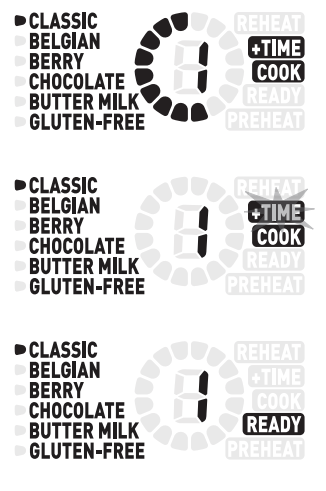
- +TIME can only be activated at any time.
- When the cooking is finished, COOK & +TIME will disappear, then READY will come back to notify the user that the cooking is finished and beep THREE times.
- When the cooking is finished, COOK & +TIME will disappear, then READY
will come back to notify the user that the cooking is finished. +TIME can be triggered ON/OFF by pressing the +TIME BUTTON
TROUBLESHOOTING
CLEANING & MAINTENANCE
- When you are finished cooking, turn the Shade Selector to Off and unplug the power cord. Allow the unit to cool down completely before handling.
- Press the plate release buttons to remove plates from the housing. Be sure that the plates have cooled completely before handling. a. We recommend cleaning the plates after every use. The plate should be washed in warm, soapy water or a dishwasher. (Fig. 15) Failing to do so may negatively impact the non-stick coating performance. Never use an abrasive cleanser or harsh pad on the non-stick coating.
- To clean the exterior:
- Polish using stainless steel cleaners approved for household cooking appliances.
- Follow the instructions for use on the polish; then rinse the outside of the waffle maker with a sponge. NOTE: Do not clean this product with aerosol sprays or the like.
TIPS FOR BETTER COOKING RESULTS
- Each time the waffle maker is used, wipe a small amount of cooking oil onto the waffle plates, then wipe with a soft cloth.
- Pour the batter with a ladle into each waffle plate.
- The amount of batter should not go past the separation line between the two cooking plates (9).
- Increase or reduce the waffle color to suit your taste, using the 6-position browning indicator.
- The green light, accompanied by a beep, is an indicator that the waffle maker is ready to use.
- The green light goes out and lights up again regularly during the cooking process, to show that the selected temperature is maintained. Depending on the type of batter used, cooking cycle times will vary.
- Some steam will be produced during cooking cycles; this is normal and allows for a fuller waffle. During the cooking cycle, the top of the waffle maker will drift upward, allowing the waffle batter to fully expand into the plate cavities. Do not impede this movement. The beep will sound again once the cooking cycle is complete. This will let you know the waffles are ready. Never lock the waffle maker when in use.
- Cooking time depends on the kind of batter used and the waffle brownness desired.
- Cooking time typically takes 3 to 5 minutes.
- User can change the function by turn the knob to the expected function, the related RECIPE & SHADE LEVEL will flash THREE times to confirm and then back to the new ready status, READY will appear again and beep TWO times to notice the user.
Brownie Waffles
Shake up your brownie recipe by turning the classic, beloved dessert into chocolaty waffles! These brownies are chewy on the inside and crispy on the outside. These elevated waffles are a great way to have dessert for breakfast or to satisfy your sweet tooth at a moment’s notice.
TYPE: BREAKFAST & BRUNCH
- SERVES: 4
- DIFFICULTY: EASY
- PREP TIME: 10 MIN
- COOK TIME: 10 MIN
Ingredients
- 1 cup all-purpose flour
- ⅓ cup unsweetened cocoa powder
- ⅔ cup sugar
- ½ teaspoon baking powder
- ½ teaspoon salt
- 1 stick of butter, melted
- 2 eggs
- 1 teaspoon vanilla extract
- 3 tablespoons water
- ½ cup mini chocolate chips
Directions
- Preheat an All-Clad Waffle Maker.
- In a large mixing bowl, add the flour, cocoa powder, sugar, baking powder, and salt.
- In another mixing bowl, add the eggs, vanilla extract, and water. Whisk the ingredients until well combined.
- Stir the wet mixture into the dry ingredients. Then add the melted butter, whisking constantly. Add the chocolate chips, and stir briefly to combine.
- When the waffle machine beeps and the ready light is green, ladle the batter into the waffle maker.
- Cook until the waffle maker beeps a second time, and gently remove them from the waffle maker. They will crisp up as they cool.
- Repeat with the remaining batter.
- Serve immediately on their own, or with desired toppings.
Cinnamon Roll Waffles
Can’t decide between cinnamon rolls and waffles? You can have both, thanks to this delicious and easy recipe that combines both brunch favorites into one! Drizzled with an irresistible cream cheese glaze, these cinnamon roll waffles are sure to please
- TYPE: BREAKFAST & BRUNCH
- SERVES: 4
- DIFFICULTY: EASY
- PREP TIME: 10 MIN
- COOK TIME: 10 MIN
Ingredients
For the Waffles:
- 2 cups all-purpose flour
- ½ teaspoon salt
- 1 teaspoon baking powder
- ½ teaspoon baking soda
- 3 teaspoons ground cinnamon
- 2 eggs
- 1 ¾ cups buttermilk
- ¼ cup butter, melted
- 2 tablespoons maple syrup
- 1 tablespoon vanilla extract
For the Cream Cheese Glaze:
- 4 tablespoons butter
- ¾ cup powdered sugar
- 2 ounces softened cream cheese
- ½ teaspoon vanilla extract
Directions
- Preheat an All-Clad Waffle Maker.
- In a large mixing bowl, add the flour, salt, baking powder, baking soda, and cinnamon. Stir together until well combined.
- In another mixing bowl, add the eggs, buttermilk, butter, maple syrup, and vanilla extract. Whisk until well combined.
- Stir the wet mixture into the dry ingredients until just combined. The batter should be slightly lumpy.
- For the glaze, beat the butter, powdered sugar, cream cheese, and vanilla extract together. Set aside.
- When the waffle machine beeps and the ready light is green, ladle the batter into the waffle maker.
- While the waffles are cooking, gently heat the cream cheese mixture in the microwave until runny.
- Continue to cook the waffles until the waffle maker beeps a second time, and the waffles are golden brown and crispy.
- Serve immediately, drizzled over the waffles with sugar and cinnamon, if desired.
FOR MORE MANUALS BY ALL-CLAD, VISIT MANUALSLIBRARYY
All-Clad WD824D51 4-Slice Waffle Maker- FAQs
What setting should I use on my All-Clad waffle maker?
For best results, preheat to setting 7 (medium-high) for 10 minutes before adding batter.
How much batter should I use per waffle?
Use 2–3 oz of batter per segment (about ½ cup total for a 4-slice waffle maker).
Is the All-Clad waffle maker dishwasher safe?
Yes! The removable nonstick plates are dishwasher-safe for easy cleaning.
How do I clean my waffle maker?
For removable plates: Wash in the dishwasher or with warm, soapy water.
For stuck-on batter: Use a soft brush or sponge—avoid metal scrubbers.
For burnt sugar: Apply a paste of baking soda + water, let sit, then wipe.
Should I grease the waffle maker?
Lightly coat with vegetable oil, canola oil, or nonstick spray before the first waffle.
Avoid excessive oil, which can cause sticking.
How do I make crispy waffles?
Preheat thoroughly.
Use cornstarch in the batter (replace 1–2 tbsp of flour).
Bake finished waffles in a 200°F oven to keep them crisp.
Why are my waffles sticking?
Possible reasons:
Not enough oil/grease.
Batter lacks egg yolk or fat.
Waffle maker not fully preheated.
Can I use this waffle maker for pancakes?
No—this model is designed only for waffles.
How long should I cook the waffles?
Cook for 3–5 minutes, or until steam stops escaping and waffles are golden brown.
Do I need to flip the waffle maker?
No—the All-Clad WD824D51 does not require flipping.

