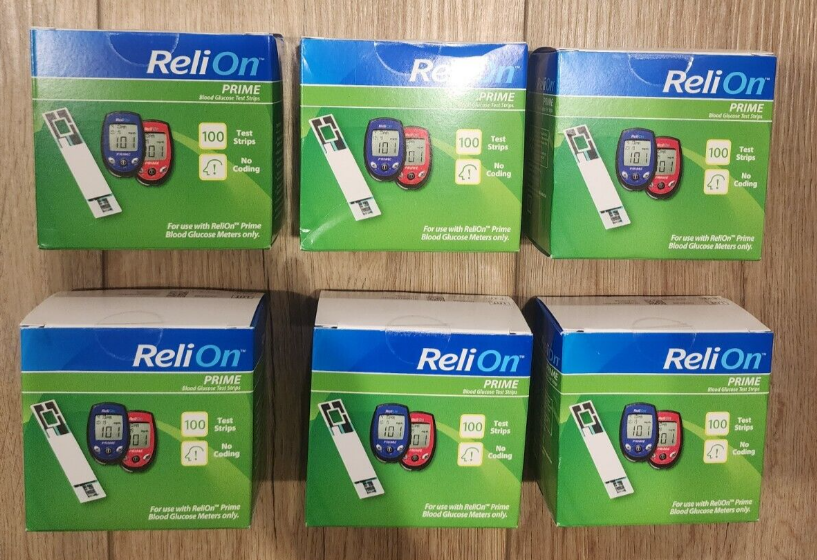
Relion Prime Blood Glucose Monitoring System
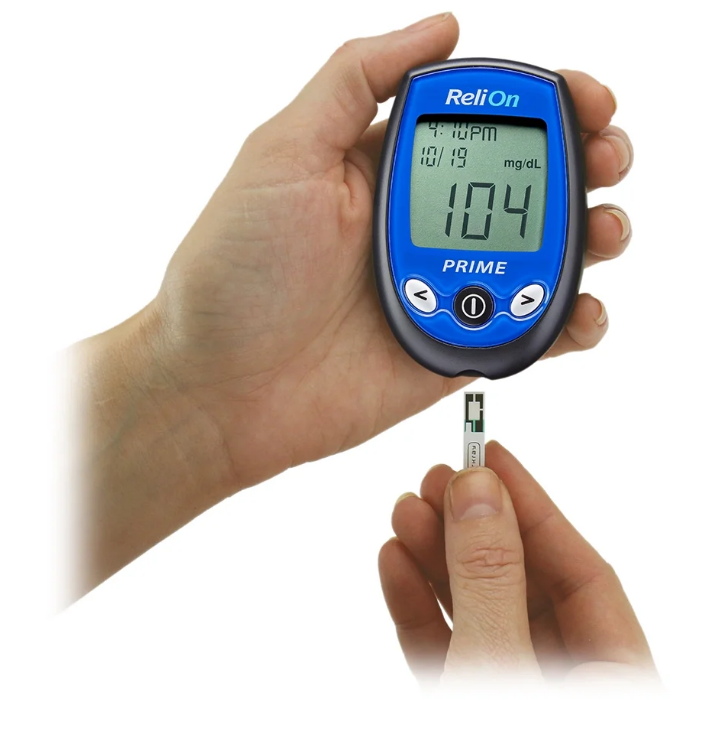
Important Information
- Test results below 70 mg/dL indicate low blood glucose (hypoglycemia)
- Test results above 240 mg/dL indicate high blood glucose (hyperglycemia)
- If results are below 70 mg/dL or above 240 mg/dL, repeat the test
- If results continue to measure below 70 mg/dL or above 240 mg/dL, consult your diabetes healthcare professional immediately
- If symptoms are not consistent with test results AND all the instructions have been followed carefully, contact your diabetes healthcare professional
- Before testing, always make sure both the meter and test strips are at operating temperature
THE ReliOn® Prime SYSTEM
The ReliOn® Prime System Includes
- ReliOn® Prime Meter
- Carrying Case
- User Instruction Manual
- Other materials required but not provided:
- Test Strips
- Control Solution
- Lancing Device and/or Lancets
UNDERSTANDING THE ReliOn® Prime BLOOD GLUCOSE METER
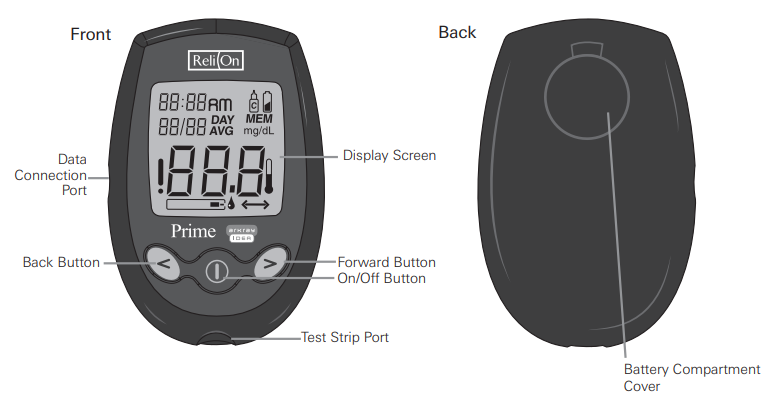
Explanation of the Full Display Screen
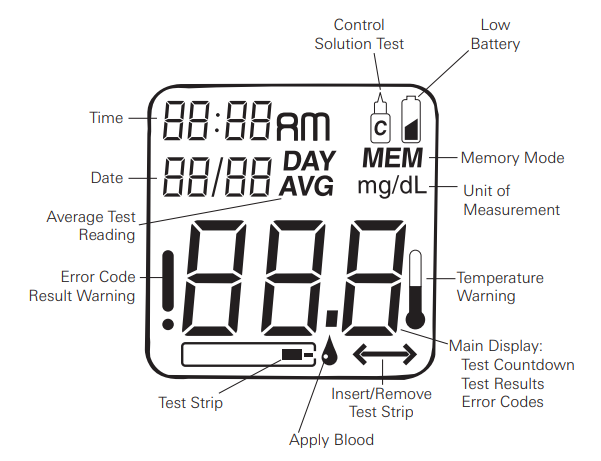
If any part of the display screen is missing when the meter is turned on, call Customer Service at 800.631.0076.
ReliOn® Prime TEST STRIPS
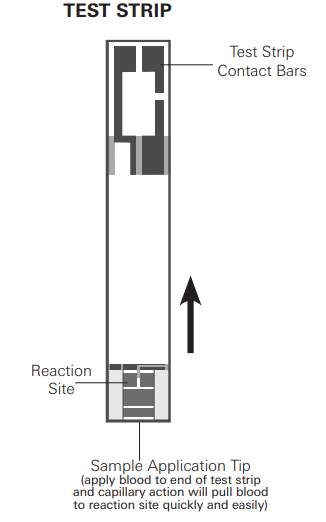
These capillary action test strips require only 0.5 micro-liter (μl) of blood and provide an end-fill sample application tip for easy blood application. The ReliOn® Prime Blood Glucose Monitoring System measures the amount of glucose (sugar) in fresh capillary whole blood. When a drop of blood is added to the sample application tip, the sample is drawn into the test strip reaction site. The glucose in the blood reacts with the enzyme on the test strip. This reaction produces a current proportional to the amount of glucose in the blood. The meter detects the current and converts it into a blood glucose reading.
TESTING WITH ReliOn® Prime TEST STRIPS
The ReliOn® Prime Blood Glucose Monitoring System works with the ReliOn® Prime Test Strips.
Important Test Strip Information
- Store the test strip bottle in a cool, dry place between 39°F– 86°F (4°C–30°C)
- Keep away from direct sunlight and heat
- Do not refrigerate or freeze
- Do not store or transfer the test strips outside the original bottle
- As soon as you have removed a test strip, replace the cap securely on the bottle
- Use test strips within 90 days (3 months) of opening and not beyond the expiration date
 .
. - Write the date of opening on the bottle label to remind you to discard the strips after 90 days (3 months)
- Do not bend, cut, or alter a test strip
- Do not reuse a test strip
- Use only ReliOn® Prime Test Strips with the ReliOn® Prime Meter
- Ensure your hands are clean and dry before handling test strips
Changing the Battery
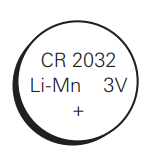
The ReliOn® Prime Blood Glucose Meter has a CR2032 battery installed.
Note:
Changing the battery should only take a few seconds. If the battery is changed within 30 seconds, the meter memory is not affected. You will not lose any past test results, and the settings are not affected.
However, if it takes longer than 30 seconds to change the battery, or if the battery is dead before changing it, the time and date settings may need to be reset.
The first time the meter is turned on after changing the battery, you may see a display screen message (E00). This means you should check that the time and date are correct. (See pages 18-21 for detailed instructions on changing the time and date.)
WARNING: Keep all batteries out of children’s reach. If a battery is swallowed, consult a doctor immediately.
When the battery power is getting low, your meter shows![]() . You have enough power for about 100 tests before you need to replace the battery.
. You have enough power for about 100 tests before you need to replace the battery.
If the ![]() is flashing, there is only enough power for about 20 tests. Replace the battery as soon as possible.
is flashing, there is only enough power for about 20 tests. Replace the battery as soon as possible.
When the battery has run out, the meter will not work.
How to Change the Battery
Step 1
Turn the meter off. The battery cover is on the back of the meter.
Step 2
Pull the battery cover up with your finger or fingernail. Remove the battery cover.
Step 3
Remove the old battery. If necessary, turn the meter over and tap it gently against the palm of your hand until the battery falls out. Avoid the use of sharp objects that may damage the meter.
Step 4
Insert the new battery. The “+” on the battery should be facing up.
Step 5
Replace the battery cover.
Meter Set Up
Before using the ReliOn® Prime Meter for the first time, you must set the time and date. You can choose between the 12-hour format (1-12 o’clock with am or pm) and the Military 24-hour format (0 23). The date format can either be displayed as month/day (U.S.A. format) or day/month (International format). Do not perform a blood glucose test until you have set the meter correctly.
Setting the Time and Date
- Step 1: Turn on the meter
Press the On/Off button to turn the meter on. The full screen appears briefly. If any part of the display screen is missing (see page 11), call Customer Service. The meter then displays the time, date, unit of measurement, and the insert test strip symbol. - Step 2: Enter set-up mode
Press and hold down the On/Off button for more than 2 seconds to enter the setup mode. - Step 3: Set the time format
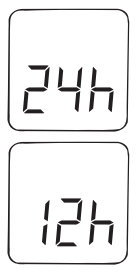
The time can be displayed in either 24-hour format or 12-hour format with AM and PM. The meter displays the current time format. To change format, press either the Back or Forward button. Press the On/Off button to select the time format. The date format then appears on the display.
- Step 4: Set the date format
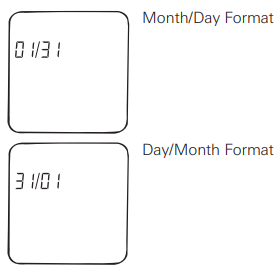
The date format can either be displayed as month/ day (01/31) or day/month (31/01). The meter displays the current format. To change format, press either the Back or Forward button. Press the On/Off button to select the date format. The hour setting then flashes on the display.
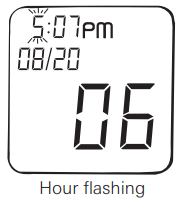
- Step 5: Set the hour
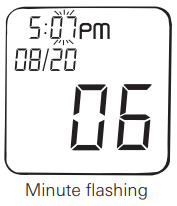
Press and release the Back or Forward button to change the hour. Hold the Back or Forward button down to scroll through quickly. When the correct hour is displayed, press the On/Off button. The minute setting then flashes on the display.
- Step 6: Set the mminutes
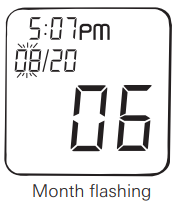
Press and release the Back or Forward button until the correct minute appears. Hold the Back or Forward button down to scroll through quickly. When the correct minute is displayed, press the On/Off button. The month setting then flashes on the display.
- Step 7: Set the month (If day/month format is selected, then Step 7 will set day)
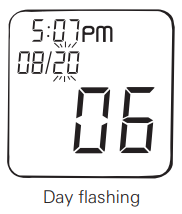
Press and release the Back or Forward button until the correct month appears. Hold the Back or Forward button down to scroll through quickly. When the correct month is displayed, press the On/Off button. The day setting then flashes on the display.
- Step 8: Set the day
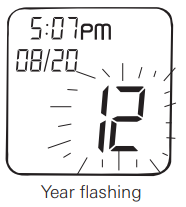
(If day/month format is selected, then Step 8 will set the month) Press and release the Back or Forward button until the correct day appears. Hold the Back or Forward button down to scroll through quickly. When the correct day is displayed, press the On/Off button. The year setting then flashes on the display.
- Step 9: Set the year
Press and release the Back or Forward button until the correct year appears. Hold the Back or Forward button down to scroll through quickly. When the correct year is displayed, press the On/Off button for two seconds to exit setup mode.
Note:
Pressing the On/Off button for more than 2 seconds at any stage saves the time and date and exits the set-up mode. The meter automatically shuts off after 2 minutes if no buttons are pressed. Settings stored up to that point are saved.
BLOOD GLUCOSE TESTING
ReliOn® Lancing Device
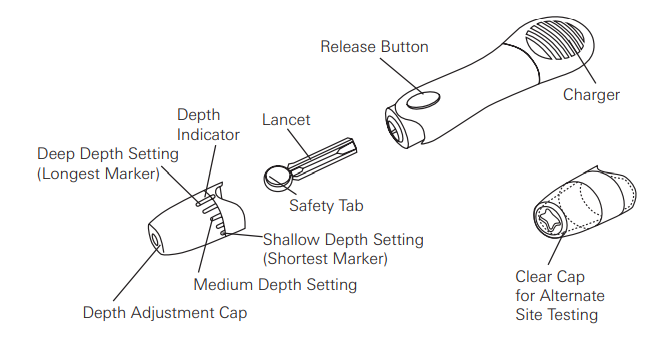
Step 1
Pry the depth adjustment cap sideways to remove it.
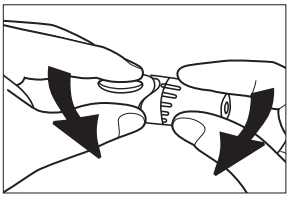
NOTE: Do not use the lancet if the cap is missing or damaged.
NOTE: The Lancing device is for single-patient use only and should never be shared with another person, even a family member. This lancing device should not be used for multiple patient testing by healthcare providers or at healthcare provider sites.
Step 2
Insert a new, unused lancet into the Holder until it stops.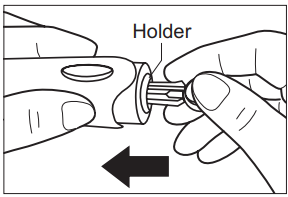
Step 3
Twist off the safety tab.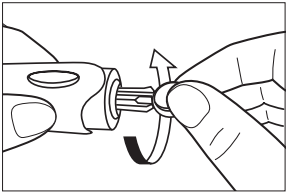
Step 4
Attach the depth adjustment cap.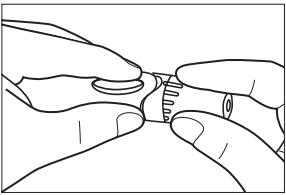
Step 5
Adjust the depth of the natural setting if necessary. If the obtained amount of blood is excessive, turn the dial to a lower setting. If the obtained amount of blood is insufficient, turn the dial to a larger setting.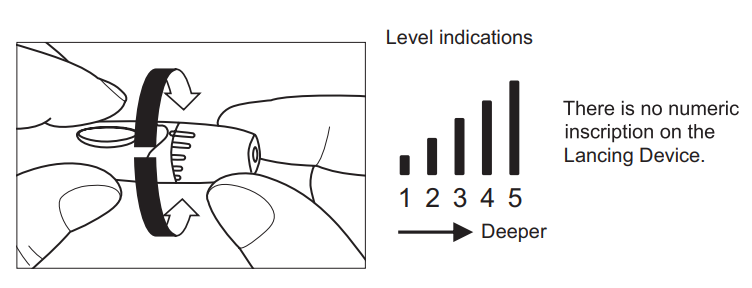
Step 6
Pull the charger to reset the device. You may hear a click.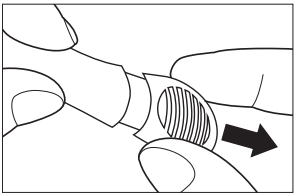
Obtaining a Drop of Blood
Step 1
Wash hands with soap and warm water. Dry hands thoroughly. If you use alcohol wipes to cleanse fingers, make sure the area is dry before lancing the finger. Residual alcohol may lead to inaccurate readings.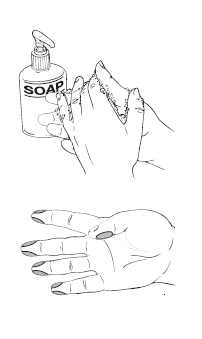
Step 2
Let the arm hang down for 10 to 15 seconds. (Holding the arm below the heart and massaging the wrist, palm, and finger makes it easier to obtain a blood drop.)
Step 3
Choose a site on the side of a fingertip to minimize pain.
Step 4
Press the depth adjustment cap to the side of the fingertip. Push the release button.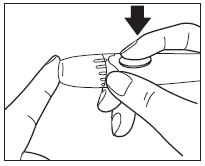
Step 5
Set aside the Lancing Device and wait a few seconds for a blood drop to form. Keeping the hand warm, lowering the hand to waist level, and gently massaging your wrist, palm, or the base of the finger helps the flow of blood. Use a different site each time you test to help prevent soreness and calluses.
PERFORMING A BLOOD GLUCOSE TEST
Note: For Instructions on Alternate Site Testing, refer to pages 31-38.
Step 1
Insert a ReliOn® Prime Test Strip into the meter. Insert the contact bars into the test strip port, with the reaction site facing up.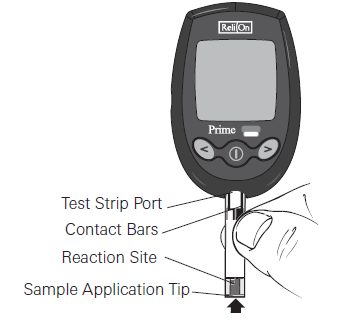
When the test strip is inserted, the meter turns on automatically. If any part of the display screen is missing (see page 11), call Customer Service.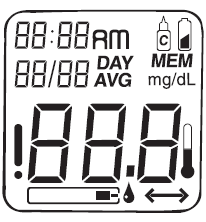
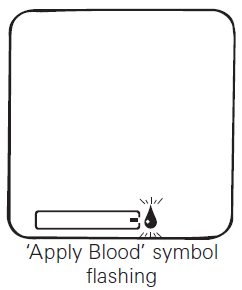
The test strip and flashing blood droplet tell you the meter is ready for you to apply a drop of blood to the sample application tip at the end of the test strip.
Step 2
Lance your finger using the Lancing Device. Touch the sample application tip at the end of the strip to the blood drop on your finger. The capillary action will pull the blood to the reaction site.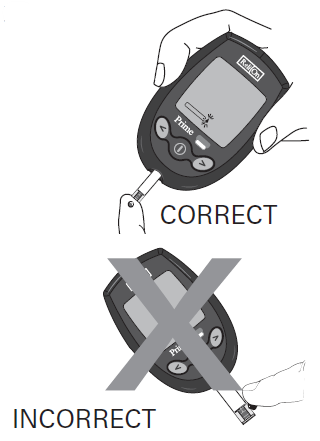
DO NOT add blood to the top of the test strip. You may receive an abnormal (high) result.
IMPORTANT: The meter will start to count down, showing a flashing dash when it detects that blood has been applied. Discard the test strip if the meter does not start to count down after a blood drop is applied.
IMPORTANT: The minimum sample volume is 0.5 μL. Smaller samples may not start the meter or can start the meter count down and provide an “E13” error message. Ensure blood fills the reaction site.

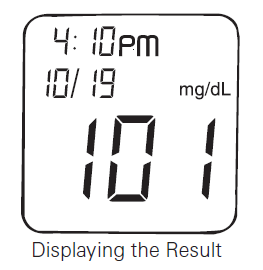
The meter will count down, showing a flashing dash. The result is displayed in 7 seconds.
Step 3
Always record your results in your self-testing logbook along with other information such as insulin dosage, diet, and exercise. The result is automatically stored in memory with the time and date.
Step 4
A lancet should be used once. After use, put the theprotectivep cap back on and remove the lancet from the lancing device. Safely dispose lancet so as not to cause accidental injury. Remove the used test strip and dispose of it carefully. The meter shuts off automatically when the test strip is removed.
CARING FOR YOUR ReliOn® Prime BLOOD GLUCOSE METER
Cleaning the Meter
The ReliOn® Prime Blood Glucose Meter is a precise instrument. Please handle it with care. Clean the outside of the meter with a damp cloth only. Dirt, dust, blood, control solution, or water entering the meter could cause damage. Your ReliOn® Prime Blood Glucose Meter should not need decontamination, as no blood or control solution should come into contact with the meter if the instructions are followed correctly.
Storage
The ReliOn® Prime Blood Glucose Meter is designed to be stored within a 32°F – 122°F (0°C – 50°C) temperature range.
- Do not leave your meter in extremely hot or cold place,s such as near a heat source (radiator) or in a car in very hot or cold weath.er
- Do not store or use your meter or test strips where they may be exposed to high humidity, such as in a bathroom or kitchen..hen
- Never hold the meter or test strips under running water
- Do not use or store your meter on or near a stelectromagneticnetic field such as a microwave oven, stereo amplifiers, or a mobile phone
- Do not store your meter or test strips near bleach or cleaners that contain bleach
SPECIFICATIONS
- Test Strips: ReliOn® Prime
- Result range: 20 to 600 m g/dL
- Calibration: Plasma referenced
- Sample Size: Minimum 0.5 micro-liter (μL)
- Blood Source: Capillary Whole Blood
- Hematocrit Range: 33%-52%
- Test Time: 7 seconds
- Glucose Units: mg/dL
- Assay Method: Biosensor, Glucose ooxidase(Asper gillus ni ger sourced)
- Power Source: SiSingleplacement 3V (CR2032) battery
- Battery Life: More than 2,000 tests at 4 tests per day
- Display Type: Liquid Crystal Display (LCD)
- Memory: 250 results with 14- and 30-day averaging.. Shut-off: 2 minutes after the last user action
- Size: Approx 3.3″ x 2.2″ x 0.6″ (83.5 mm x 55.5 mm x 16 mm )
- Weight: Approx. 1.48 oz. (42 g)
- Optimum Operating Ranges: 50°F – 104°F (10°C – 40°C)
- Relative Humidity: 20% – 80%
- Altitude: 10,000 ft. (3,048 meters)
WARNINGS, PRECAUTIONS, AND LIMITATIONS
- The ReliOn® Prime Blood Glucose Monitoring System is not designed to substitute for pathology laboratory equipment and should not be used for the diagnosis of diabetes.
- Severe dehydration (excessive water loss) may cause false low results. If you believe you are suffering from dehydration, consult your healthcare professional immediately.
- A red blood cell count (hematocrit) that is very high (above 52%) can give abnormally low results. A very low hematocrit level (below 33%) can give abnormally high results.
- Inaccurate results may occur in severely hypotensive individuals or patients in shock.
- Inaccurate low results may occur for individuals experiencing a hyperglycemic-hyperosmolar state, with or without ketosis.
- Patients undergoing oxygen therapy may yield false results.
- Do usetoit est newborns. The system has not been validated for neonatal use.
- Do not use the ReliOn® Prime system at altitudes over 10,000 ft (3,048 m).
- Triglycerides up to 3,300 mg/dL do not significantly affect test results. However, glucose values in specimens beyond this triglyceride level should be interpreted with caution.
- Metabolites of icodextrin (maltose, maltotriose, and maltotetraose) do not affect test results.
- Use only fresh capillary blood. Do not use serum or plasma, or venous whole blood.
IMPORTANT: Low or high blood glucose readings can indicate a potentially serious medical condition. If your blood glucose reading is unusually low or high, or you do not feel the way your readings indicate, repeat the test using a new strip. If your result is still not consistent with your symptoms or if your blood glucose result is less than 60 mg/dL or higher than 240 mg/dL, contact your diabetes healthcare professional for advice.
WARRANTY
You are a valued ReliOn® customer. It is important to us that you are completely satisfied with your Blood Glucose Meter.
ReliOn® warrants that your Meter will be free from defects in materials and workmanship for five years from the date of the original purchase. If during this time the meter does not work properly because of a defect in materials or workmanship, ReliOn® agrees to replace or repair, free of charge, any parts proven to be defective and subject to warranty.
This warranty is instead of all other warranties, expressed or implied, including any implied warranty of merchantability or fitness for any purpose, other than stated herein.
This warranty does not apply to the performance of the ReliOn® Prime meter that has been damaged by accident or has been altered, misused, tampered with, or abused in any way. This warranty only applies to the original purchaser of the meter and/or its agents.
RETURNS
You must contact Customer Service at 800.631.0076 before returning your meter. You will be instructed on how to return the meter to ARKRAY. Returned meters without this authorization will not be accepted.
For more manuals by Relion, visit ManualsLibraryy
Relion Prime Blood Glucose Monitoring System- FAQs
How do I clear the memory on my ReliOn Prime meter?
With the meter off, press and hold the “M” button. When “CLR” appears, release the button, then press it again to confirm. The display will briefly show “CLR” before returning to the main screen.
How can I reset my blood glucose meter?
Remove the battery and wait at least 60 seconds. Reinsert the battery, ensuring proper contact, then press and hold the Home button for 10–15 seconds to restart the device.
What does “HI” mean on the ReliOn Prime meter?
“HI” indicates a blood glucose level above 600 mg/dL, which signals severe hyperglycemia. If this appears again after retesting, seek medical attention immediately.
What is a normal blood sugar level?
1. Normal (fasting): Below 100 mg/dL
2. Prediabetes: 100–125 mg/dL
3. Diabetes: 126 mg/dL or higher on two separate tests
What does the E00 error mean?
E00 appears after changing the battery for the first time. It’s a reminder to check and update the time and date settings.
Does ReliOn offer a mobile app?
Yes, the ReliOn™ Platinum BGM Companion App is available for both iOS and Android devices.
When is the best time to check blood sugar with a glucometer?
Testing is typically recommended before meals and at bedtime, especially for those using insulin. Your doctor may advise a specific schedule based on your treatment plan.
How do I know if my meter is giving accurate readings?
Test your blood sugar with the meter at the same time as a lab test using a fingerstick sample. A reading within 15% of the lab result is considered accurate.

