Yada Dash Road Cam HD Smart Dash Cam

INTRODUCTION
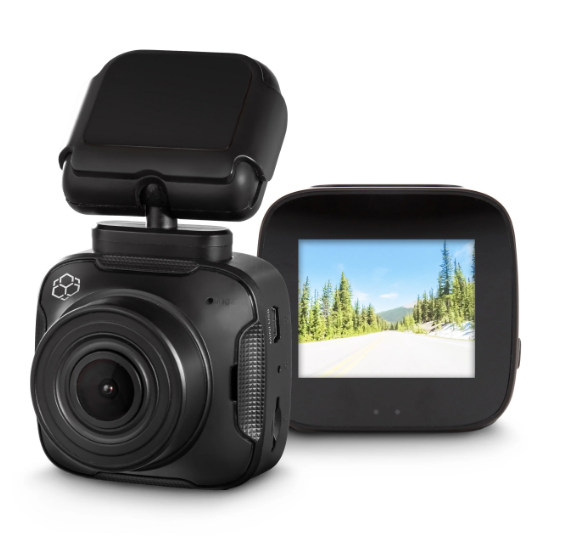
The Yada Dash Road Cam HD is a video recording camera intended to capture incidents while driving. The 2.7” LCD is convenient for instant playback. Simply mount the camera as directed and use loop recording or motion detection recording to capture events while driving.
Please read all of the installation instructions carefully before installing and using the product. Improper installation or usage will void the manufacturer’s warranty.
All certifications and technical specifications can be found at www.letsyada.com.
PACKAGE CONTENTS
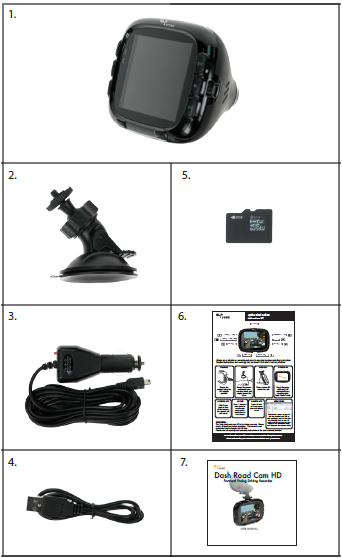
- Dash Road Cam HD
- Suction Cup Mount for Camera
- 12V/24V Power Charger
- USB Cable for PC
- 4GB SD Card
- Quick Start Guide
- User’s Manual
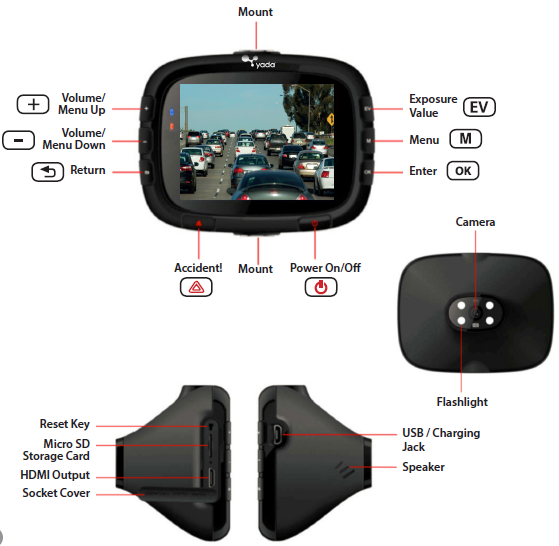
Names
SAFETY INFORMATION
- Please read all safety warnings listed in this user’s manual.
- Do not operate or adjust the camera while driving. The camera should be set before operating the vehicle.
- Make sure the camera is not blocking the driver’s line of sight and check local laws and regulations for placement instructions.
- Do not disassemble the camera. This will void the warranty and possibly cause failure, electric shock, or fire. Please contact Winplus North America for repair or warranty claims.
- Damage due to production malfunction, loss of data, or other damages occurring while using this product shall not be the responsibility of the manufacturer.
- Always keep your eyes on the road and the surrounding vehicles. At no time should the screen be used as a monitor for driving assistance.
- This product is a road safety accessory, and the manufacturer is not liable for any losses brought on by malfunctions, loss of data, or any other form of losses from using this product.
- This product is an accessory designed for the specific purpose of recording and saving captured video footage of the areas near the vehicle. Certain functions may not be supported depending on the driving conditions and vehicle conditions. The firmware updates for improving performance may result in different performance for each product. The video may not be recorded depending on the conditions in which the device is used. Please use the device only for your reference. The recording may not take place depending on the status of the SD card.
- This device is designed to capture and save accident footage of the vehicle in which the product is installed. However, it does not guarantee that every accident footage will be recorded. Accidents with a very minor level of impact may not activate the impact sensor, and the accident may not be recorded as event footage.
- Do not put anything inside the SD memory card slot except for the card itself.
- Do not operate the product with sharp instruments such as a pen or pencil.
- Do not attach a sticker or apply paint to the device or the SD Card.
- Do not remove the SD card during operation.
- Do not expose the camera to the direct heat of the vehicle’s heating system.
- The camera is not weatherproof and is not intended for outside use. It should remain in the interior of the vehicle for proper operation. At no time should the camera be exposed to moisture or weather elements.
OPERATION
Charge the Camera
- For safety, the camera should be fully charged prior to operating. The first few times, we suggest charging the camera for 12 hours. Normally, the camera will fully charge in 3 hours.
- Using the USB to 12V charger provided, simply plug the USB end into the camera and the 12V end into any vehicle 12V socket.
- Using the Mini USB to USB Cable provided, simply plug the Mini USB end into the camera and the USB into any powered PC.
- If the battery is low on the camera, the battery icon will flash.
Memory
- Insert the Micro SD card by gently pulling off the socket cover on the camera, and place the Micro SD card in the slot and push till it clicks. Then replace the socket cover and push till it is secure.
- To remove the Micro SD Card, push once till the card releases from the port.
- The camera will hold up to a 32GB microSD card.
- The camera should be powered down before adding or removing the microSD card.d
- Micro SD Card Recording Capacity Guide
The capacity guide is based on 720 x 480 resolution recording
Mounting the Camera
- Please check your local laws and regulations regarding where mounting on the windshield is permitted.
- The Dash Road Cam HD, positioned on the front windshield and its a forward-facing angle, greatly affects the video recording quality. Follow these instructions to get the best results:
- Install the suction cup mount on the central axis of the vehicle. A good starting point is underneath your rearview mirror.
- Do not use the Dash Road Cam HD without the mount.
- Do not place any item between the Dash Road Cam HD and the front windshield or cover up the line of sight from the camera.
- Once set in place, you can view on the LCD monitor the exact angle that will be recorded and adjust accordingly.
Power On
- The Dash Road Cam HD should automatically turn on and start recording when Power is detected.
- To manually turn on, Press and hold the power button until you see the Yada Logo screen.
- To power down, press and hold the power button until the camera shuts off completely.
- To shut off the LCD monitor while driving, press the button just once (do not hold). The camera will continue to record, but the screen will be black.
You will only see the LED indicators for functionality.
Shooting Mode
The camera comes pre-set to the most common recording function called “Loop Record”. To see all modes descriptions and how to change settings, please see the next section, “Settings”.
Reset
If the camera locks and does not allow you to operate, reset the camera by switching off and on the Reset button.
SETTINGS
The Dash Road Cam HD has several different functions available for your use. To access the shooting modes, scroll using the Menu Up or Menu Down buttons on the camera.
LOOP RECORD
- This is the default recording setting for the camera.
- Press OK to start preview, and the Dash Road HD Cam should automatically start recording.
- A red dot “REC” on the screen flashing indicates recording.
- Files are looped or recorded over by default for 10 minutes. The Micro SD Card will hold 10-minute segments and record over them as space is needed.
- Files saved under the suffix “LOOP”
- Stop Loop Video: Press the OK button while videoing to pause recording.
- Digital Zoom: When videoing, use the PLUS, MINUS buttons as digital zoom control. This camera has a 16x digital zoom.
- Adjust the EV Value: When in video preview mode, press the EV key on the camera, then the PLUS, MINUS keys to adjust, and OK to save.
- Additional Settings: Press M and use the PLUS/MINUS button to select, then press OK.
Resolution Setting: FULL HD1080P (1920 x 1080) 10fps, HD 720P (1280 x 720) 30fps, WVGA (720 x 480) 30fps, VGA (640 x 480) 30fps and QVGA 320 x 240 30fps. The default setting is HD720P. Using PLUS and MINUS to set the resolution and then pressing OK to save the setting. Press RETURN to exit and OK to record.
Loop Record Setting: Select Off, 3 minutes, 5 minutes, 10 minutes, or 15 minutes. Use the key to save your selection, and press the M key to exit and the OK key to record. The default is 10 minutes.
Auto Close Panel: Select On or Off, and press OK to save the settings. The default is On. After one minute of recording, the screen will automatically shut off.
Audio Setting: Choose On or Off, and press the OK key to save the settings. If you do not want the video with sound, you can select Off. In the middle of the screen, the MUTE icon will appear.
G-Sensor Setting: Select the sensitivity of the G-Sensor: Low, Mid, or High. This is the sensitivity to turn on the Accident record mode. The default setting is Low. In the event of an accident, you can also press the Accident button on the camera. A red triangle will appear on the screen. The camera will automatically save the current and previous files, and they will not be recorded over. Files will have an icon of a key in the top left corner to designate them as saved.
Standby Videos Setting: Use the PLUS, MINUS button to select On / Off, then press OK. Having the Standby Videos On will mean the Dash Road Cam HD will continue recording even if the power is disconnected or the engine is off. In the Standby recording mode, the screen will shut off 30 seconds after the power is disconnected, but video recording will continue. The default is Off.
CONTINUOUS RECORD
- Press the MINUS key to enter Continuous Record Mode.
- Press OK to start preview, OK again to start recording.
- A red dot “REC” on the screen flashing indicates recording.
- Files are NOT deleted or recorded over. Once the Micro SD Card is full, the camera will notify you.
- Files saved under the suffix “SOS”
- Digital Zoom: When videoing, use the PLUS, MINUS buttons as digital zoom control. This camera has a 16x digital zoom.
- Adjust the EV Value: When in video preview mode, press the EV Key on the camera, then the PLUS, MINUS Key to adjust, and OK to save.
- Additional Settings: Press M and use the PLUS, MINUS button to select, then press OK.
Resolution Setting: FULL HD1080P (1920 x 1080) 10fps, HD720P (1280 x 720) 30fps, WVGA (720 x 480) 30fps, VGA (640 x 480) 30fps, and QVGA 320 x 240 30fps. The default setting is HD720P. Using the PLUS, MINUS key to set the resolution, and then pressing the OK key to save the setting. Press RETURN to exit and OK to record.
Anti-Shaking Setting: Choose On or Off, and press OK to save the settings. The default is off.
Date Stamp Setting: This determines if the date/time is displayed. The default is ON. Choose On or Off, and press OK to save the settings.
Audio Setting: Choose On or Off, and press the OK key to save the settings. If you do not want the video with sound, you can select Off. In the middle of the scrthe een, MUTE icon will appear.
TAKE PICTURE
- Press the MINUS key to enter Picture Mode.
- Press OK to start preview, OK again to take a picture.
- Press OK each time you want to take a picture.
- Files are NOT deleted or recorded over. Once the Micro SD Card is full, the camera will notify you.
- Files saved under the suffix “SOS”.
- Digital Zoom: When videoing, use the PLUS, MINUS buttons as digital zoom control. This camera has a 16x digital zoom.
- Adjust the EV Value: When in video preview mode, press the EV key on the camera, then the PLUS, MINUS key to adjust, and OK to save.
- Additional Settings: Press RETURN and use the PLUS, MINUS buttons to select, then press OK.
Capture Mode Setting: Select single shot, 2 seconds self-timer, 5 seconds self-timer, 10 seconds self-timer. The default is single shot.
Resolution Setting: Select 12M, 8M, 5M, or 3 M. The default is 12M.
Quality Setting: Select The Best, Fine, or Normal. The default is The Best.
Sharpness Setting: Select Strong, Normal, or Soft. The default is Normal.
White Balance Setting: Select Auto, Daylight, or Cloudy. The default is Auto.
Color Setting: Select Normal, Black & White, or Sepia. The default is Normal.
ISO Setting: Select Auto, 100, 200, or 400. The default is Auto.
Face Detection Setting: Select Off, Face Detection, or Smile Detection. The default is Off.
Quick Review Setting: Select Off, 2 Seconds, or 5 Seconds. The default is Off.
Date Stamp Setting: Select Off, Date, Date / Time. The default is Date / Time.
Anti-Shaking Setting: Select On or Off. The default is Off.
Shutter Sound Setting: Select On or Off. The default is On.
Flash Mode Setting: Select On or Off. The default is Off.
MOTION DETECTION RECORD
- Press the MINUS key to enter Motion Detection Record Mode.
- Press OK to start preview, OK again to start recording
- Recording will start once the camera senses motion. If there is no motion for 1 minute, the camera will stop recording until motion is detected again.
- The red dot on the screen indicates recording..
- Files are NOT deleted or recorded over. Once the Micro SD Card is full, the camera will notify you.
- Files saved under the suffix “SOS”.
Voice Record
- Press the MINUS key to enter Voice Record Mode
- Press OK to start preview, OK again to record voice, and OK to stop recording.
- Files are NOT deleted or recorded over. Once the Micro SD Card is full, the camera will notify you.
- Files saved under the suffix “SOS”
Playback
- Press the MINUS key to enter Playback Mode
- Press OK to start preview
- Press the PLUS, MINUS keys to select video/voice/photo
- Press OK to play back video, during playback, press the PLUS, MINUS key to fast forward or rewind. Press OK again to stop playback.
SYSTEM SETTINGS
Date/Time Setting: Press OK to enter the Date/Time setting. Press the OK key to save the settings.
Auto Power Off Setting: Select off, 2 minutes, 5 minutes, 10 minutes. Press the OK key again to save the settings. The default is 5 minutes.
Beep Sound Setting: Select On or Off. Press the OK key again to save the settings. The default is On.
Language Setting: Select English, Deutsch, François, Español, Italian, Portuguese, Traditional Chinese, Simplified Chinese, and Japanese. Press the OK key again to save the settings. The default is English.
Light Frequency: Select 50Hz/60Hz; Press the OK key again to save the settings. The default is 60Hz.
Default setting: Select Cancel or Ok to confirm. Press the OK key again to save the settings.
Version: Press the OK key to show the version number.
LCD Rotate Setting: Select 0 Degree or 180 Degree. Press the OK key again to save the settings. The default is 0 degrees.
HDMI setting: Select NTSC and PAL. Press the OK key again to save the settings. The default is NTSC.
HDMI Output: HDMI plug can offer 1080P resolution output. Insert the HDMI cable into the HDMI port of the camcorder, and connect the other end to the HDMI port of the TV set. Of course, the TV set should be in HDMI mode.
Format Setting: Select Cancel or OK to confirm. Warning: All data will be deleted if you select OK.
VIEWING FILES
- Connect the camera to your PC with the provided mini USB to USB connector; you can also view the Micro SD card on your PC
- On your PC, open up DCIM and you can view videos in the 100MEDIA folder, and pictures in the Camera folder..
- Instructions for Mac users: AVI files require a compatible video player. A free, compatible viewer can be downloaded at www.videolan.org. Follow instructions to install and view files.
Customer Service/Contact
For questions or issues regarding the product, please visit www.letsyada.com or contact Winplus to speak to our customer service representative:
Winplus North America Tel.: 866-294-9244
You can also contact us online by visiting www.letsyada.com for more information about the product.
IF YOU ARE EXPERIENCING ANY ISSUES WITH THE PRODUCT DURING OPERATION, DO NOT RETURN THE PRODUCT TO THE STORE. CONTACT WINPLUS DIRECTLY FOR INSTRUCTIONS ON HOW TO RETURN/EXCHANGE THE PRODUCT.
For more Manuals by Yada, visit ManualsLibraryy
Yada Dash Road Cam HD Smart Dash Cam-FAQs
How much memory do I need for my dash cam?
For 2 hours/day, 5 days/week driving, a 64GB card (~60GB storage) is recommended.
Higher frame rates (30-60fps) and resolutions (1080p/4K) require more storage.
What is the purpose of Wi-Fi on a dash cam?
Allows direct smartphone/tablet connection via an app.
Enables live viewing, video downloads, and remote control without removing the SD card.
How do I view footage on my dash cam?
Via smartphone app (Wi-Fi connection).
On a computer (remove SD card & play via VLC/QuickTime).
Most dash cams record in MP4 or AVI formats.
Does a dash cam monitor speed?
Optional but useful for recording speed, location, and route data.
Some models have built-in GPS, while others require an external module.
Are there wireless dash cams?
Yes! Battery-powered models exist (e.g., Vantrue N2 Pro).
Best for temporary use (rental cars) since they require recharging.
Do dash cams record audio?
Yes, most record in-car audio (can usually be disabled).
Audio stops when the car is off, unless the cam has a battery.


