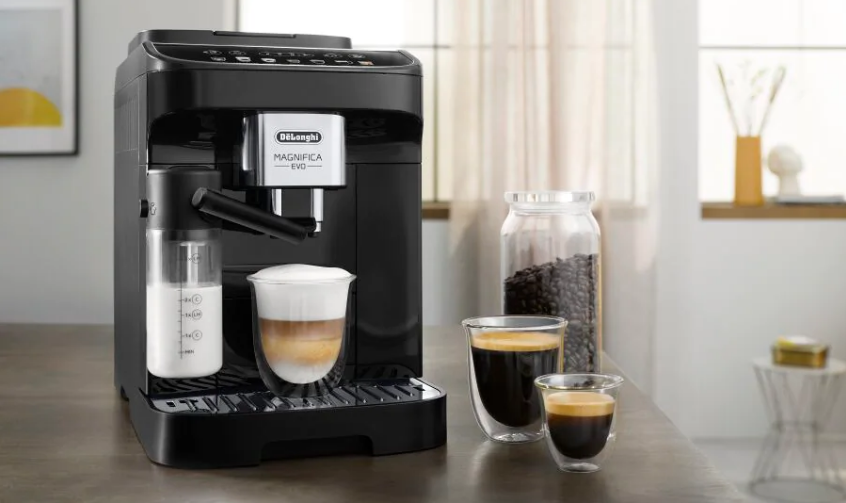
De’Longhi ECAM29X6Y Magnifica Evo Coffee Maker

IMPORTANT SAFEGUARDS
When using electrical appliances, basic safety precautions should always be followed, including the following.
- Read all instructions carefully.
- Make sure the voltage of your electrical system corresponds to the voltage shown on the bottom of the machine.
- Do not touch hot surfaces. Use handles or knobs.
- To protect against fire, electrical shock, and personal injury, do not immerse the cord, plug, or appliance in water or other liquid.
- Keep the appliance out of the reach of children and do not leave the appliance unattended while in operation.
- Unplug from the outlet when not in use and before cleaning.
- Do not operate with a damaged cord or plug, or after the appliance malfunctions, or has been damaged in any manner. Return the appliance to the nearest authorized service facility for examination, repair, or adjustment.
- The use of accessory attachments not recommended by the manufacturer may result in fire, electrical shock, or personal injury.
- Do not use outdoors.
- Make sure the power cord does not hang over the edge of the table or countertop to avoid getting accidentally caught or entangled.
- Do not place the appliance or its electrical parts on or near electric stoves, cooking surfaces, or gas burners.
- Plug the cord into the wall outlet. To disconnect, first turn the machine off, then remove the plug from the wall outlet.
- Do not use the appliance for anything other than the intended use. This appliance is to be utilized for domestic use only. The manufacturer declines all responsibility for any damage caused by improper, incorrect, or irresponsible use.
WARNING: To reduce the risk of fire or electric shock, do not remove the cover or the exterior of the unit. Don’t attempt to repair or modify the machine; doing so will void the warranty. Repair should be done by authorized service personnel only!
SAVE THESE INSTRUCTIONS
THIS APPLIANCE IS FOR HOUSEHOLD USE ONLY
SHORT CORD INSTRUCTIONS
- A short power cord is provided to reduce risks resulting from becoming entangled in or tripping over a longer cord.
- Longer, detachable power supply cords or extension cords are available and may be used if care is exercised in their use.
- If an extension cord is used, the marked electrical rating should be at least as great as the electrical rating of the appliance. If the appliance is provided with 3- 3-wire, grounding-type cord, the extension should be a grounding-type 3-wire cord. The longer cord should be arranged so that it will not drape over the countertop or tabletop where it can be pulled on by children or tripped over.
- Your product is equipped with a polarized alternating current line plug (a plug having one blade wider than the other). This plug will fit into the power outlet only one way. This is a safety feature. If you are unable to insert the plug fully into the outlet, try reversing the plug. If the plug should still fail to fit, contact your electrician to replace your obsolete outlet. Do not defeat the safety purpose of the polarized plug.
BEFORE USE
Checking the appliance
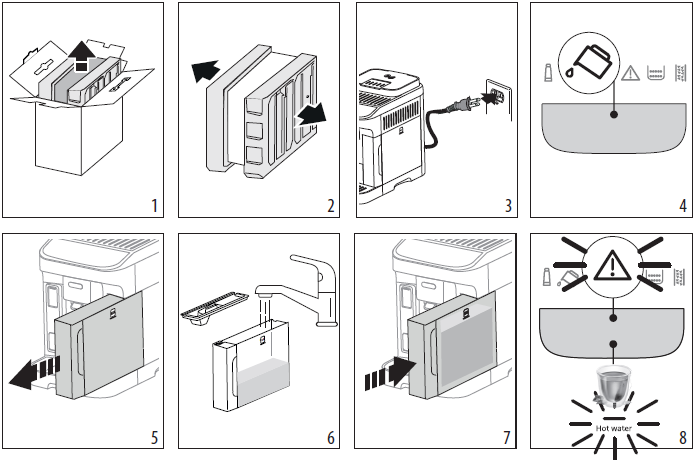
After removing the packaging, make sure the product is complete and undamaged and that all accessories are present. Do not use the appliance if it is visibly damaged. Contact De’Longhi Customer Services.
Installing the appliance
When you install the appliance, you should respect the following safety warnings:
- The appliance gives out heat. After positioning the appliance on the worktop, leave a space of at least 1.18 in / 3 cm between the surfaces of the appliance and the side and rear walls and at least 5.9 in / 15 cm above the coffee maker.
- Water penetrating the appliance could cause damage. Do not place the appliance near taps or sinks.
- The appliance could be damaged if the water it contains freezes. Do not install the appliance in a room where the temperature could drop below the freezing point.
- Arrange the power cord in such a way that it cannot be damaged by sharp edges or contact with hot surfaces (e.g., electric hot plates).
Connecting the appliance
Check that the mains power supply voltage corresponds to that indicated on the rating plate on the bottom of the appliance.
Connect the appliance to an efficiently earthed and correctly installed socket with a minimum current rating of 13A only. If the power socket does not match the plug on the appliance, have the socket replaced with a suitable type by a qualified professional.
Setting up the appliance
The first time you use the machine, the water circuit is empty, and the appliance could be very noisy. The noise becomes less as the circuit fills.
Cleaning and maintenance of materials in contact with food
- When used for the first time, or after 3 or 4 days without use, clean the appliance and the removable accessories that come into contact with water, coffee, and milk, as indicated in the instructions for use. Check the instructions to see which accessories are dishwasher safe.
- If the appliance is not used for more than 3 or 4 days, before making the first beverage, rinse the water circuit.
- Be certain to take maximum care when carrying out all cleaning and maintenance operations described in the instructions for use and/or prompted by the display or warning lights of the appliance itself.
Making cappuccinos and milk-based coffees
- The appliance has been tested for use with cow’s milk and the following products of plant origin: soya, rice, and almond. No other type of milk or product of plant origin may be used.
- To clean the system, following use with any type of milk, please follow the standard procedures described in the instruction manual.
- The cleaning methods provided by the manufacturer and described in the instructions do not guarantee the complete removal of allergens.
- In the case of confirmed or suspected allergies and intolerances, make sure that your machine has not been previously used with any milk or product of plant origin containing the allergens you are allergic to or the substances you are intolerant to.
DESCRIPTION
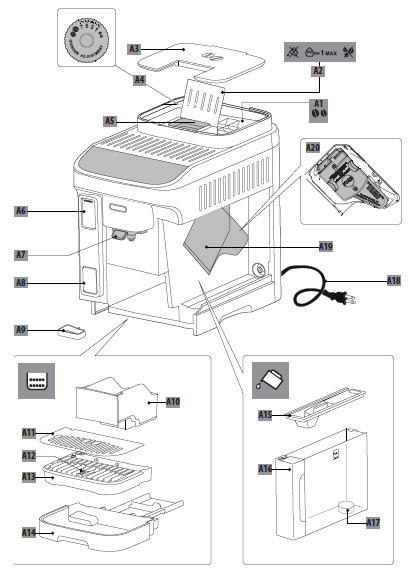
Description of the appliance – A
- A1. Beans container
- A2. Pre-ground coffee funnel lid
- A3. Beans container lid
- A4. Grinding adjustment dial
- A5. Pre-ground coffee funnel
- A6. Milk container/ Water spout connector door
- A7. Coffee spouts (adjustable height)
- A8. Sensor window
- A9. Condensate tray
- A10. Grounds container
- A11. Cup tray
- A12. Drip tray water level indicator
- A13. Drip tray grille
- A14. Drip tray
- A15. Water tank lid
- A16. Water tank
- A17. Water filter housing
- A18. Power cord
- A19. Infuser door
- A20. Infuser
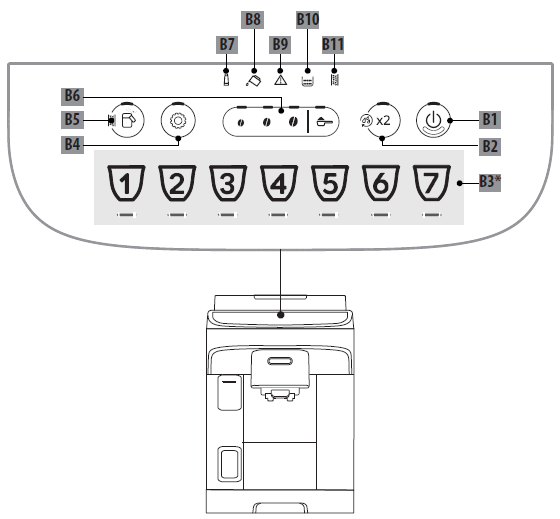
Description of the control panel – B
- B1. ON/Standby button with LED integrated light
- B2. X2 button with LED integrated light (Rinsing function when pressed and held for 5 seconds)
- B3. Direct recipes with LED integrated light (number and type of recipes may vary depending on the model)
- B4. Setting the menu button with an LED integrated light
- B5. Milk Clean button with LED integrated light (Descaling function when pressed and held for 5 seconds)
- B6. Strength selection and pre-ground function buttons
- B7. Exhausted water #lter LED integrated light
On steady LED integrated light: insufficient water in the tank A16
Flashing indicator light: the water tank is extracted
- B8. General alarm LED integrated light
On steady LED integrated light: the grounds container
A10 needs to be emptied
Flashing LED integrated light: put the grounds container back in place
- B9. Descaling indicator light
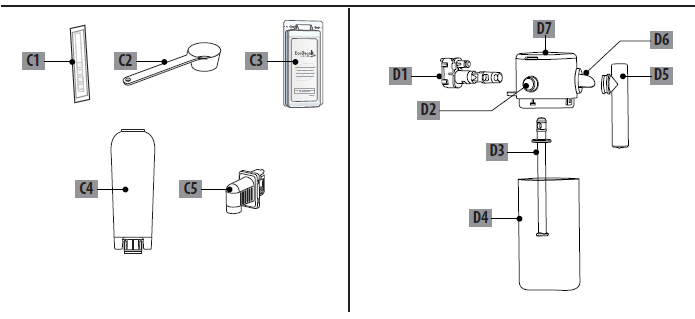
Description of the accessories – C
- C1. Total Hardness Test
- C2. Measuring spoon
- C3. Descaler
- C4. Water softener filter
- C5. Hot water spout
Description of Milk container – D
- D1. Milk container connector (removable for cleaning)
- D2. Milk container lid release button/ Milk container connector release button
- D3. Milk intake tube
- D4. Milk container
- D5. Milk spout
- D6. Milk Spout Seat
- D7. Milk container lid

SETTING UP THE APPLIANCE


- The first time you use the appliance, you need to make 4-5 cappuccinos before the results in the cup will be satisfactory.
- The first time you use the machine, the water circuit is empty, and the appliance could be very noisy. The noise becomes less as the circuit fills.
- Possible traces of coffee in the grinder are the result of settings tests performed on the appliance before sale, proof of the meticulous care and attention we invest in our products.
- We recommend you install the water filter supplied immediately. After two months (see date indicator) or when the appliance has not been used for 3 weeks, the filter should be replaced even if the message has not yet appeared.
- Customize water hardness as soon as possible.
TURNING THE MACHINE ON AND OFF
- Each time the appliance is turned on, it performs an automatic preheat and rinse cycle, which cannot be interrupted. The appliance is not ready for use until the cycle has been completed.
- Whenever the machine is turned off after being used to make coffee, it performs an automatic rinse cycle.
Danger of scalding!
During rinsing, a little hot water flows from the coffee spouts. Take care to avoid contact with splashes of water.
To turn the appliance on or off, press the POWER button.
If you will not be using the appliance for some time, unplug it from the mains socket.
MAKING HOT WATER
MAKING MILK-BASED BEVERAGES
Preparing the milk container
To open the milk container lid:
- Release the lid by turning it clockwise. The line on the lid must be aligned with the UNLOCK symbol.
- Then lift the lid.
Which milk to use?
- For a richer, denser froth, use skimmed or partially skimmed milk at refrigerator temperature (about 5°C). To avoid producing milk with poor froth or large bubbles, always clean the Lattecrema System after use.
- The quality of the froth may vary depending on:
- The type of milk or vegetable beverage;
- The brand used.
- The ingredients and nutritional values.
How much milk should be added to make the directly selected beverages?
There is a graduated scale on the milk container to help you add the ideal quantity for the recipe. Remember that:
To close the milk container lid again:
- Insert the lid (the line on the lid must be aligned with the symbol).
- Turn the lid towards the symbol until it clicks in place.
Select the coffee strength or pre-ground coffee
Once the milk container has been prepared, before selecting the desired milk beverage, you can customize the coffee strength as described in paragraph “8.3 Varying the coffee strength”. Alternatively, you can select pre-ground coffee and then add one measure of coffee.
MEASURING WATER HARDNESS
The descaling alarm is displayed after a period of time established according to water hardness. The machine is set by default for a hardness value of “4”. The machine can also be programmed according to the hardness of the water supply in the various regions, so that descaling is required less often.
- Remove the indicator paper from its packaging. If provided with your model, you will find it attached to the Quick Guide.
- Immerse the paper completely in a glass of water for about one second.
- Remove the strip from the water and shake lightly. After about a minute, 1, 2, 3, or 4 red squares appear, depending on the hardness of the water. Each square corresponds to one level.
Removing the filter
If you want to use the appliance without the filter, you must remove it and notify the appliance of its removal.
- Extract the water tank and the exhausted filter.
- See instructions in section “15. Settings menu” to set the machine.
TIPS FOR ENERGY SAVING
- To reduce energy consumption, after delivering one or more beverages, remove the milk container.
- Set auto-off to 15 minutes (see “15. Settings menu”);
- Enable Energy Saving (see “15. Settings menu”);
- Always carry out the descaling cycle when prompted by the machine.
Cleaning
CLEANING THE MILK CONTAINER
Important!
When cleaning the milk container, do not use detergents, abrasive sponges, or metal objects to remove any milk deposits.
Clean the milk container each time you prepare milk as described below:
- Remove the milk container lid and extract all removable components.
- Extract the milk intake tube.
- Turn the milk spout into the vertical position and pull to extract.
- Press the button to extract the connector.
- In a dishwasher (recommended): Rinse all components and the container with hot running water (at least 40°C), then place them in the top basket of the dishwasher and run a programme at 50°C, e.g., standard ECO. By hand: Rinse all components and the container with hot running water (at least 40°C), then immerse all the components in hot tap water (at least 40°C) with a mild/neutral washing-up liquid for at least 30 minutes. Rinse thoroughly with hot tap water.
- Make sure the air groove (in enlargement) is clean.
- Assemble all the lid components. To reinsert the connector, press the corresponding button.
- Attach the lid back on the milk container.
CLEANING THE INFUSER
Important! The infuser cannot be extracted while the machine is on.
- Press the button to turn the machine on.
- Remove the water tank.
- Open the infuser door on the right side of the machine.
- Press the two colored release buttons inwards, at the same time pulling the infuser outwards;
- Soak the infuser in water for about 5 minutes, then rinse under the tap.
Important! RINSE WITH WATER ONLY
NO DETERGENTS < NO DISHWASHER
- Do not use detergents when cleaning the infuser, as they could damage it.
- Use the brush to remove any coffee residues left in the infuser housing, visible through the infuser door.
- After cleaning, replace the infuser by sliding it onto the internal support, then push the PUSH symbol fully in until it clicks into place.
Please note:
If the infuser is difficult to insert, before insertion, adapt it to the right position by pressing the two levers.
- Once inserted, make sure the two colored buttons have snapped out.
- Close the infuser door.
- Put the water tank back.
TROUBLESHOOTING
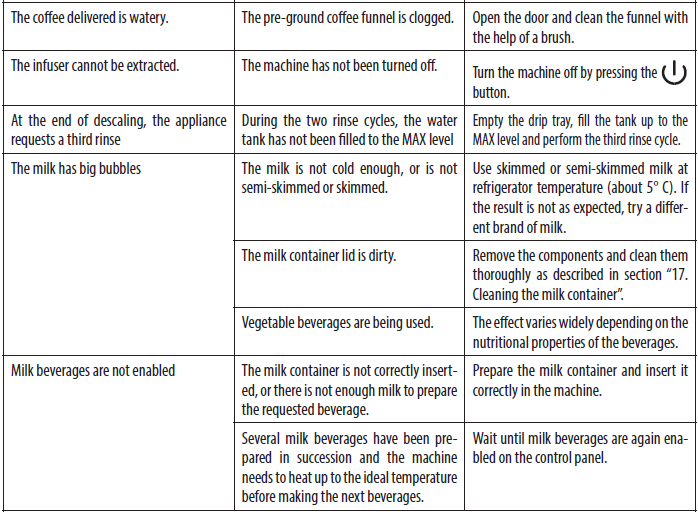
Below is a list of some possible malfunctions.
If the problem cannot be resolved as described, contact customer services.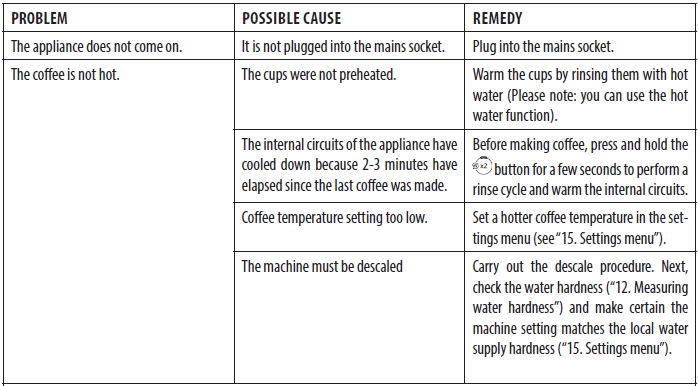


For more Manuals by DeLonghi, visit ManualsLibraryy
De’Longhi ECAM29X6Y Magnifica Evo Coffee Maker-FAQs
Are De’Longhi Magnifica Evo parts dishwasher safe?
Yes, the milk carafe and its components (5 removable parts) are dishwasher-safe.
How much coffee does the Magnifica Evo use per shot?
Single shot: 7–8g of beans (18–23 sec extraction)
Double shot: 14–16g (22–26 sec extraction)
How do I adjust the cup size?
Press & hold the desired coffee button until it blinks.
Stop dispensing at your preferred volume.
How do I deep clean the machine?
Fill the water tank with 1:1 white vinegar & water.
Run a cleaning cycle (follow the manual).
Rinse thoroughly with fresh water afterward.
How much descaling solution should I use?
Use 100ml of De’Longhi EcoDecalk (or a full 100ml pack) mixed with 1L water.
How do I make stronger coffee?
Adjust the grind size (finer = stronger).
Increase the coffee dose in settings.
Use dark roast beans for a bolder taste.
Can I use pre-ground coffee?
Yes! The Magnifica Evo supports both whole beans and ground coffee.
What’s the best grind setting?
Espresso: Fine grind
Americano/Lungo: Medium grind
Drip-style coffee: Coarse grind
How do I descale the machine?
Fill the tank with EcoDecalk + water.
Place a container under the spouts.
Press & hold the descaling button for 5 sec.
Follow on-screen prompts (takes ~30 min).
Why is the descale light still on?
The cycle may not be complete.
Hard water may require more frequent descaling.
Use only De’Longhi EcoDecalk (other descalers may not reset the sensor).

