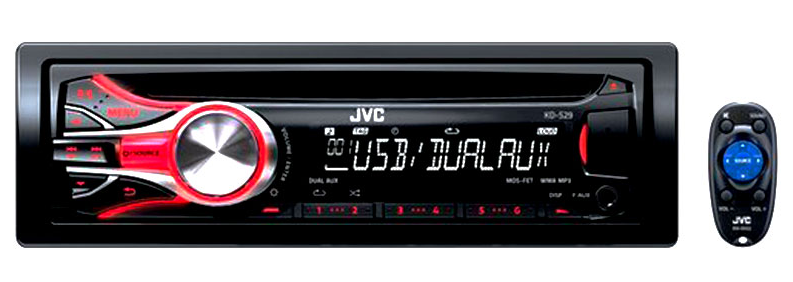
JVC KD-S39 Car Receiver
IMPORTANT FOR LASER PRODUCTS
- CLASS 1 LASER PRODUCT
- CAUTION: Do not open the top cover. There are no user-serviceable parts inside the unit; leave all servicing to qualified service personnel.
- CAUTION: (For U.S.A.) Visible and/or invisible class II laser radiation when open. Do not stare into the beam.
(For Canada) Visible and/or invisible class 1M laser radiation when open. Do not view directly with optical instruments. - REPRODUCTION OF LABEL: CAUTION LABEL, PLACED OUTSIDE THE UNIT.
Warning:
Stop the car before operating the unit.
Caution:
Adjust the volume so that you can hear sounds outside the car. Driving with the volume too high may cause an accident. Avoid using the USB device or iPod/iPhone if it might hinder driving safety.
Caution on volume setting:
Digital devices (CD/USB) produce very little noise compared with other sources. Lower the volume before playing these digital sources to avoid damaging the speakers by the sudden increase in the output level.
Temperature inside the car:
If you have parked the car for a long time in hot or cold weather, wait until the temperature in the car becomes normal before operating the unit.
Condensation:
When the car is air-conditioned, moisture may collect on the laser lens. This may cause disc read errors. In this case, remove the disc and wait for the moisture to evaporate.
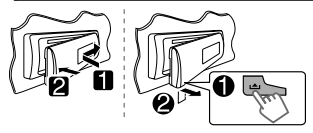
How to attach/detach the control panel
How to reset your unit

How to forcibly eject a disc

- Be careful not to drop the disc when it ejects.
- If this does not work, reset your unit.
Maintenance
Cleaning the unit
Wipe off the dirt on the panel with a dry silicone or soft cloth. Failure to observe this precaution may result in damage to the unit.
Cleaning the connector
Wipe off dirt on the connector of the unit and the panel. Use a cotton swab or cloth.
Prepration
Canceling the display demonstration
The display demonstration is always turned on unless you cancel it.


- Select <DEMO OFF>.

- Press MENU to exit.
Setting the clock

- Select <CLOCK>.

- Select <CLOCK SET>.

- Adjust the hour.

- Adjust the minute.

- Press MENU to exit.
Basic operations
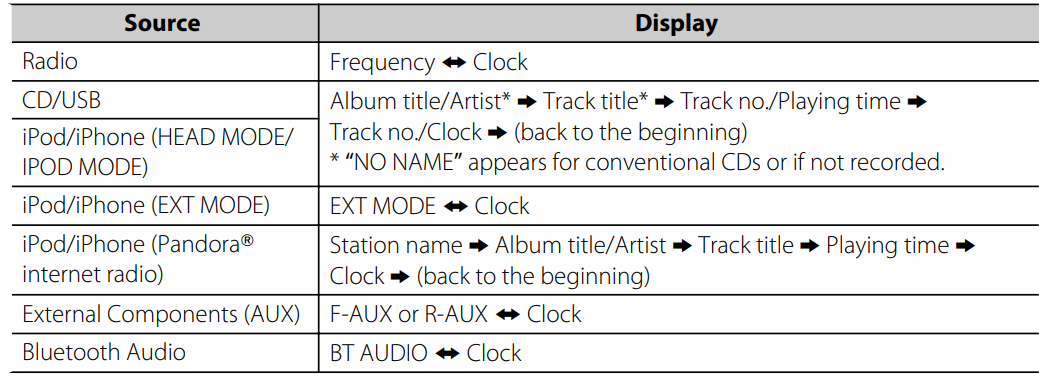
Display information

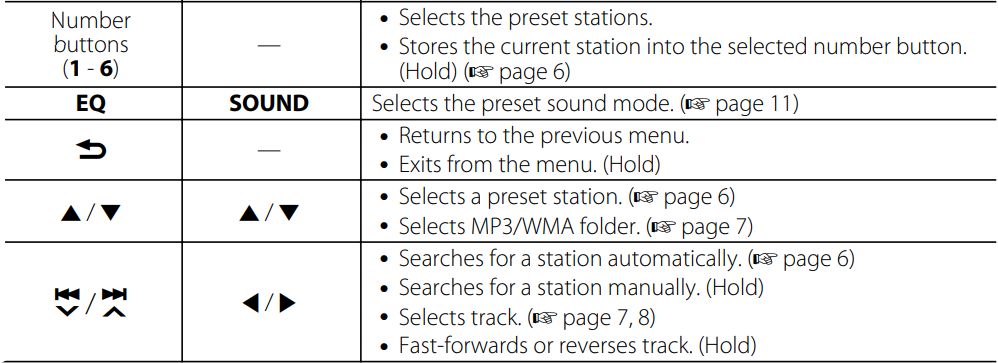
- Changes the display information. (Press)
- Scrolls the current display information. (Hold)
Control panel
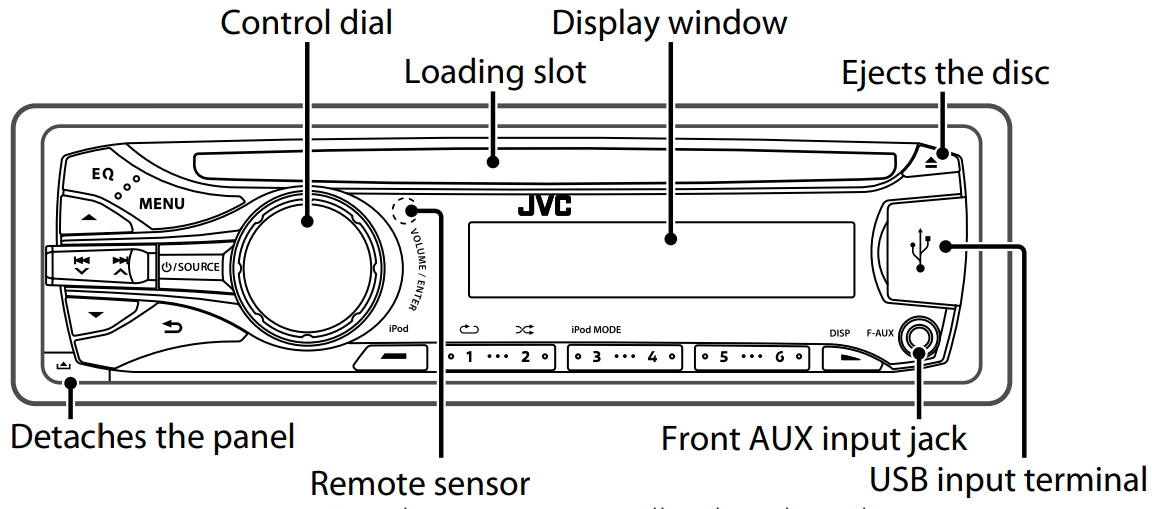
Remote sensor
- Aim the remote controller directly at the sensor.
- DO NOT expose to bright sunlight.
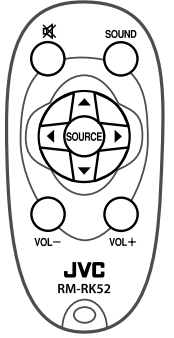
Remote controller
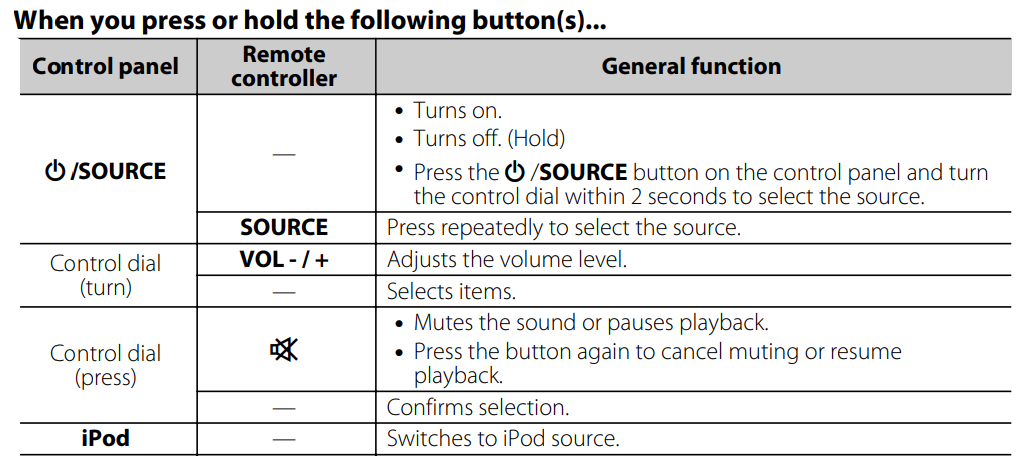
When you press or hold the following button(s)…
Radio
Searching for a station
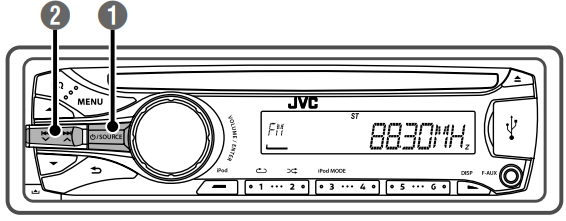
- Select <FM> or <AM>.
- Auto search. (Press)
Manual search. (Hold)
“M” flashes, then press the button repeatedly.
“ST” lights up when receiving an FM stereo broadcast with sufficient signal strength.
Storing stations in memory
Manual presetting
You can preset up to 18 stations for FM and 6 stations for AM.
While listening to a station…

The preset number flashes and “MEMORY” appears. The current station is stored in the selected number button (1 – 6).
– – – – – – – – or – – – – – – – –
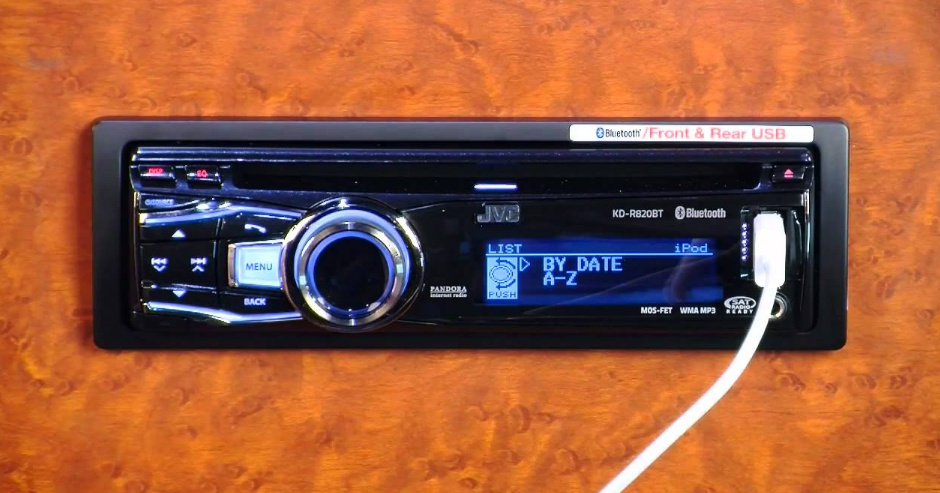
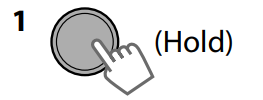
 “PRESET MODE” flashes.
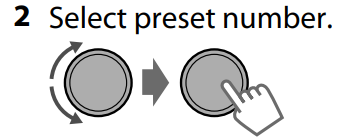
- Select a preset number.
 The preset number flashes and “MEMORY” appears.
Auto presetting (FM only)
SSM (Strong-station Sequential Memory)
You can preset up to 18 stations for FM.
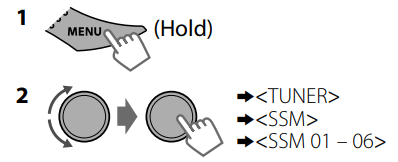
“SSM” flashes. When all the stations are stored, “SSM” stops flashing.
To preset <SSM 07 – 12>/<SSM 13 – 18>, repeat steps 1 and 2.
Selecting a preset station
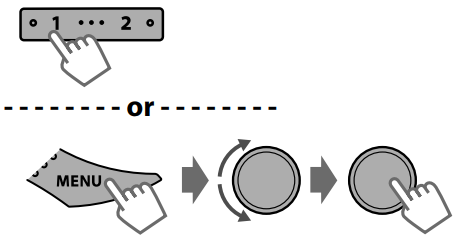
You can also select a preset station using ▲/▼.
Setting the Radio Timer
You can tune in to a preset station at a specific time regardless of the current source.
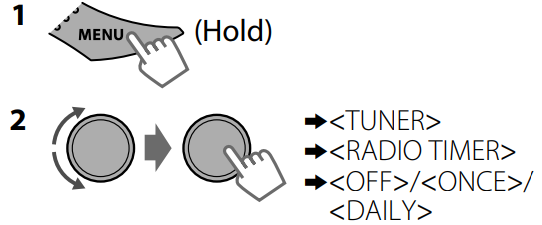
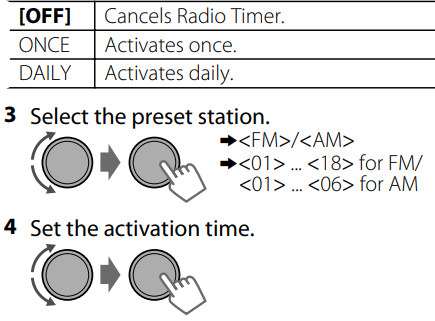
5. Press MENU to exit.
 Lights up after the Radio Timer has been set.
- Only one timer can be set. Setting a new timer will override the previous setting.
- The Radio Timer will not activate if the unit is turned off or if <AM> is set to <OFF> after selecting an AM station for the timer.
CD/USB
Playing a CD/USB device
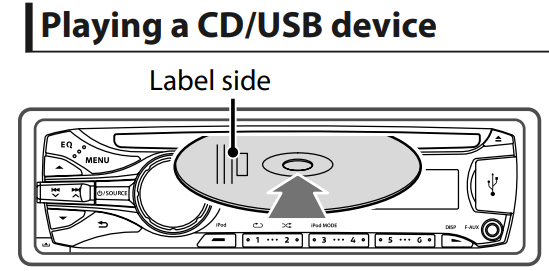
The source changes to “CD” and playback starts.
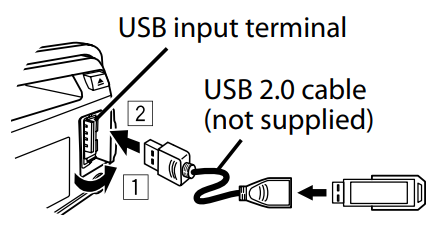
The source changes to “USB” and playback starts.
- This unit can play MP3/WMA files stored on CD-R, CD-RW, and USB mass storage devices (such as a USB memory and a Digital Audio Player).
- Make sure all important data has been backed up. We shall bear no responsibility for any loss of data in a USB mass storage class device while using this system.
- Ejected disc not removed within 15 seconds will reload automatically.
- If the disc cannot be ejected, see page 3.
Selecting a folder/track

 Selects track. (Press)
- Fast-forwards or reverses the track. (Hold)
Selecting a track/folder from the list

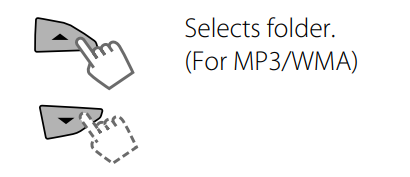
- Select a folder.
 (For MP3/WMA)
 - Select a track.

- For MP3/WMA
If the disc contains many folders or tracks, you can fast search for the desired folder or track by turning the control dial quickly.
- For MP3/WMA
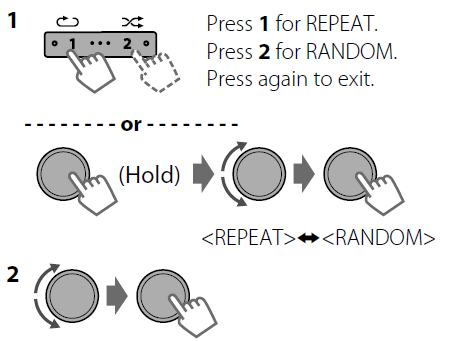
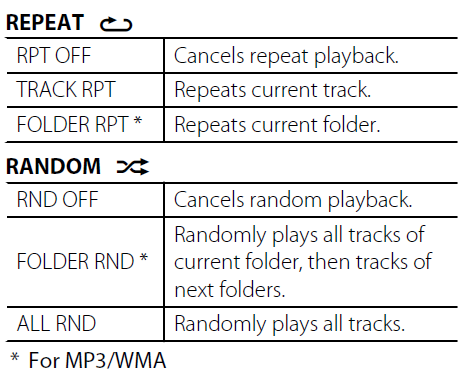
Selecting the playback modes
You can select one of the following playback modes at a time.
iPod/iPhone
Playing an iPod/iPhone

Selecting the control mode

<HEAD MODE>/<IPOD MODE>/ <EXT MODE>
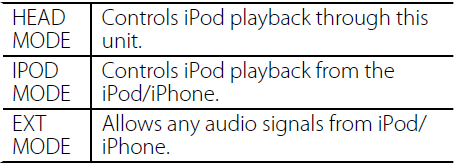
You can also change the setting using <IPOD SWITCH> in the menu. (page 13)
Selecting a track
Applicable under <HEAD MODE>/<IPOD MODE> only.

- Selects track/chapter. (Press)
- Fast-forwards or reverses the track. (Hold)
Selecting a track from the list
Applicable under <HEAD MODE> only.

- Select the desired list.
 PLAYLISTS ↔ ARTISTS ↔ ALBUMS ↔ SONGS ↔ PODCASTS ↔ GENRES ↔ COMPOSERS ↔ (back to the beginning)
 - Select the desired track.
 Repeat this step until the desired track is selected.
- If the selected menu contains many tracks, you can fast search for the desired track by turning the control dial quickly.
Selecting the playback modes
Applicable under <HEAD MODE> only.
You can select one of the following playback modes at a time.
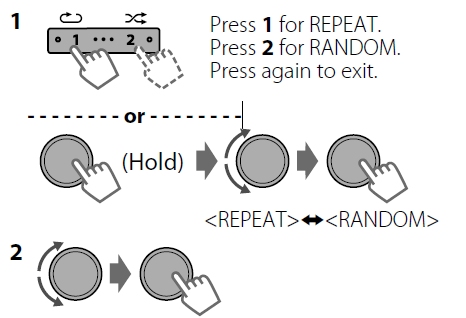
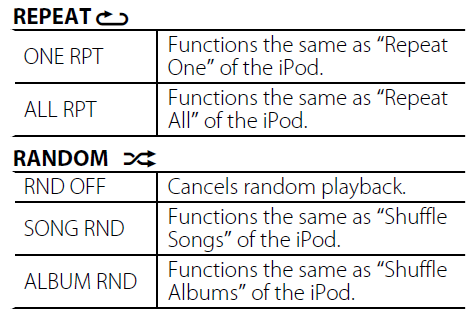
“ALBUM RND” is not applicable for some iPod/iPhone models.
Pandora Internet Radio
Preparation
- Search for “Pandora” in the Apple iTunes App Store to find and install the most current version of the Pandora application onto your device.
- In the application on your device, log in and create an account with Pandora. If you are not a registered user, an account can also be created at www.pandora.com.
- Pandora is only available in the US.
- Because Pandora is a third-party service, the specifications are subject to change without prior notice. Accordingly, compatibility may be impaired o,r some or all of the services may become unavailable.
- Some functions of Pandora cannot be operated from this unit.
- For issues using the application, please contact Pandora at [email protected].
Listening to Pandora internet radio
- Open the Pandora application on your device.
- Connect the device to the USB terminal.
The source switch and the broadcast start automatically from your current station.
Basic Operations
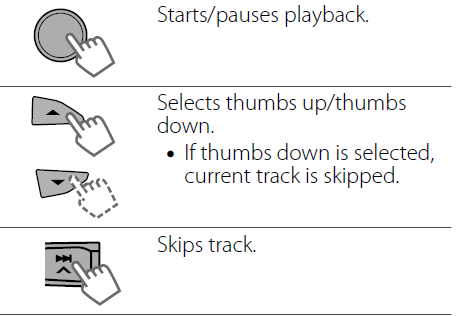
Searching the registered station from the list

- Select the station list display mode.

- Select the desired station.

To bookmark song/artist information
While receiving a song…
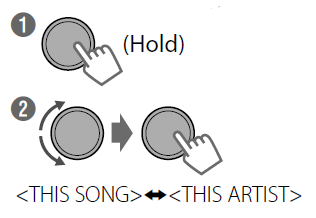
“BOOKMARKED” appears, and the song/artist information is stored on the iPod/iPhone.
- This unit allows you to bookmark songs and/or artists in your personalized Pandora account. The bookmarks will not be available for review on the unit but will be available in your Pandora account.
External components
For details, refer also to the instructions supplied with the external components.
Playing an external component from the Front/Rear AUX
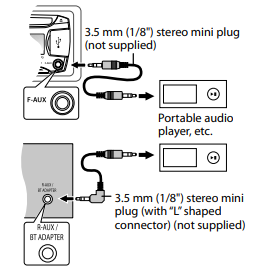
- Connect to F-AUX on the control panel and/or R-AUX on the rear panel.
- Set the source as necessary.


- → <SRC SELECT>
- → <F-AUX>/<R-AUX>
- → <F-AUX ON> or <R-AUX ON>
- Press MENU to exit.
- Select <F-AUX> or <R-AUX>.

- Turn on the connected component and start playing the source.
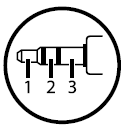 Use a 3-terminal plug head stereo mini plug for optimum audio output. Otherwise, sound may be interrupted or unclear while listening to an external component.
Bluetooth
For Bluetooth operations, it is required to connect the Bluetooth adapter, KS-BTA100 (separately purchased), to the auxiliary input jack (R-AUX/BT ADAPTER) on the rear of the unit. (Installation/Connection Manual)
- KS-BTA100 is not available in some countries. Please contact your dealer where you purchased this unit.
- Operations may be different depending on the connected Bluetooth device. For details, refer also to the instructions supplied with the device.

Preparation
For details on registering and using the Bluetooth device, refer to the instructions manual supplied with KS-BTA100.
- Register (pair) a Bluetooth device with KS-BTA100.
- Change the <SRC SELECT> settings of this unit.

- Press MENU to exit.
Additional information
About discs
This unit can only play the following CDs: This unit can play back multi-session discs; however, unclosed sessions will be skipped during playback.
Unplayable discs
- Discs that are not round.
- Discs with coloring on the recording surface or discs that are dirty.
- Recordable, rewritable disc that has not been finalized. (For details on disc finalization, refer to your disc writing software and your disc recorder instruction manual.)
- 8 cm (3 inch) CD. Attempting to insert using an adapter can cause a malfunction. There may also be problems ejecting the disc if inserted.
Handling discs
- Do not touch the recording surface of the disc.
- Do not stick tape, etc., hondisc, or use a disc with tape stuck on it.
- Do not use any accessories for the disc.
- Clean from the center of the disc and move outwards.
- Clean the disc with a dry silicon or soft cloth. Do not use any solvents.
- When removing discs from this unit, pull them out horizontally.
- Remove any burrs from the center hole and disc edge before inserting a disc.
DualDisc playback
The non-DVD side of a “DualDisc” does not comply with the “Compact Disc Digital Audio” standard. Therefore, the use of the non-DVD side of a DualDisc on this product may not be recommended.
About audio files
Playable files
- File extensions: MP3(.mp3), WMA(.wma)
- Bit rate:
- MP3: 8 kbps – 320 kbps
- WMA: 32 kbps – 192 kbps
- Sampling frequency:
- MP3: 48 kHz, 44.1 kHz, 32 kHz, 24 kHz, 22.05 kHz, 16 kHz, 12 kHz, 11.025 kHz, 8 kHz
- WMA: 48 kHz, 44.1 kHz, 32 kHz
- Variable bit rate (VBR) files. (The elapsed time for VBR files will not be displayed correctly.)
Unplayable files
- MP3 files:
- encoded in MP3i and MP3 PRO format
- encoded in an inappropriate format
- encoded with Layer 1/2
- WMA files:
- encoded in lossless, professional, and voice format
- not based upon Windows Media® Audio
- copy-protected with DRM
- Files that include data such as AIFF, ATRAC3, etc.
Maximum number of characters for a file/folder name
Varies depending on the disc format used (includes 4 extension characters—<.mp3> or <.wma>).
- ISO 9660 Level 1 and 2: 64 characters
- Romeo: 64 characters
- Joliet: 32 characters
- Windows long file name: 64 characters
Others
- This unit can show WMA Tag and ID3 Tag Version 1.0/1.1/2.2/2.3/2.4 (for MP3).
- The search function works, but the search speed is not constant.
About the USB device
- When connecting a USB cable, use the USB 2.0 cable.
- You cannot connect a computer or portable HDD to the USB input terminal of the unit.
- Connect only one USB device to the unit at a time. Do not use a USB hub.
- USB devices equipped with special functions, such as data security functions, cannot be used with the unit.
- Do not use a USB device with 2 or more partitions.
- This unit cannot recognize a USB device whose rating is other than 5 V and exceeds 1 A.
- This unit may not recognize a memory card inserted into the USB card reader.
- This unit may not play back files in a USB device properly when using a USB extension cord.
- Depending on the shape of the USB devices and connection ports, some USB devices may not be attached properly, or the connection might be loose.
- Operation and power supply may not work as intended for some USB devices.
- The maximum number of characters for:
- Folder names: 63 characters
- File names: 63 characters
- MP3 Tag: 60 characters
- WMA Tag: 60 characters
- This unit can recognize a total of 65,025 files, 255 folders (255 files per folder, including folders without unsupported files), and 8 hierarchies.
Cautions
- Do not pull out and attach the USB device repeatedly while “READING” is shown on the display.
- Electrostatic shock at connecting a USB device may cause abnormal playback of the device. In this case, disconnect the USB device, then reset this unit and the USB device.
- Do not leave a USB device in the car, exposed to direct sunlight or temperatures. Failure to do so may result in deformation or damage to the device.
About iPod/iPhone
- iPod/iPhone that can be connected to this unit:
- iPod touch (4th generation)
- iPod touch (3rd generation)
- iPod touch (2nd generation)
- iPod touch (1st generation)
- iPod classic
- iPod with video (5th generation)*
- iPod nano (6th generation)
- iPod nano (5th generation)
- iPod nano (4th generation)
- iPod nano (3rd generation)
- iPod nano (2nd generation)
- iPod nano (1st generation)*
- iPhone 4S
- iPhone 4
- iPhone 3GS
- iPhone 3G
- iPhone
*<IPOD MODE>/<EXT MODE> are not applicable.
- It is not possible to browse video files on the “Videos” menu in <HEAD MODE>.
- The song order displayed on the selection menu of this unit may differ from that of the iPod.
- When operating an iPod/iPhone, some operations may not be performed correctly or as intended. In this case, visit the following JVC website:
<http://www3.jvckenwood.com/english/car/index.html> (English website only).
Trademark and license notice
- Microsoft and Windows Media are either registered trademarks or trademarks of Microsoft Corporation in the United States and/or other countries.
- “Made for iPod” and “Made for iPhone” mean that an electronic accessory has been designed to connect specifically to iPod or iPhone, respectively, and has been certified by the developer to meet Apple performance standards. Apple is not responsible for the operation of this device or its compliance with safety and regulatory standards. Please note that the use of this accessory with an iPod or an iPhone may affect wireless performance.
- iPhone, iPod, iPod classic, iPod nano, and iPod touch are trademarks of Apple Inc., registered in the U.S. and other countries.
- PANDORA, the PANDORA logo, and the Pandora trade dress are trademarks or registered trademarks of Pandora Media, Inc., used with permission.
Troubleshooting
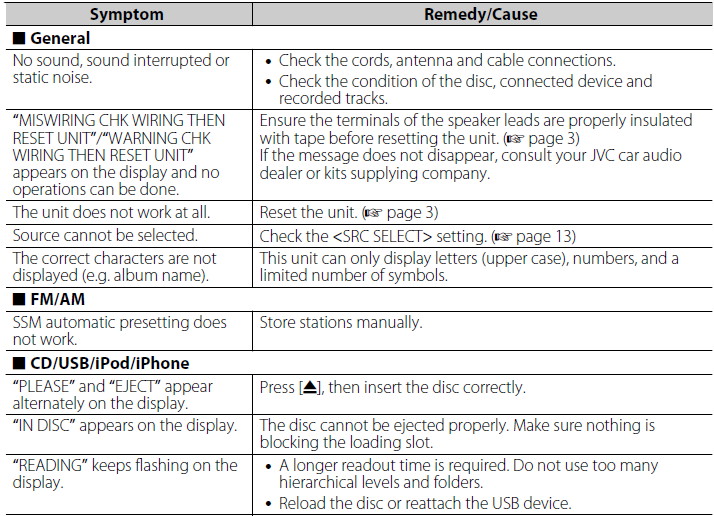
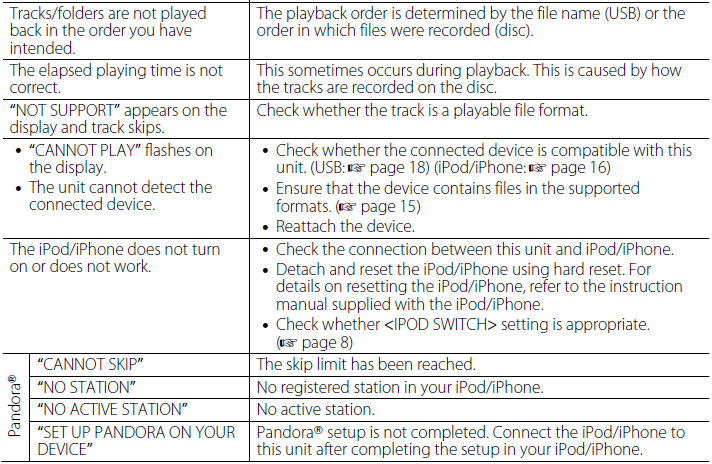
Specifications
AUDIO AMPLIFIER SECTION

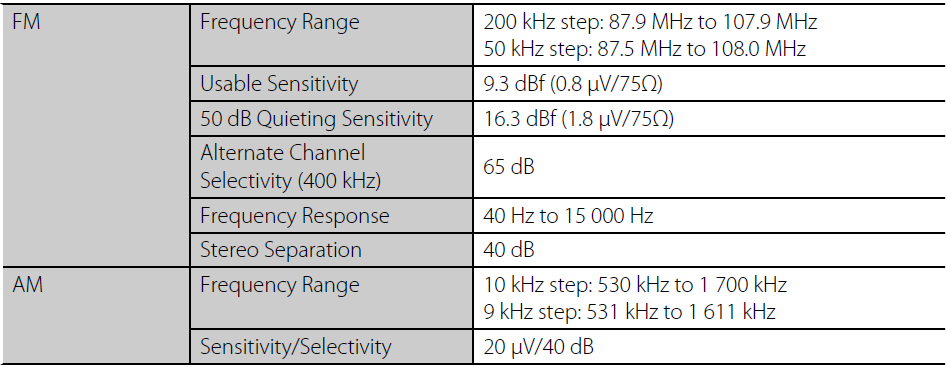
TUNER SECTION
CD PLAYER SECTION

USB SECTION

GENERAL

Subject to changes without notice.
For more manuals by JVC, visit ManualsLibraryy
JVC KD-S39 Car Receiver- FAQs
How do I connect my phone via Bluetooth?
Turn on Bluetooth on your phone.
Press BT AUDIO on the stereo.
Select “JVC KD-S39” from your phone’s Bluetooth list.
Enter PIN “0000” if prompted.
How do I remove a paired Bluetooth device?
Enter Bluetooth Mode (press Ú or BT AUDIO).
Go to Settings > Pairing > Device Delete.
Select the device and confirm “YES”.
How do I eject a CD manually?
If the stereo displays “PLEASE EJECT”, press the ⏏ (eject) button.
If stuck, use a small tool to gently release the CD.
How do I connect a USB drive?
Plug the USB into the USB port.
Press SOURCE until USB mode activates.
Use the knob/buttons to navigate files.
How do I disable demo/retail mode?
Go to Settings > Demo Mode.
Select “OFF” or “Home Mode”.
Save and exit.
Why is my radio not picking up stations?
Check the antenna connection.
Ensure you’re in the correct FM/AM band.
Try manual tuning if auto-scan fails.
How do I reset the radio stations?
Perform a full reset (see Q3).
Rescan for stations and save presets again.
Does the JVC KD-S39 support Apple CarPlay/Android Auto?
No, this model does not support CarPlay or Android Auto.
How do I improve sound quality?
Adjust EQ settings (Rock, Pop, Custom).
Enable Sound Lift for better highs.
Use Bass Ext for deeper lows.



 “PRESET MODE” flashes.
 The preset number flashes and “MEMORY” appears.
 (For MP3/WMA)